Getting Started
This information can help you get started using the application. For more detailed information about each function within the application, see the relevant section of this user guide.
Click the links in each section to view the getting started information.
Introduction
Basic Account Management
Language Support and Localization
Industry Information and Regulations
Overview
Welcome to the Supplier view!
The Supplier view is where you access your requisition information, allowing you to manage and engage with client organizations that you have contracts with. The view is an application that can be used by account managers, sourcing organizations, recruiters, or vendor organizations providing project services.
The Supplier view shares much of the same data as the MSP and client organizations, giving you fast access to items that you might need to act on. You can use your supplier profile to submit candidates and accept interview requests under open requisitions, or to review and confirm expenses submitted under filled engagements.
Supplier application features include:
-
A comprehensive requisition process that includes sourcing, interviewing, hiring and invoicing
-
Online time and expense entry for your workers
-
Supplier billing and invoicing
-
Business validation for consultants/firms/independent contractors
-
Competitive bidding environment for project based work
-
Home page dashboard with detailed reporting for supplier engagements across clients
The application is the entry point for requisition management. Viewing new and open requests, as well as associated candidates for those requests, is primarily the activities that you do in the VMS. When new requests appear, you can view the request details and determine which candidate(s) best suit the job requirements.
Accessing Requisition Data
Request information can be viewed in two places on the Home page, in the Pending Items view of the Action Items section or the Requests view in the Updates section. You can navigate to each of the sections by scrolling to the section and clicking on the view selector pill.
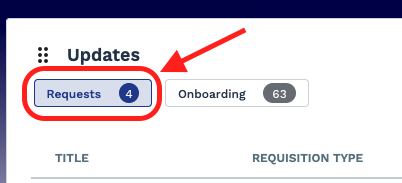
The Action Items section displays a set of clickable navigation that gives you access to tabular views of items based on their system status. To view requests that you need to take action on, for example, click . A table opens with items that need your perusal and acceptance (items can include negotiated rates, and so on).
The Updates section displays requests, or requests that are filled, and need to be onboarded.
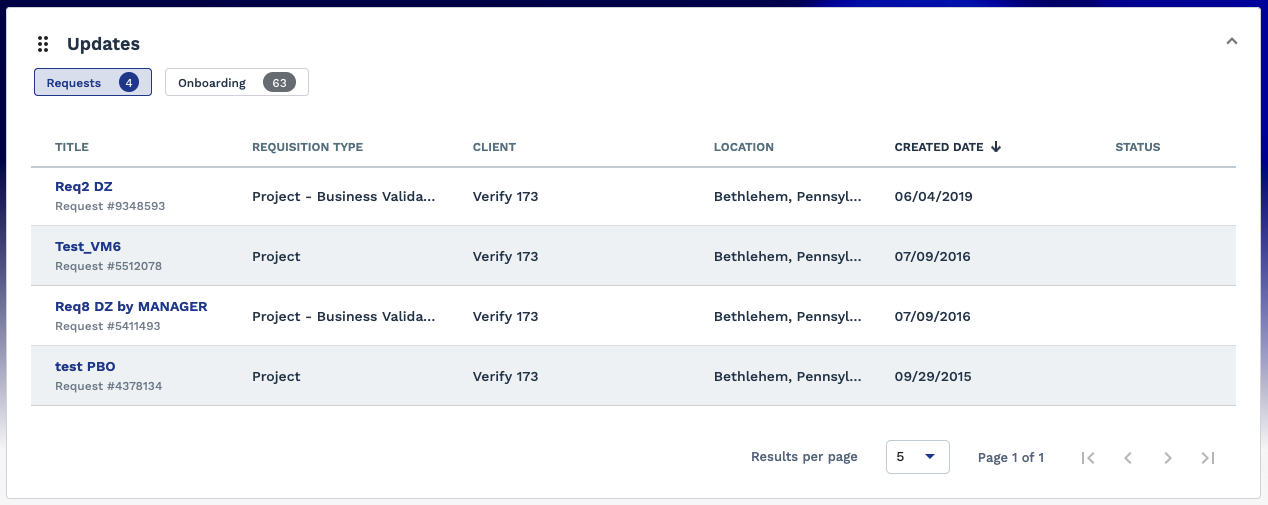
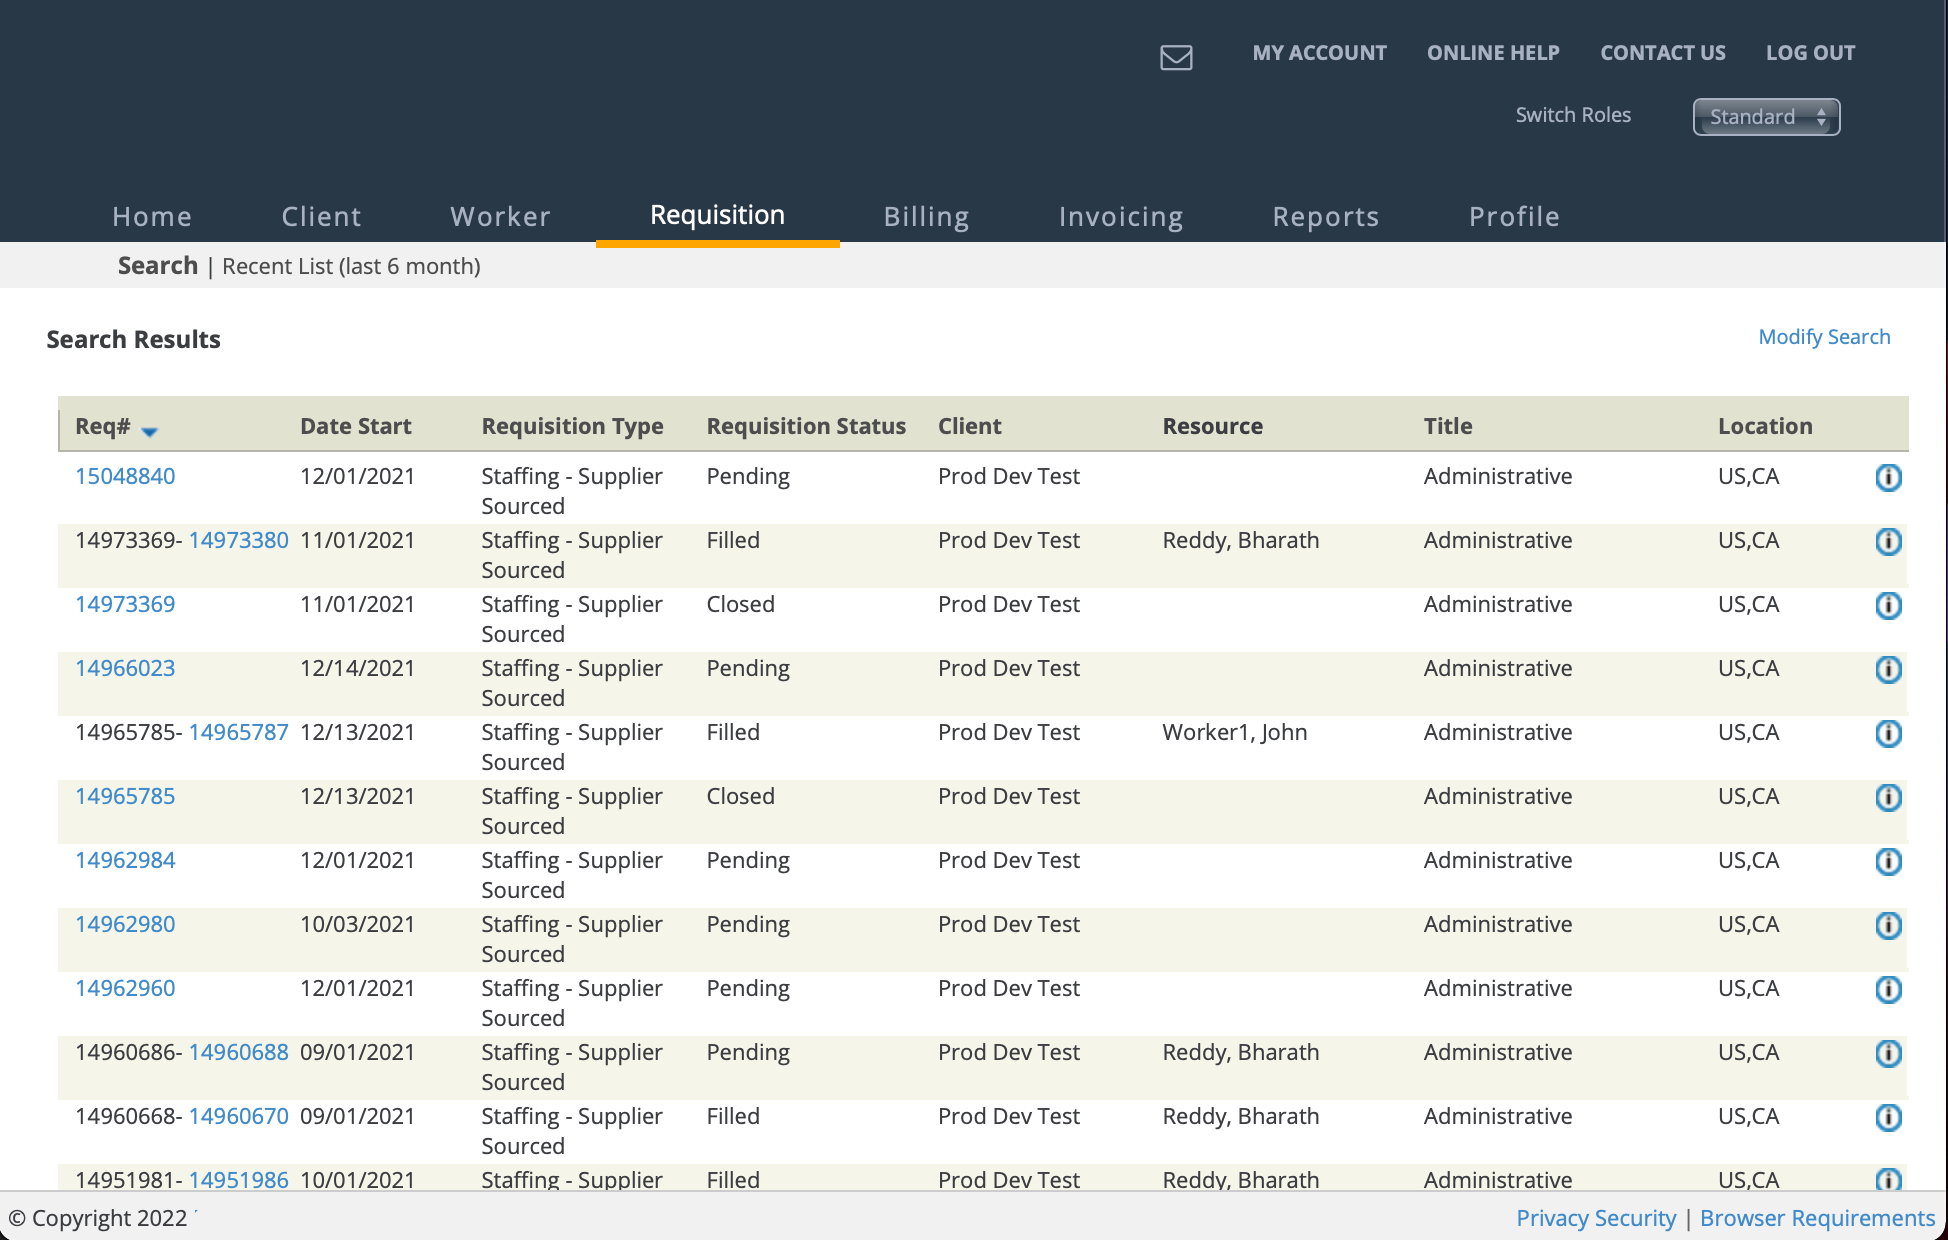
Clicking on any of the linked content navigates you to the Requisitions page, which provides a search tool that allows you to locate requests based on the client, the type of requisition, the status of the request, other search parameters, or any combination of parameters.
The Requisition tab holds information for both requests and engagements. In the search results under the Req# column, you see the request number displayed first, and to the left. If your candidate fills the request, an engagement number appears as a second string of numbers to your right, after the hyphen. clicking any of the blue links takes you to the respective request or engagement.
The Requisition Status column displays the request's current status. It is important to note that the status can depend on review protocols or any pending action that are enabled for the client organization, and/or your supplier organization.
- Request sub tab: Resume/Portfolio - Look up existing resumes, add new candidates to the request, and submit them for consideration.
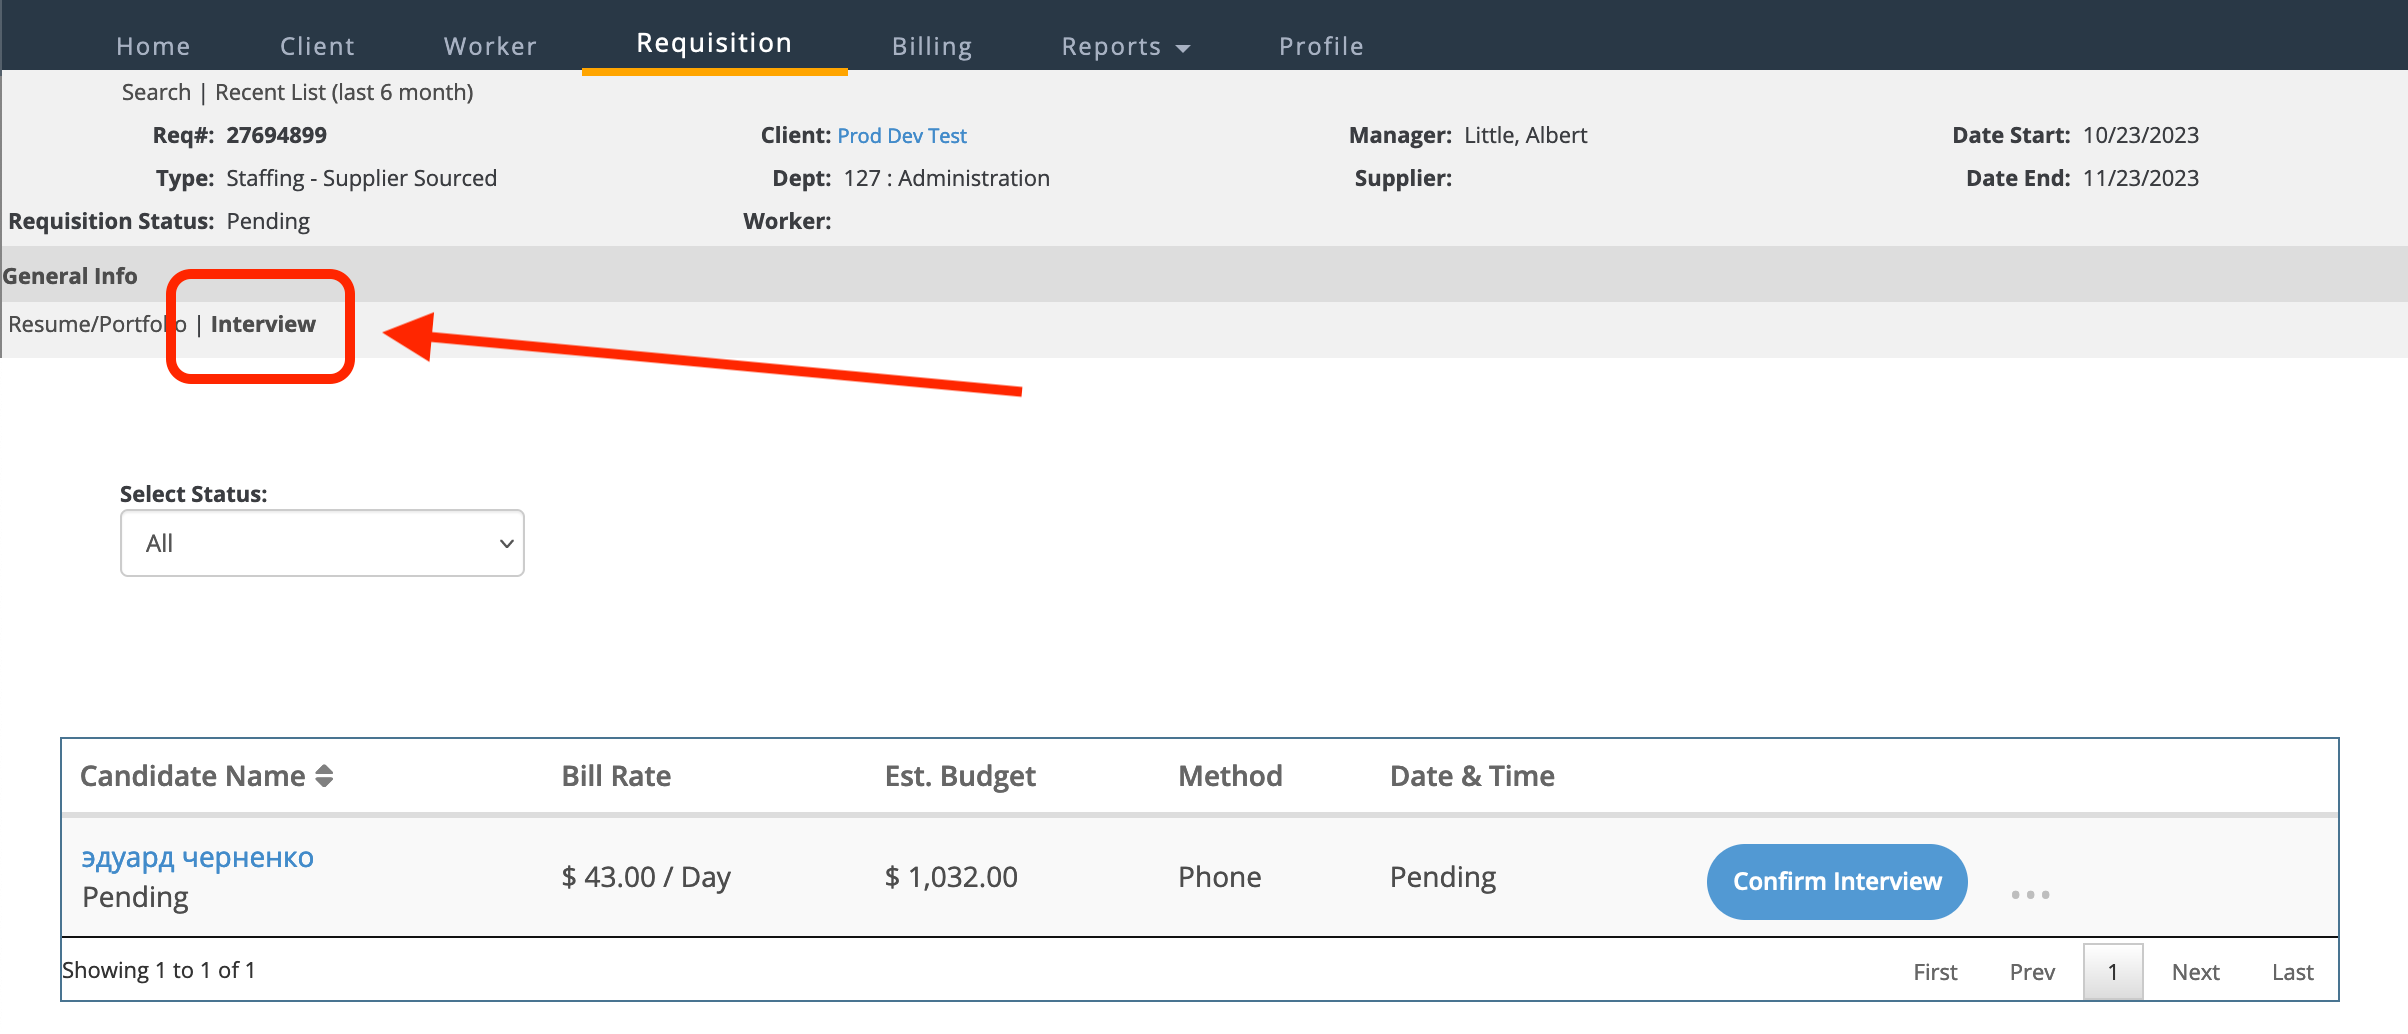
- Request sub tab: Interview - View, confirm, and reschedule requested interviews.
- Engagement sub tab: Allocation - View cost centers or departments that are associated with the requisition.
- Engagement sub tab: Billing - View any associated billing (for example, timecards and expenses).
Submitting Candidates
When you receive requests for sourcing, you can open the request information and view the details. If you have a worker that meets the client organization's job requirements, you can submit that candidate. Another main function in the submission workflow is managing interviews that are scheduled with your candidates.
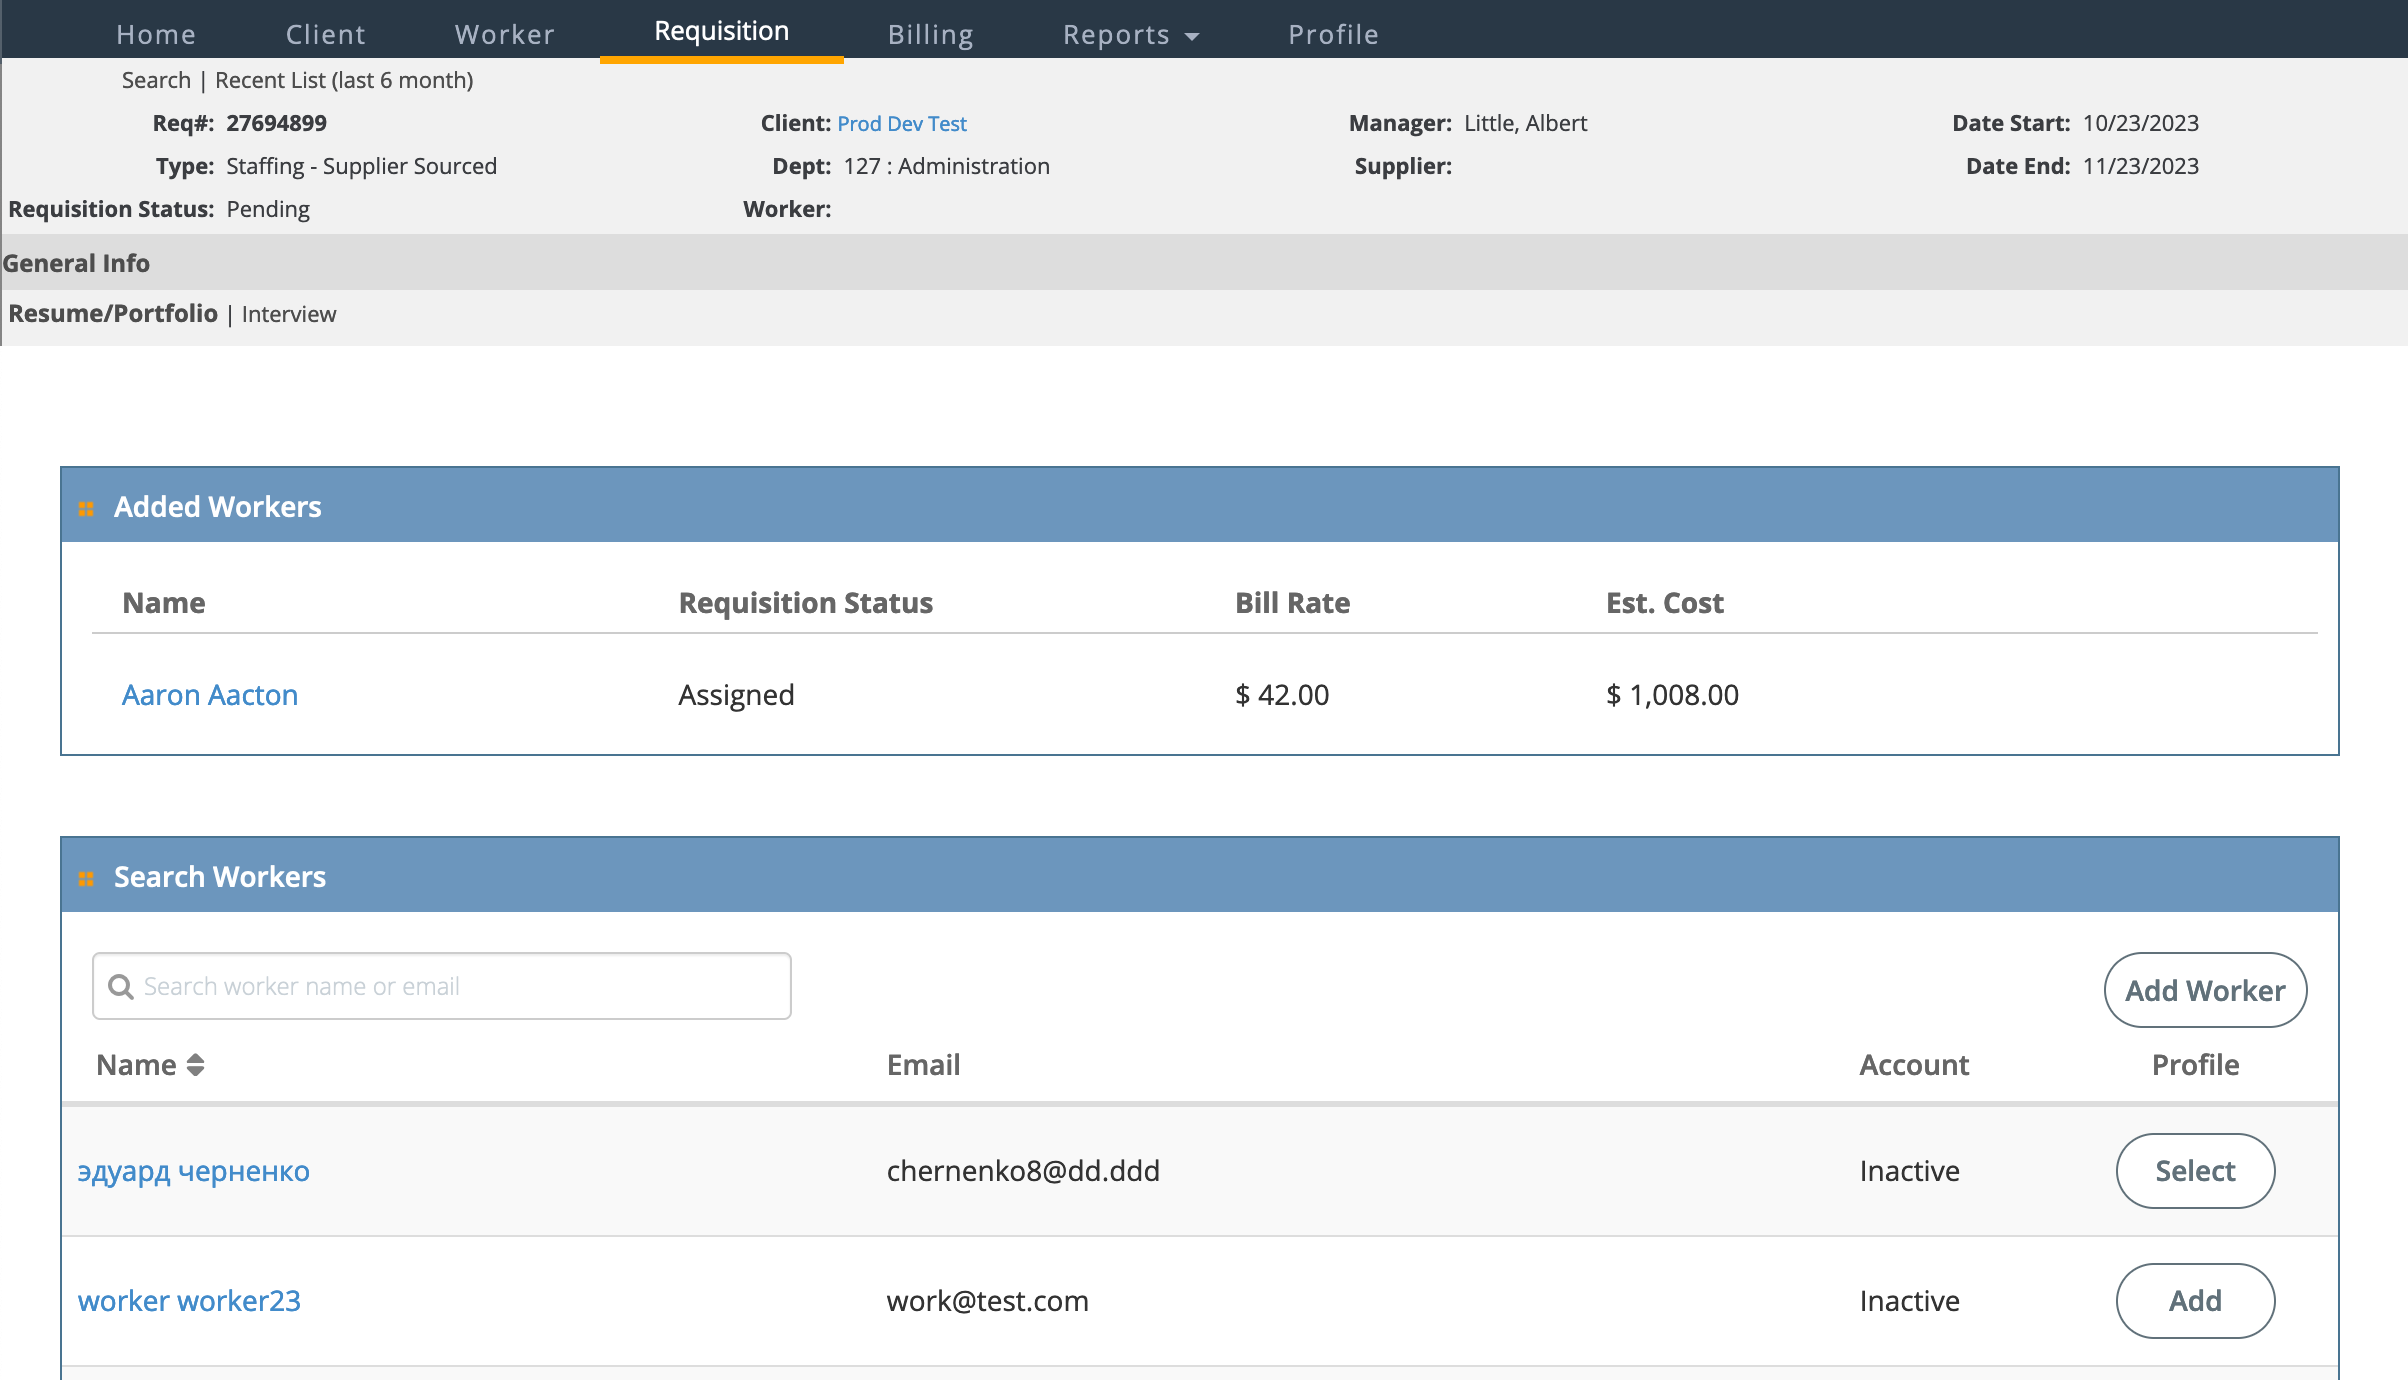
You can select from existing workers in the system, or add a new candidate by configuring a profile and resume. Candidates that have been submitted to the request appear in the top table (Added Workers), and workers available for submission appear in the bottom table (Search Workers).
If an interview is required, then you will need to confirm the interview time, or propose a new time for your candidate. You can review all upcoming interview information on the Interview sub tab.
Engagements
Once your candidate is submitted and accepted by a client organization, the engagement is created and your candidate is assigned. You can view all of the engagement information by using the search function on the Requisitions page, and clicking the engagement link. The engagement page opens with a view of general information, the location, the schedule, the financial (bill rates/pay rates) designations, contact information, and any configured custom fields. If you have permissions to access and update custom fields, you can enter specific data related to the request, to the worker, and so on.
The Allocation sub tab allows you to view the configured allocation fields and values for that particular engagement. Allocations are used to associate billing to a particular project, cost center, or account. The Billing sub tab displays any billing entered for the engagement.
Worker Profile
If the client organization needs you to complete some onboarding steps, you can access those workflow steps from within the worker's profile, or the LifeCycle sub tab. To access the worker's profile, at the top of the Engagements page, click the worker's name. You can also select the Worker tab at the top of the page, and then search for and select the worker. Under the sub tab options, select LifeCycle.

Billing and Invoicing
Billing is accessible from a few different points. You can view items that require client manager review from the Home page. In the Action Items pane, the Pending Billing row displays the number of items pending. You can click the blue number link to open the list of items in a table on the Billing tab.
You can also navigate to the Billing tab and use the search function to locate items in any status. The search results return items that match your query. To access the billing line information, click the blue number link in the Line# column. The billing General Info page opens with the billing field information.
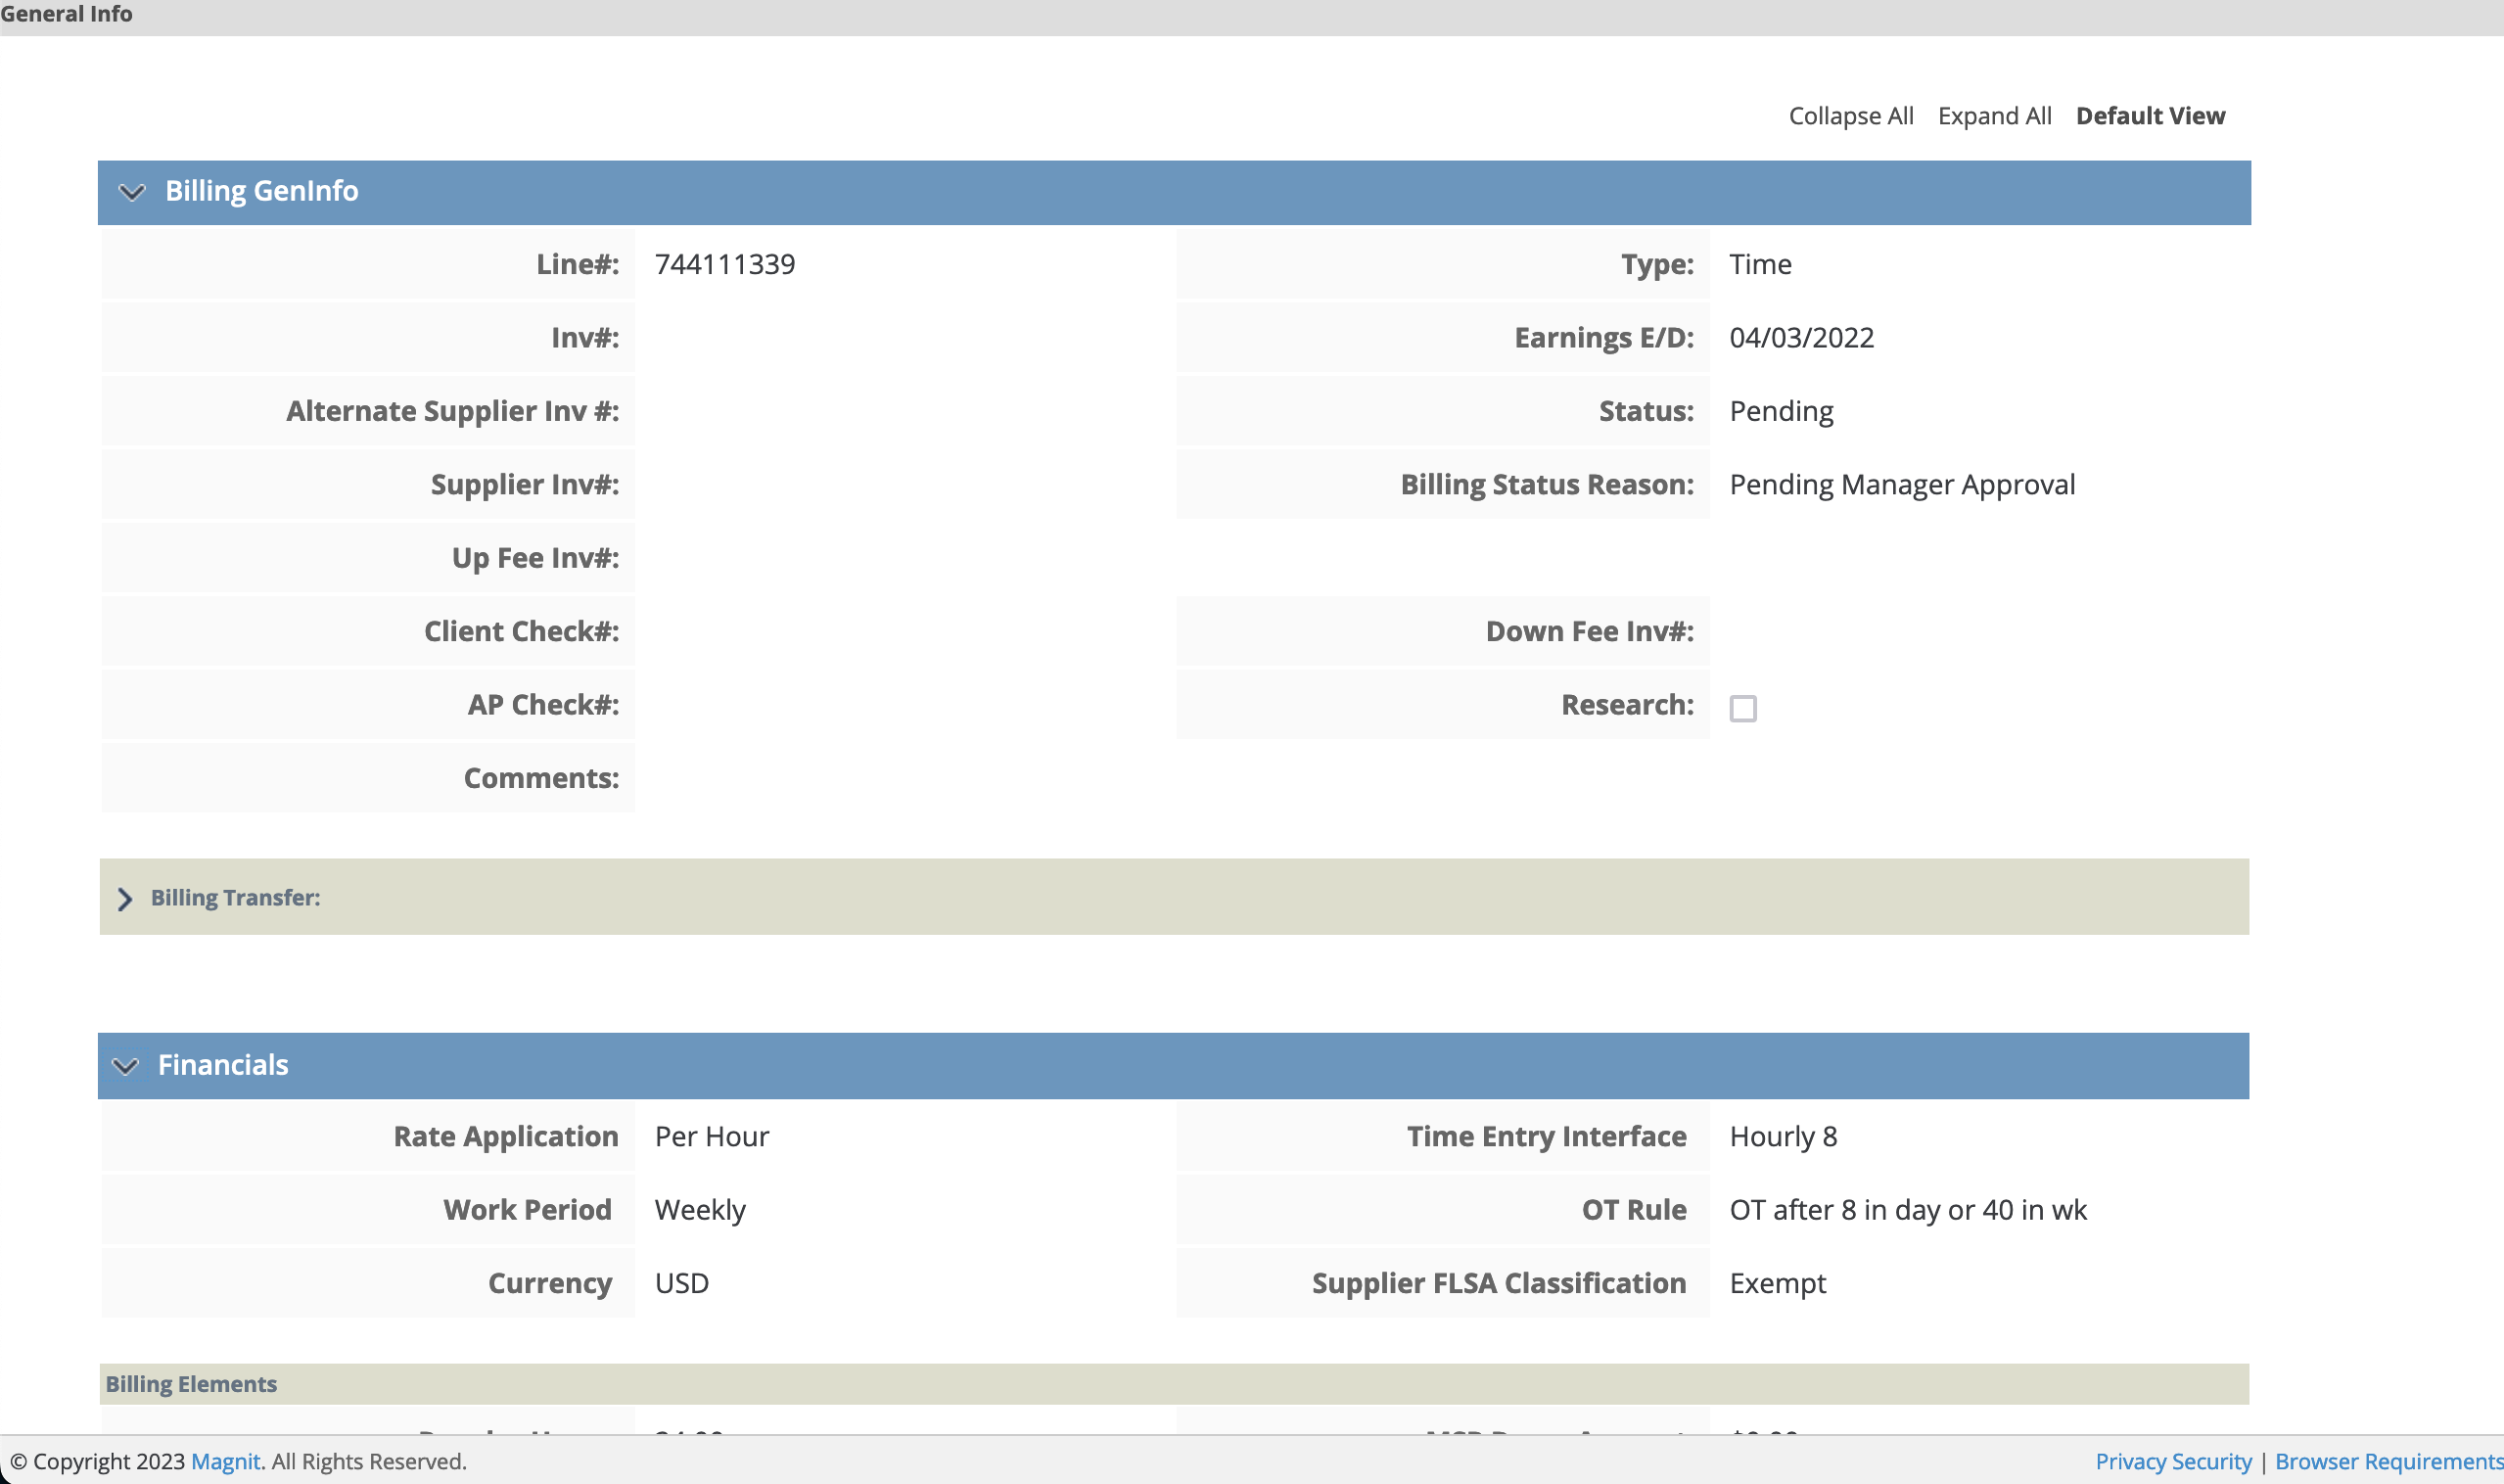
- Billing GenInfo - Includes the Earnings End Date, Invoice Number (if processed), Billing Status, and the Status Reason
- Financials - Includes Rate Application, OT Rule, and the Supplier FLSA Classification
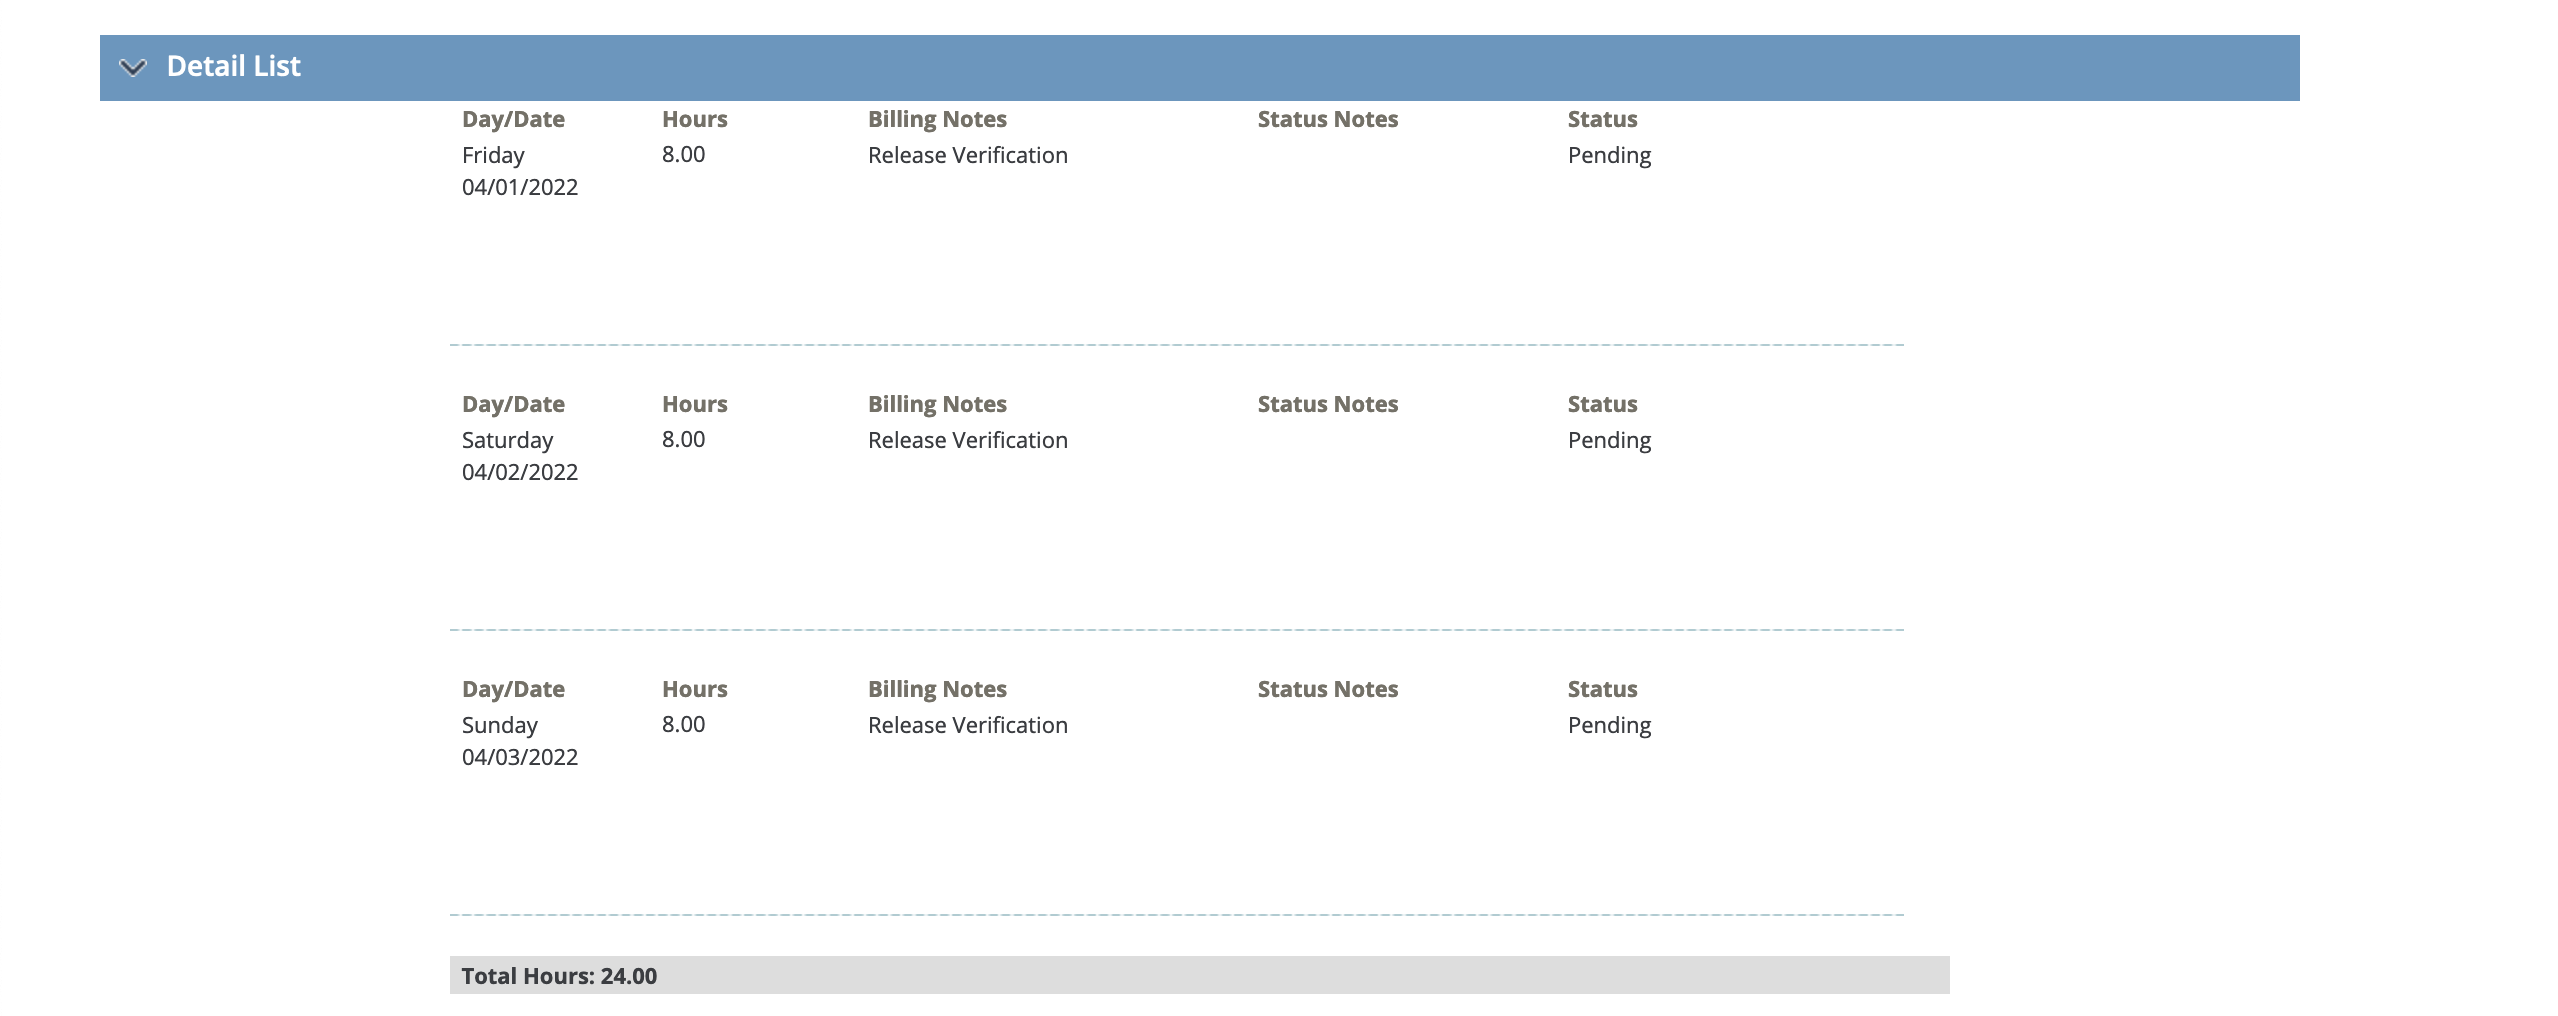
- Detail List - Includes the breakdown of time and expense for billing
If you will be working with payments and invoicing, you can access this information in the VMS. When the system processes approved billing, you export those billing items and prepare a report to be used for worker payroll. You might also need to confirm submitted expenses (review receipts for IRS compliance) before they can be processed. Once you have completed these tasks, you can search for invoices where billing is associated and keep those documents for your records.
Supported Requisition Types
- Staffing-Recruited - Requisitions are forwarded to suppliers to identify a temporary worker for a client organization's staffing need(s). The client engages the worker for a temporary staffing assignment.
- Staffing-Referred - Requisitions are used to engage a worker that has been referred by a client manager for a temporary staffing assignment. Generally, these are workers who are sourced directly by the client manager and payrolled by Magnit, where Magnit is the employer of record.
- Project Requisitions - Created when a client organization has a project assignment with a defined scope of work, and needs an independent contractor/business entity to complete a specific deliverable.
- Managed Services - Requisitions used for headcount tracking when the client organization wants to have visibility into the resource, but manages the contract and downstream financials outside of the application.
- Biz Val (Business Validation) - Requisitions used for the vetting of independent contractors to validate compliance and safe engagement.
Supported Language Types
- Links
- Buttons
- Labels
- Some statuses and status reasons - For example, 'Worker Withdrawn' status is translated, but the status reason is not.
- Standard and customizable reports - Exported files with report output for these types are translated. Only report name, description, and so on, are translated. Report output data is not translated.
- Common values - For example, 'Yes' and 'No'.
- User guide (depending on language)
| Language | User Role | Date Format | Monetary Format |
|---|---|---|---|
| English (U.S.) |
|
MM/DD/YYYY | $xxx,xxx.xx |
| English (U.K.) |
|
DD/MM/YYYY | xxx,xxx.xx$ |
| German |
|
DD.MM.YYYY | xxx.xxx,xx$ |
| French |
|
DD/MM/YYYY | xxx xxx.xx$ |
| Spanish |
|
DD/MM/YYYY | xxx.xxx,xx$ |
| Latin American Spanish |
|
DD/MM/YYYY | $xxx.xxx,xx |
| Korean |
|
YYYY/MM/DD | $xxx,xxx.xx |
| French Canadian |
|
MM/DD/YYYY | $xxx xxx.xx |
| Portuguese |
|
DD/MM/YYYY | $xxx.xxx,xx |
| Dutch |
|
DD-MM-YYYY | $xxx.xxx,xx |
| Italian |
|
DD/MM/YYYY | xxx.xxx,xx$ |
| Chinese Simplified |
|
YYYY-MM-DD | $xxx,xxx.xx |
| Chinese Traditional |
|
YYYY-MM-DD | $xxx,xxx.xx |
| Japanese |
|
YYYY/MM/DD | $xxx,xxx.xx |
| Swedish |
|
YYYY-MM-DD | xxx.xxx.xxx,xx kr |
| Polish |
|
YYYY-MM-DD | xxx.xxx,xx$ |
| Thai |
|
YYYY-MM-DD | $xxx.xxx,xx |
Update Your Security Questions
- Log into the application.
- Navigate to .
- On the GenInfo tab, scroll to the Security Questions section.
-
Click
 .
.
- From the Question drop down, select the question to update.
-
In the Response field for the updated question, enter
text that answers the question.
Note:You can update one or all of your questions.
-
Click
 .
.
Supplier Guide
Features and functions available in the Supplier view
- Request - The client organization uses a job description and job parameters (pay/bill rate, location, schedule, and so on) to configure a request for a worker/s. Configured vendors are notified of the request and are invited to submit candidates for the position. Workers can be known, that is, the client organization might have already identified the worker, or unknown.
- Engagement - Once the workers for a position are identified, and the client organization as agreed, the request is converted to an engagement. Financial details and schedule are confirmed.
The Supplier view of the application is a portal that allows you to manage requisition information entered into the system by client organizations. Requests include RFI's that require you to submit bids for review, or requests for contingent workers. Information submitted by client organizations that you agreement with appear in this view. All billing item review, request review, and worker management tasked to a vendor is completed in the Supplier view.
- Ability to create requests and submit candidates (Vendor On Premises role)
- Ability to submit candidates, manage approvals, and submit quotes for project requests (Standard role)
Other abilities include managing bank information and managing organizational information. Contact your system administrator if you need to modify permissions on a user account.
You view requests based on the information (data) that you have permission to view. Your supplier agreement is defined and set up in the system, and then you are able to submit candidates and bids (depending on the request type) through the application. Additionally, you can manage the bidding process through the application if the client organization has enabled the Supplier Acceptance Approval workflow. Contact your Program Representative for more information about this workflow.
Additionally, the functions that you can perform in the Supplier view are segregated by user permission. These permissions include the ability to submit candidate resumes for an open request for work, or the ability for you to create requests for a job. Each permission is assigned to your user role by a program administrator.
Your organization is notified when the client organization selects your organization with an existing active agreement. Notifications come in the form of emails, or application level notifications, such as pending requests on your Home page.
The options available to your vendor organization depend on the system settings. For more information about options in the Supplier view, contact your Program Representative.
Overview
Welcome to the Supplier view!
The Supplier view is where you access your requisition information, allowing you to manage and engage with client organizations that you have contracts with. The view is an application that can be used by account managers, sourcing organizations, recruiters, or vendor organizations providing project services.
The Supplier view shares much of the same data as the MSP and client organizations, giving you fast access to items that you might need to act on. You can use your supplier profile to submit candidates and accept interview requests under open requisitions, or to review and confirm expenses submitted under filled engagements.
Supplier application features include:
-
A comprehensive requisition process that includes sourcing, interviewing, hiring and invoicing
-
Online time and expense entry for your workers
-
Supplier billing and invoicing
-
Business validation for consultants/firms/independent contractors
-
Competitive bidding environment for project based work
-
Home page dashboard with detailed reporting for supplier engagements across clients
The application is the entry point for requisition management. Viewing new and open requests, as well as associated candidates for those requests, is primarily the activities that you do in the VMS. When new requests appear, you can view the request details and determine which candidate(s) best suit the job requirements.
Accessing Requisition Data
Request information can be viewed in two places on the Home page, in the Pending Items view of the Action Items section or the Requests view in the Updates section. You can navigate to each of the sections by scrolling to the section and clicking on the view selector pill.
The Action Items section displays a set of clickable navigation that gives you access to tabular views of items based on their system status. To view requests that you need to take action on, for example, click . A table opens with items that need your perusal and acceptance (items can include negotiated rates, and so on).
The Updates section displays requests, or requests that are filled, and need to be onboarded.
Clicking on any of the linked content navigates you to the Requisitions page, which provides a search tool that allows you to locate requests based on the client, the type of requisition, the status of the request, other search parameters, or any combination of parameters.
The Requisition tab holds information for both requests and engagements. In the search results under the Req# column, you see the request number displayed first, and to the left. If your candidate fills the request, an engagement number appears as a second string of numbers to your right, after the hyphen. clicking any of the blue links takes you to the respective request or engagement.
The Requisition Status column displays the request's current status. It is important to note that the status can depend on review protocols or any pending action that are enabled for the client organization, and/or your supplier organization.
- Request sub tab: Resume/Portfolio - Look up existing resumes, add new candidates to the request, and submit them for consideration.
- Request sub tab: Interview - View, confirm, and reschedule requested interviews.
- Engagement sub tab: Allocation - View cost centers or departments that are associated with the requisition.
- Engagement sub tab: Billing - View any associated billing (for example, timecards and expenses).
Submitting Candidates
When you receive requests for sourcing, you can open the request information and view the details. If you have a worker that meets the client organization's job requirements, you can submit that candidate. Another main function in the submission workflow is managing interviews that are scheduled with your candidates.
You can select from existing workers in the system, or add a new candidate by configuring a profile and resume. Candidates that have been submitted to the request appear in the top table (Added Workers), and workers available for submission appear in the bottom table (Search Workers).
If an interview is required, then you will need to confirm the interview time, or propose a new time for your candidate. You can review all upcoming interview information on the Interview sub tab.
Engagements
Once your candidate is submitted and accepted by a client organization, the engagement is created and your candidate is assigned. You can view all of the engagement information by using the search function on the Requisitions page, and clicking the engagement link. The engagement page opens with a view of general information, the location, the schedule, the financial (bill rates/pay rates) designations, contact information, and any configured custom fields. If you have permissions to access and update custom fields, you can enter specific data related to the request, to the worker, and so on.
The Allocation sub tab allows you to view the configured allocation fields and values for that particular engagement. Allocations are used to associate billing to a particular project, cost center, or account. The Billing sub tab displays any billing entered for the engagement.
Worker Profile
If the client organization needs you to complete some onboarding steps, you can access those workflow steps from within the worker's profile, or the LifeCycle sub tab. To access the worker's profile, at the top of the Engagements page, click the worker's name. You can also select the Worker tab at the top of the page, and then search for and select the worker. Under the sub tab options, select LifeCycle.
Billing and Invoicing
Billing is accessible from a few different points. You can view items that require client manager review from the Home page. In the Action Items pane, the Pending Billing row displays the number of items pending. You can click the blue number link to open the list of items in a table on the Billing tab.
You can also navigate to the Billing tab and use the search function to locate items in any status. The search results return items that match your query. To access the billing line information, click the blue number link in the Line# column. The billing General Info page opens with the billing field information.
- Billing GenInfo - Includes the Earnings End Date, Invoice Number (if processed), Billing Status, and the Status Reason
- Financials - Includes Rate Application, OT Rule, and the Supplier FLSA Classification
- Detail List - Includes the breakdown of time and expense for billing
If you will be working with payments and invoicing, you can access this information in the VMS. When the system processes approved billing, you export those billing items and prepare a report to be used for worker payroll. You might also need to confirm submitted expenses (review receipts for IRS compliance) before they can be processed. Once you have completed these tasks, you can search for invoices where billing is associated and keep those documents for your records.
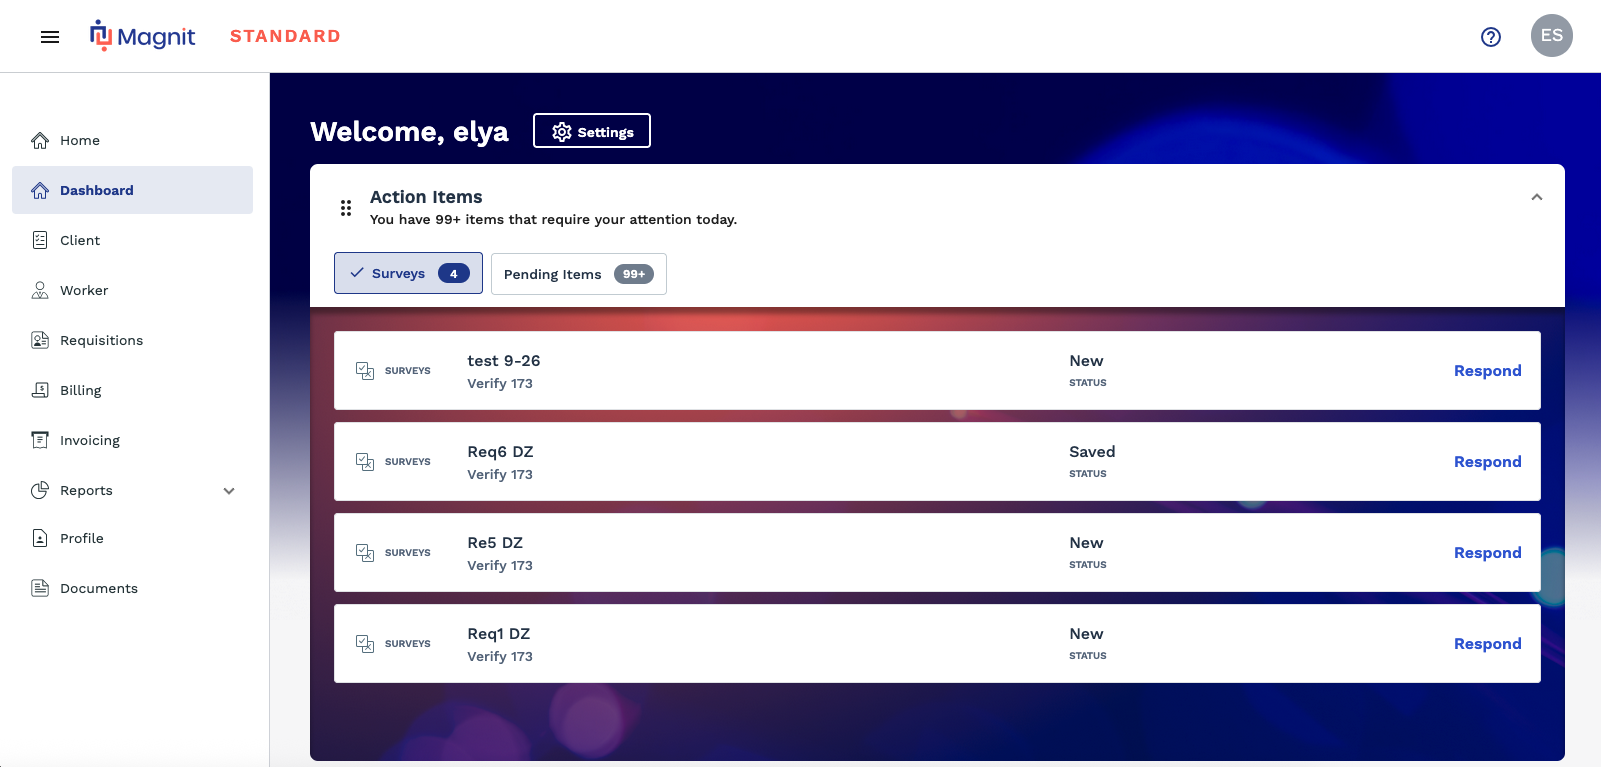
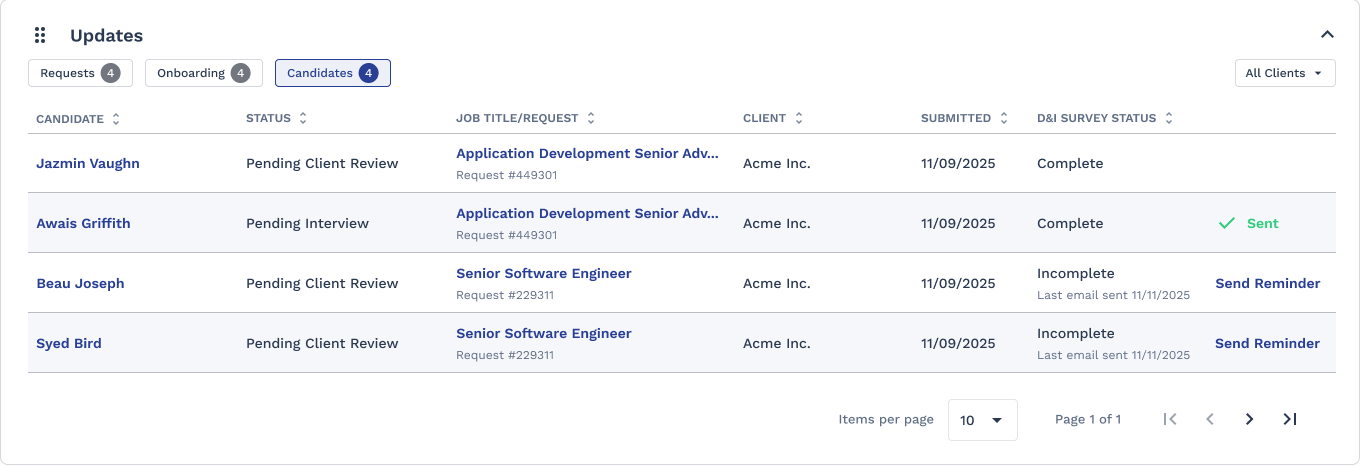
Home Page
The Home page displays a list of requests that you are actively managing, and important announcements for your supplier organization.
- Action Items - Displays selectors to navigate you to actions that await your perusal. This can include billing, or reviewing quotes.
- Updates - Displays items that were recently updated, and their statuses.
Note that from this view you can trigger actions. The right column in the table displays any triggers, and the trigger result. In this view you can click the blue text links to activate the trigger, or to access the specific information set.
In any table where it displays, access request information by clicking the blue request or engagement number.
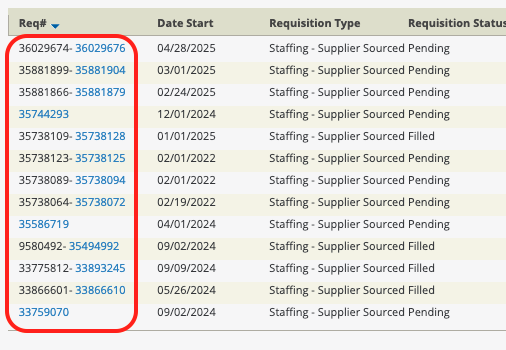
The first number in the list (left) is the request number, and the second number (right) is the engagement number. Only filled requests (converted to engagement) have a second number. Project worker engagements (if enabled) have both clickable numbers, with the first number being the project engagement, and the second number being the project worker engagement worker. Workers assigned to projects (project worker request type disabled) do not display a value in the Title column.
You can locate request/engagement information using the Search functionality. This functionality can be accessed by clicking Search button at the top of any of the information table views, or by clicking the Requisition tab. For more information about the search functionality, see Searching Through Requisition Data.
The Recent Candidates section displays candidate activity for all requisitions. Clicking the worker's name navigates you to the page, and clicking the request number navigates you to . You can manage the pagination using the display controls at the bottom of the section, and by clicking the header row label.
The Action Items section displays view selectors that represent statuses that require action, including pending onboarding items.
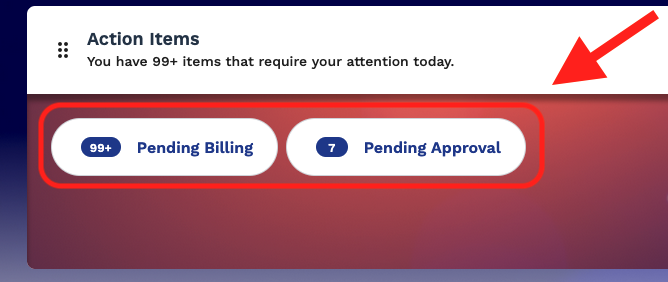
Clicking each selection navigates you to the item information. The selector buttons display the number of items that require attention.
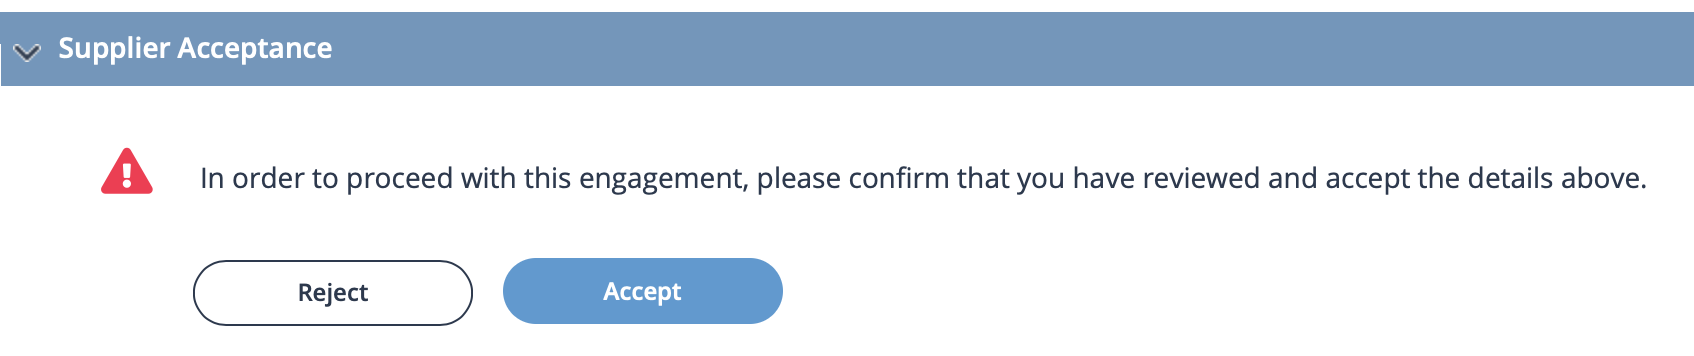
Supplier Acceptance
If a client organization that you have an agreement with is using the Supplier Acceptance workflow, you see a notification in the Action Items section on the Home page.
The Supplier Acceptance workflow allows for a review process of all request details before it is converted to an engagement. Revisions to the original information on the request must also be reviewed and accepted by your supplier/vendor organization before conversion. If your organization rejects the engagement details, the client organization or MSP must modify and resubmit the details for acceptance.
Email notifications are sent when details are available for review. The engagement information also displays a badge at the top of the Gen Info tab.
![]()
To accept or reject information, in the Supplier Acceptance section of the details, use the action buttons.
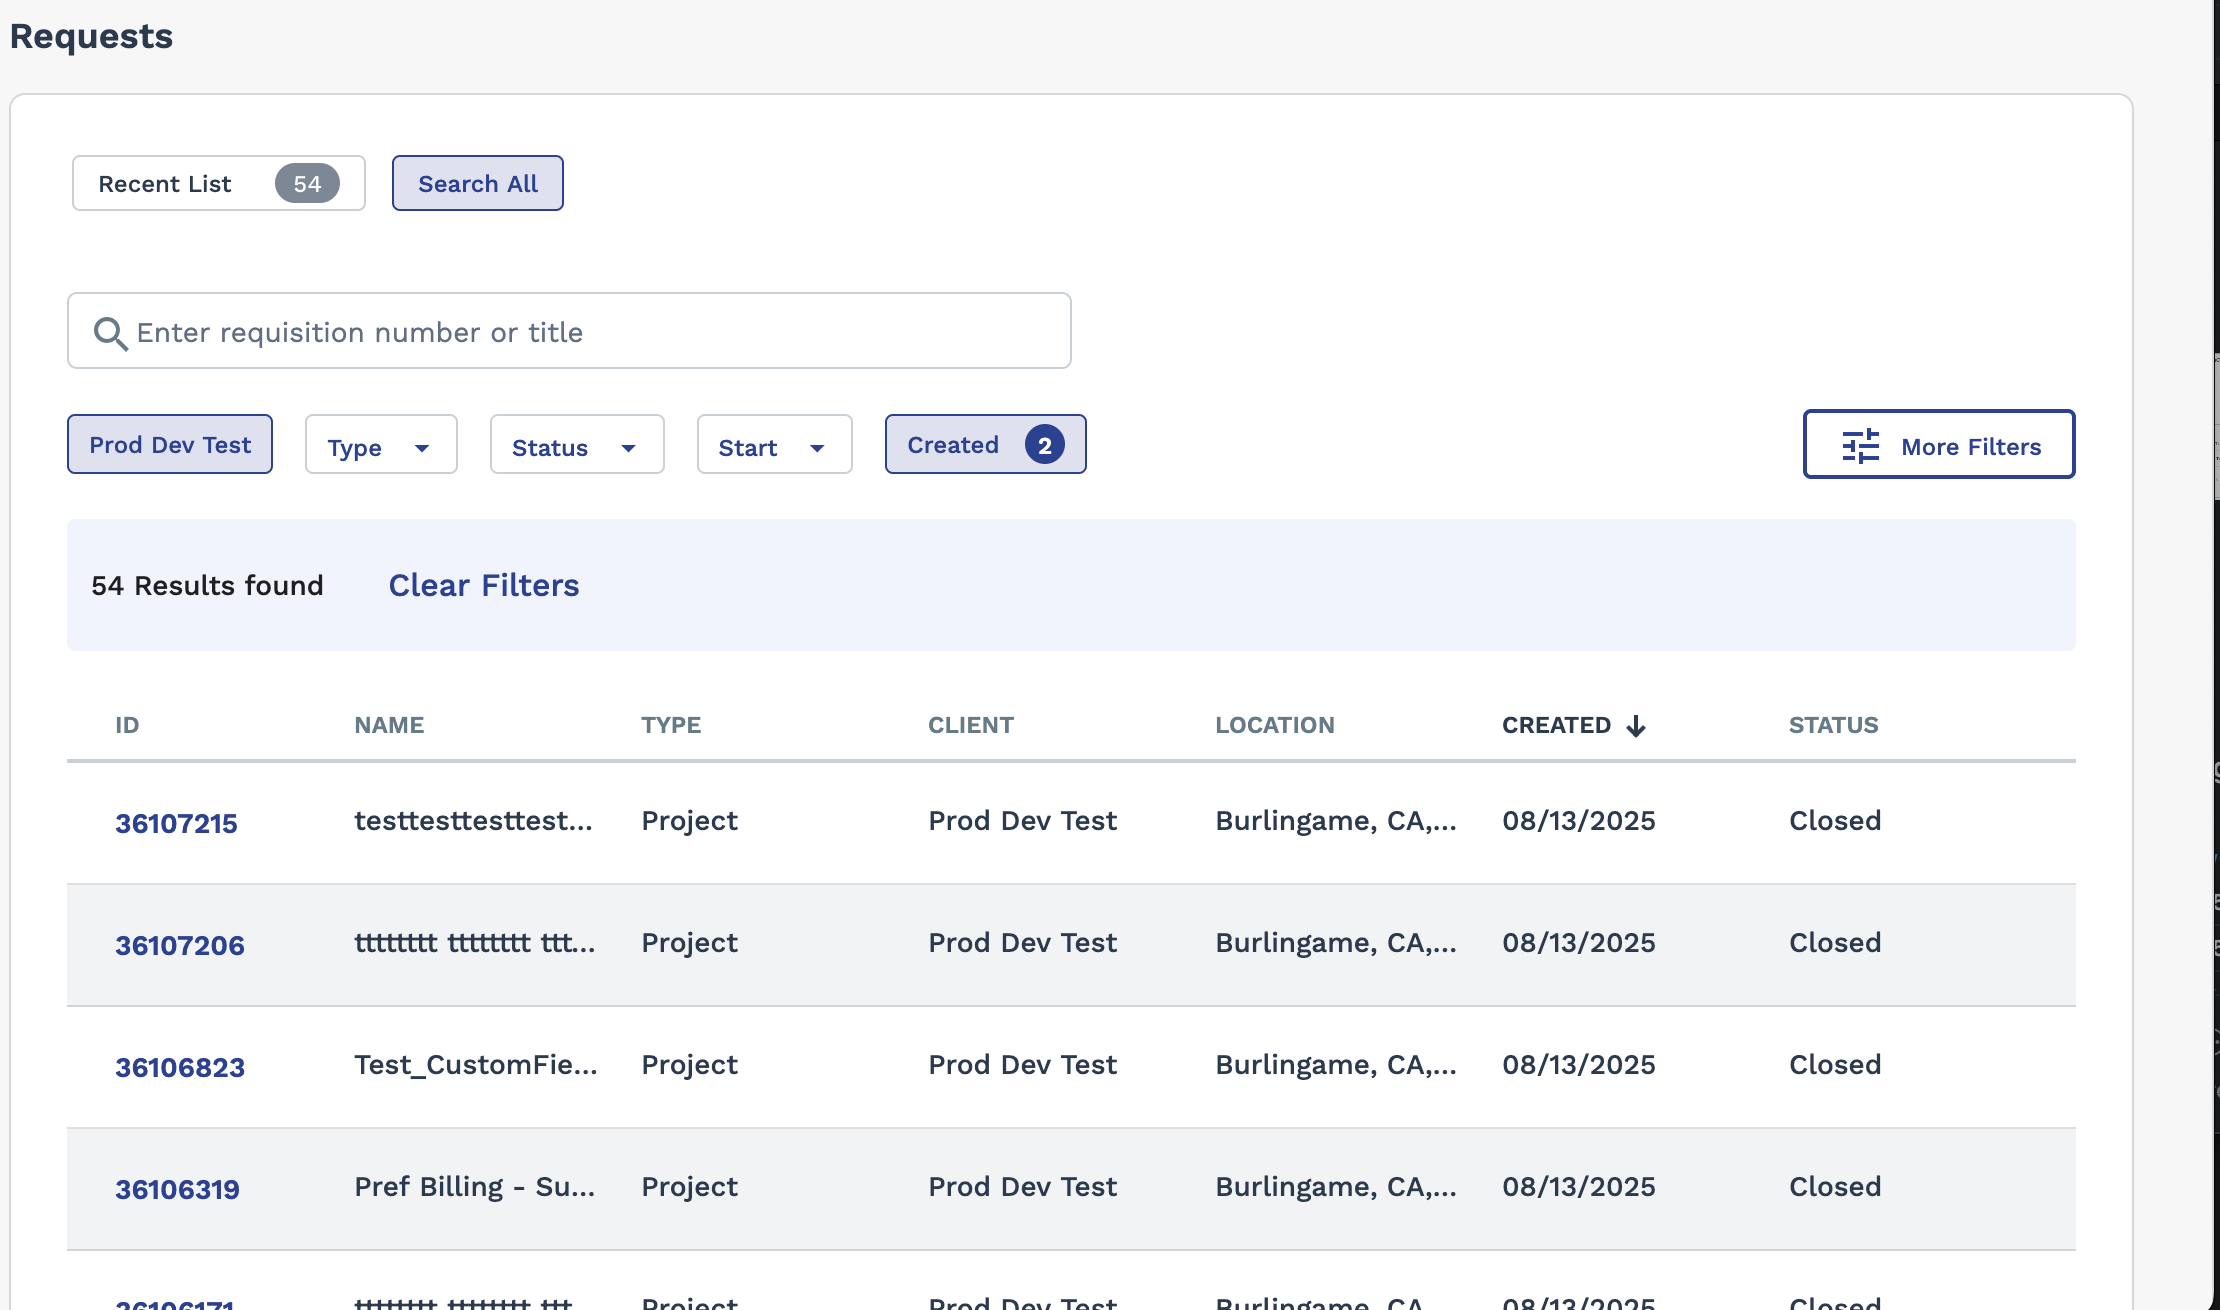
Searching Through Requisition Data
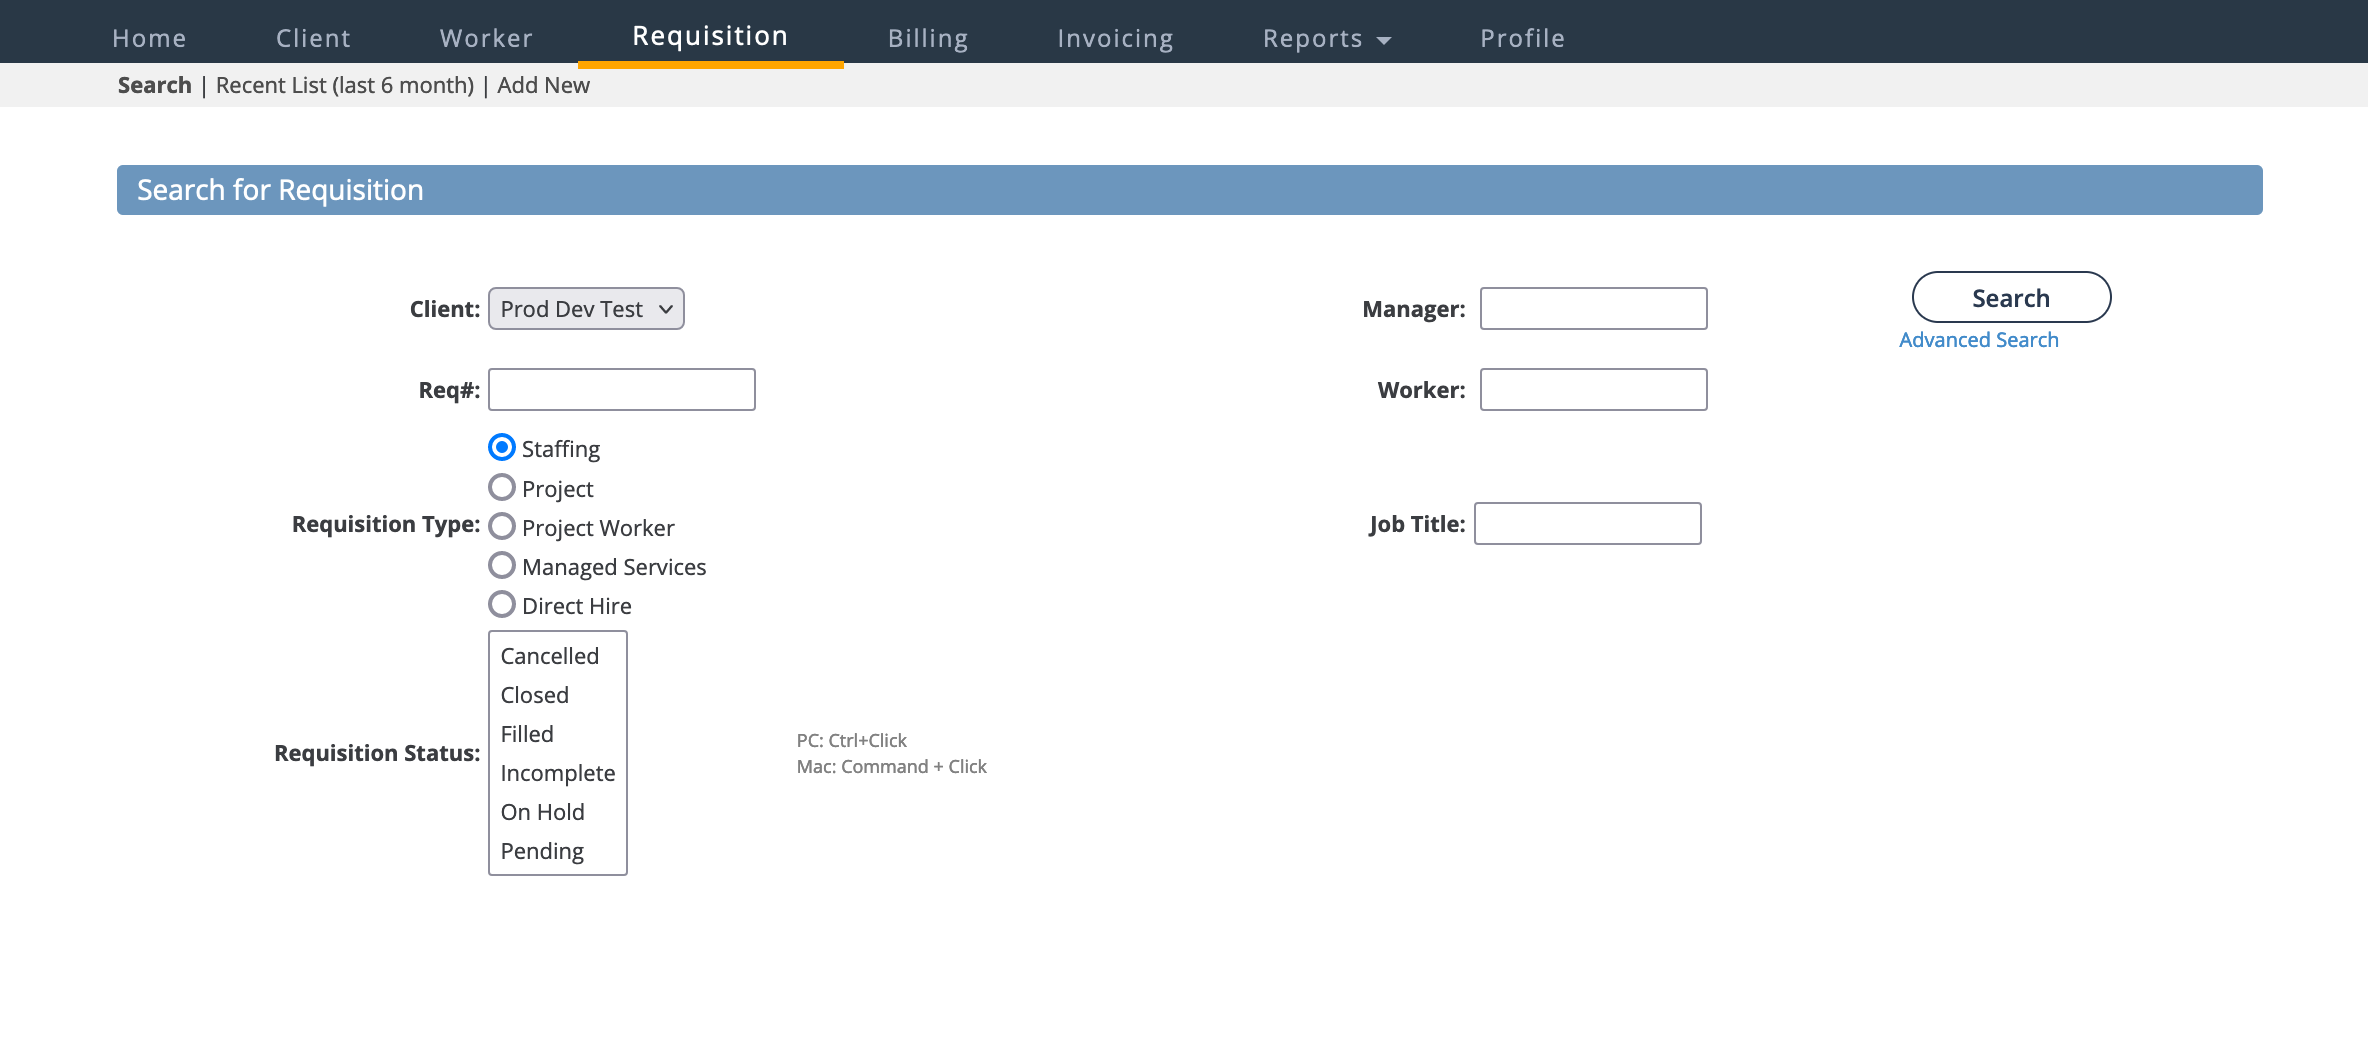
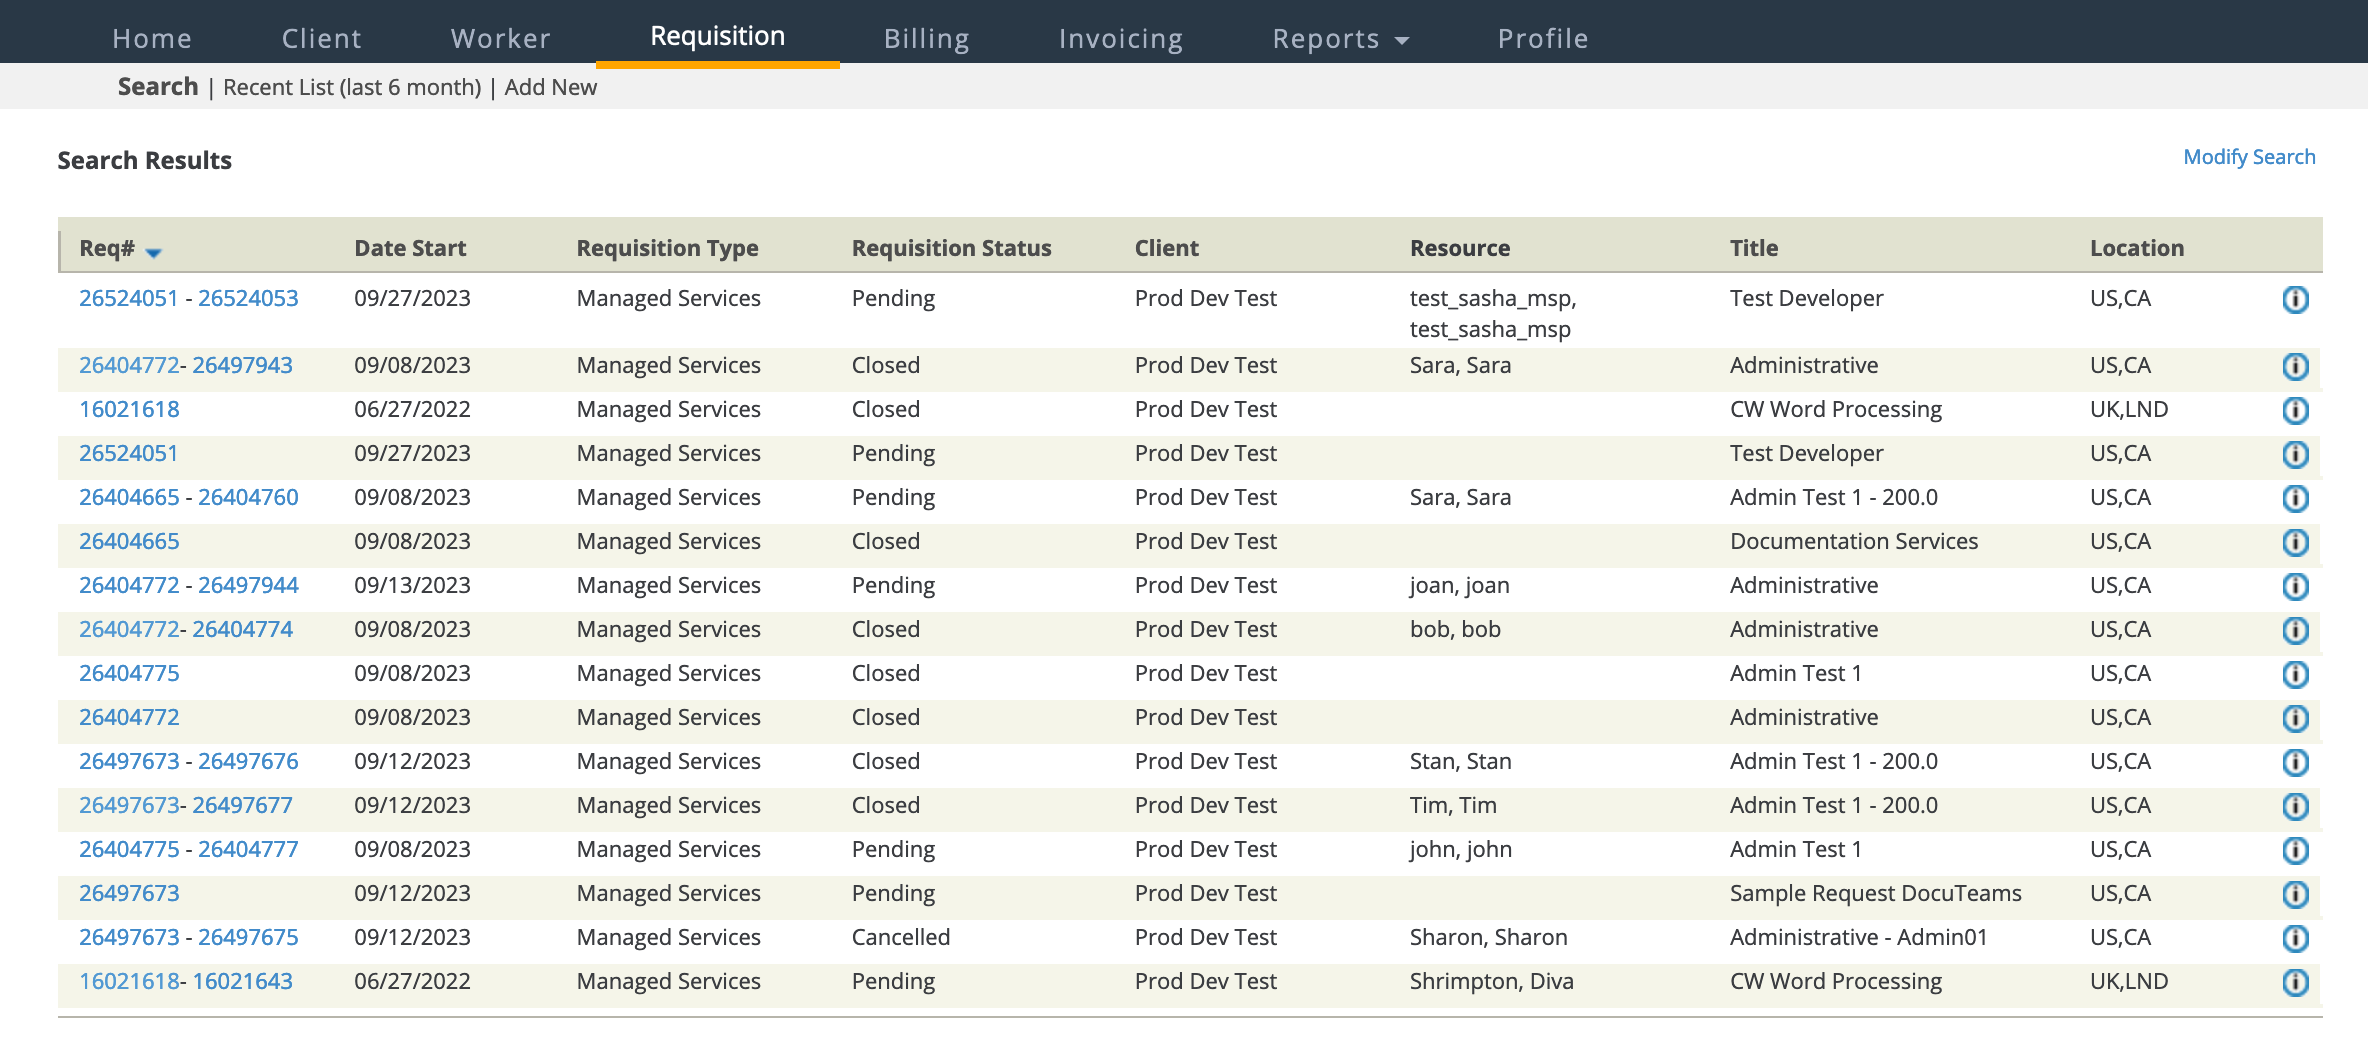
You can search through requisition data in the system using the search functionality in the application. The search displays any data that your user/organization has permission to view.
You can click the blue request or engagement number text to access the information.
The ID column is the identifier of the item. For engagements, two numbers display, the first being the original request number, and the second being the engagement (filled request) number. If your client organization is using projects with project workers, for a project worker row, the number in the Req# column is the project engagement number (left), and the second number is the project worker engagement (right).
There are two modes for searching, basic and advanced.
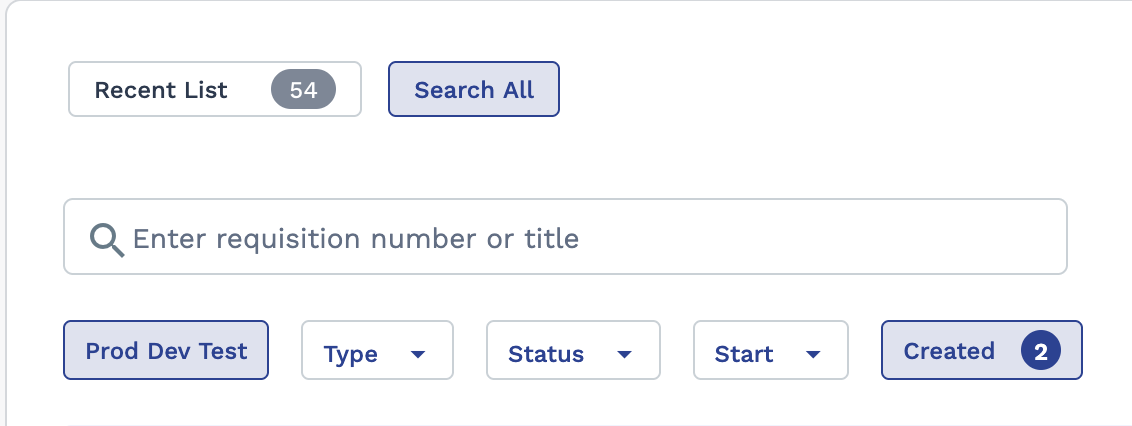
- Recent List or Search All or Pending Approval- Filter your search by recent items (last 6 months of data ONLY) or all items for the client organization or items pending approval ONLY.
- List- level search field - Search by entering text that describes the job, job title, and so on. Search my item ID number.
- Requisition Type - Search by request type. These types are enabled for a client organization.
- Requisition Status - Search by request status.Tip:You can select multiple values from this field by clicking each value while holding down Command (Mac) or Ctrl (PC).
- Start - Use the date range input to search by requisition start date.
- Created - Use the date range input to search by requisition created date.
The advanced search (![]() )uses the basic search parameters.
)uses the basic search parameters.
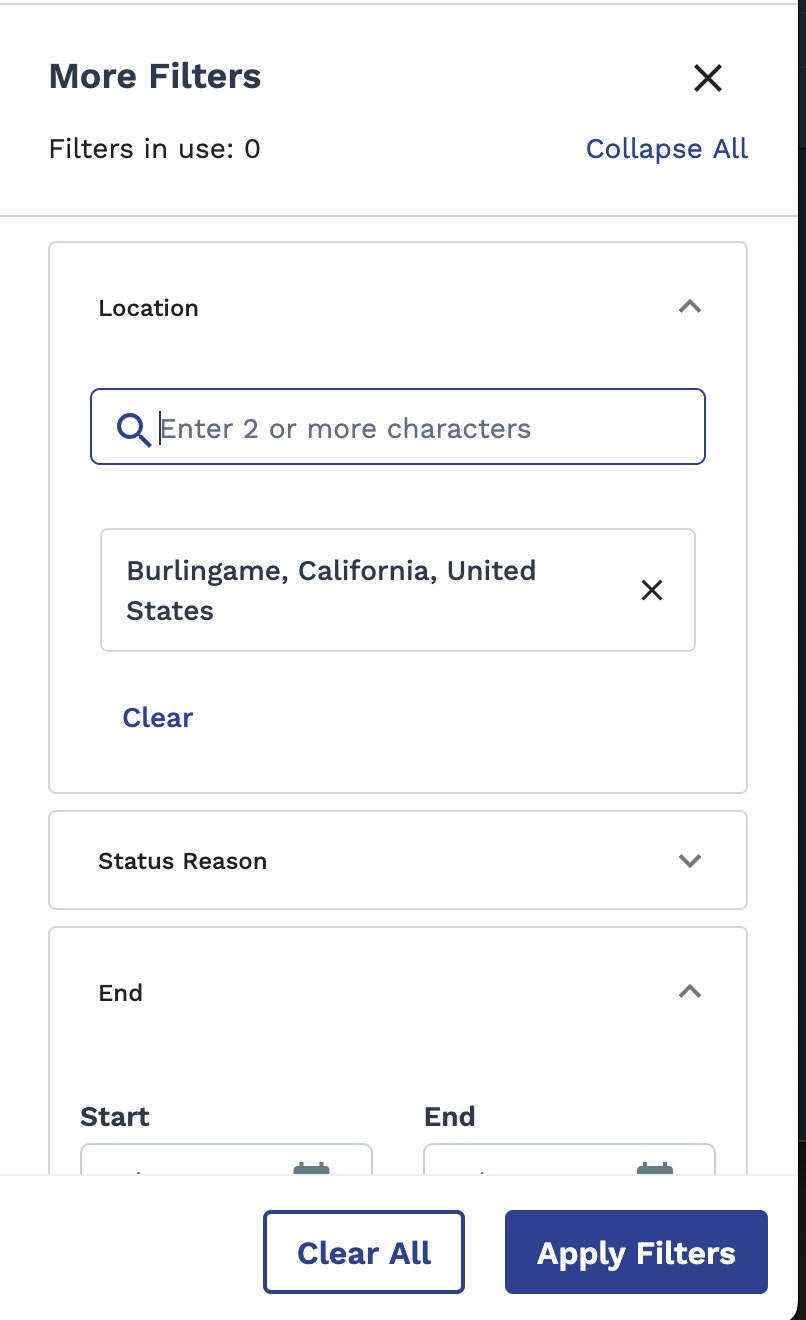
- Location (Country, State/Province, and City/Town) - Search by location. Use the drop down menus to search through the client organization's configured locations.
- Status Reason - Search by the reasons assigned to the request or engagement by the system, for example, 'Pending Sourcing'.
- Closed - Search by engagement closed date.
- End - Search by engagement end date.
- Custom Fields - Search by custom field and value.
Client Page
You use the Client page to access configured information for a client organization that you contract with. You can view the client's locations (address information) in the General Info section.
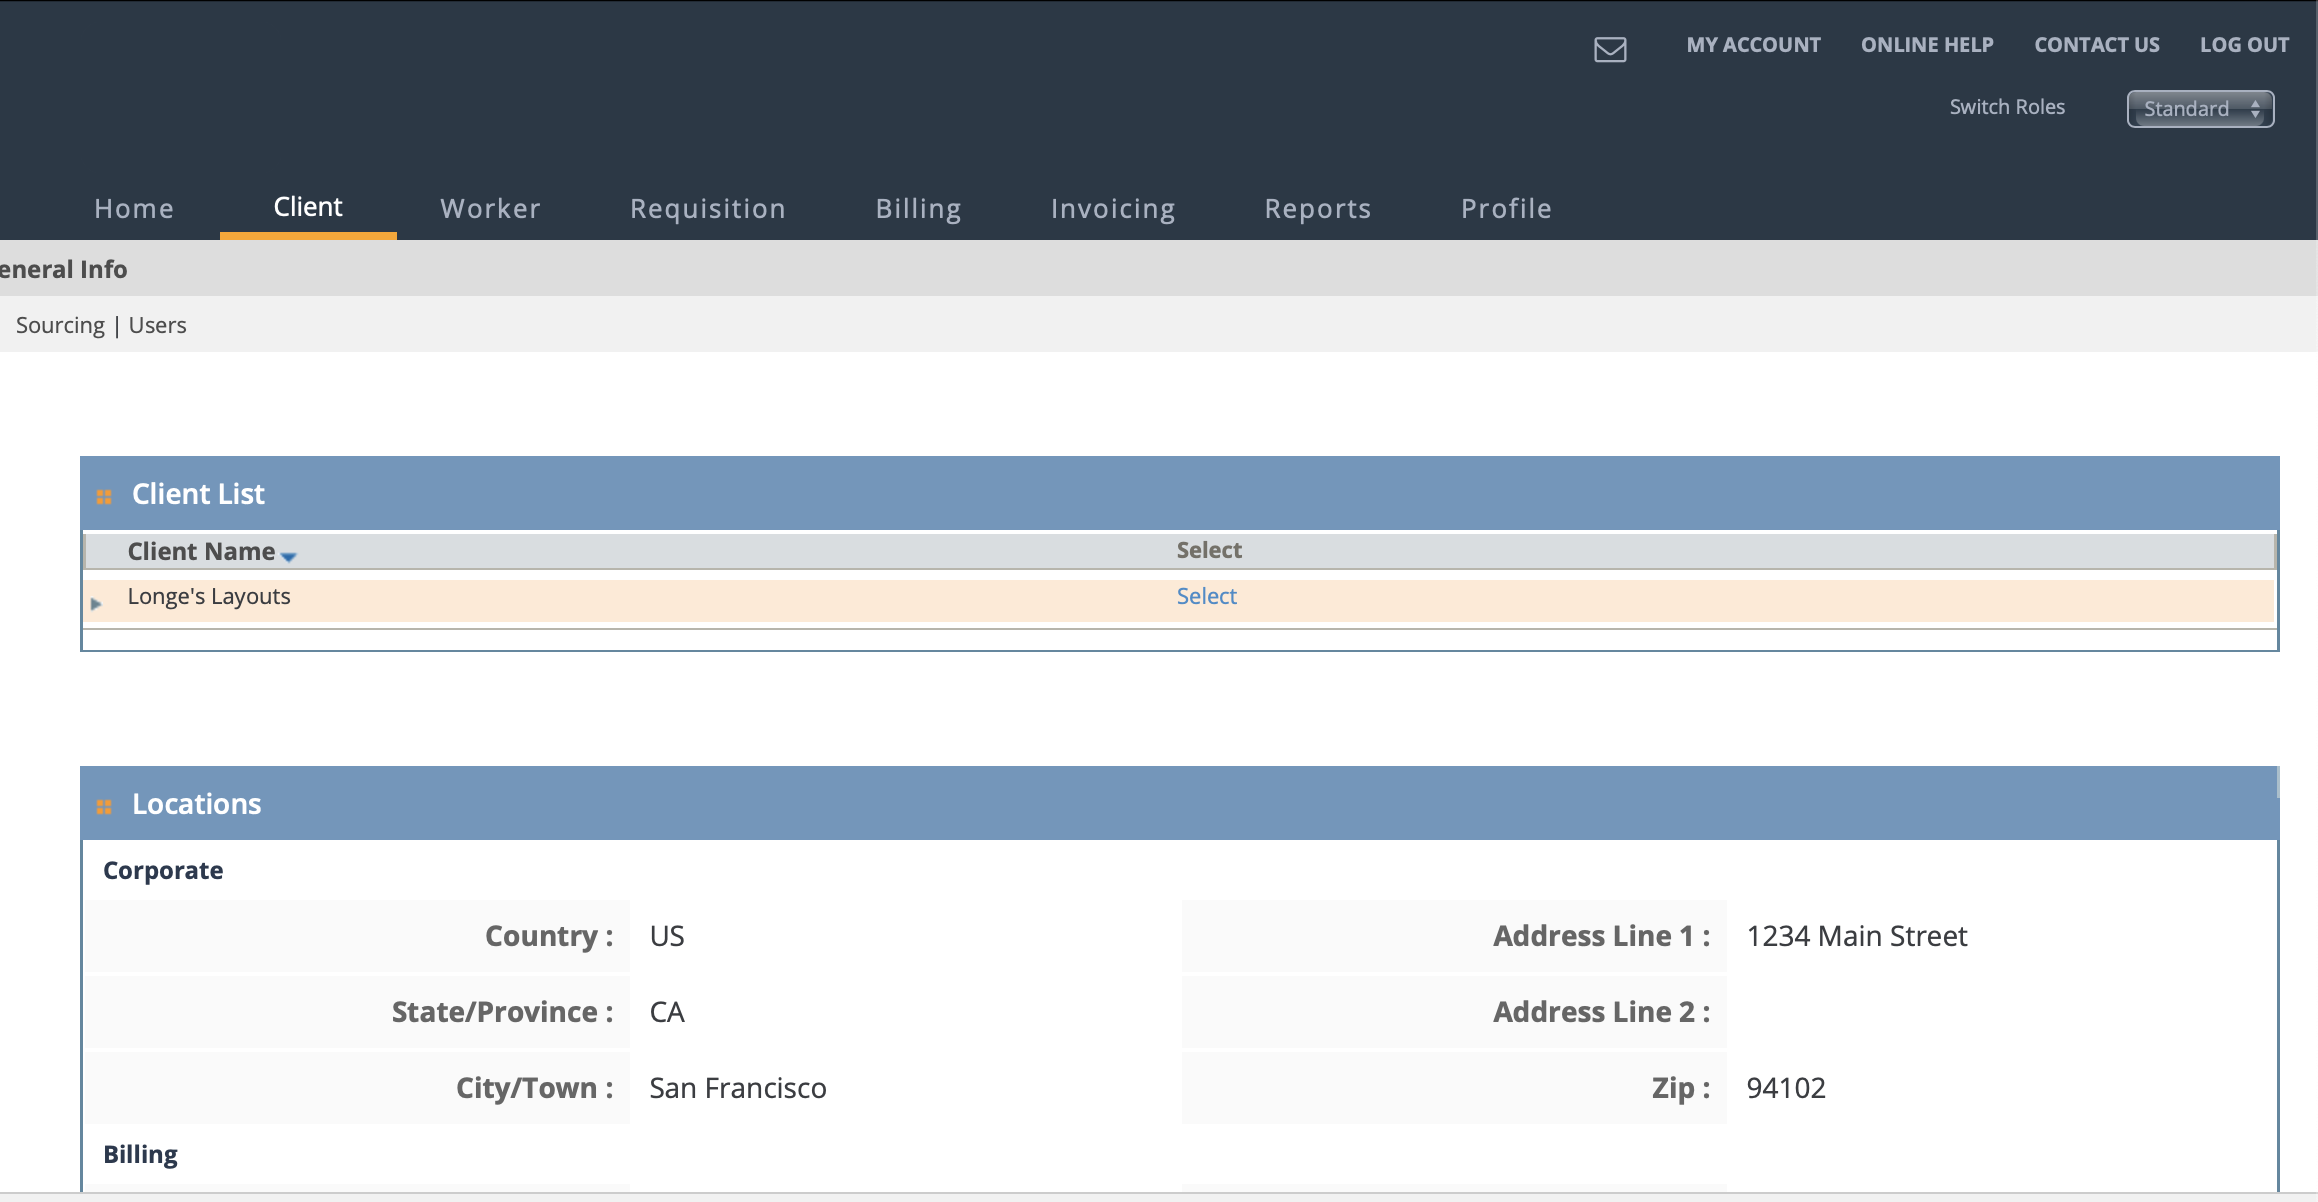
To access additional information, click Select for a name in the Client List. The client organization's business validation or Questionnaire (request for information/proposal) information is displayed.
Worker Page
The Worker page displays a list of all worker records configured for your supplier organization.

Use this page to manage worker records, submit workers for an engagement, or create a worker resume, which is used to submit worker information to a request. The information in a worker's record can be different than the information that is submitted to a request.
You can also configure a worker Talent Network profile, which can be added to a client organization's system database of workers that can be queried when searching for candidates for a position. The information included in the database are the worker's engagement/s, and the information for each of those engagements.
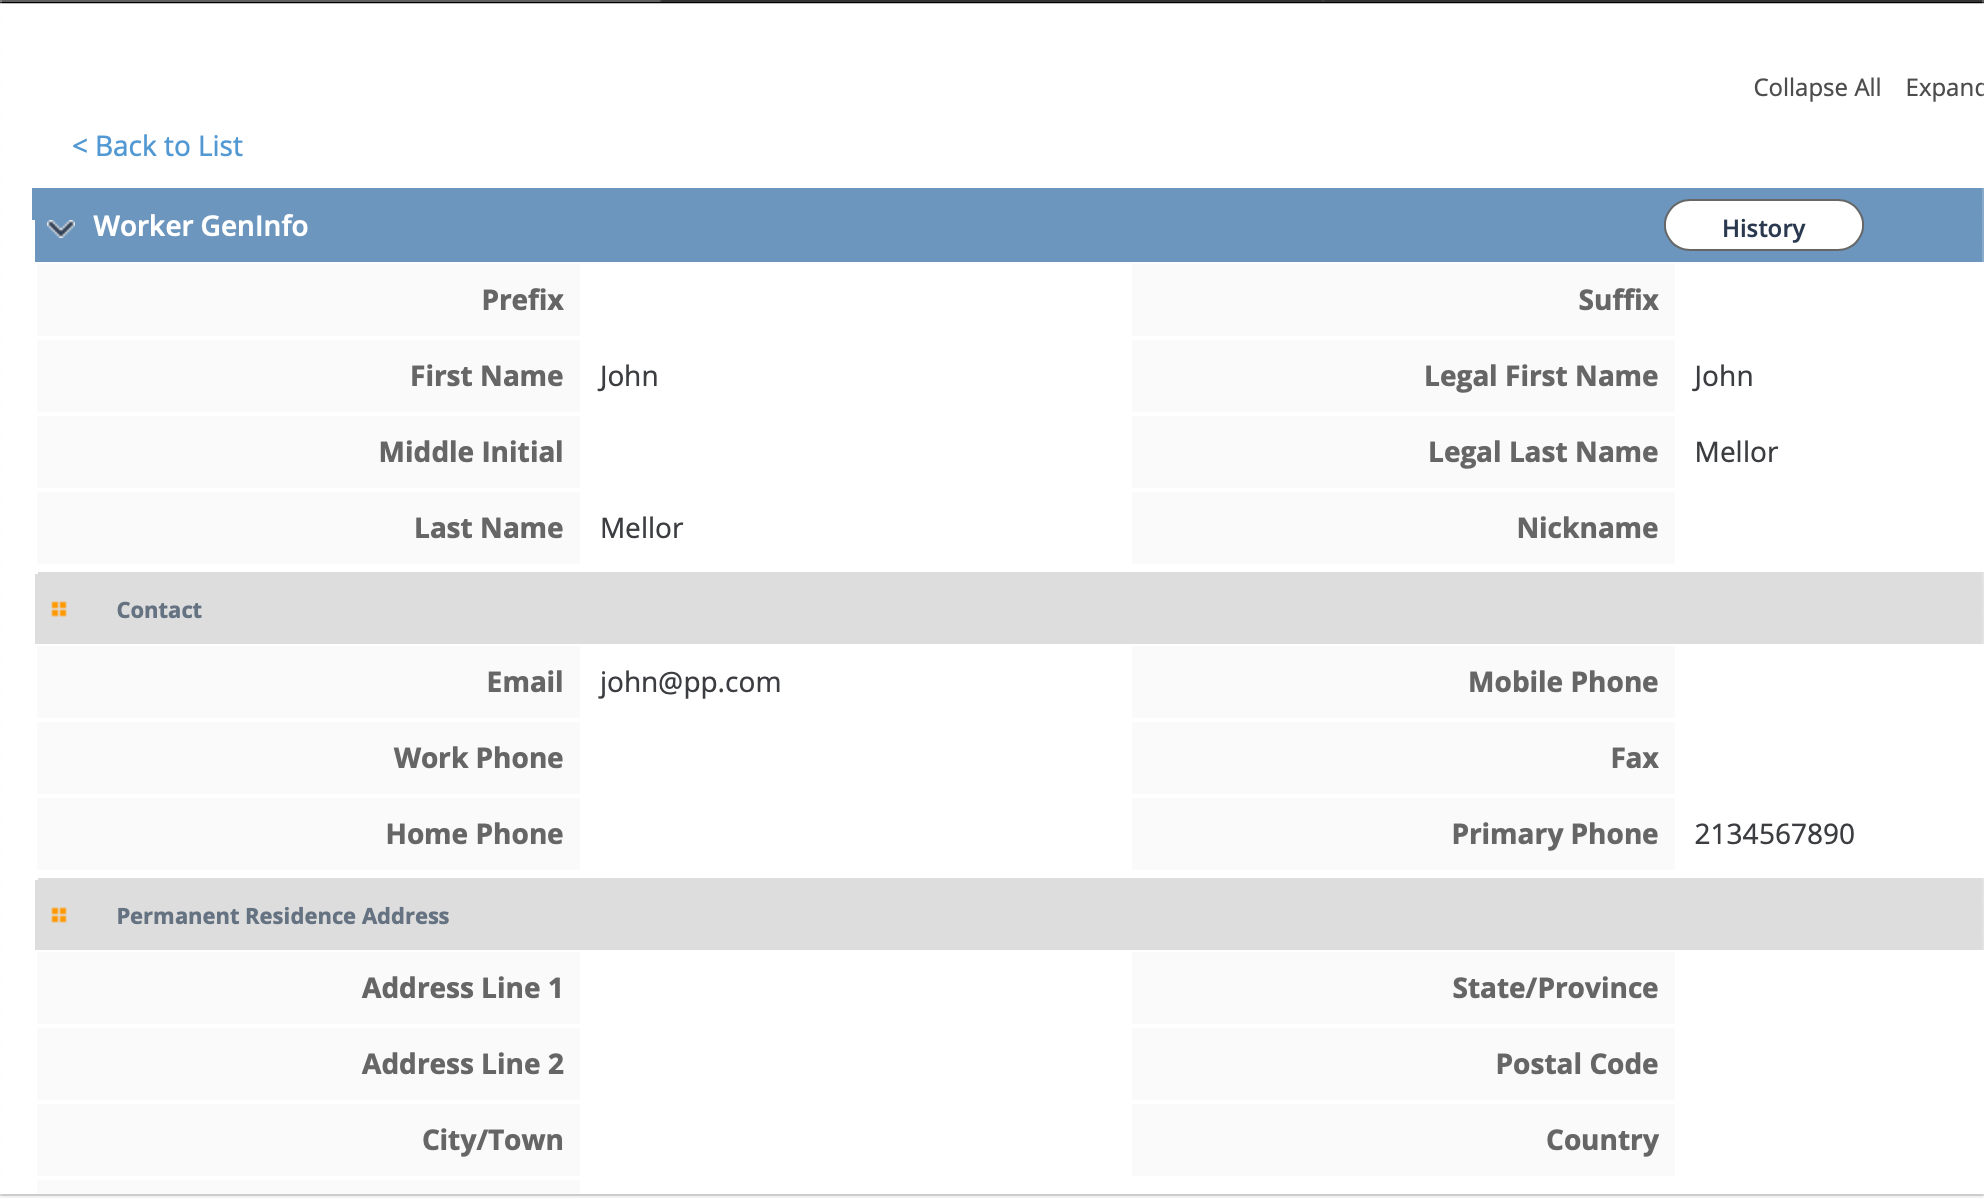
To access a worker's general system information, click the worker's name (blue text). The worker's GenInfo page opens.
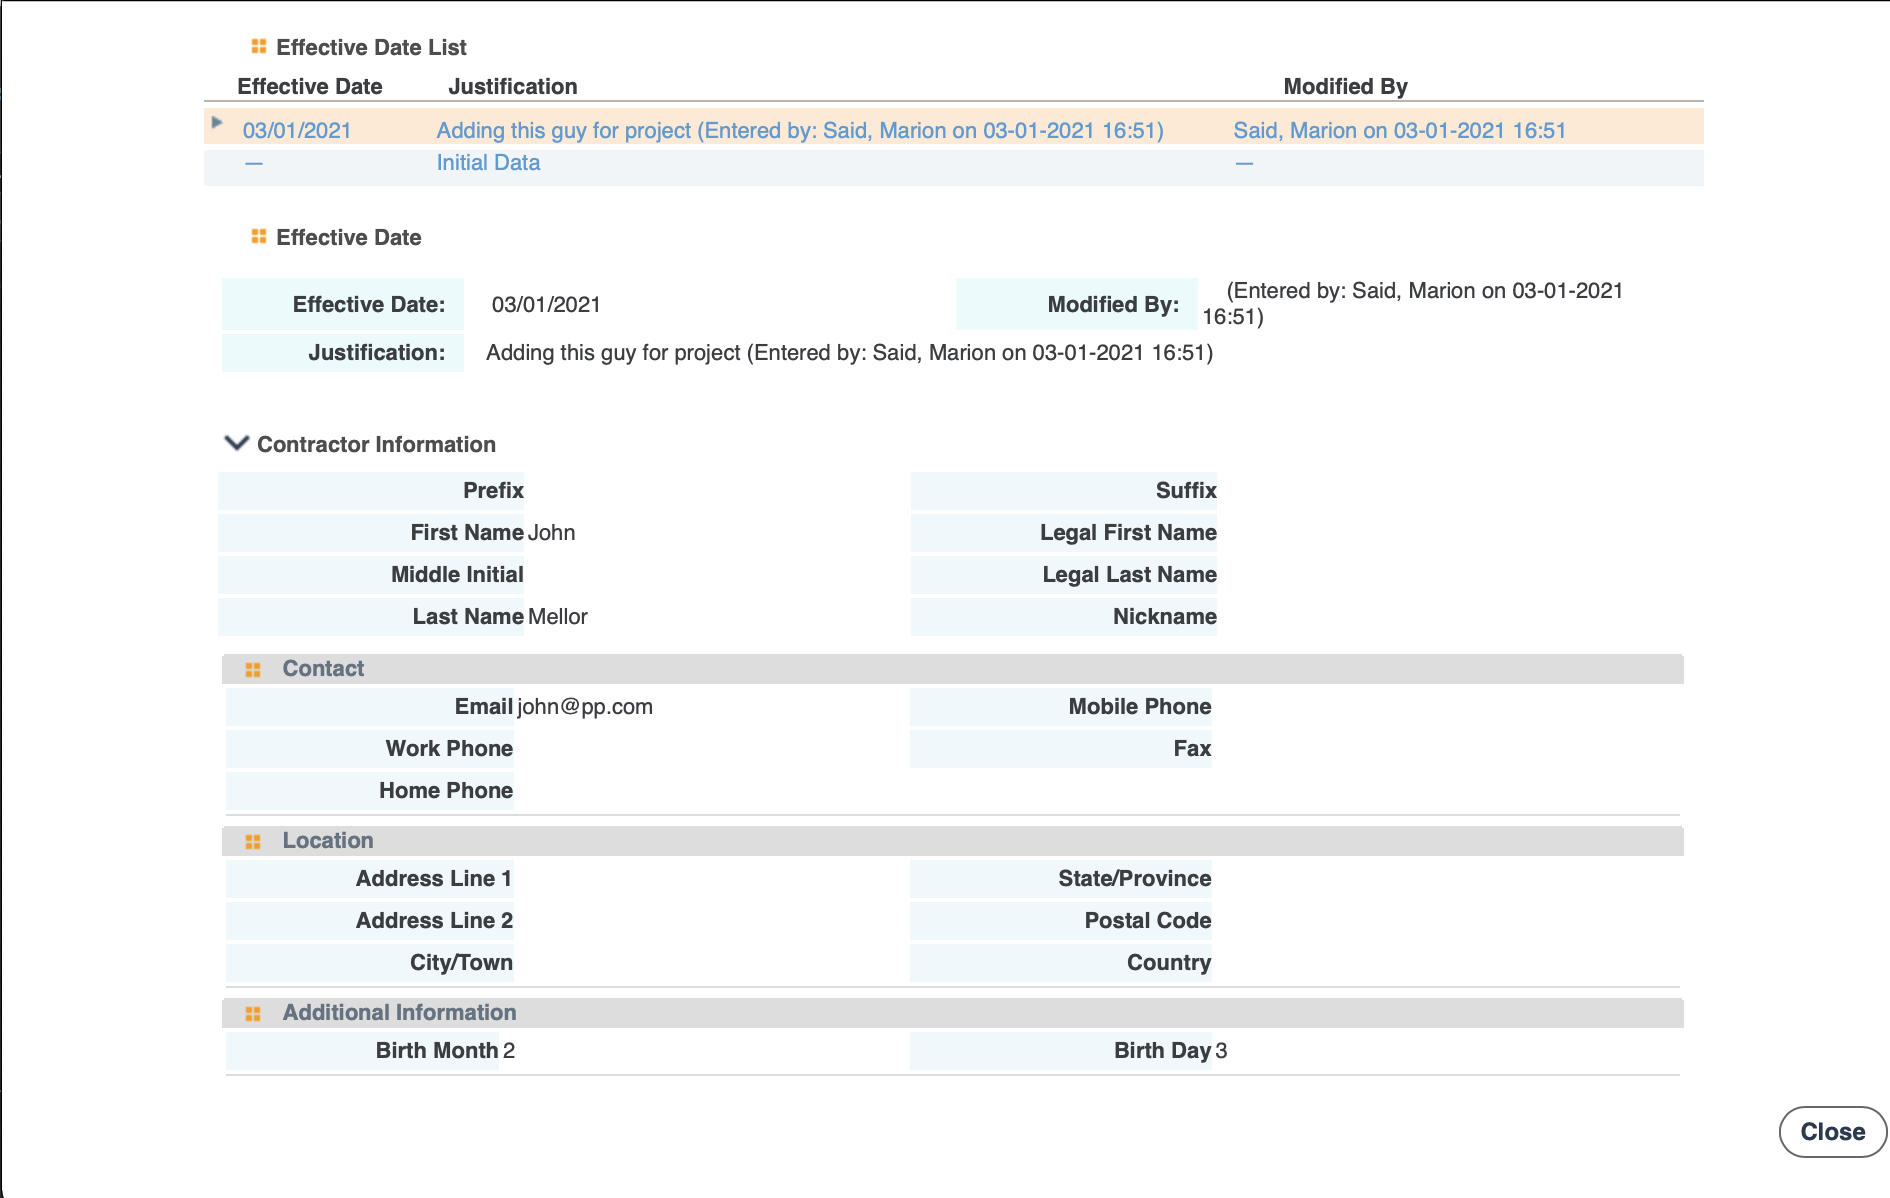
You can edit the worker's information by clicking ![]() . You
can also view change history by clicking
. You
can also view change history by clicking ![]() . A
pop up opens that displays changes to the information based on effective date.
. A
pop up opens that displays changes to the information based on effective date.
- Profile
- Resume
- Worker LifeCycle
- Requisition - Displays request/engagement information for the selected worker. Click the blue number text to access full details.
- Billing - Displays billing information for the selected worker. Click the blue line number text to access full details. For more information about the full billing details, see Billing Item Detail.
- Documentation - Any documents relevant to the worker. This information can include certifications not required for an engagement.
Searching for Workers
- Navigate to the Home page in the Supplier view.
- Click Worker.
-
In the search field, enter text. You can enter the worker's name (full or
partial), or the worker's email (full or partial). The application uses full
text search, and all results display in the results table.
Additionally, you can use the advanced search filters. To access the filters, click Advanced.
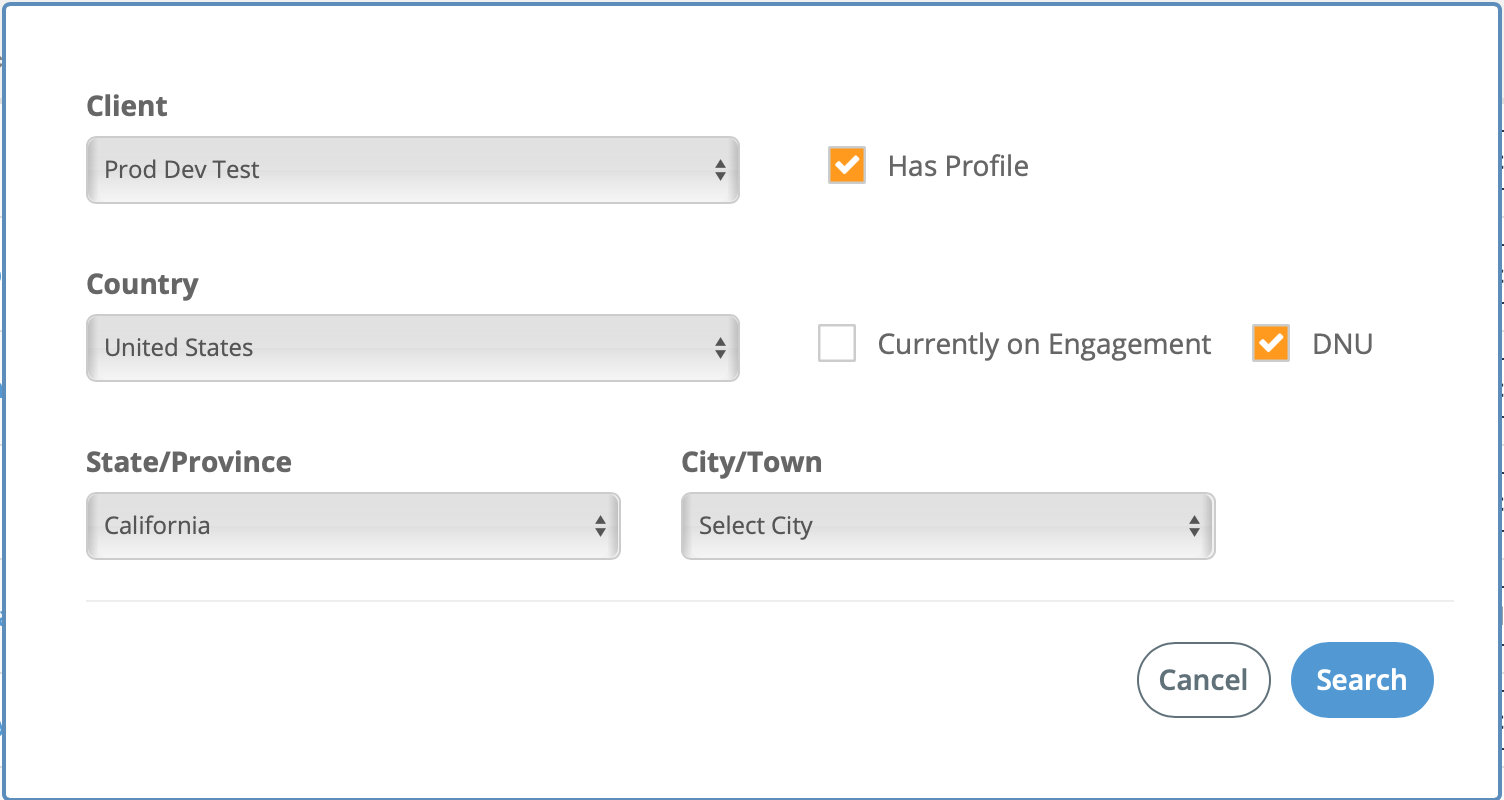 Use the following filters:
- Client - Filter by client organization (existing supplier contract).
- Country - Filter by country. The list that displays is not restricted to countries that the client organization has a contract for.
- State/Province - Filter by state or province. The list that displays is not restricted to states or provinces that the client organization has a contract for.
- City/Town - Filter by city or town. The list that displays is not restricted to cities or towns that the client organization has a contract for.
- Has Profile - Filter by profile. Select the check box to include or not include workers with profiles. For more information about worker profiles, see Profile.
- Currently on Engagement - Filter by workers assigned to engagements.
- DNU -Filter by workers that have been marked 'Do Not Use'.
- The results display in the results table. You can access the worker's information by clicking the worker's name (blue text).
General Info
| Section | Description |
|---|---|
| Contractor Information | Displays general worker information. This information can be edited
in this section, or in the worker's User
Account. Note: The Birthplace
and Nationality fields are only
visible/editable if the client organization is configured to use the
Worker ID Check functionality. See c_worker_id_check.html. |
| Contact | Displays the contact information for the worker. |
| Permanent Residence Address | Displays the worker's residence information. This includes the country, state/province/region, and subdivision. |
| Emergency Contact Information | Displays the emergency contact information for the worker. |
Profile
| Field | Description |
|---|---|
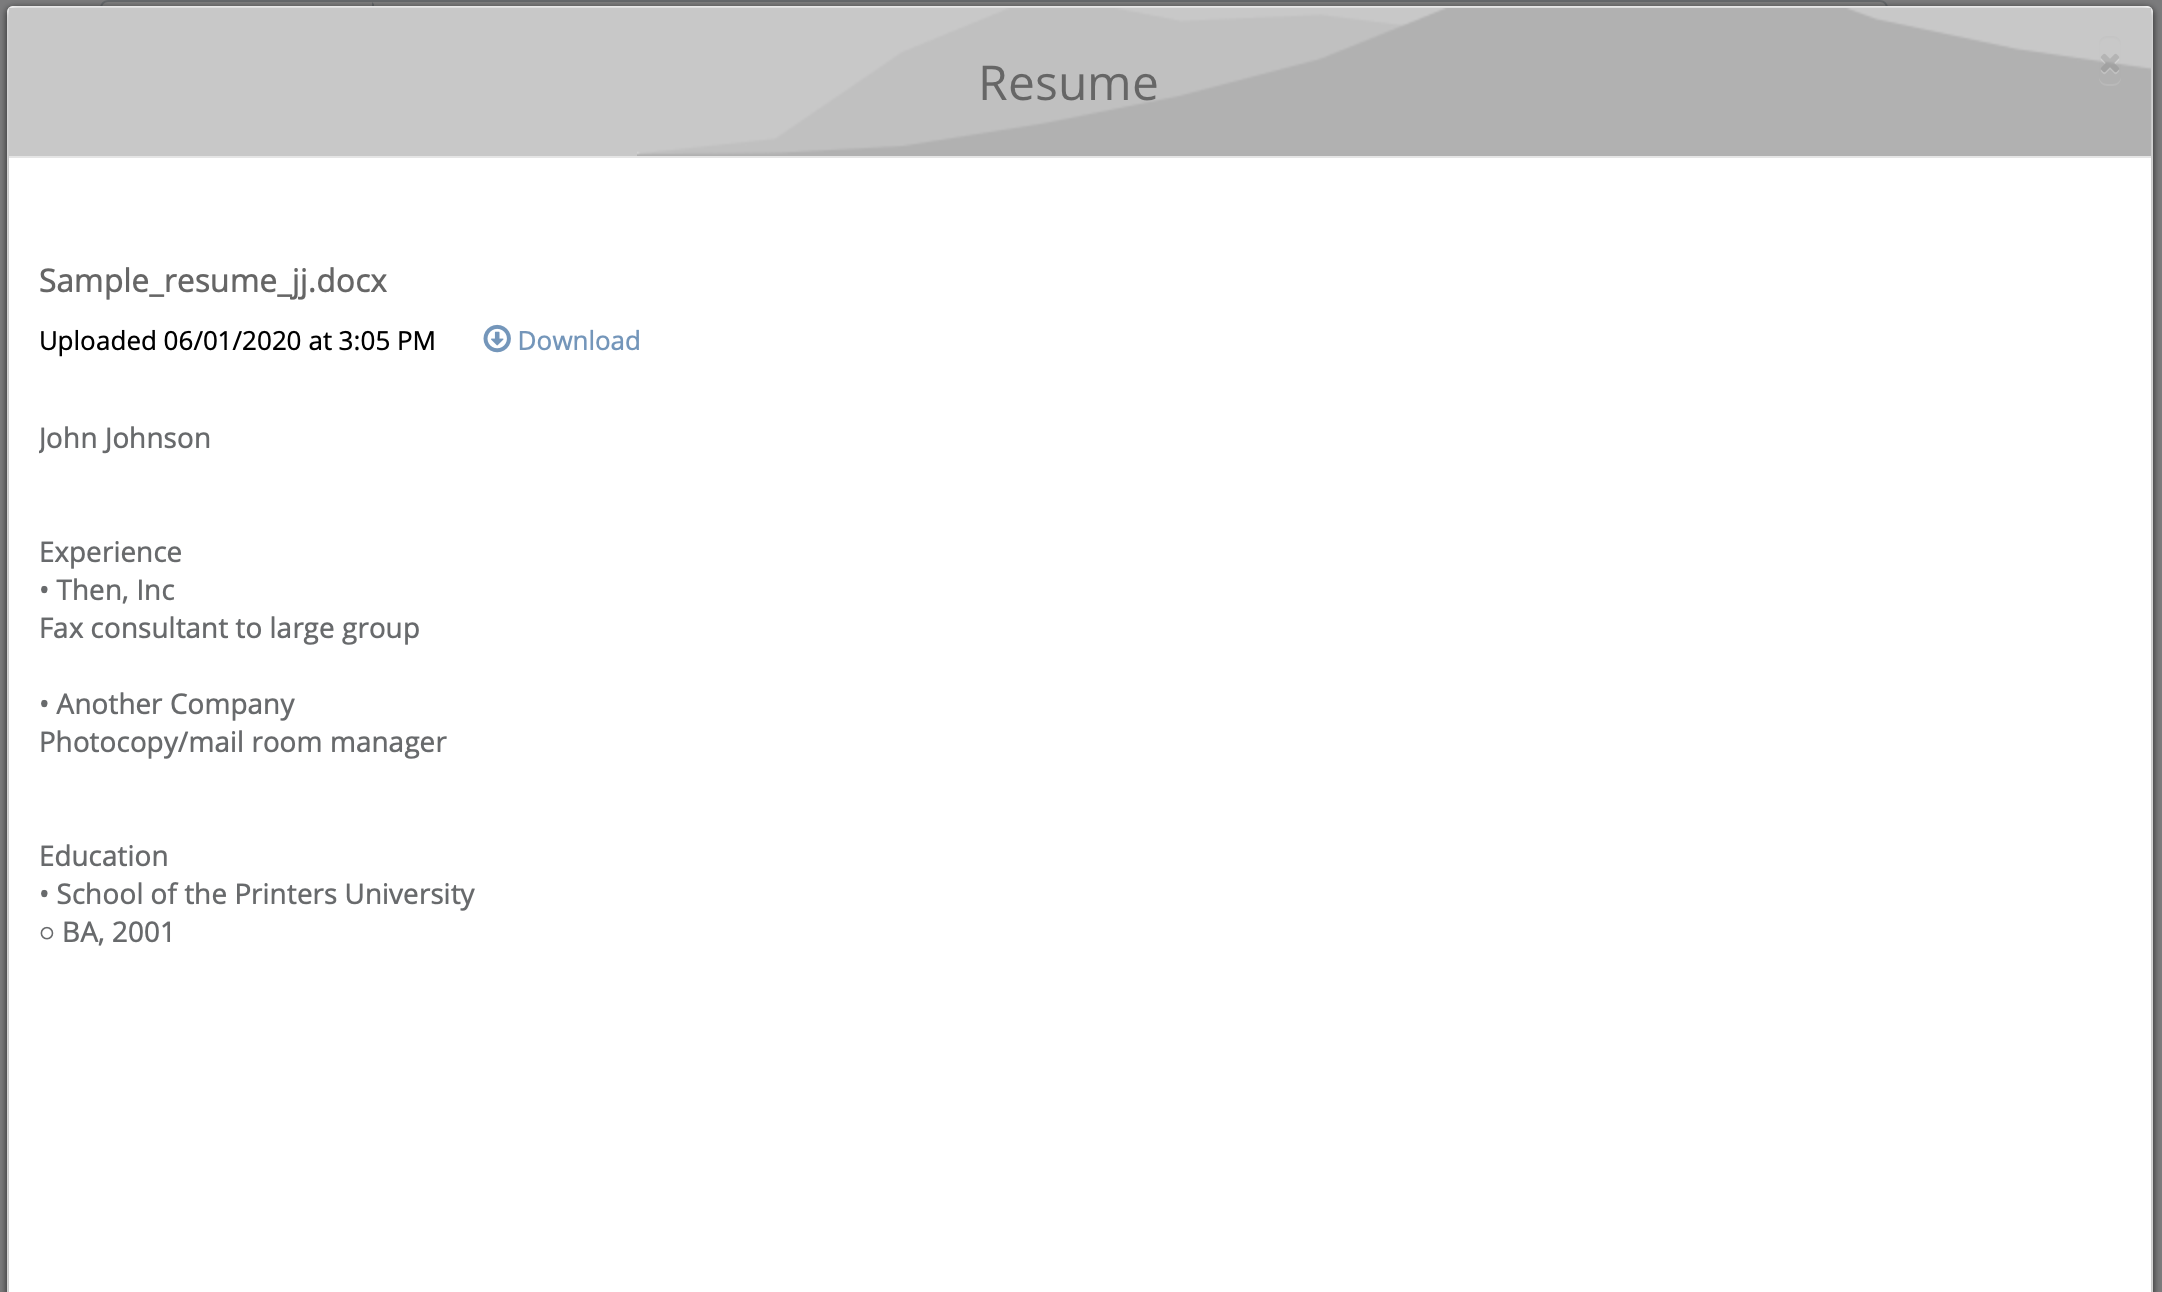
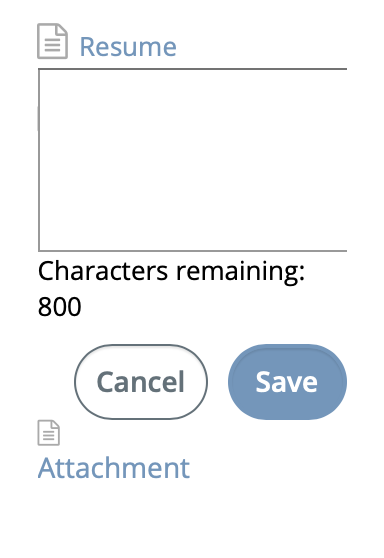
| <Worker's Name> | Displays the worker's profile information. In this section, you can view the resume uploaded when the worker was submitted as a candidate. To view the resume, click the text. A pop-up opens with the resume information.
You can also click You
can add notes to the worker profile. Click
You can only add a maximum of 800 characters. After adding your
text, click To upload a new
resume for the profile, click
You can
drag and drop, or click |
| Summary | Displays a summary for the worker. This field is free text entry. |
| Skills | Displays skills summary for the worker's profile.
You can add skills to the profile
by editing the section, and then using the text field to enter skill
text. The field auto suggests skills that appear in the system.
After making a selection, use the Years of
Experience drop down to add the number of experience
years for the skill. You can add another skill by clicking |
| Experience | Displays job experience for the worker. This section automatically
populates with experience in the uploaded resume file. Note: If you
upload a new version of the file, this information is
overwritten. You can add experience to the worker
profile by adding information for the following fields:
You can also delete job experience by clicking Remove. |
| Education | Displays the education of the worker. This section automatically
populates with experience in the uploaded resume file. Note: If you
upload a new version of the file, this information is
overwritten. You can add education to the worker
profile by adding information for the following fields:
You can also delete education by clicking Remove. |
| Languages | Displays the languages that the worker has competency in. You can add a language for a worker by selecting it from the drop down, and selecting the check box for the language of competency. |
| Military Service | Displays the military service for the worker. This section
automatically populates with service in the uploaded resume
file. Note: If you upload a new version of the file, this
information is overwritten. You can add service to
the worker profile by adding information for the following
fields:
You can also delete service by clicking Remove. |
| Certificates & Licenses | Displays any certifications or licenses that the worker holds. This
section automatically populates with information in the uploaded
resume file. Note: If you upload a new version of the file, this
information is overwritten. You can add
certificates and licenses to the worker profile by adding
information for the following fields:
You can also delete certificates and licenses by clicking Remove. |
| Patents | Displays any patents that the worker holds. This section
automatically populates with information in the uploaded resume
file. Note: If you upload a new version of the file, this
information is overwritten. You can add patents to
the worker profile by adding information for the following
fields:
You can also delete patents by clicking Remove. |
| Publications | Displays any publications that the worker has. This section
automatically populates with information in the uploaded resume
file. Note: If you upload a new version of the file, this
information is overwritten. You can add
publications to the worker profile by adding information for the
following fields:
You can also delete publications by clicking Remove. |
Resume
Resume List
This section displays a list of all resumes submitted for the workers. To access the resume information, click the blue text in the list. You can also add a resume to the worker's account. For more information about adding a resume, see Add a Resume for a Worker.| Field | Description |
|---|---|
| Title | The title of the worker's resume. This value might be generated by the application. |
| Date/Time Created | The timestamp when the resume record was created. |
| Supplier | The supplier for the worker's resume. The same candidate can be submitted by different suppliers. |
| Duties | Any of the worker's previous duties. |
| Skills | Any of the worker's previous skills. |
| Attachments | The worker's resume file, attached to the worker resume record. |
| Additional Information | Additional information for the worker's specific resume submission. This information includes skills, and if the worker is marked 'DNU'. This setting only applies to worker's resumes within a specific MSP organization. |
Additional Information
| Field | Description |
|---|---|
| Date Available | The date that the worker is available. |
| Description of Services | A description of the services offered by the worker. This field is free text. |
| Minimum Hourly Rate | The worker's minimum hourly rate. |
| Skill Detail | Any skills and years of experience with that skill. |
| Pitcher Candidate List | A list of clients that the candidate was pitched to. |
| Location List | Any locations associated with the worker. |
| Previous Employee of Client | From the Client drop down select the name of the client organization that the worker was previously assigned to. Use the Dates of Employment drop downs to configure the date. |
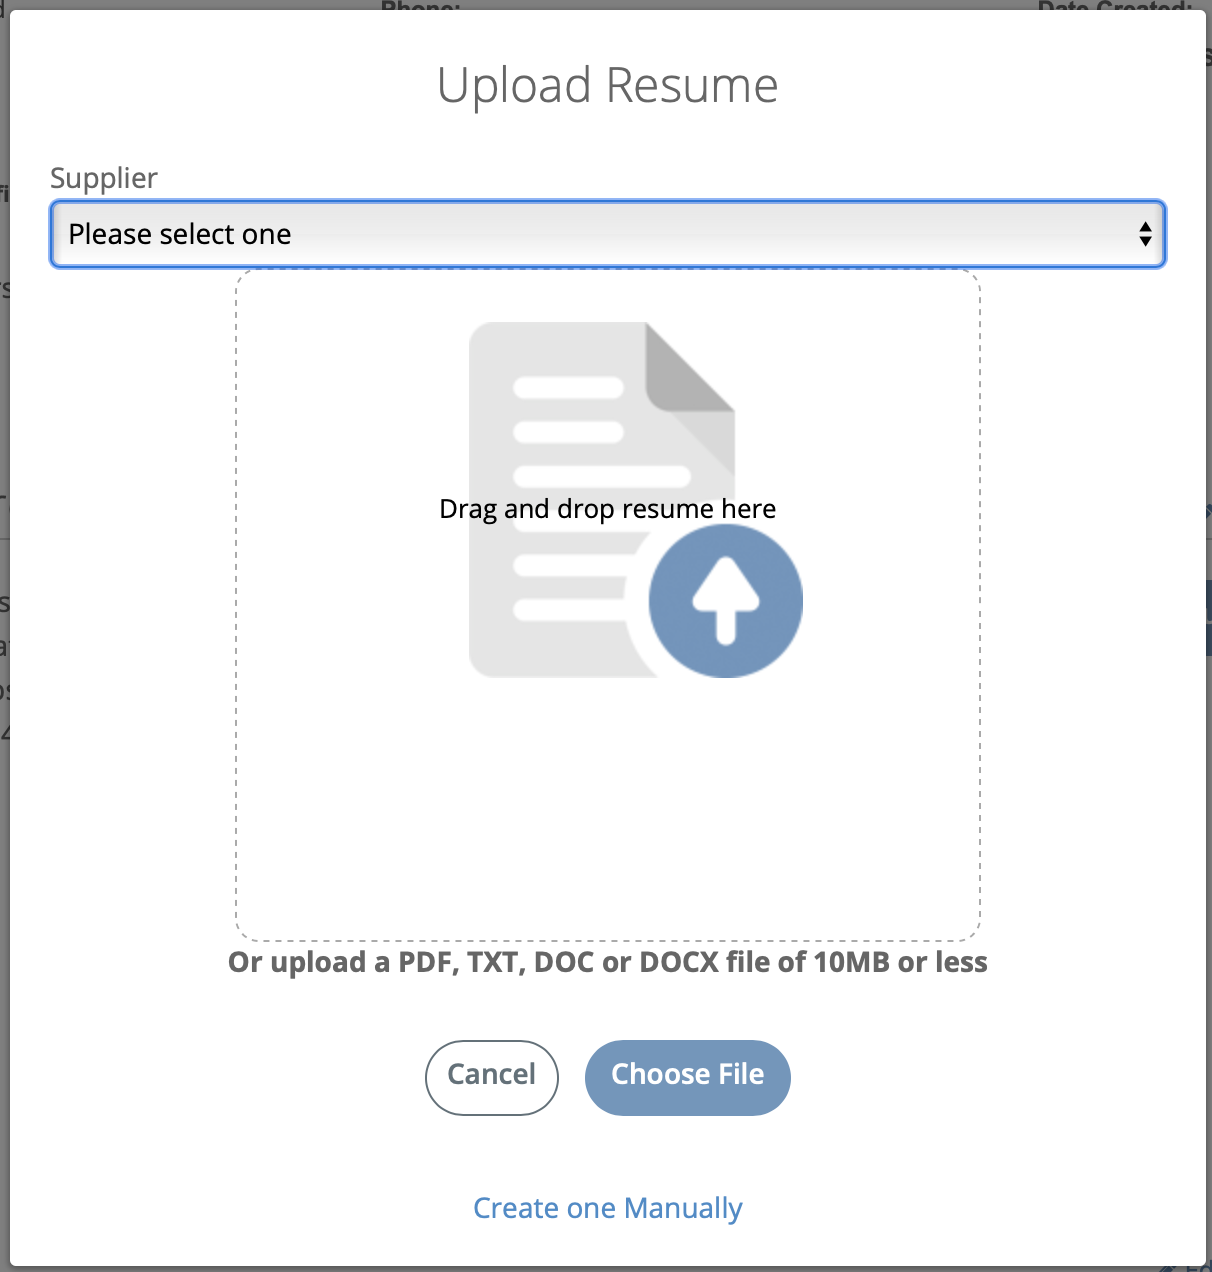
Add a Resume for a Worker
The worker's information is required before you create a resume for the worker. For more information about setting up a worker profile, see Profile.
- Navigate to the Home page in the Supplier view.
-
Locate the worker by using the search function, or click the worker name from
the list.
For more information about searching for workers, see Searching for Workers.
- Click the blue worker's name text. You can also configure a new worker and add the worker's resume on that worker record.
- Click Resume.
-
Click
 .
.
- In the Title field, add a description of the resume record.
-
From the Supplier drop down, select the supplier to
associate the resume with.
Note:This field defaults to your supplier organization.
-
In the Duties field, enter the worker's previous
duties.
Note:You can use the styling palette to format the text.
-
In the Skills field, enter the skills that the worker
has.
Note:You can use the styling palette to format the text.
-
In the Education field, enter the worker's
education.
Note:You can use the styling palette to format the text.
-
Optionally, if you have attachments (resume files, certification documentation,
and so on), click Attachments. A pop up opens that allows
you to upload your files.
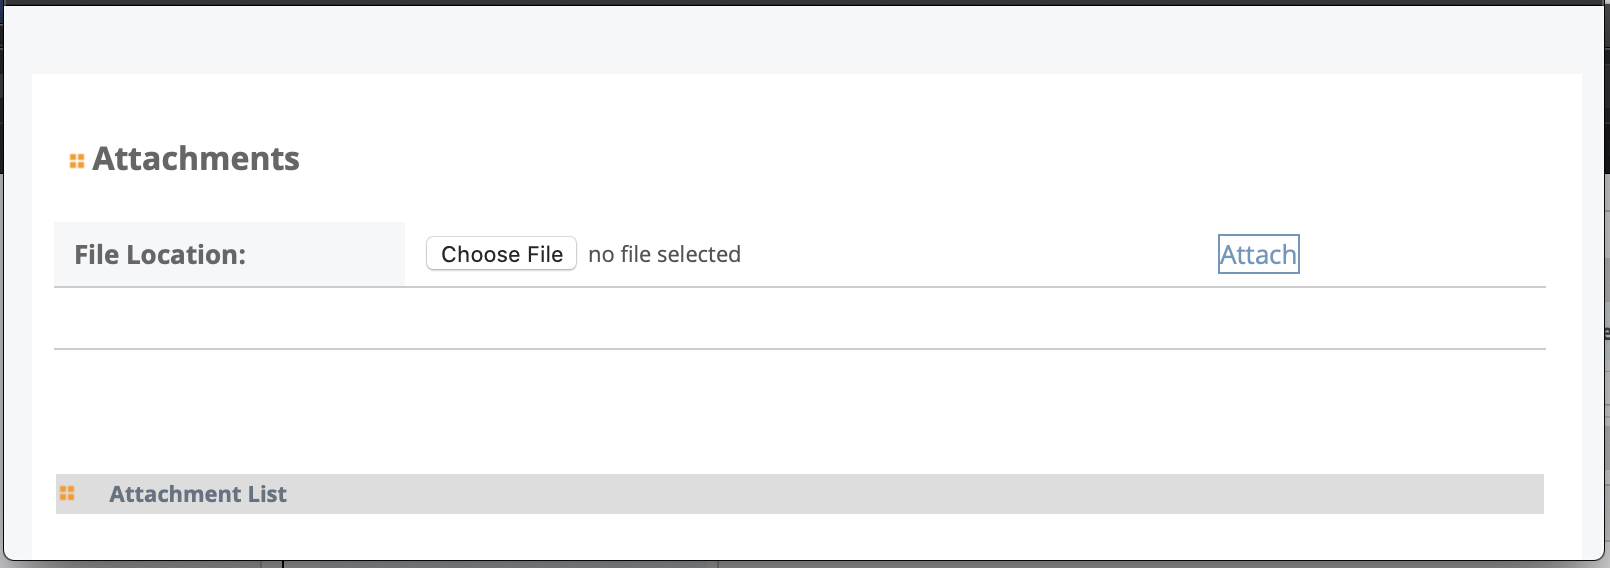
Click
 , select your file from your file browser, and
then click Attach. The file appears in the
Attachment List on the pop up. Select the check
boxes for any uploaded files and then click Save to
close the pop up.
, select your file from your file browser, and
then click Attach. The file appears in the
Attachment List on the pop up. Select the check
boxes for any uploaded files and then click Save to
close the pop up. -
Click .
Worker LifeCycle
You can track worker and request onboarding and offboarding using the LifeCycle feature in the Worker record. The feature displays two sets of on/offboarding tabs, one for each type.
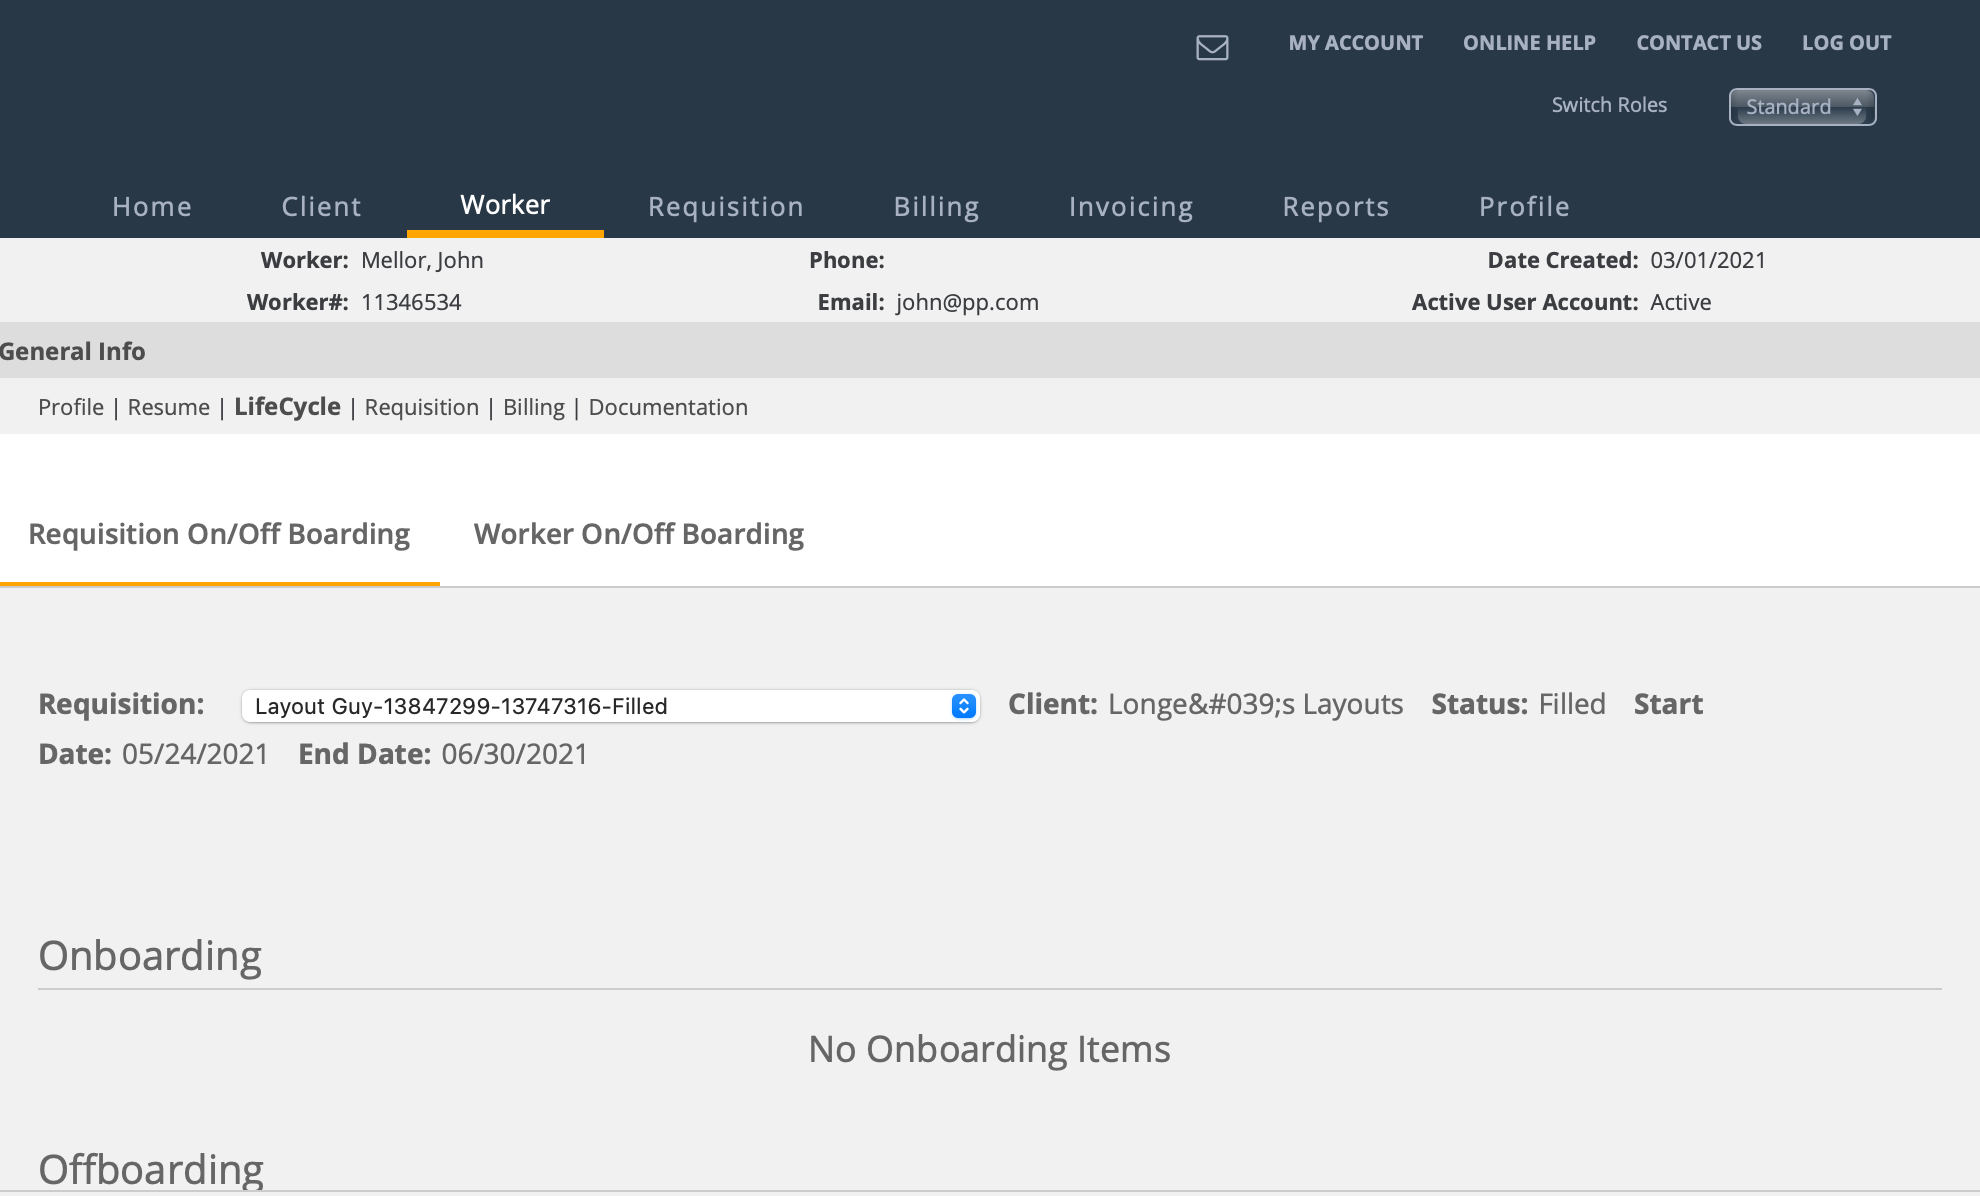
The Requisition On/Off Boarding tab allows you to view configured boarding items and statuses, filtered by request/engagement. Use the drop down to view items for specific engagements.
The Worker On/Off Boarding tab allows you to view configured boarding items and statuses, filtered by client organization. The items that display are based on the worker record.
You can manage open items for a worker by selecting the level of item, and for engagement level items, selecting the engagement from the Requisition drop down. Engagement information displays in the header section of the page. Each item displays in the relevant section.
- Attachments - Click the
 icon to upload documentation for the
item. If permission is not enabled, this icon is not visible.
icon to upload documentation for the
item. If permission is not enabled, this icon is not visible. - History - Click the
 icon to display a history of changes for the
item.
icon to display a history of changes for the
item.
If you have permission, you can modify the status of either type of boarding item by
clicking ![]() , and modifying the Status drop down,
then clicking
, and modifying the Status drop down,
then clicking ![]() .
.
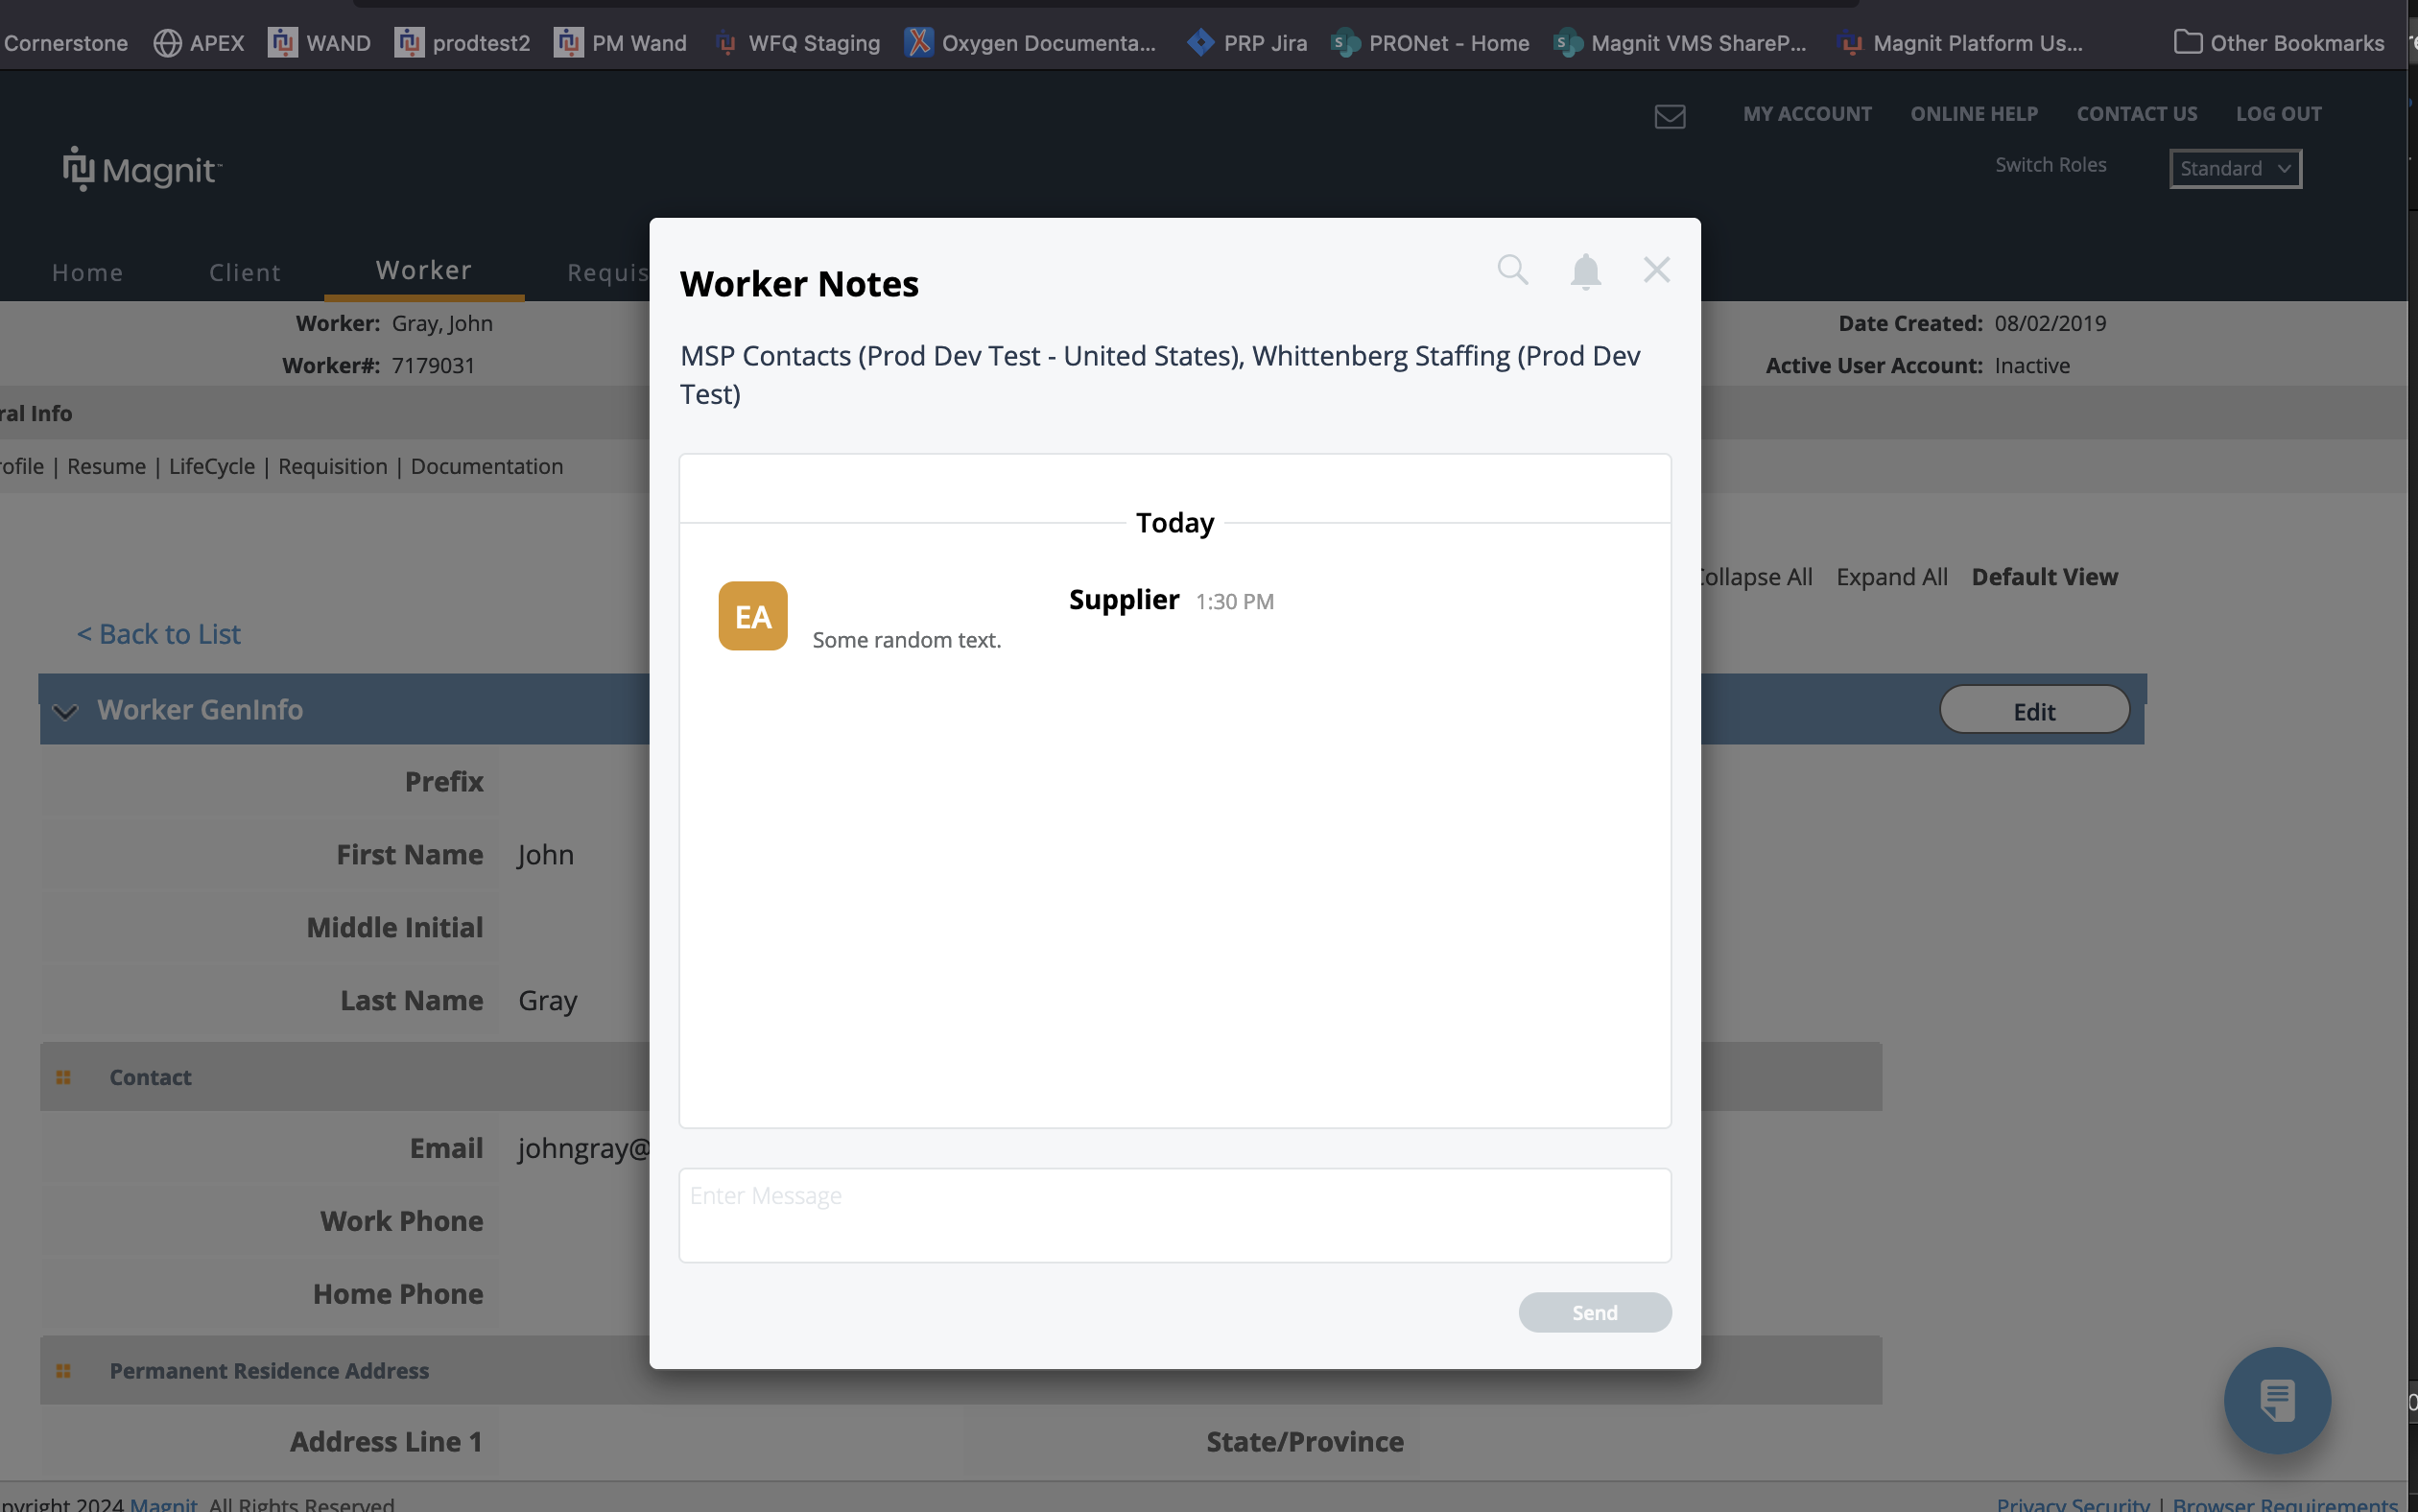
You can also add notes to the worker, specifically for the onboarding/offboarding lifecycle, click the Notes widget icon in the lower right corner of the screen.
If you are modifying a worker level item, select the client organization from the Client drop down. Additional fields might be required (for example, dates) to complete the item.
You might be required to submit a worker's identification documentation for verification. See Submit a Worker's Identification.
Submit a Worker's Identification
Online verification of a worker's identification documentation is a requirement is some countries. This onboarding step is added by Magnit Global according to client country guidelines. Contact the Program Representative for more information.
There are two verification methods when the ID check onboarding item is required, digital file upload or in-person verification at a Magnit Global office. Both options might not be available in the client country.
- Navigate to the Worker page in the Supplier view.
- Locate the accepted worker and click the worker's name (blue link text).
- Click LifeCycle.
-
On the Requisition On/Off Boarding tab, locate the
Worker ID Check section.
Note:This item will in 'Pending' status.
-
Click the item description to open the item.
-
For Employee Relationship, use the radio buttons to
select the employment relationship.
- Employee
- Self-employed (subcontractor relationship to the supplier organization)
- Self-employed (worker is the supplier organization)
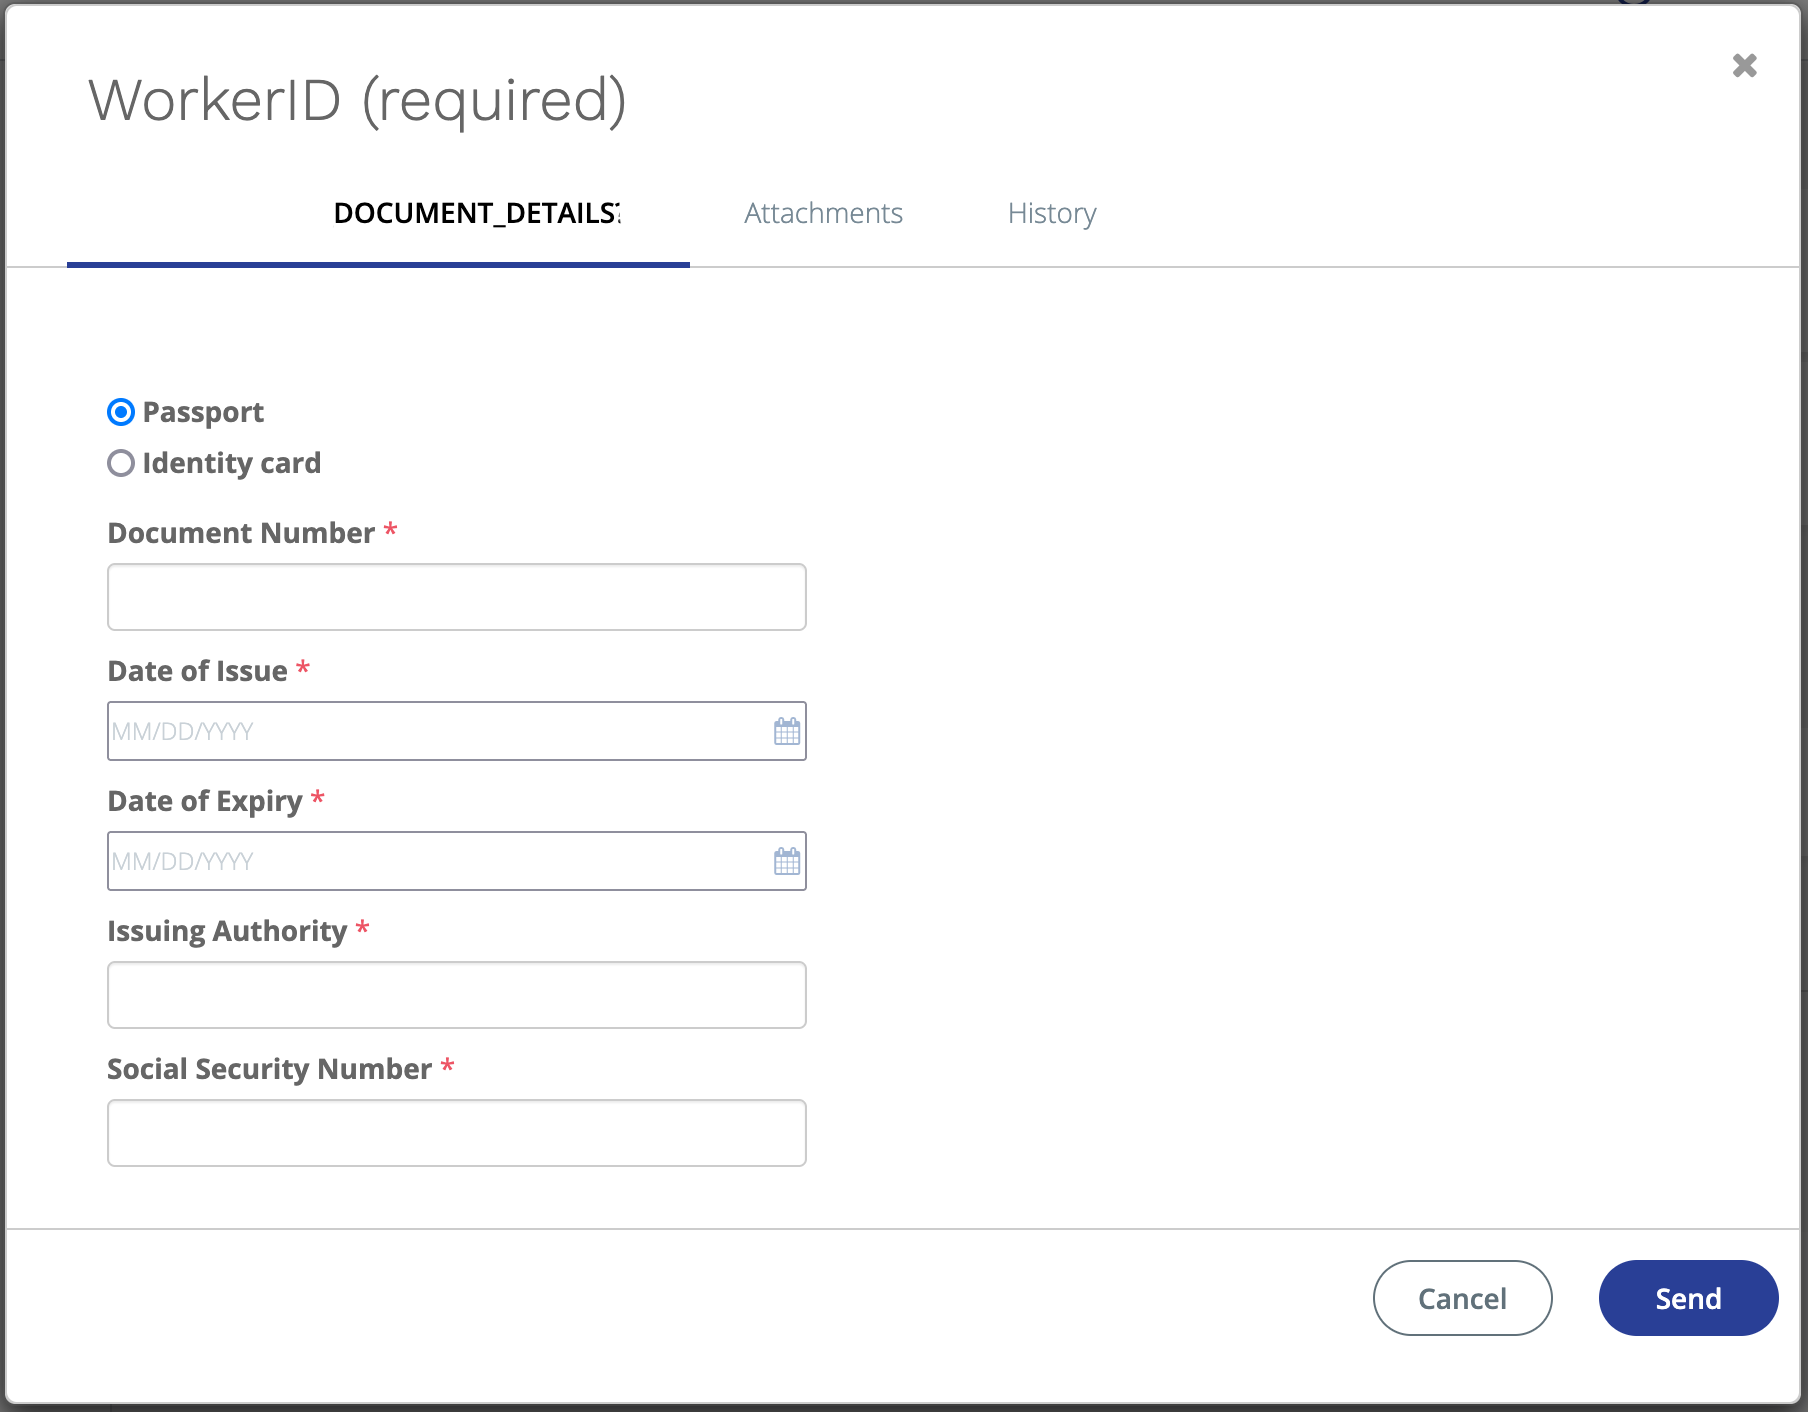
- In the Document Details section, use the radio buttons to select the type of document.
-
Enter the required information:
- Document Number
- Date of Issue
- Date of Expiry
- Issuing Authority
- <identifier> Number - This requirement depends on the locality.
- In the Location section, use the radio buttons to select the submission method. There might only be one option depending on the configuration.
-
Click
 .
.
Request Page
The Request page allows you to access request information assigned to you. The page displays information in two views, a search view that allows you to configure each parameters to locate a specific request, and a consolidated view of all requests in the system made over the last 6 months. For more information about using the search functionality, see Searching Through Requisition Data.
If you have the 'MSP Vendor On Premises' permission, you can click the Add New link to access the workflow that allows you to create a request for work. For more information about this workflow, see Requests in the Supplier View.
Requests in the Supplier View
You can select your vendor organization as the source to fill the position, or you can select another vendor to notify of the open request. Once the request is filled (candidate accepted by the client organization), you can manage aspects of the engagement.
The Staffing creation workflow includes a helper step that allows you decide which type of worker that the client organization requires. Options displays in the helper step depend on the engagement types that your vendor organization is contracted to facilitate with the client organization.

Making a selection prompts you to configure the required information for that specific job type. You can only fill requests for the client parent and operational unit that your organization has a agreement with.
If you know the worker that you want to hire, or if the client organization has identified the worker for the position, then you can create a payroll request. This type of request is only available to client organizations that have enabled the option.
Create a Request
- Navigate to the Home page in the Supplier view.
- Click Requisition.
- From the Client drop down, select the client to create the request for.
-
In the Manager / Email field, enter the client (hiring)
manager's name or email. The application automatically suggests manager names
based on the text that you enter.
The client manager is notified when the request is submitted.
- From the Operational Unit drop down, select the operational unit for the request.
- From the helper section, click the radio button for the type of worker required.
-
Click
 .
.
- On the Description page, from the Reason drop down, select the reason for the request.
- If enabled, in the Reason Detail field, add text for additional explanation for the reason.
-
From the Manager field, select the client manager for
the request. This field automatically populates with the manager that you enter
in the Manager / Email field.
You can change this field from the client manager that you notify. The client manager for the request is the hiring manager, and is responsible for approving billing items.
-
From the Department drop down, select the
department/cost center for the job.
If you do not see a department in the drop down, you can click Add New, and search for configured departments.
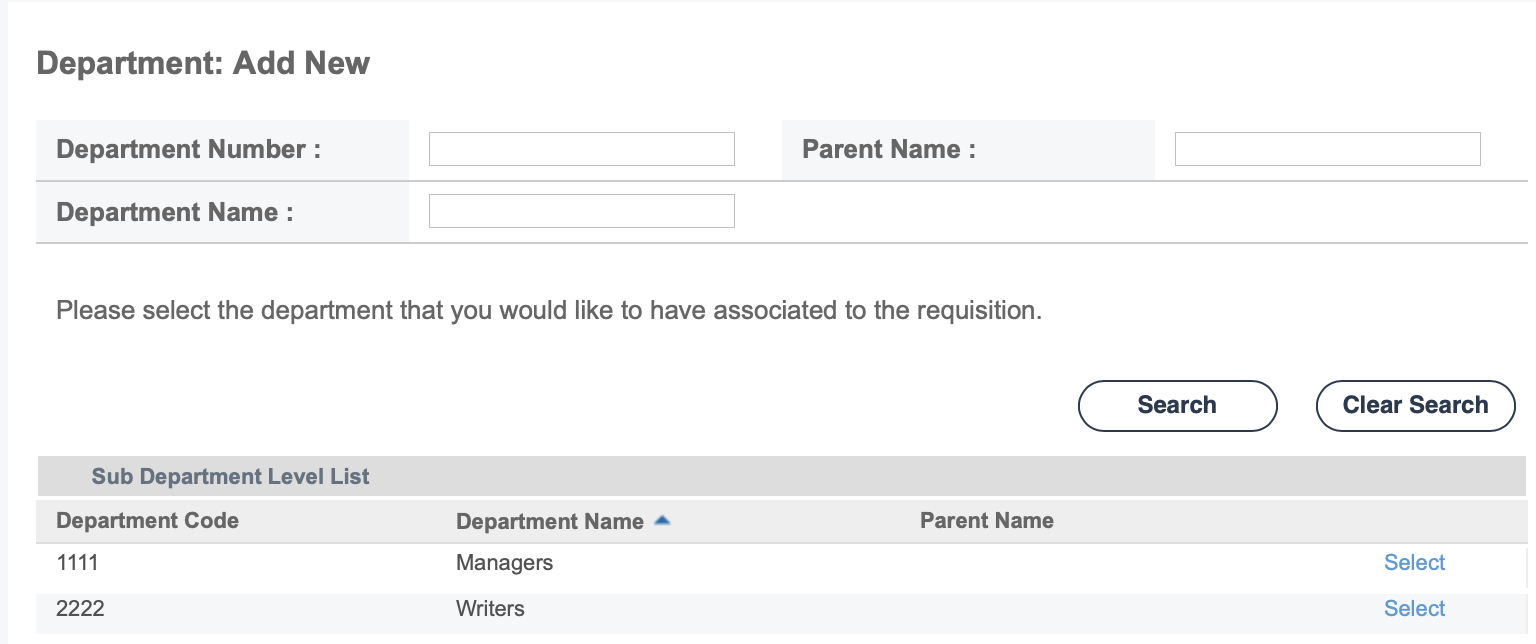
You can search by department number, department name, parent department name, or any combination of values. After entering search parameters, click
 . From the search results, add your department
to the request by clicking Select in the row for the
department.
. From the search results, add your department
to the request by clicking Select in the row for the
department. -
From the Job Category drop down, select the job
category.
Job categories are configured for the client organization based on the request/engagement types defined in the contract. You can only add requests for jobs that exist at the client organization level.
-
From the Job Code drop down, select the job code
associated with the job category. This selection automatically populates the
duties, skills, and education requirements fields. You can modify these fields
if you have the correct permissions.
Note:You can use the styling palette to format the text.
-
In the Number of Positions field, enter the number of
positions open in the request. The request is considered open until all
positions have an accepted candidate assigned.
Note:This value defaults to '1'.
- Optionally, you can click Attachments, and using the upload pop up, add supporting documents for the request.
-
In the Location section, from the
Country drop down, select the country where the job
is performed. The selection in this field drives the options in the remaining
fields in the Location section.
Note:This selection is used to calculate taxes for billing items.Note:You can edit the location on a request after it is filled. To edit the location, locate the engagement on the Requisition page, scroll to the Location section, then click
 in the header. You can use the drop downs to
select from configured values. You can also use the radio buttons to change
the work location.
in the header. You can use the drop downs to
select from configured values. You can also use the radio buttons to change
the work location. - From the State/Province drop down, select the state or province where the work is performed.
- From the City/Town drop down, select the city or town where the work is performed.
- From the Address drop down, select the address where the work is performed.
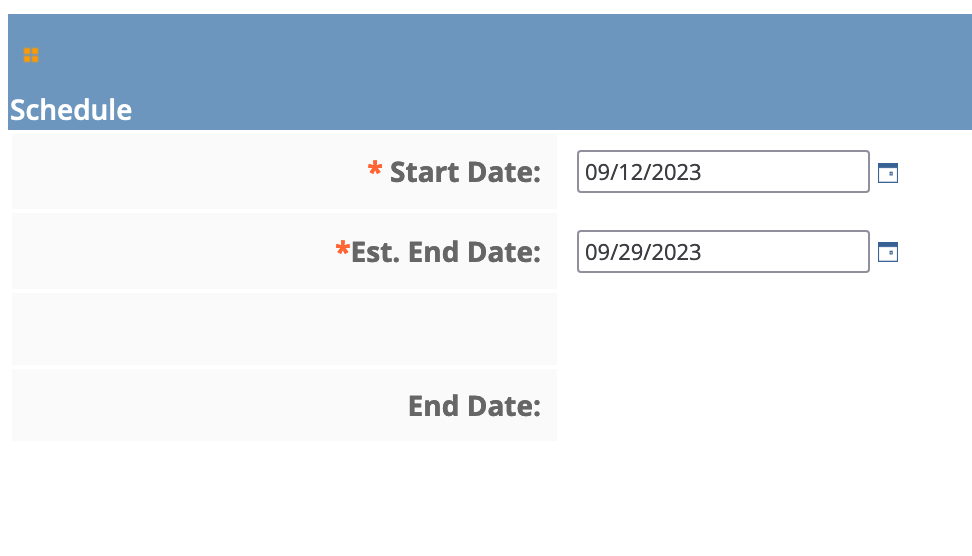
- In the Schedule section, in the Start Date field, enter the date that the job starts. This date can be in the future. You can also click the calendar icon to open a calendar pop up that allows you to select the date.
- In the Est. End Date field, enter the estimated date that the job ends. This date can be modified after the job/engagement is filled. You can also click the calendar icon to open a calendar pop up that allows you to select the date.
- In the Hours Per Week field, enter the number of hours per week for the job.
- In the Hours Per Day field, enter the number of hours per day for the job.
- In the Day Per Week field, enter the number of days per week for the job.
- Optionally, in the Schedule Notes field, enter text notes for the schedule.
- In the Financials section, in the Max Rate field, enter the maximum bill rate for the job.
- From the Rate Application drop down, select how the billing rate is applied.
- In the Currency drop down, select the currency that the job financials are denominated in.
- In the Contact Information section, from the MSP Contact drop down, select the MSP associated with the job.
- In the MSP Phone field, enter the contact telephone number for the MSP.
-
Click
 .
Note:You can also click
.
Note:You can also click to save your request configuration as a draft.
You can access this draft later.
to save your request configuration as a draft.
You can access this draft later. -
On the Sourcing : Modify page, select the vendors to
notify of the job. These vendors are able to submit candidates for the job, and
are visible to the client manager.
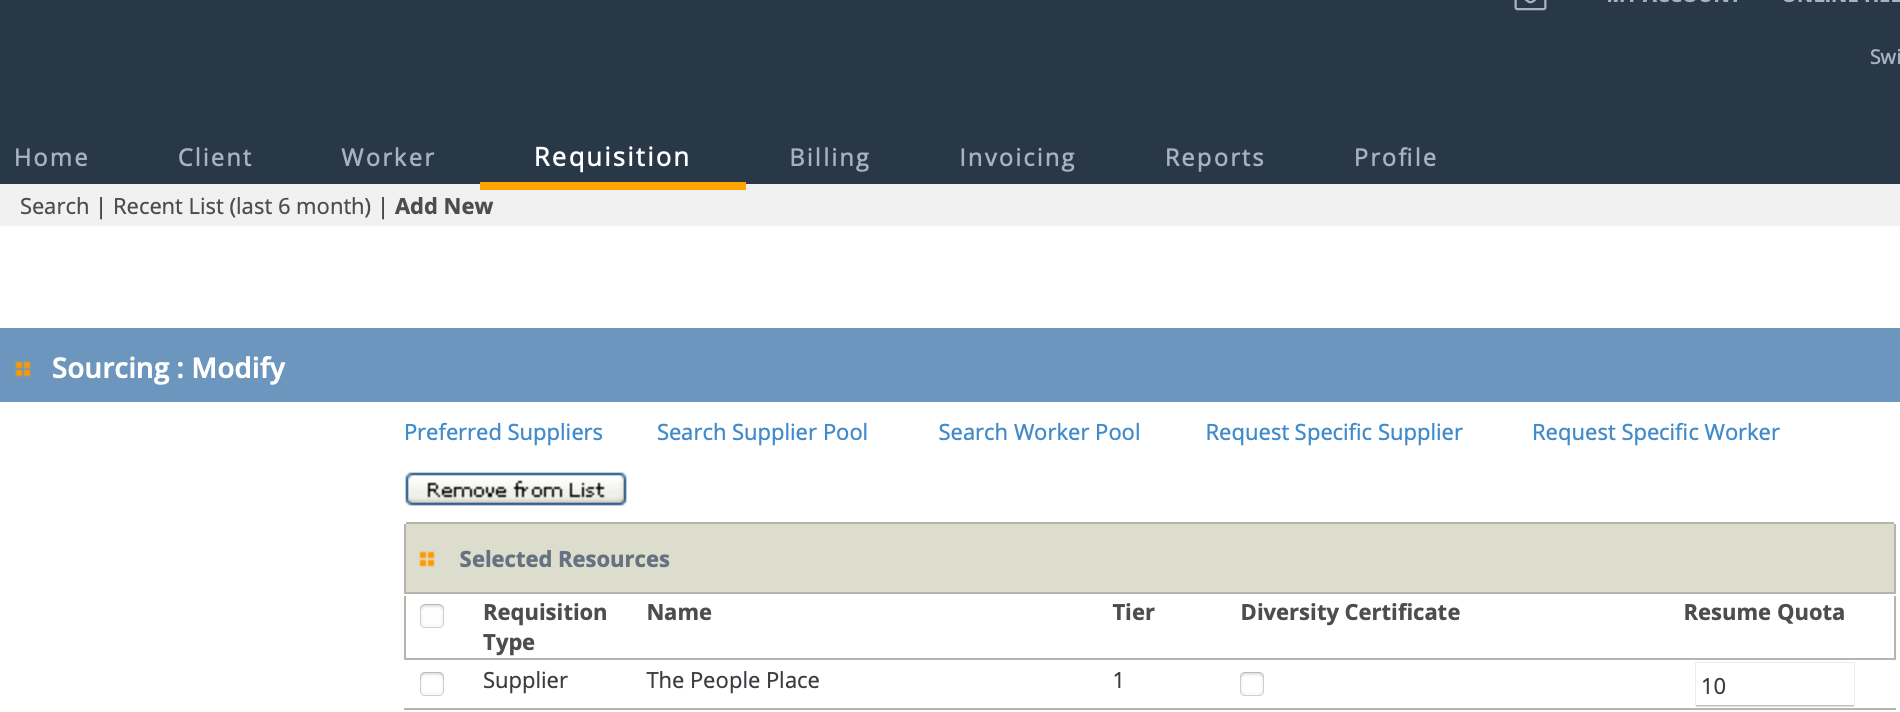 Your supplier organization appears by default. Clicking automatically selects your organization and
submits the request. Additionally, you can use the following options by
clicking the blue text links at the top of the section:
Your supplier organization appears by default. Clicking automatically selects your organization and
submits the request. Additionally, you can use the following options by
clicking the blue text links at the top of the section:- Preferred Suppliers - If you have a list of preferred vendors, click the text, and then from the Results table, select the vendor check box, and then click Add to List.
- Search Supplier Pool - To search for vendors that your organization
is associated with, click the text, and then enter parameters to
define your search.
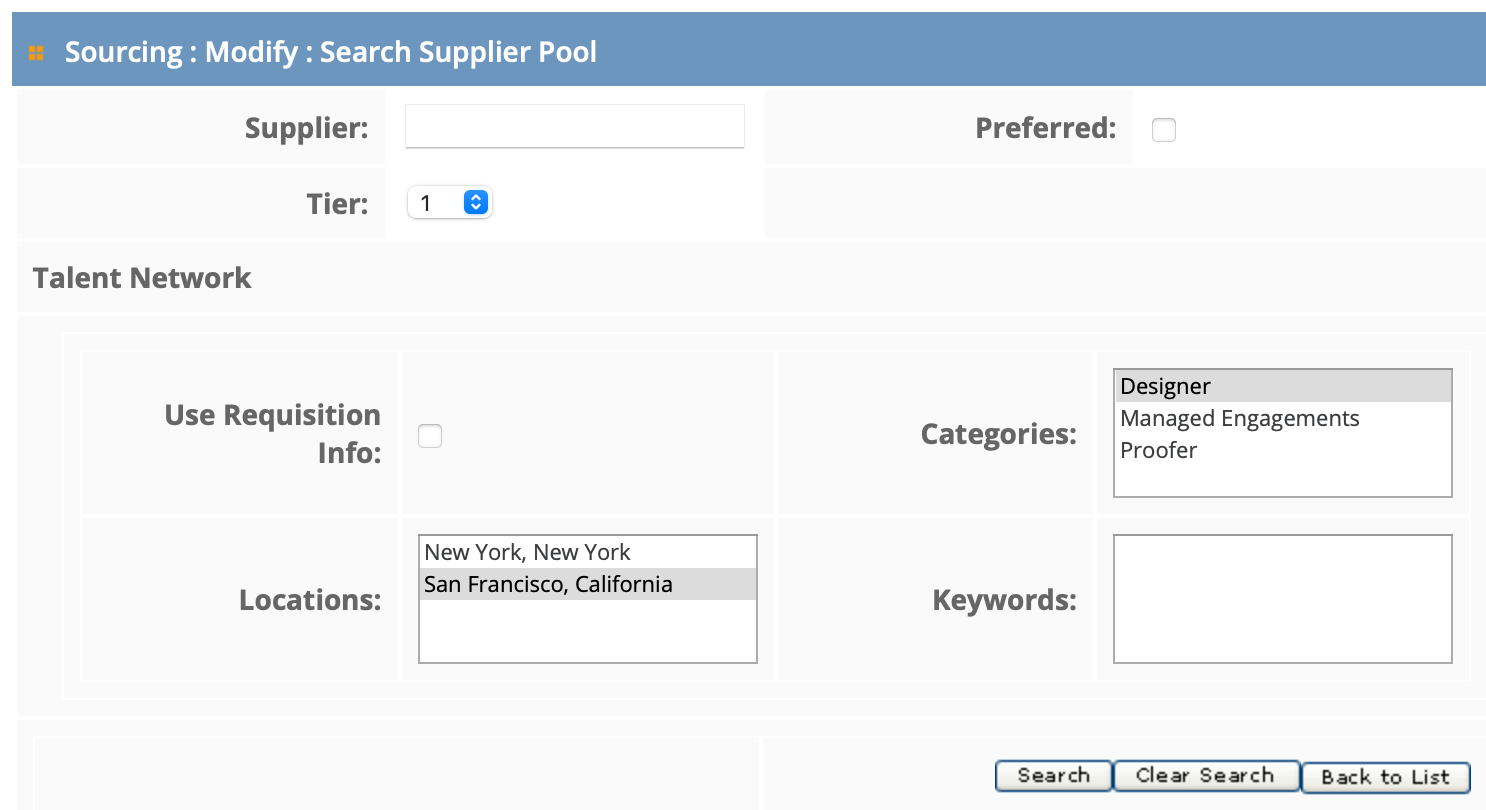
In the Results table, select the check box of the supplier and click Add to List.
- Search Worker Pool - To search for workers in your organization,
click the text, and then enter parameters to define your
search.
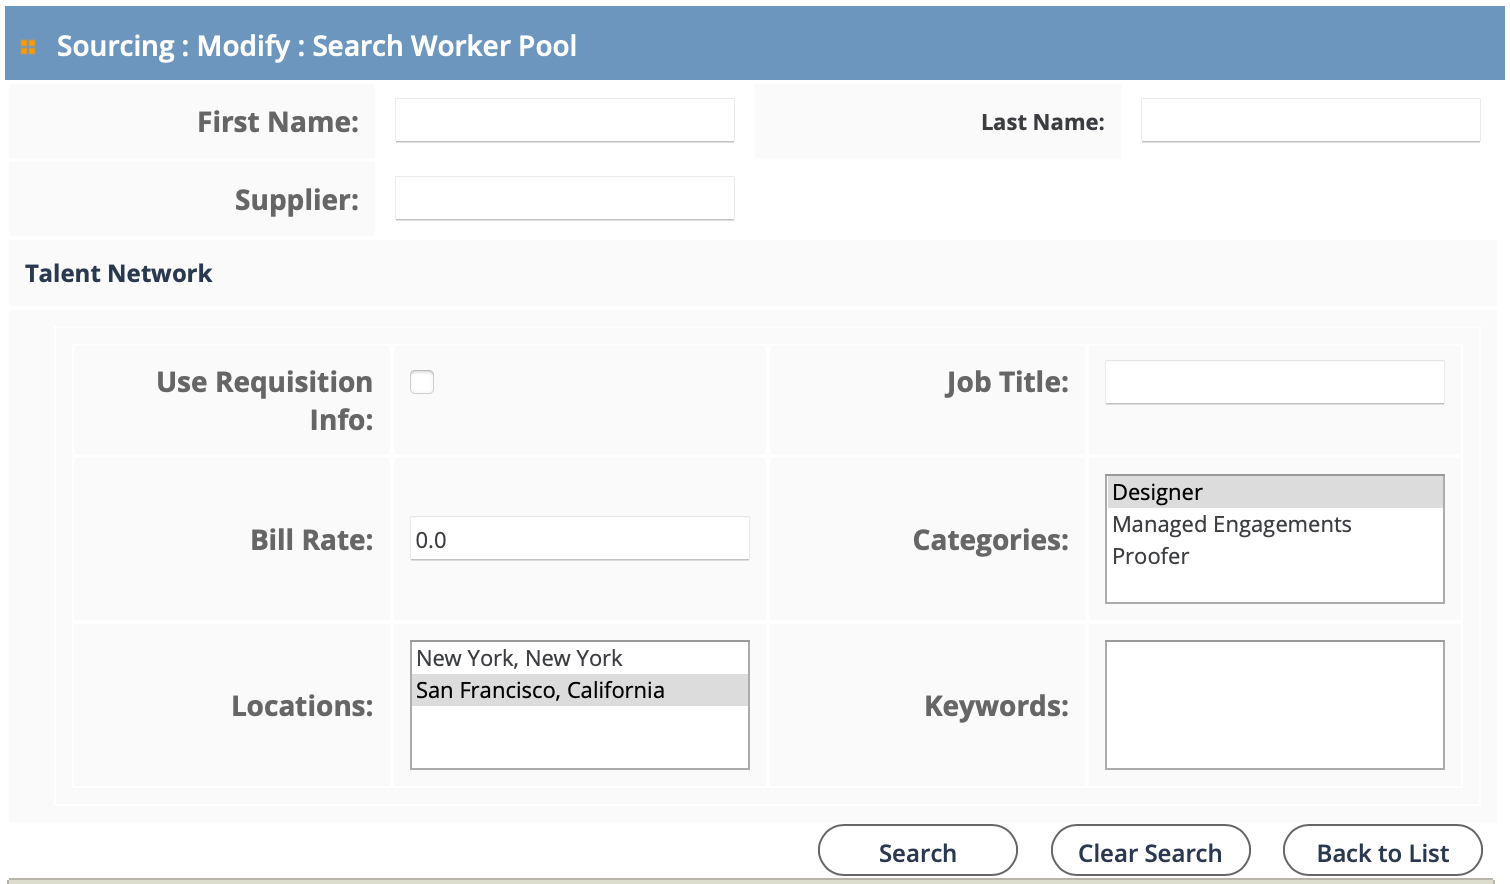
In the Results table. select the check box of the worker to add.
- Request Specific Supplier - To request a specific supplier/vendor
for the request, enter the supplier's name, the supplier's contact
person's name, the contact phone number, and contact email address.
All of this information is required. After configuring
the fields, click
 .
. - Request Specific Worker - To request a specific worker for a request, enter the worker's first name, last name, and email address. This information is used to contact the worker, and is required. You can additionally add the supplier name for the worker, and the worker's telephone number. After you configure these fields, click Add to List.
-
Click .
-
On the Confirmation page, review the request
information, and click
 .
The request is submitted with the request status set to 'Pending Sourcing'. You can click the Resume/Portfolio tab to search for workers in your supplier organization to submit to the client organization. For more information about submitting workers, see Submit a Worker to a Request.
.
The request is submitted with the request status set to 'Pending Sourcing'. You can click the Resume/Portfolio tab to search for workers in your supplier organization to submit to the client organization. For more information about submitting workers, see Submit a Worker to a Request.
Create a Payroll Request
- Navigate to the Home page in the Supplier view.
- Click Requisition.
- From the Client drop down, select the client to create the request for.
-
In the Manager / Email field, enter the client (hiring)
manager's name or email. The application automatically suggests manager names
based on the text that you enter.
The client manager is notified when the request is submitted.
- From the Operational Unit drop down, select the operational unit for the request.
- Select the I have a worker to refer to for payroll service check circle.
-
Click .
- On the Description page, from the Reason drop down, select the reason for the request.
- If enabled, in the Reason Detail field, add text for additional explanation for the reason.
-
From the Manager field, select the client manager for
the request. This field automatically populates with the manager that you enter
in the Manager / Email field.
You can change this field from the client manager that you notify. The client manager for the request is the hiring manager, and is responsible for approving billing items.
-
From the Department drop down, select the
department/cost center for the job.
If you do not see a department in the drop down, you can click Add New, and search for configured departments.
You can search by department number, department name, parent department name, or any combination of values. After entering search parameters, click
. From the search results, add your department
to the request by clicking Select in the row for the
department. -
From the Job Category drop down, select the job
category.
Job categories are configured for the client organization based on the request/engagement types defined in the contract. You can only add requests for jobs that exist at the client organization level.
- From the Job Code drop down, select the job code associated with the job category. This selection automatically populates the duties, skills, and education requirements fields. You can modify these fields if you have the correct permissions.
-
In the Number of Positions field, enter the number of
positions open in the request. The request is considered open until all
positions have an accepted candidate assigned.
Note:This value defaults to 1.
- Optionally, you can click Attachments, and using the upload pop up, add supporting documents for the request.
-
In the Location section, from the
Country drop down, select the country where the job
is performed. The selection in this field drives the options in the remaining
fields in the Location section.
Note:This selection is used to calculate taxes for billing items.
- From the State/Province drop down, select the state or province where the work is performed.
- From the City/Town drop down, select the city or town where the work is performed.
- From the Address drop down, select the address where the work is performed.
- In the Schedule section, in the Start Date field, enter the date that the job starts. This date can be in the future. You can also click the calendar icon to open a calendar pop up that allows you to select the date.
- In the Est. End Date field, enter the estimated date that the job ends. This date can be modified after the job/engagement is filled. You can also click the calendar icon to open a calendar pop up that allows you to select the date.
- In the Hours Per Week field, enter the number of hours per week for the job.
- In the Hours Per Day field, enter the number of hours per day for the job.
- In the Day Per Week field, enter the number of days per week for the job.
- Optionally, in the Schedule Notes field, enter text notes for the schedule.
- In the Financials section, in the Pay Rate field, enter the suggested pay rate for the job.
- From the Rate Application drop down, select how the billing rate is applied.
- In the Currency drop down, select the currency that the job financials are denominated in.
-
In the Contact Information section, from the
MSP Contact drop down, select the MSP associated with
the job.
The MSP Phone number automatically populates.
- In the HR Contact field, enter the name of the human resources contact.
- In the Additional Contact field, enter additional contact information.
- In the Additional Phone field, enter an additional telephone number.
- In the Additional Email field, enter an additional email address.
-
Click .
- On the Sourcing : Modify : Request Specific Worker page, in the First Name field, enter the worker's first name.
- In the Last Name field, enter the worker's last name.
- In the Phone field, enter the worker's telephone number.
- In the Email field, enter the worker's contact email address.
-
Click Add to List.
The worker is added to the sourcing list.
- From the Specific Request table, select the check box for the worker.
-
Click .
-
Click .
Add a Payroll Worker
This is a multi-step process. first, you must create the worker's profile, and then you must submit the worker's profile to the payroll request.
- Navigate to the Home page in the Supplier view.
-
Click Requisition.
Note:If you are filling a new request, you can access new/open requests in the View section on the Home page. For more information about this section, see Home Page.
-
Use the search functionality to locate the request to fill. For more
information about the search feature, see Searching Through Requisition Data.
Note:To list all requests in all statuses for a client organization, do not configure any parameters and click.
- Click the blue request number in the Req# column for the request to fill.
-
In the General Info tab, expand the Requested
Workers tab.

-
Click
 .
.
-
On the Add New Worker page, click
 .
The requested worker's name automatically populates in the First Name and Last Name fields. You can modify the names as needed when creating the worker record.
.
The requested worker's name automatically populates in the First Name and Last Name fields. You can modify the names as needed when creating the worker record. -
Complete the worker's resume section.
The worker's profile must be completed before the worker can be assigned to a request. Entering the worker's resume information is a step in profile creation. The worker's resume data is submitted to the request, and the resume data can change over time. You can skip the resume creation step, and complete the rest of the steps in this task. To return to resume creation, locate the worker record on the Worker tab, click the worker's name (blue text) in the table, and then click
 . This allows you to return to the profile creation
settings and complete the worker's resume.
. This allows you to return to the profile creation
settings and complete the worker's resume.for more information about creating a worker profile/resume, see Profile.
- Using the Month and Day drop downs, select the worker's birth date.
-
In the Phone Number field, enter the worker's telephone
number.
The requested worker's telephone number automatically populates in this field. You can modify the contact telephone number as needed when creating the worker record.
- In the Last 4 SSN or National ID Number field, enter the last four digits of the worker's social security number, or the worker's National ID number.
- In the Re-enter field, reenter the values from the previous step.
-
Optionally, in the Supplier Notes section, enter any
required free text notes.
Note:There is a 3000 character limit for this field.
- Verify the supplier contact information in the Supplier Contact and Supplier Contact Email fields. You can modify these fields as needed.
- In the Financials section, verify the information that was submitted with the worker.
- In the Billing Info section, in the Pay Rate field, enter the pay rate for the engagement.
- In the Availability field, enter the date that the worker is available. You can also click the calendar icon to open a calendar pop up that allows you to select the date.
-
From the Supplier FLSA Classification drop down, select
the worker classification for the engagement.
These are default values, and cannot be modified.
- Optionally, select the Allow Client to Forward Resume check box to allow the client to forward a candidate resume.
-
In the Previous Experience section, using the radio
buttons, select values for the following questions:
- Worker is a previous employee - 'Yes' or 'No'. If you select 'Yes', use
the drop downs and text field to enter the worker's employment dates and
supervisor's name.

- Worker is a previous contractor or provided services through a third
party supplier - 'Yes' or 'No'. If you select 'Yes', use the drop downs
and text field to enter the worker's employment dates and supervisor's
name.

- Worker has a family member at client - 'Yes' or 'No'. If you select
'Yes', use the drop downs and text field to enter the family member's
name and the relationship to the family member. You can add additional
family members by clicking Add +.

- Worker is a previous employee - 'Yes' or 'No'. If you select 'Yes', use
the drop downs and text field to enter the worker's employment dates and
supervisor's name.
- If custom fields are used, provide values for those fields.
-
Click
 .
.
-
On the Resume/Portfolio tab, click
 .
Tip:If you do not see this tab, verify that a payroll supplier (active supplier contract for payroll), is assigned to the request on the Sourcing tab.
.
Tip:If you do not see this tab, verify that a payroll supplier (active supplier contract for payroll), is assigned to the request on the Sourcing tab. -
On the confirmation pop up, review the engagement dates and click
 .
.
-
Click .
Configure Payroll Engagement Payroll Data
- Navigate to the Requisitions page in the Supplier view.
- Enter the engagement number or locate the engagement using the search functionality.
- Click the engagement number (blue text).
- on the General Info page, scroll to the Payroll Data section.
-
Click in the section header.
- From the Office # select the office number. The Pay Group field automatically populates.
- From the Client Number drop down, select the client number.
- Enter an Effective Date.
-
Click
 .
.
-
Click .
Redline a Document in the VMS
The redlining feature for project requests allows you to collaborate on the SOW document within the VMS. You can collaborate with the program representative assigned to the project request, and the client manager of the accepted quote.
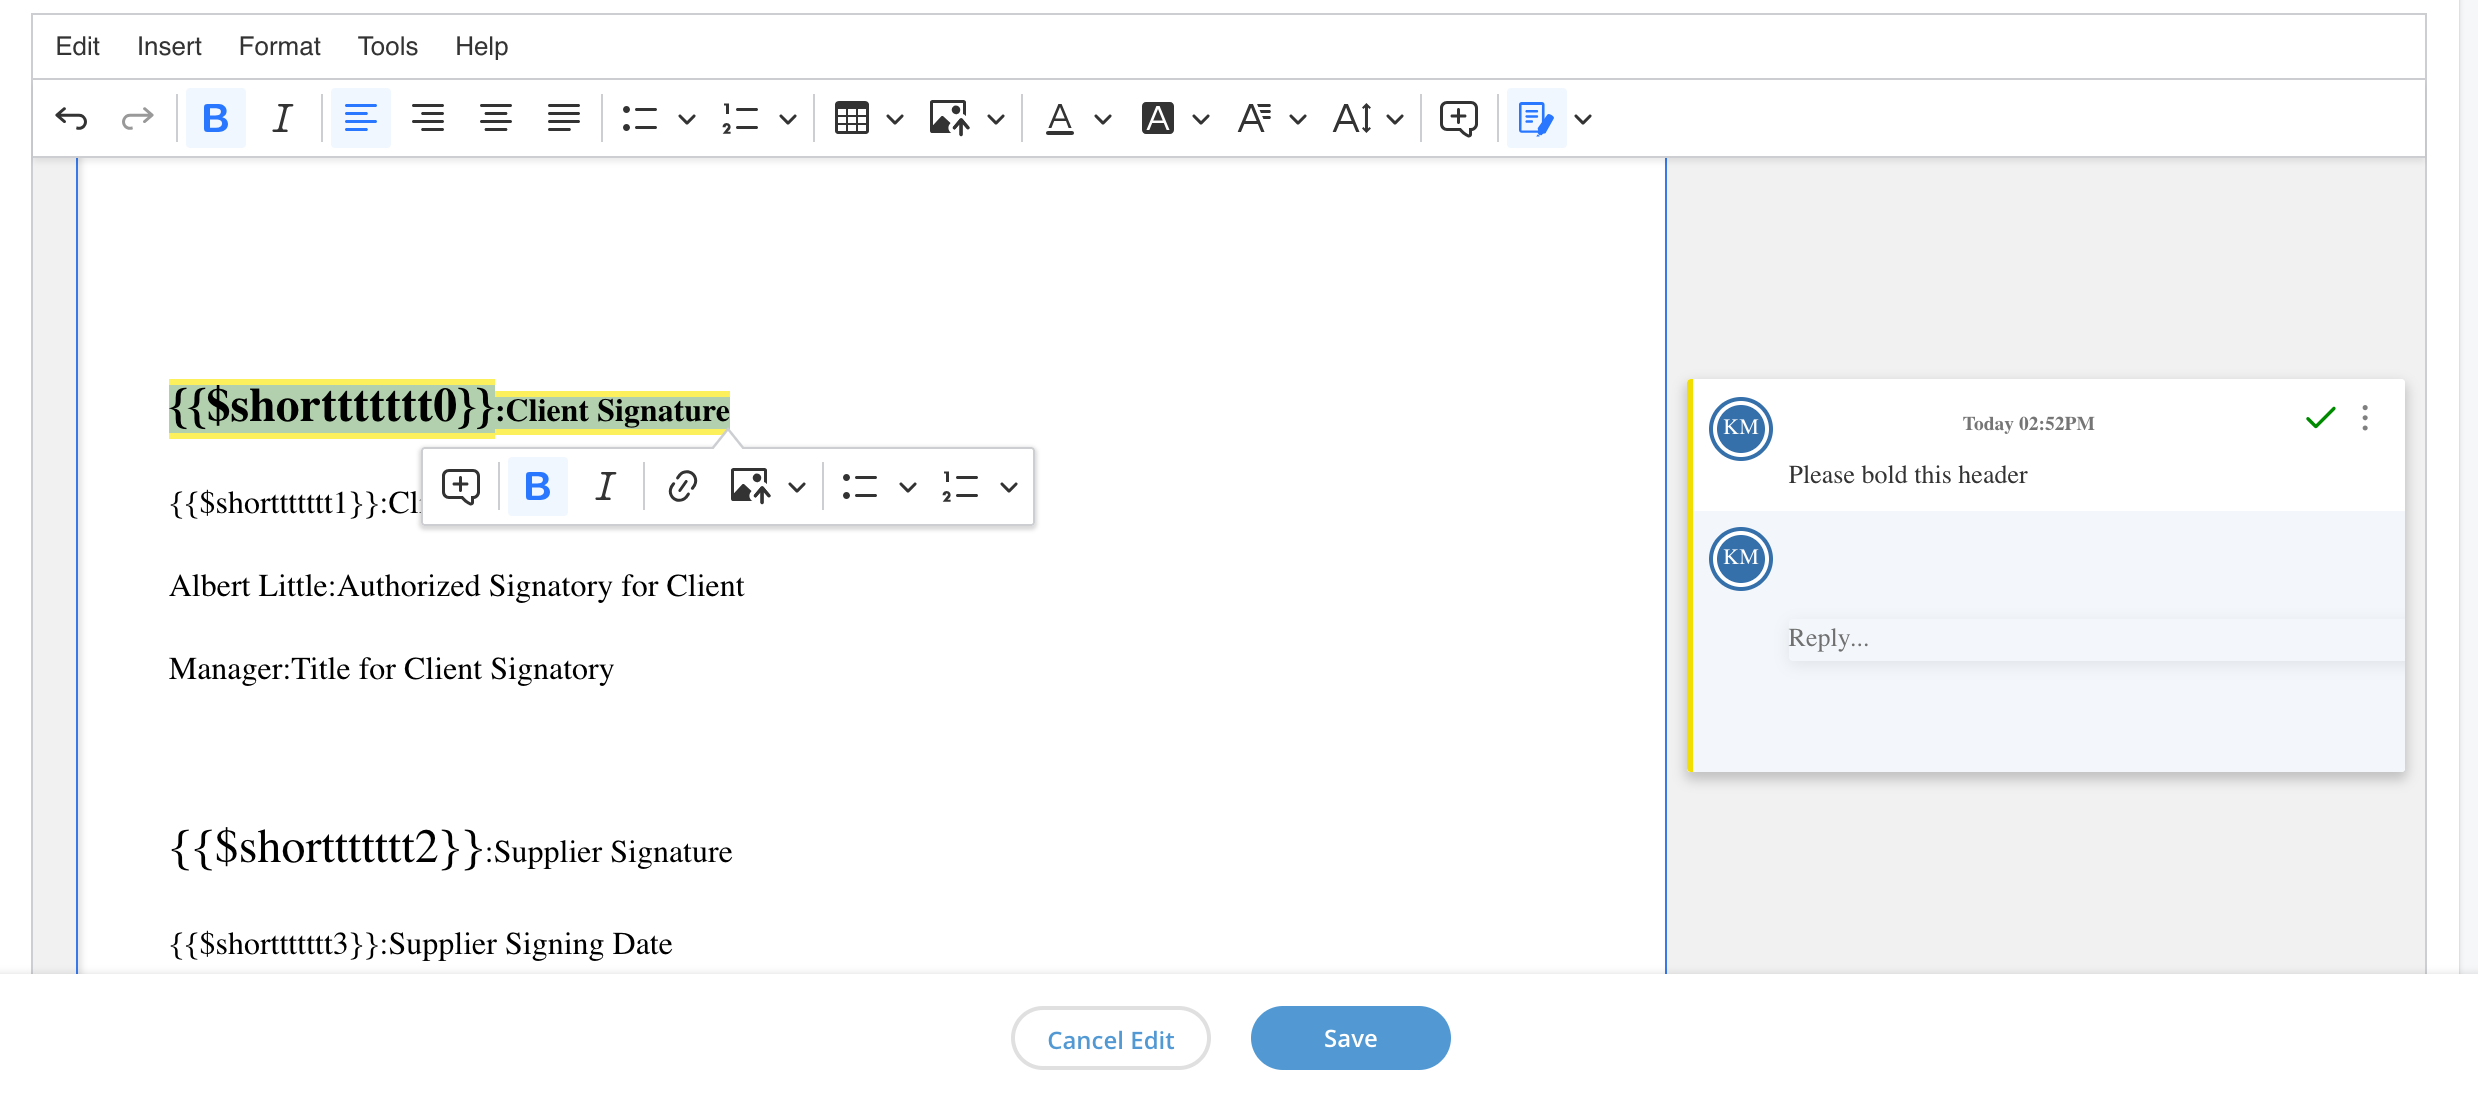
It is important to note that your program might require you to electronically sign the SOW document when the negotiation process is completed.
Redlining History
The redlining feature preserves activity from the redlining process. You can access the history by navigating to the engagement's SOW Document tab, scrolling to the content, and then aliening History.
Redline a Document
- Navigate to the Home page in the Supplier view.
-
Click Requests.
You can also enter the request number, or project name in the search bar. For more information about searching in the VMS, see c_msp_view_search_function.html.
- From the table, select the request.
- On the SOW Document tab, scroll to the Document section.
-
Click
 .
.
-
In the document editor, make edits to the document as needed.
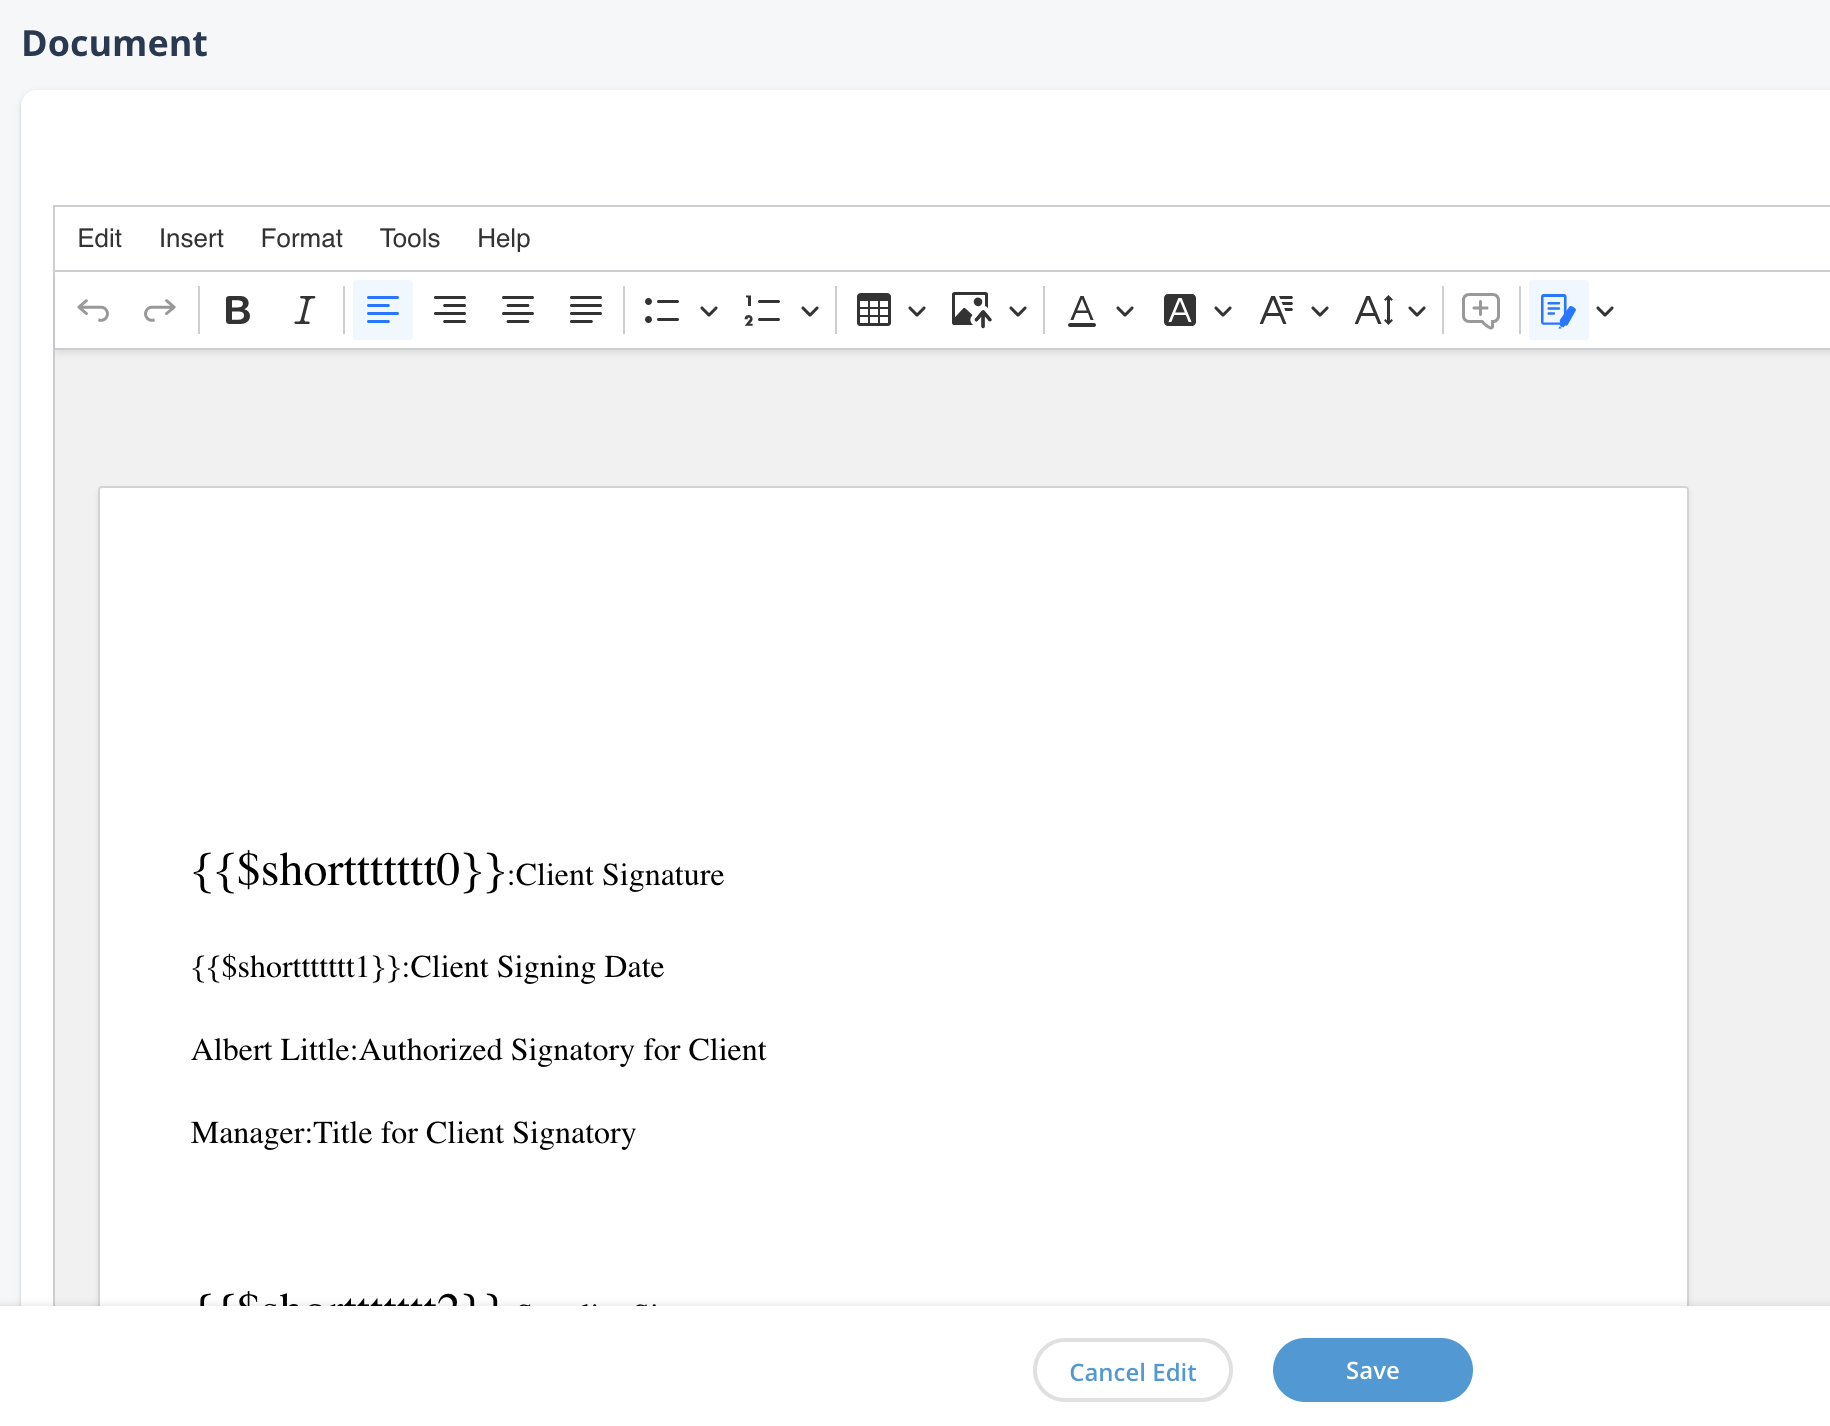
The MSP organization can restrict certain sections of the document for editing. This restriction is indicated if the Restricted Editing Mode setting at the top of the editor is enabled. If enabled, the editable sections are highlighted.
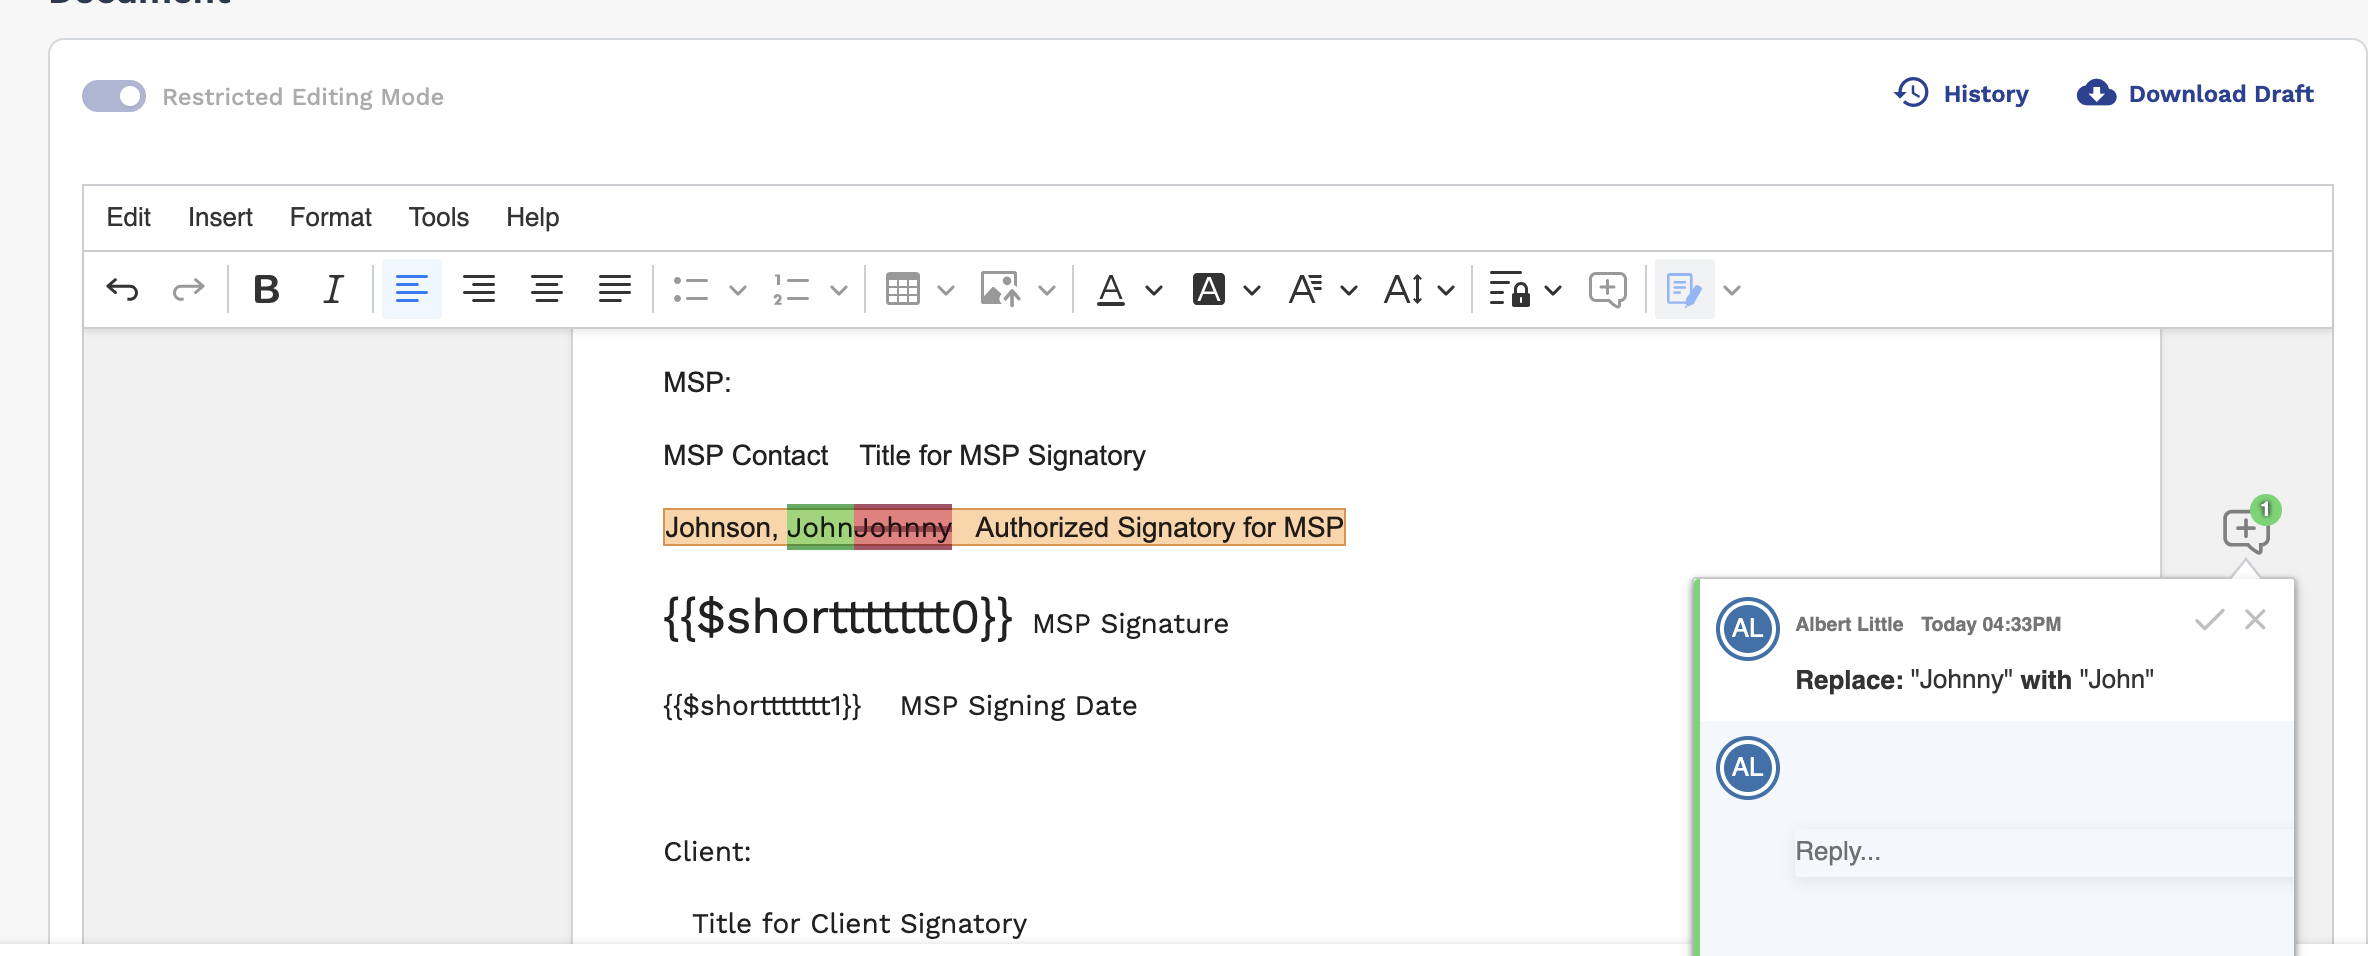
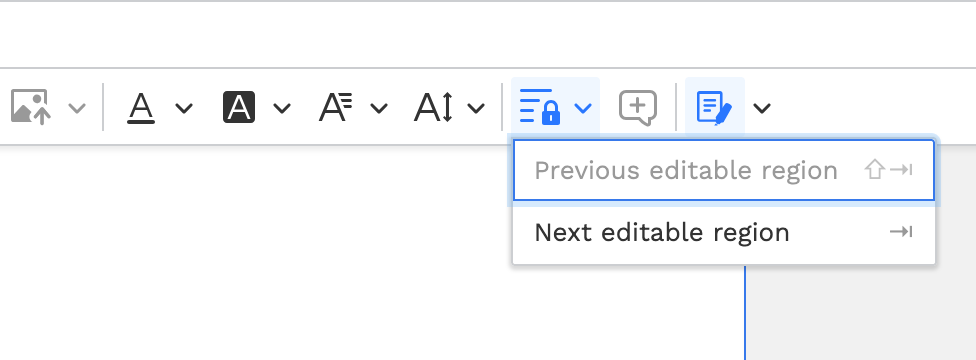
You can navigate between edible sections using the navigate icon options in the toolbar.
-
Click
 .
.
Managed Services Requests
You can use the VMS application to track engagements that might not fit a client organization's core business spend. For example, auxiliary workers such as gardeners or custodians. Managed Services (headcount tracking) engagements are primarily used to track workers that are on site, but do not require financial information or billing.
Managed services engagements do not follow the request workflow as other request types do. When you add a worker (new or existing) to a request and select an existing supplier, the request is automatically converted to an engagement (Status='Filled'). When you enter a new supplier, instead of selecting an existing supplier, the MSP receives the request for review. If configured, the application still performs all configured approval routing and duplicate worker checks.
The client organization can add worker details (if the workers are known), or they can send the open request to you (the contracted vendor) to add the details. Once you receive the notification (email or through the application), you can access the request and fill in the worker details, including the worker's job titles. After the worker information is added, the request is filled (one engagement per worker).
Managed service workers do not enter time in the system, but you can set up details at the engagement level in order to create billing items (fees with the 'Adjustment' or 'Benefit' billing type). You can only add billing items for a managed services engagement at the engagement level. The Billing page only allows you to add billing items for a worker or a supplier.
For more information about billing, see Billing Page.
Create a Managed Services Request
-
Confirm the details for the request.
Once you have confirmed the request and approvals and onboarding are completed (if configured), the request is converted to an engagement.
-
Click .
Managed Services Details View
- Location - 'Other Worker Location' only
- Schedule - Start and/of end date only
- Supplier Notes
- Requisition Custom Fields
- Worker Custom Fields
Request Information
| Tab | Section | Description |
|---|---|---|
| General Info | Description | Displays:
|
| Location | Displays:
|
|
| Schedule | Displays the configured calendar dates and rate information for the request. | |
| Financials | Displays:
|
|
| Contact Information | Displays the configured contact information for the request. | |
| Supplier Notes Contacts | Displays any additional contact information that you
add. To add an additional contact, click |
|
| Requisition Custom Fields | Displays any configured custom field information for the request. | |
| Dates of Interest | Displays dates of interest related to the request. | |
| Sourcing | <job_title> Configured at the request level. Can display multiple job titles for a request. |
See Sourcing. |
Engagement Information
| Tab | Section | Description |
|---|---|---|
| General Info | Description | Displays:
|
| Location | Displays:
|
|
| Schedule | Displays the configured calendar dates and rate information
for the request. To modify either the engagement start date or
estimated end date, or both, click
After
modifying any click |
|
| Financials | Displays:
|
|
| Contact Information | Displays the configured contact information for the request. | |
| Supplier Notes Contacts | Displays any additional contact information that you
add. To add an additional contact, click |
|
| Requisition Custom Fields | Displays any configured custom field information for the request. | |
| Worker Custom Fields | Displays any configured custom field information for the worker. | |
| Allocation | Allocation List | Displays any configured allocations that are available on the engagements. |
| Billing | Billing List | Displays any billing submitted for engagements. |
Change Work Location
- Navigate to the Home page in the Supplier view.
-
Click Requisitions.
You can access request information if the request is in the 'Pending' status. The request appears in the View section in the Home page.
- On the General Info tab, scroll to the Location section.
-
Click .
-
In the editing pane, use the radio buttons to select one of the
following:
- Same as Client Location - Default setting
- Other Client Location - Allows you to select from a client organization's configured locations (country, state/province, city/town, address, and postal code).
- Work Completed Offsite - Allows you to specify an offsite work location for the request. Select from the client organization's country and state/province, and enter the address information.
-
Click
 .
.
-
Click .
Sourcing
The Sourcing tab displays workers submitted for a managed services request. The section also allows you to managed those workers.
| Field | Description |
|---|---|
| View Filters | Use the view filters to filter the table by
|
| Allows you to edit the table and take actions on selected
workers. Note: You can only modify dates for workers in the
'Assigned' status. You can do the following:
|
Add Worker to Worker Grid
If a request is in the 'Pending' status because there are
positions that need to be filled (Remaining Positions > 0),
then you can assign a worker using the Worker Grid. The grid provides a
spreadsheet-like experience that allows you to input worker details in cell fields,
or use header columns to populate all fields in the row with a default value (![]() ).
).
Note that a request is closed when all positions are filled. If a worker is removed from a request (Change Status Reason = 'Closed') and a replacement is specified, then the request is move to the 'Pending' status, and the number of remaining positions is incremented up but the number of filled engagements that were closed. You must have permission to remove workers. See Change Worker Status.
Adding a worker to a request automatically converts the worker to an engagement unless approval routing or onboarding is configured.
- Navigate to the Home page in the Supplier view.
-
Click Requisitions.
You can access request information if the request is in the 'Pending' status. The request appears in the View section in the Home page.
-
On the Requests page, click the
Sourcing tab.
If no workers are assigned, the section appears empty. To add an initial worker, click the Assign Workers tile. If adding workers to a request, click Assign Workers in the upper right corner of the Sourcing section.
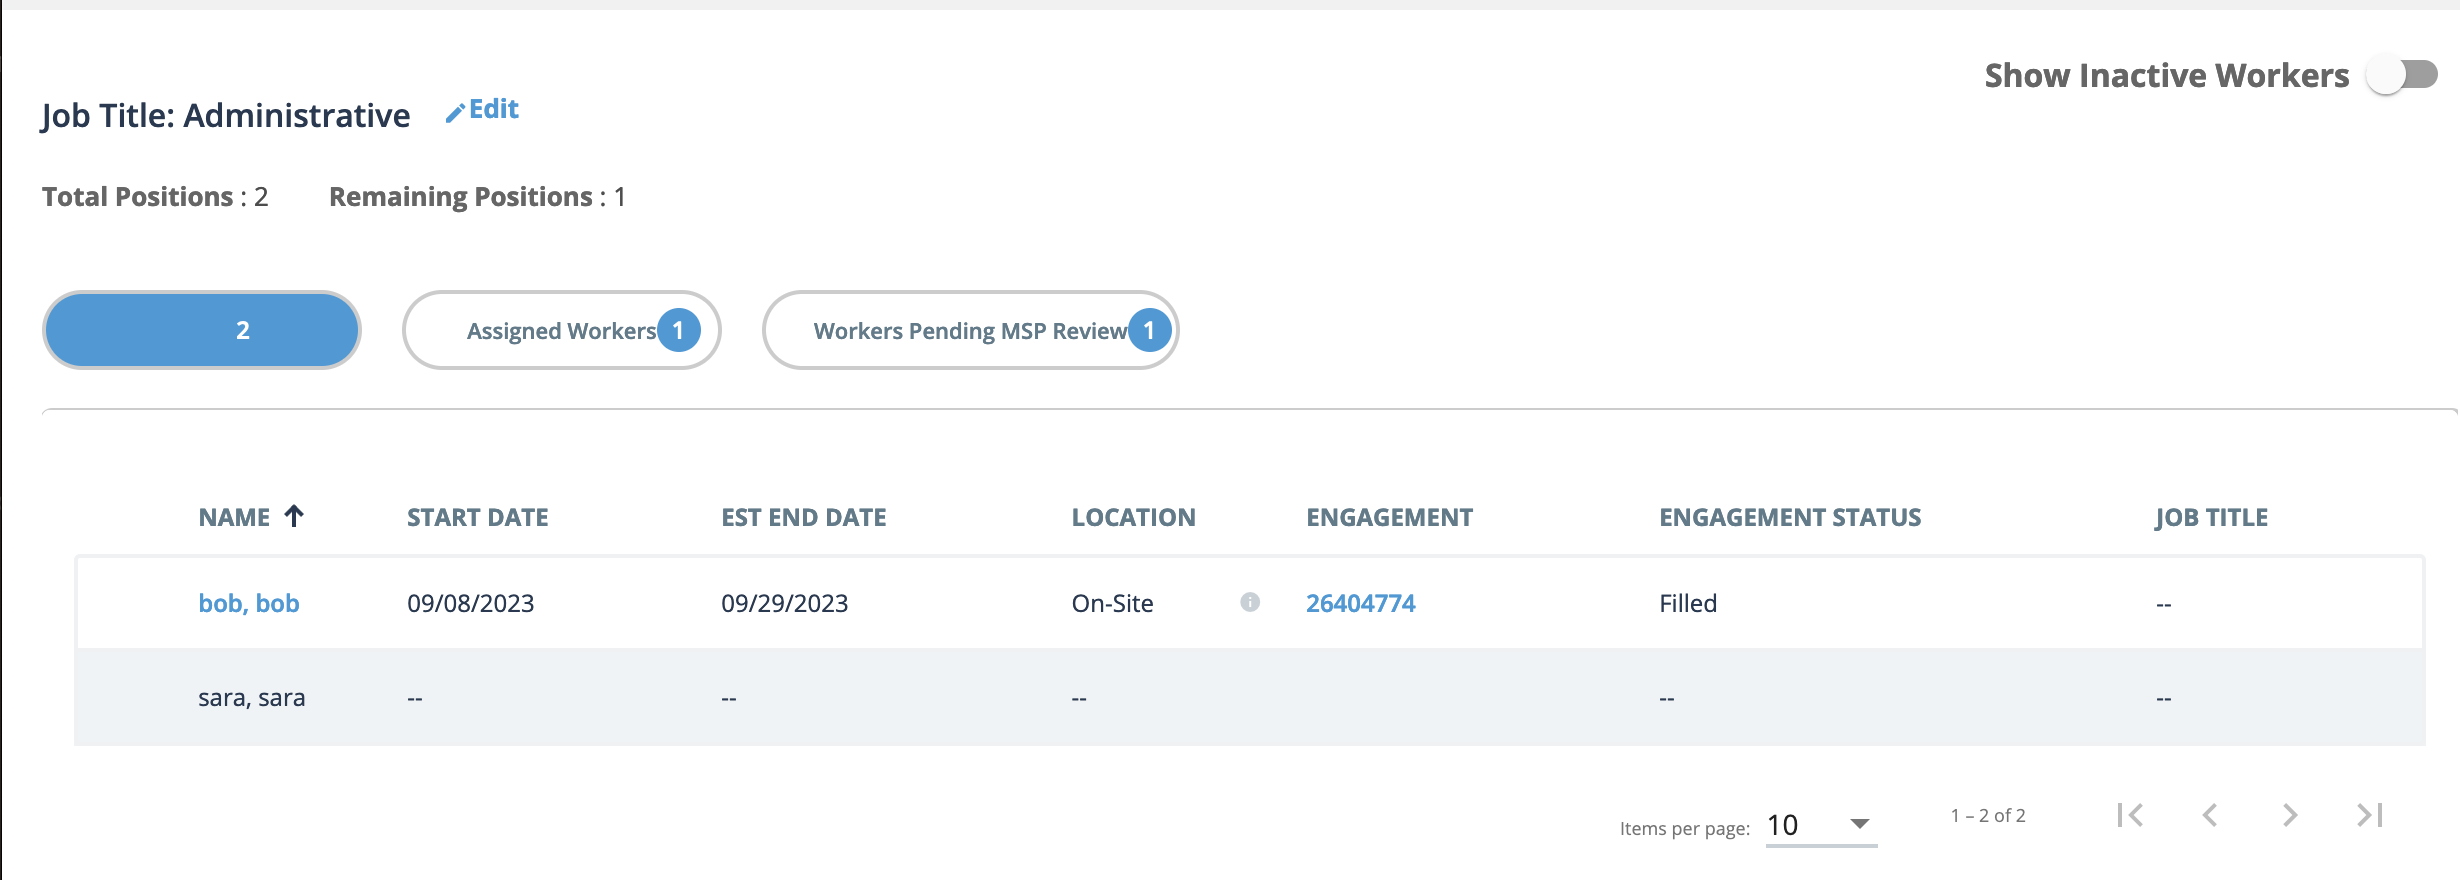
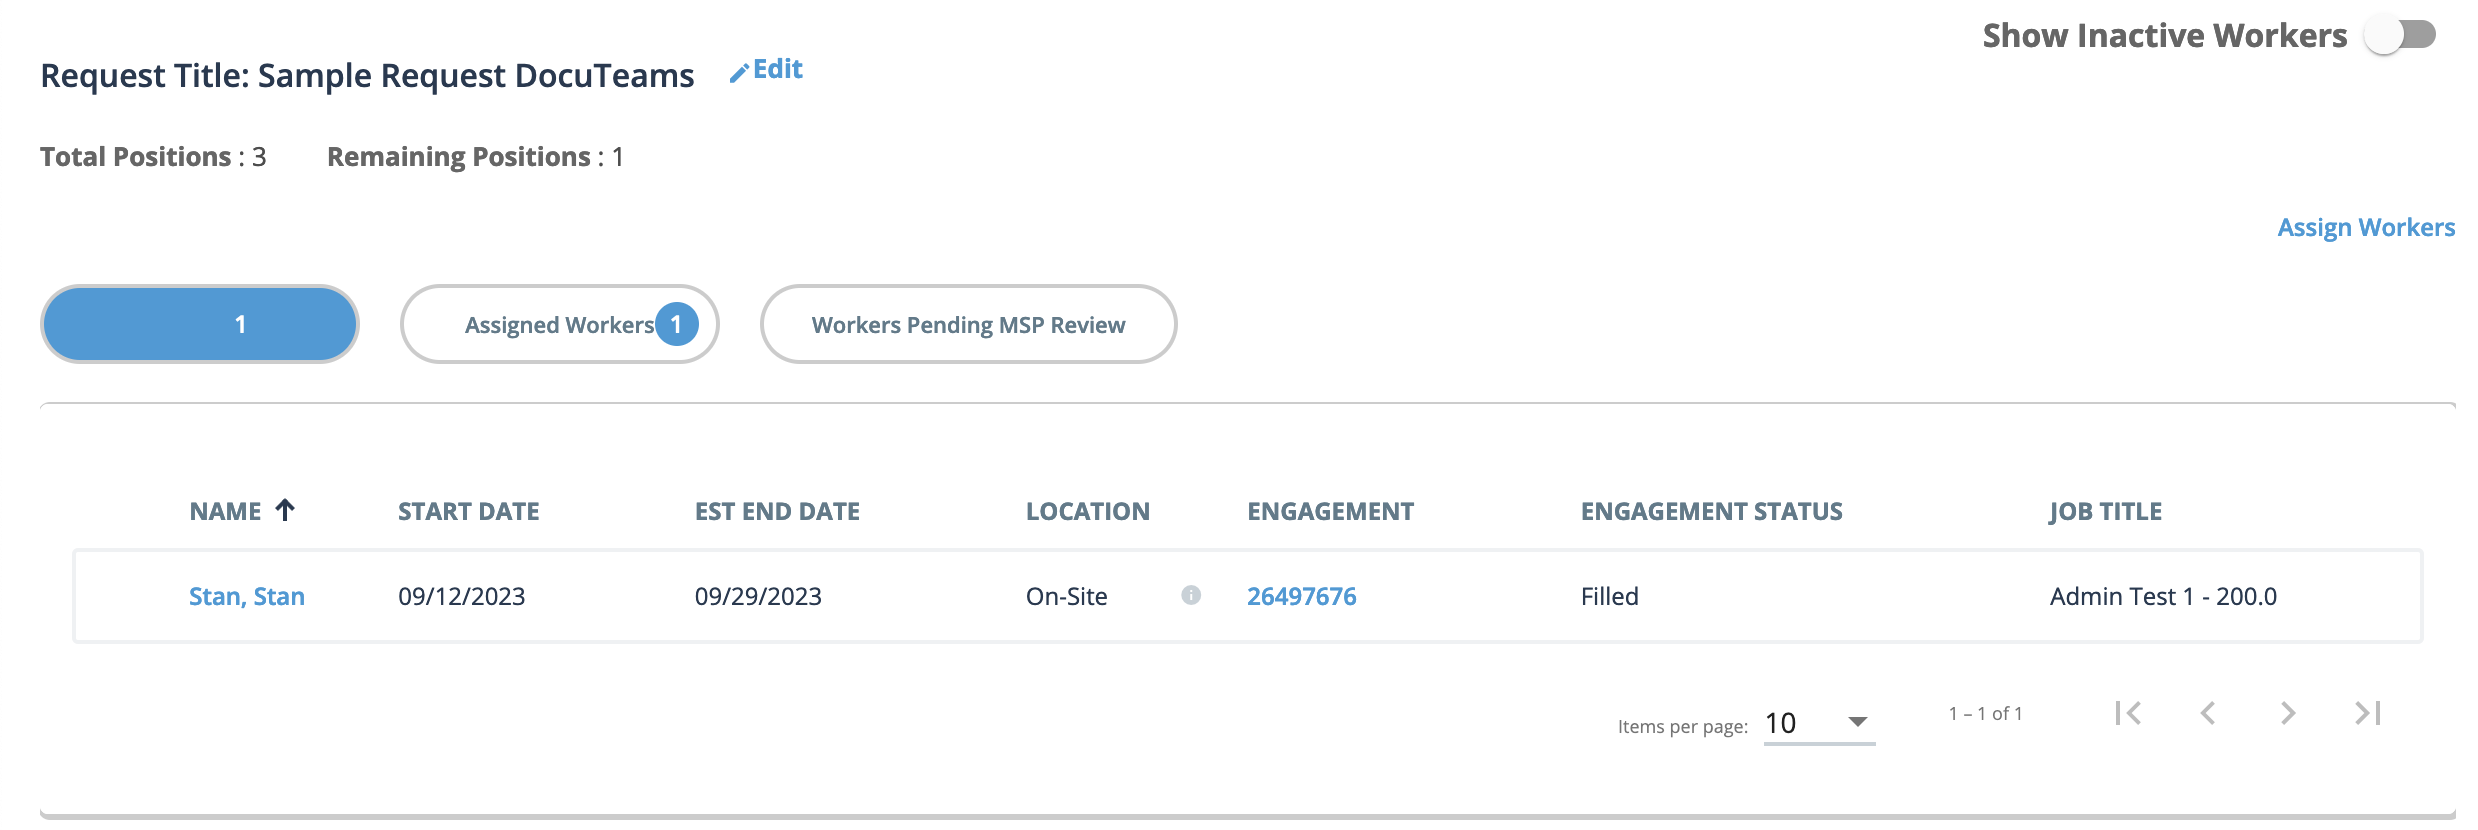
You can navigate the view using the buttons to display the following:- ALL - All workers associated with the request. This includes workers that are already added and have been converted to an engagement.
- Assigned Workers - All workers assigned to the request. Each worker is converted to an engagement.
- Workers Pending MSP Review - All workers submitted, but require MSP review.
- Click Assign Workers.
-
Using the Worker Grid, configure the worker's details.
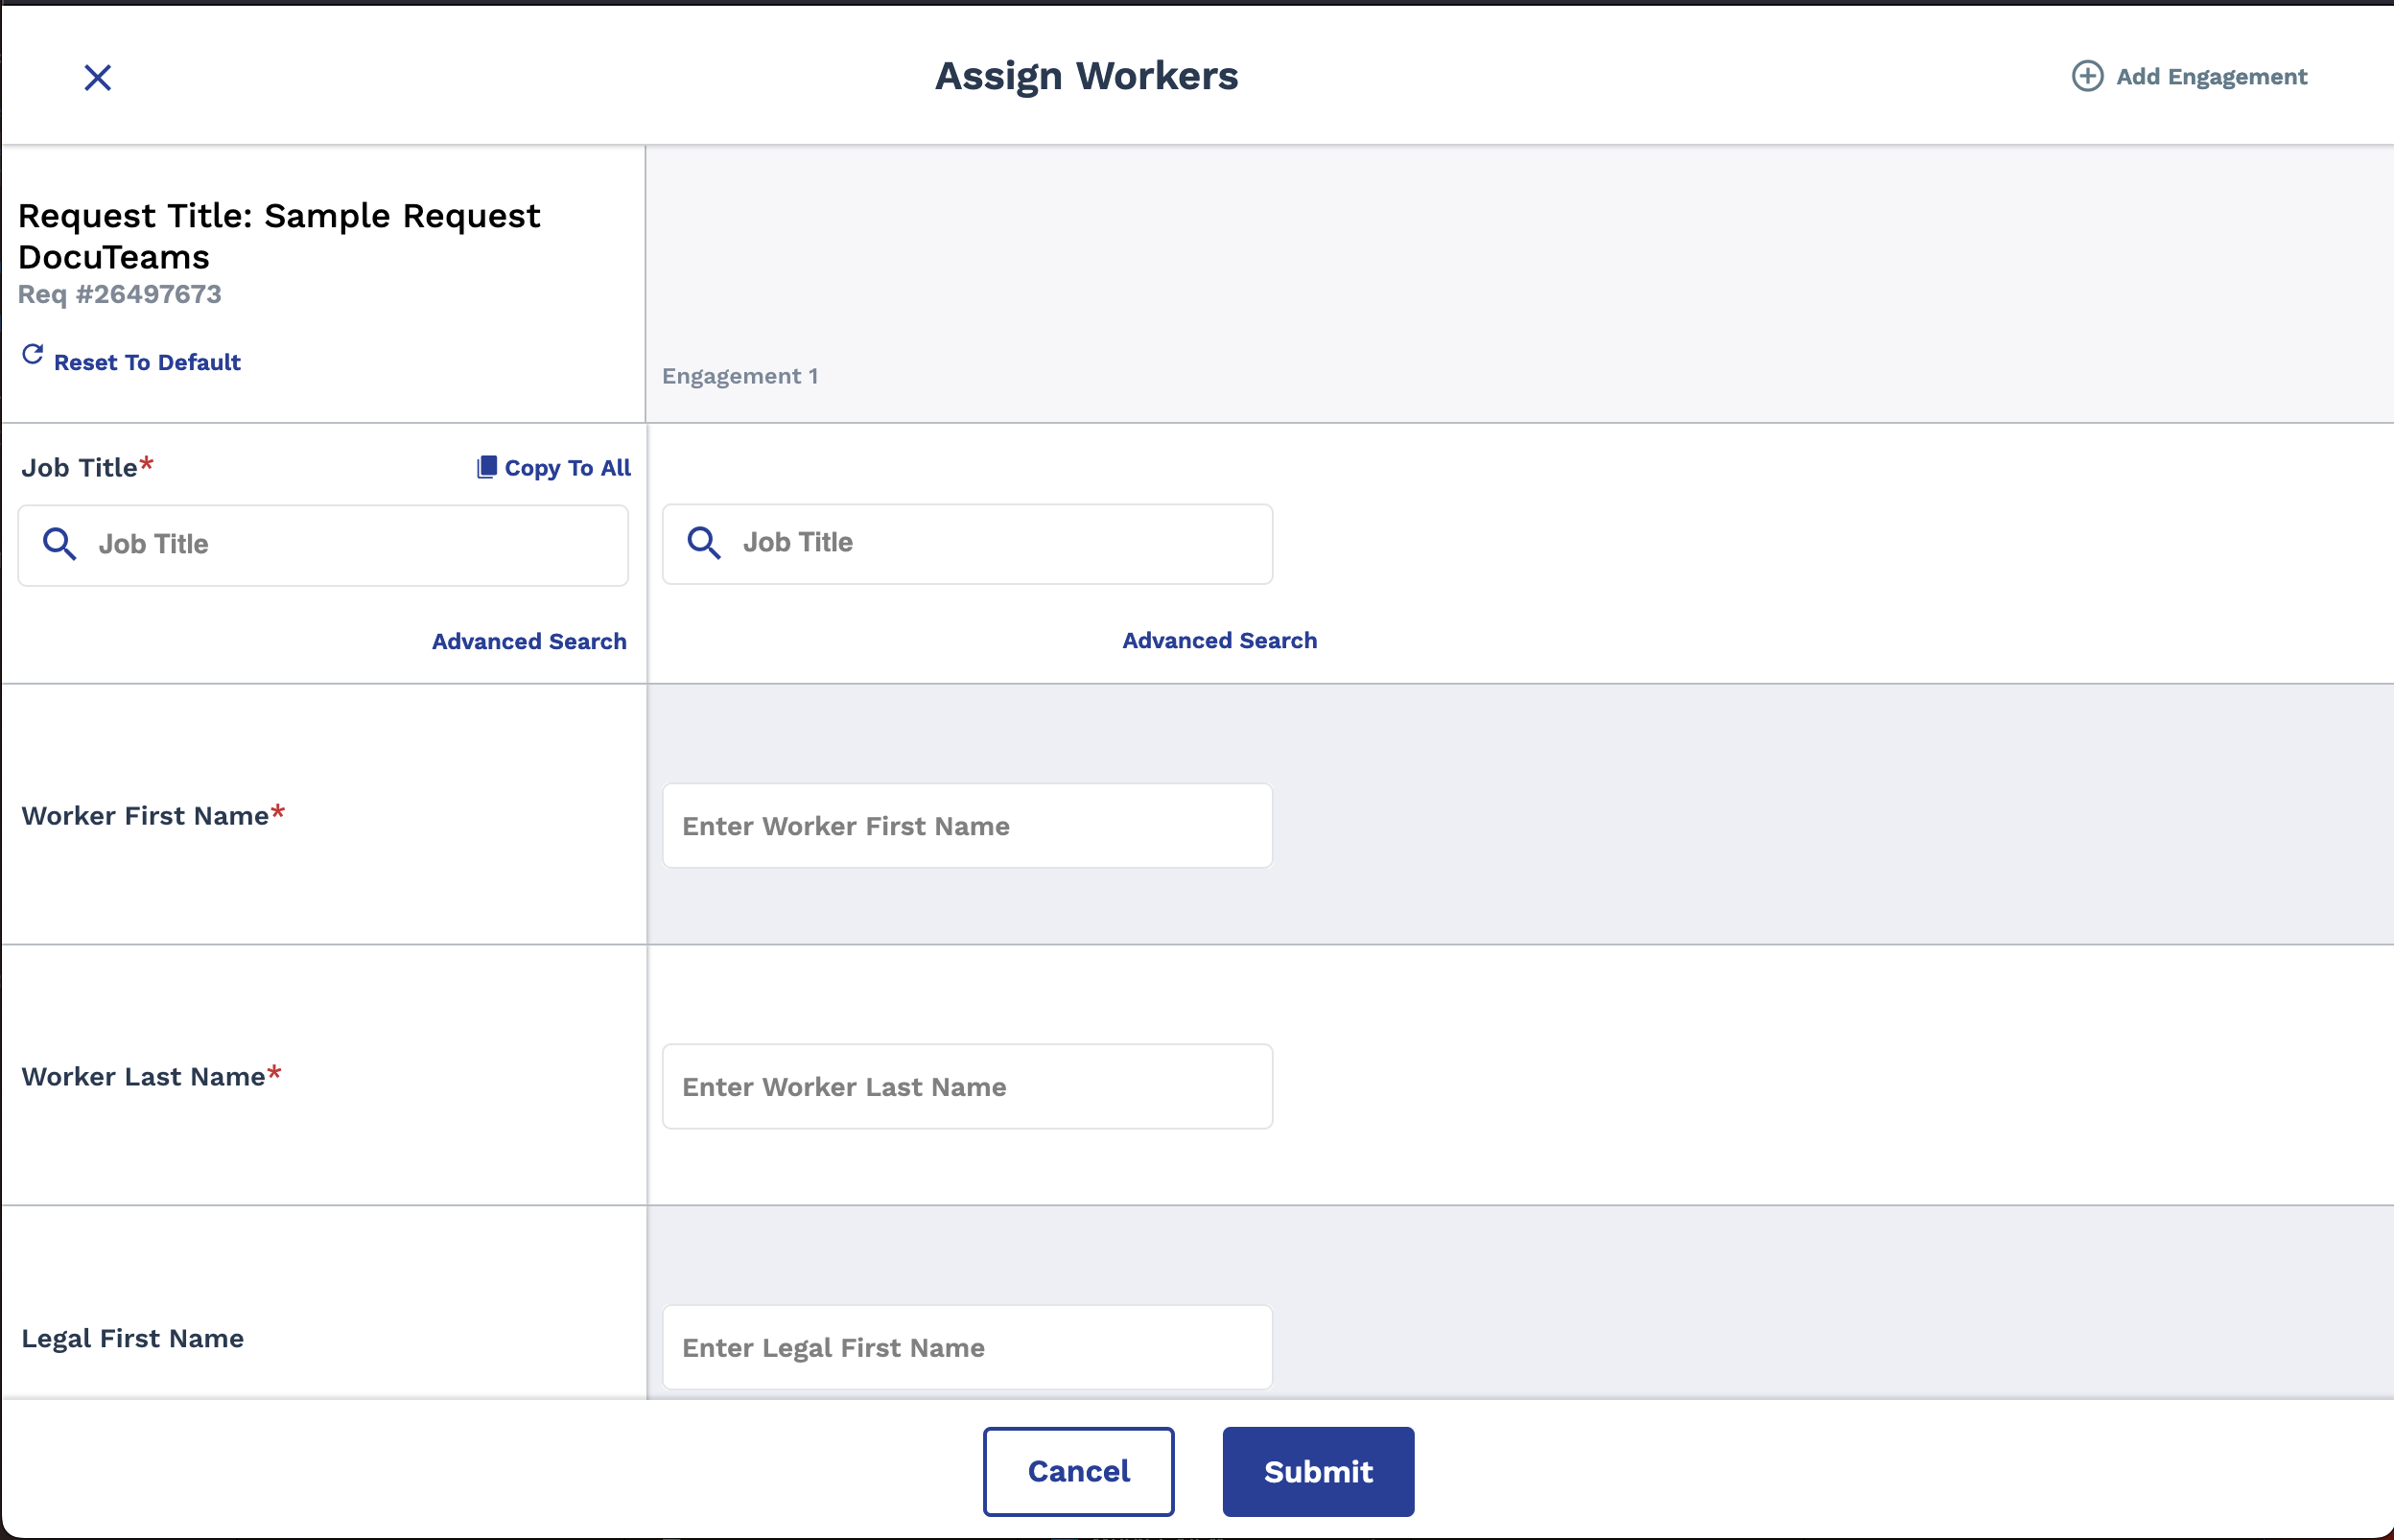 The Worker Grid displays a general detail column on the left that is pre-populated with request information. The right side of the grid displays a column for each position in the request. Enter information in the following fields:
- Job Title
- Worker First Name
- Worker Last Name
- (Worker) Legal First Name
- (Worker) Legal Last Name
- Worker Email Address
- Phone Number
- Start Date
- Estimated End Date
- Other Client Location
- Worker Offsite Country
- Worker Offsite State
- Worker Offsite City
- Worker Offsite Address
- Worker Offsite Postal Code
- Currency
- Bill Rate
- Company Name
- Custom Fields
Tip:If your workers all use the same values, you can save time by adding the value to the left column and then clicking . This adds the value to all worker columns.
Note that this button does not appear for all rows.
. This adds the value to all worker columns.
Note that this button does not appear for all rows. -
Click
 .
The worker/s now appear in the Sourcing section of the request with an associated engagement number. They also appear on the Engagements page.
.
The worker/s now appear in the Sourcing section of the request with an associated engagement number. They also appear on the Engagements page.
See Request Page.
Change a Worker's End Date
- Navigate to the Home page in the Supplier view.
-
Click Requisitions.
You can access request information if the request is in the 'Pending' status. The request appears in the View section in the Home page.
- Click the Sourcing tab.
-
Click
 .
.
- In the sourcing table, select the check box next to the worker's name, or select the check box in the header row to select all of the workers (apply action to all).
-
Click
 .
.
-
In the pop up, select values for the following:
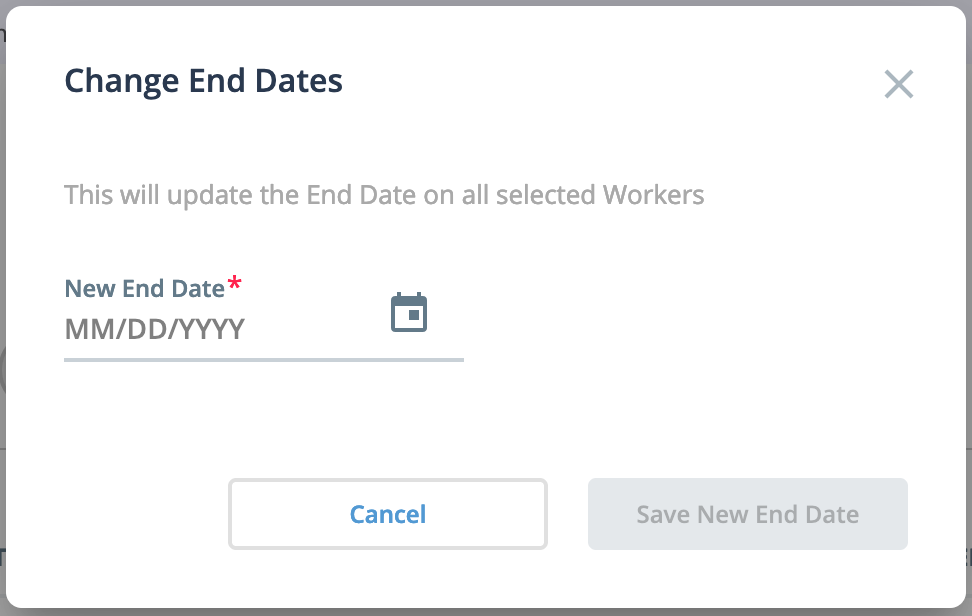
New End Date - Date cannot be backdated.
-
Click
 .
.
Change Worker Status
- A replacement is specified. See step 6.
- The reason is set to 'Worker Withdrawn'.
If you are removing a worker from multiple engagements, all statuses must be the same.
- Navigate to the Home page in the Supplier view.
-
Click Requisitions.
You can access request information if the request is in the 'Pending' status. The request appears in the View section in the Home page.
- Click the Sourcing tab.
-
Click .
- In the sourcing table, select the check box next to the worker's name, or select the check box in the header row to select all of the workers (apply action to all).
-
In the pop up, select values for the following:
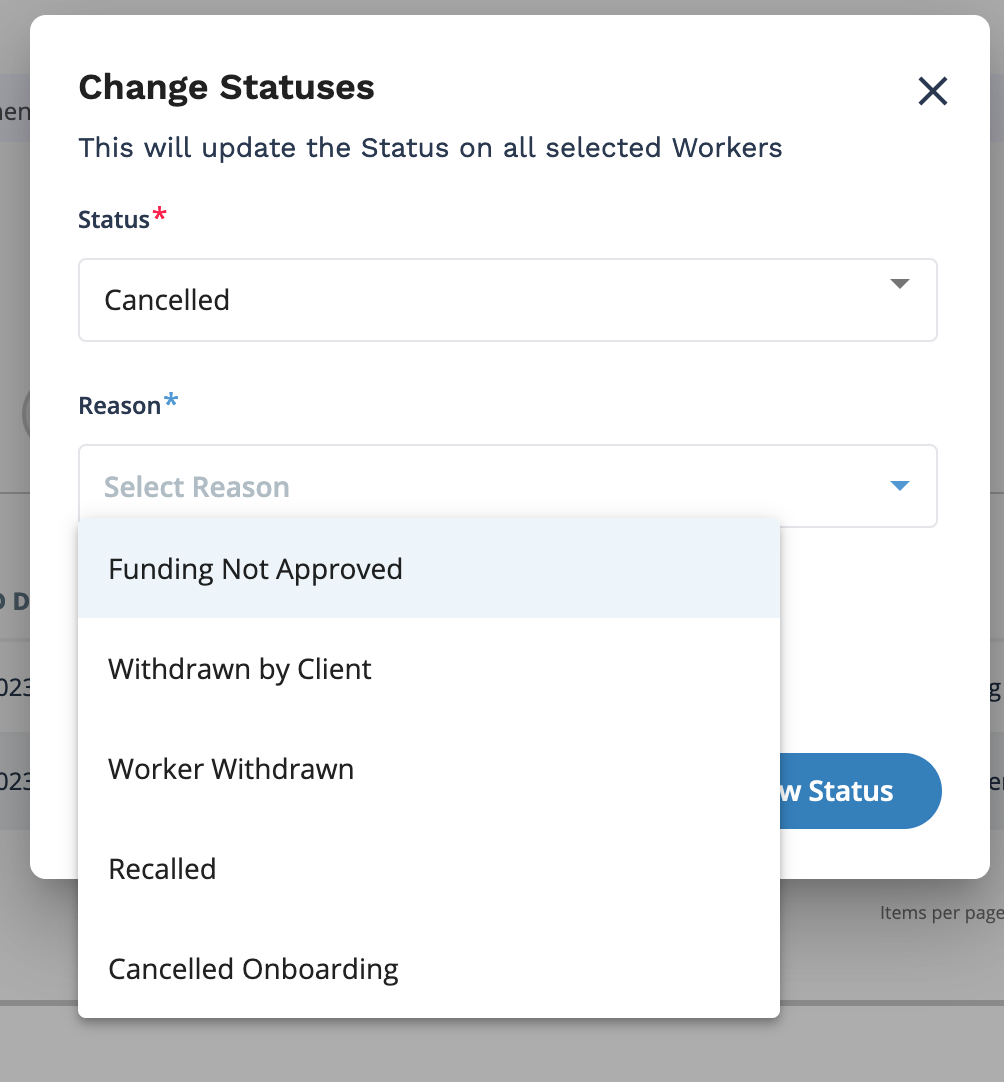
- Status - Select the status. If you change the status to 'Closed',
specify if a replacement is needed. If yes, you can assign another
worker to the open request on the engagement.Note:You cannot cancel a filled engagement with associated billing.
- Reason - Use the drop down to select the cancellation reason.
- Status - Select the status. If you change the status to 'Closed',
specify if a replacement is needed. If yes, you can assign another
worker to the open request on the engagement.
-
Click
 .
.
Confirm Assignment

- Navigate to the Home page in the MSP view.
- Click Requests, or use the search function to locate the request.
- Click the Sourcing tab.
-
For the worker with the new supplier, click Confirm
Assignment.
If the supplier is not properly set up, you see a pop up indicating this. If the supplier has been properly set up and the system recognizes a supplier name match, the engagement is nor created.
Submit a Worker to a Request
- Navigate to the Home page in the Supplier view.
-
Click Requisition.
Note:If you are filling a new request, you can access new/open requests in the View section on the Home page. For more information about this section, see Home Page.
-
Use the search functionality to locate the request to fill. For more
information about the search feature, see Searching Through Requisition Data.
Note:To list all requests in all statuses for a client organization, do not configure any parameters and click.
- Click the blue request number in the Req# column for the request to fill.
- On the request page, click Resume/Portfolio.
- Use the worker search to locate the worker to submit. You can use the text box to enter a worker's name of email address.
- Click the worker's name (blue text) in the table to select the worker.
- Review the worker's resume record information.
-
Click
 .
.
- Optionally, in the Supplier Notes field, enter text.
-
Review the vendor information for the request in the Supplier
Contact field and the Supplier Contact
Email field.
These fields default to the logged in user.
- In the Billing Info section, in the Pay Rate field, enter the pay rate for the engagement.
-
In the Bill Rate field, enter the bill rate for the
engagement.
If the client organization has a maximum bill rate defined in the supplier contract, then you are warned if they enter a rate that violates the setting. You are required to enter a reason for violating the rate.
- In the Availability field, enter the date that the worker is available. You can also click the calendar icon to open a calendar pop up that allows you to select the date.
-
Using the radio buttons, for the Sub-Contractor Worker
field, select whether the worker is sourced through another vendor. If you
select Yes, populate the following fields:
- Sub-Contractor Name - Enter the name of the vendor that is providing the worker.
- Sub-Contractor Pay Rate - Enter the pay rate for the sub-contracted worker. This is the rate that you (the vendor serving the work request) are paying the vendor providing the worker.
-
From the Supplier FLSA Classification drop down, select
the worker classification for the engagement.
These are default values, and cannot be modified.
- Optionally, select the Allow Client to Forward Resume check box to allow the client to forward a candidate resume.
- If enabled, in the EEO section, use the drop downs to select the worker EEO information that is required by the client organization.
-
Click .
The MSP associated with the request is notified of the candidate submission. If the client organization requests an interview with the submitted candidate, you need to confirm the interview details. For more information about this task, see Set Up Interviews with Candidates.
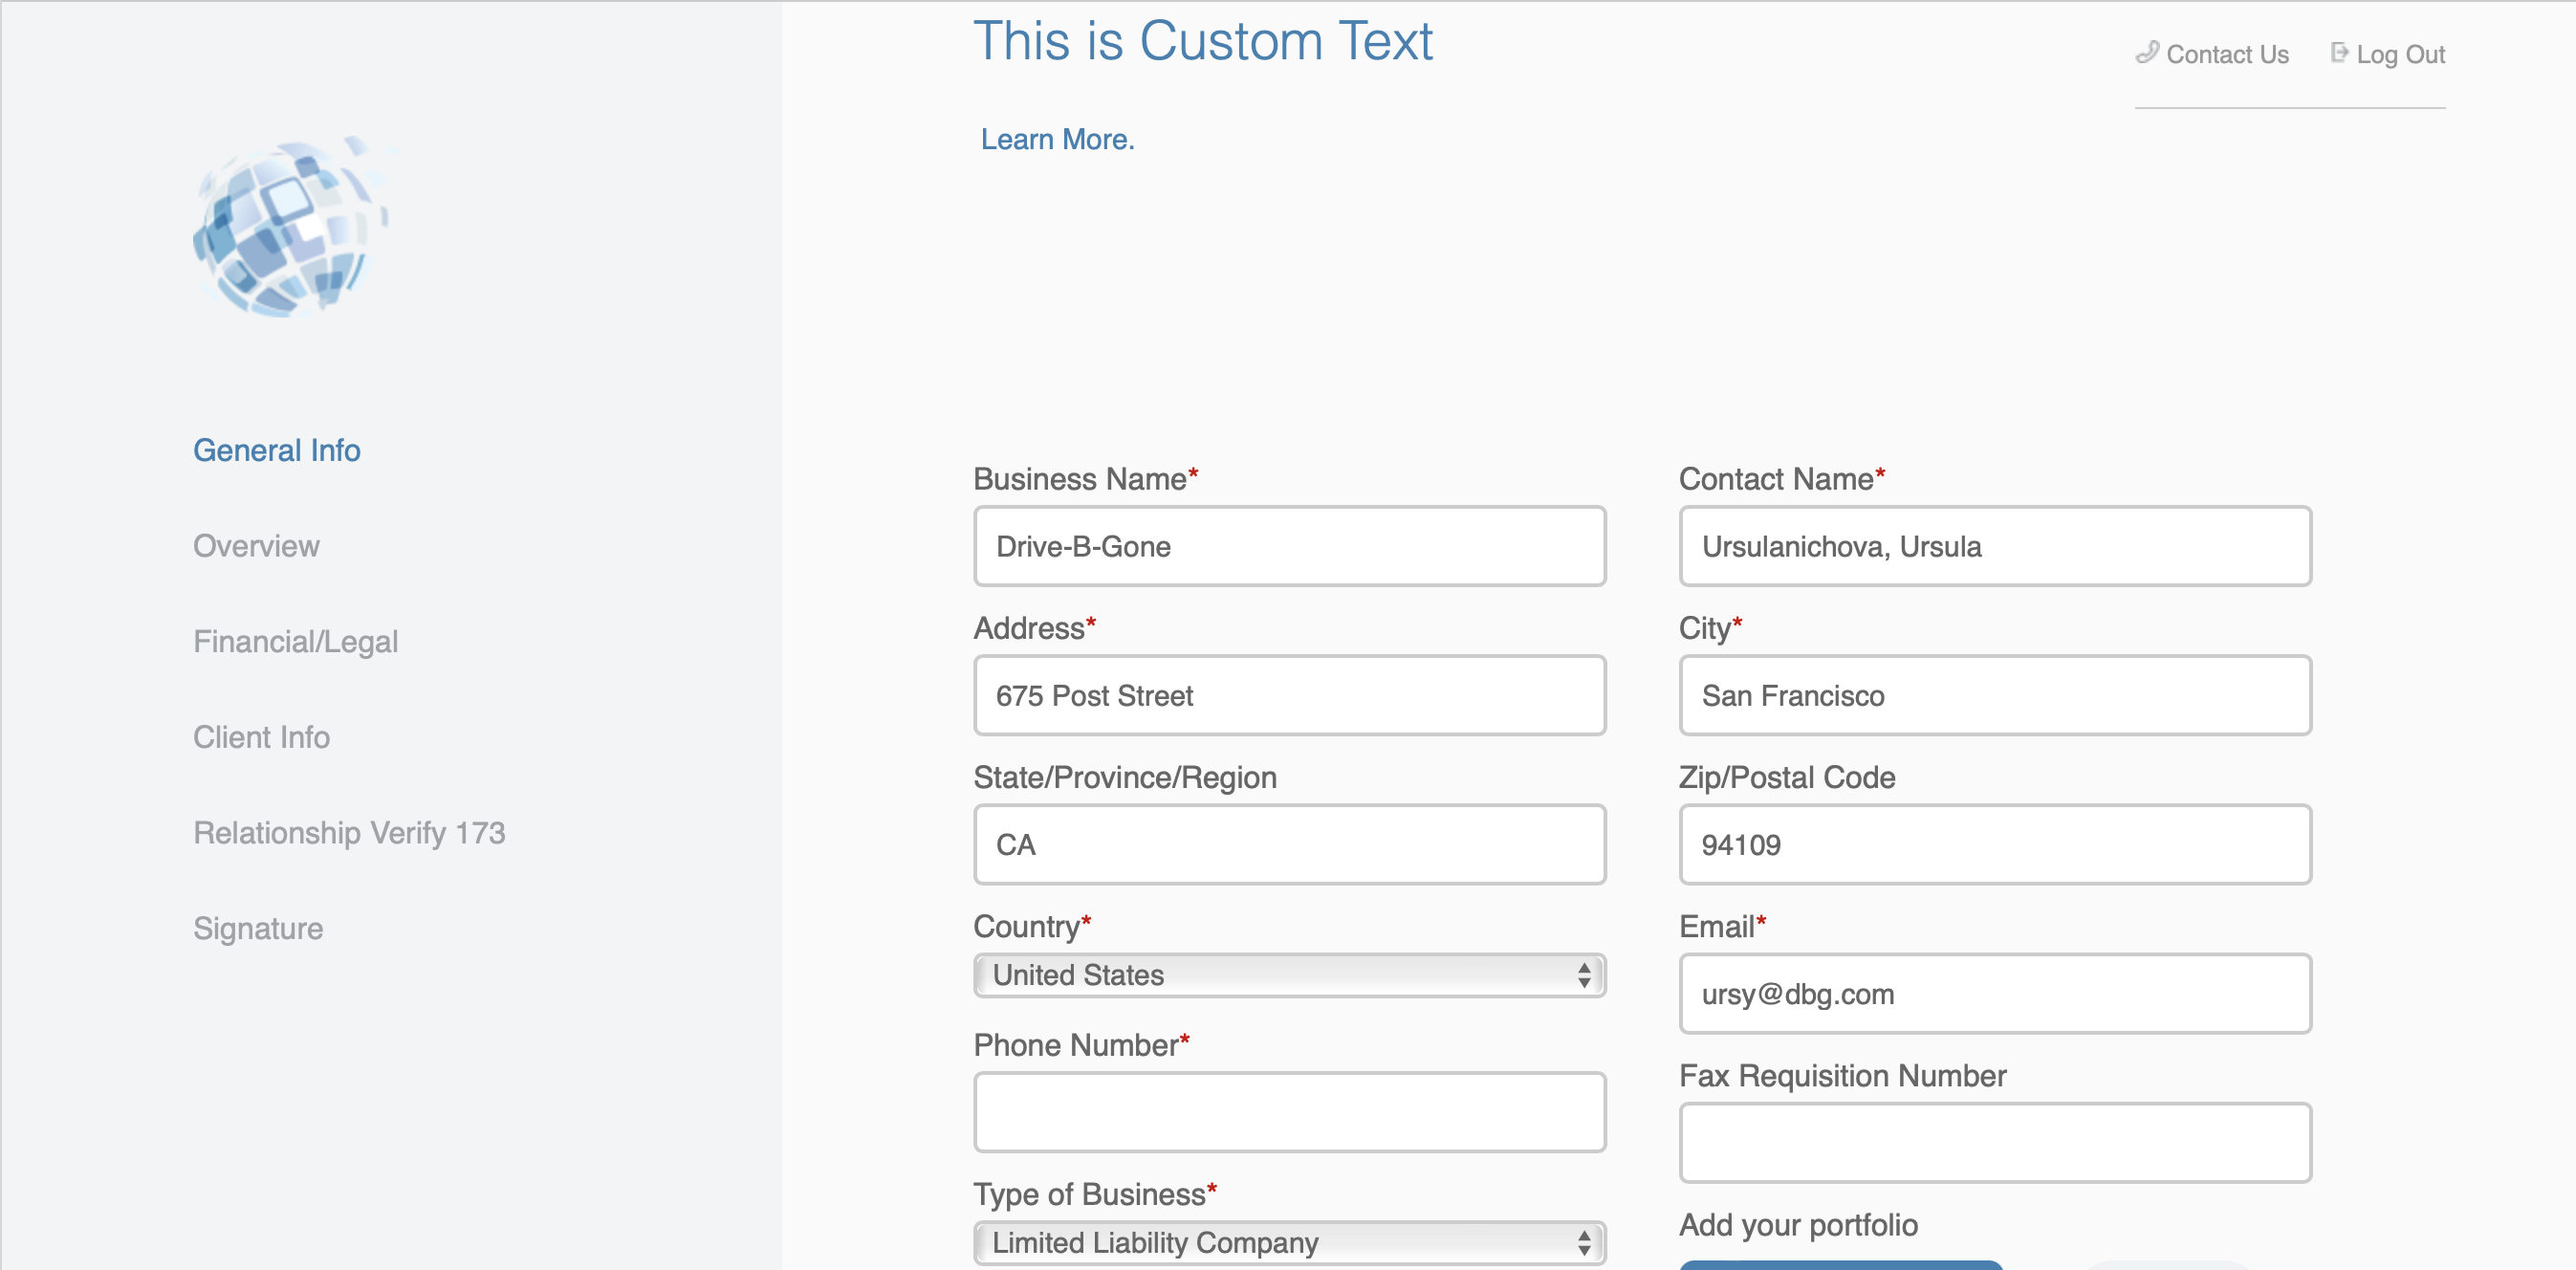
Complete BVA Questionnaire
The client might require that your supplier organization completes this questionnaire as part of the sourcing process. The questionnaire appears in the Business Validation section of the request. You can additionally be notified via a link that appears on your Home page.
- Navigate to the Home in the Supplier view.
- Navigate to the request or click the Respond Now link in the green notification field.
-
On the General Info page, verify your organizational
information.
 Note:You can advance each page by clicking
 .
. -
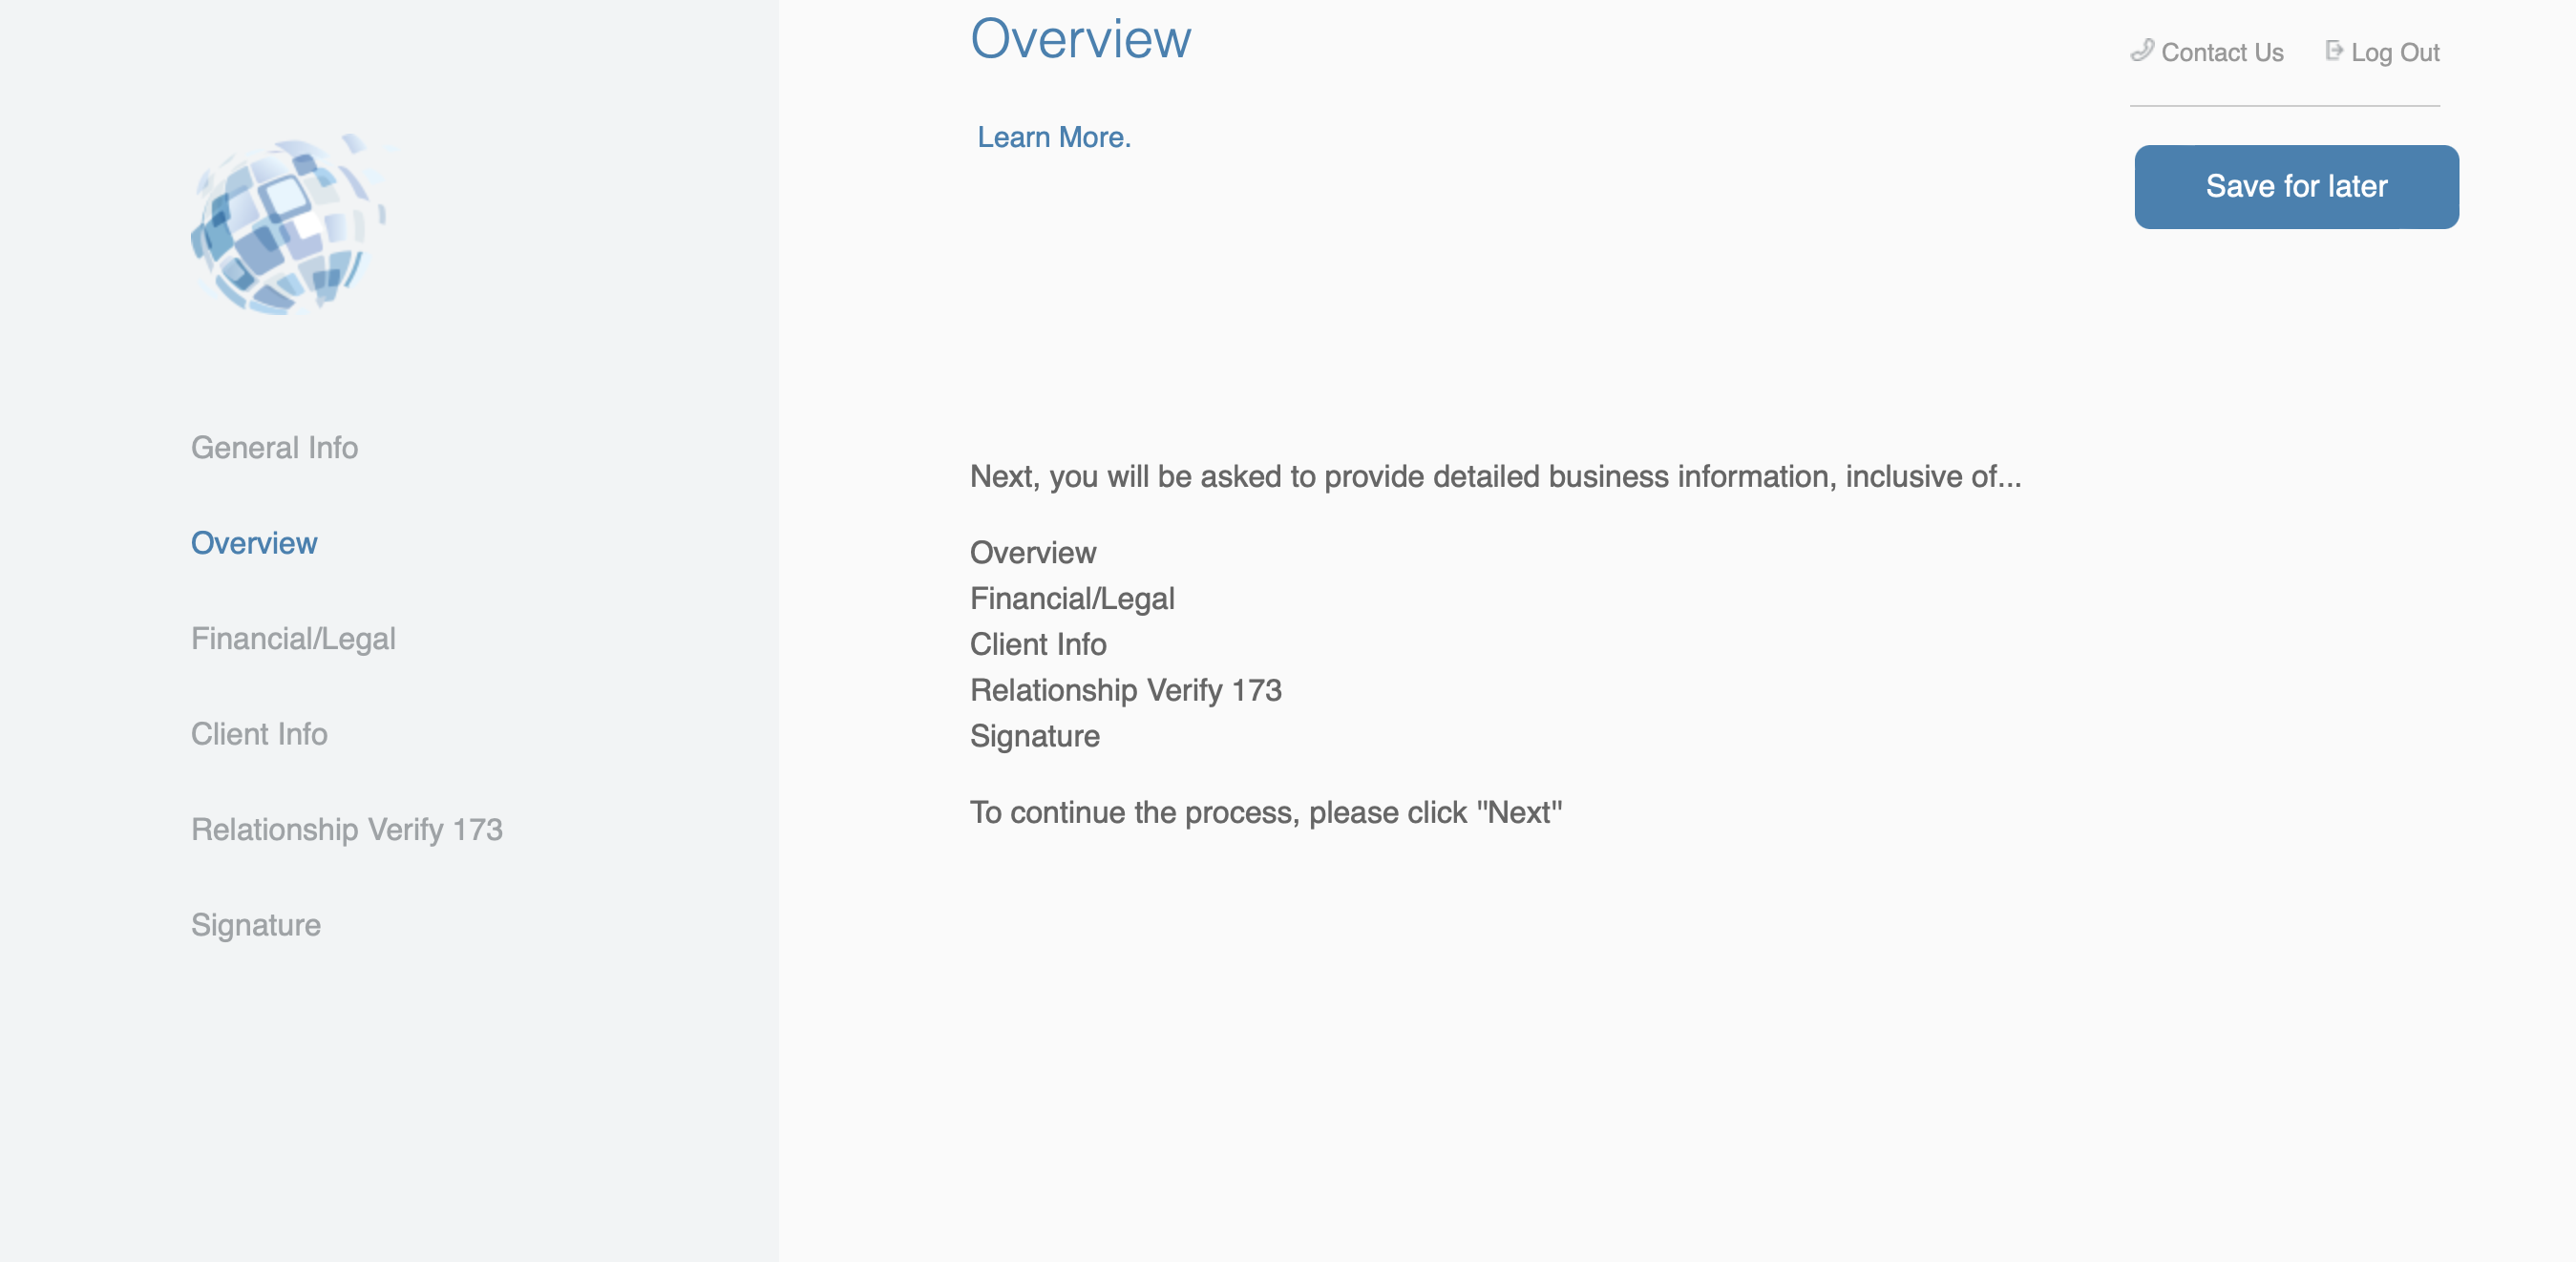
On the Overview page, review the required information to
provide and ready any required documentation.
-
On the Financial/Legal page, confirm your tax and
business registration information.
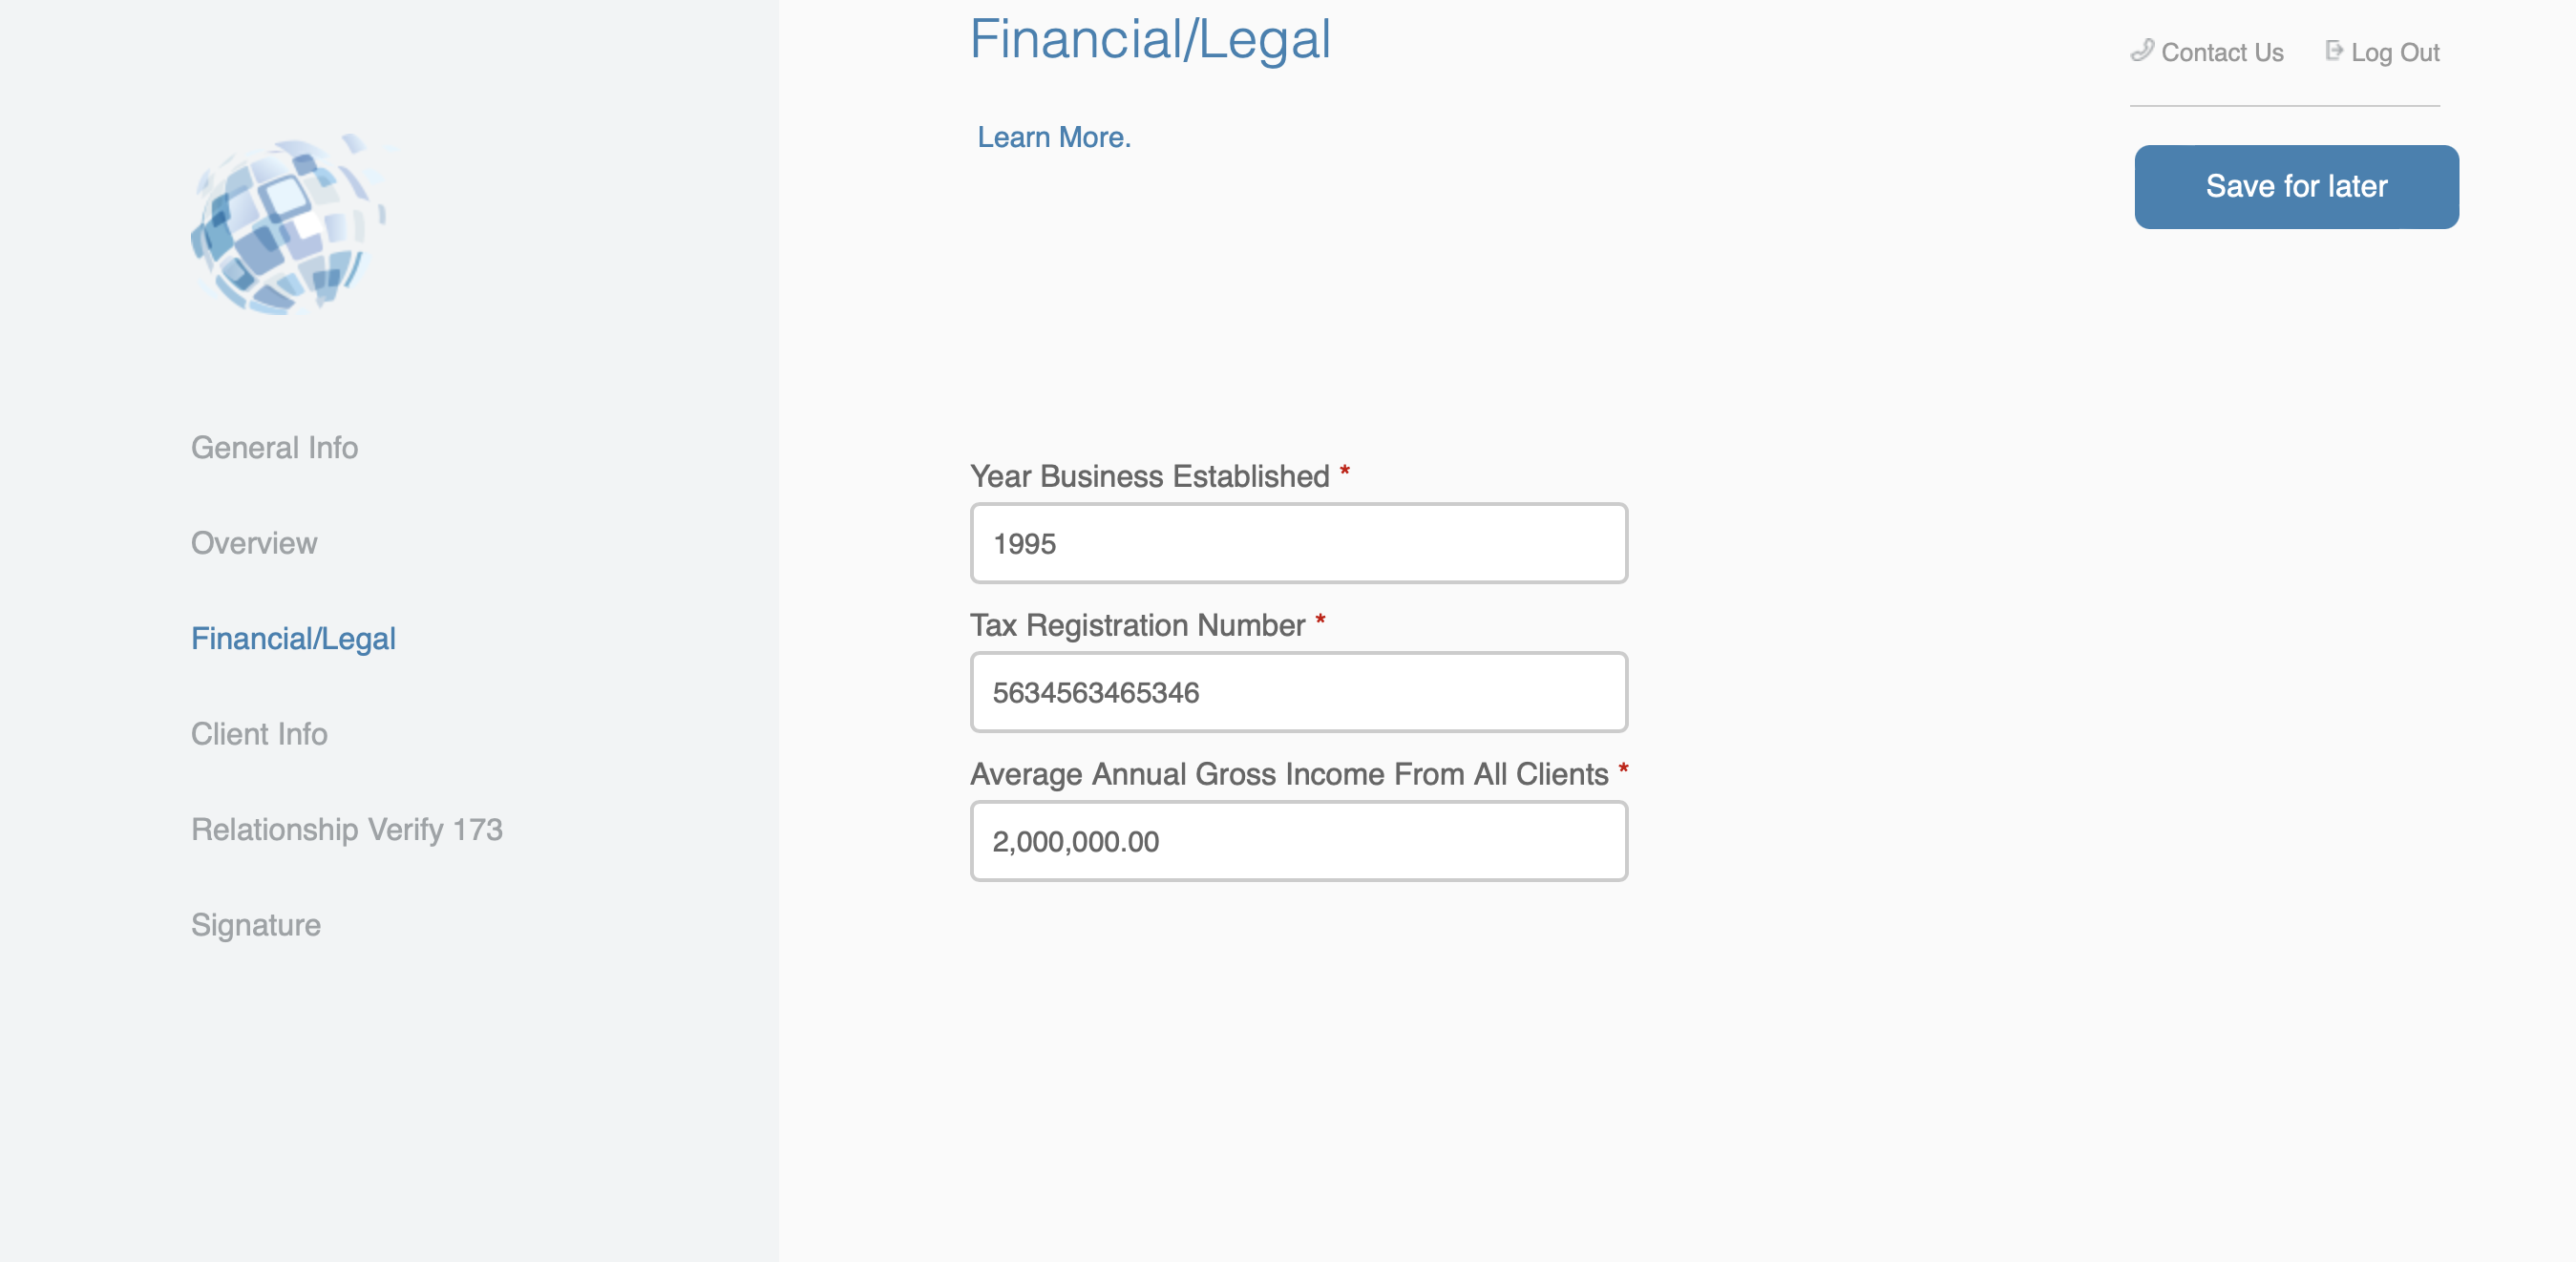
Additionally, provide your insurance information (if required), and attach any required documentation.
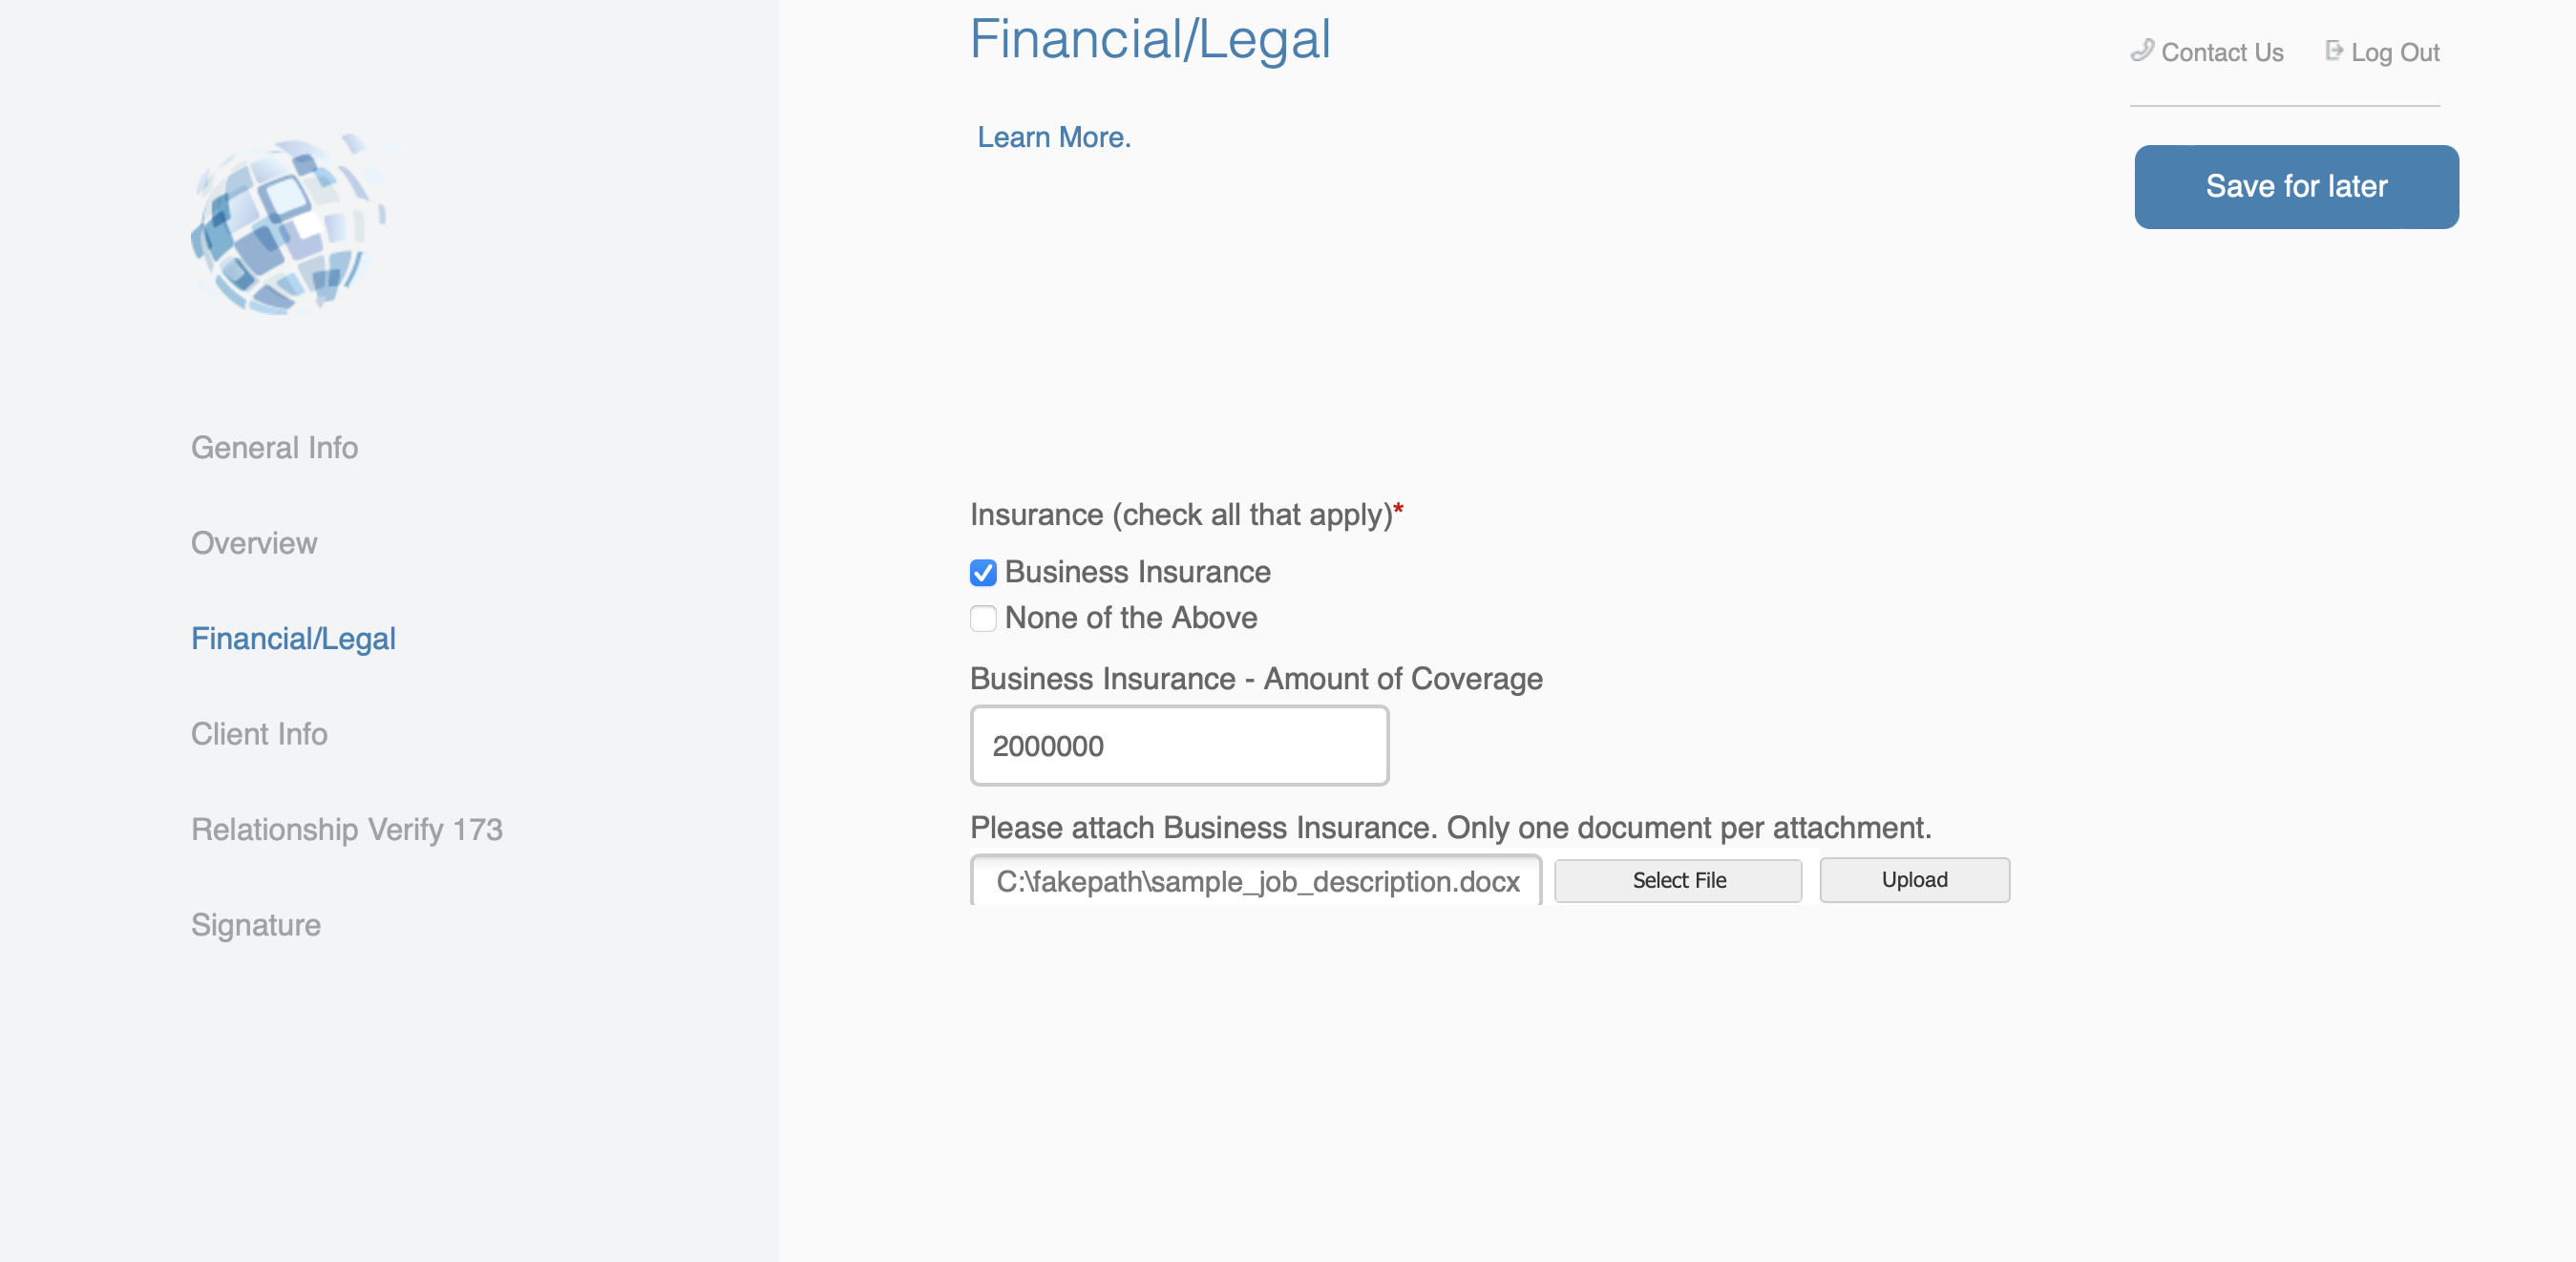
-
On the Client Info page, add your company details in
regard to the project.
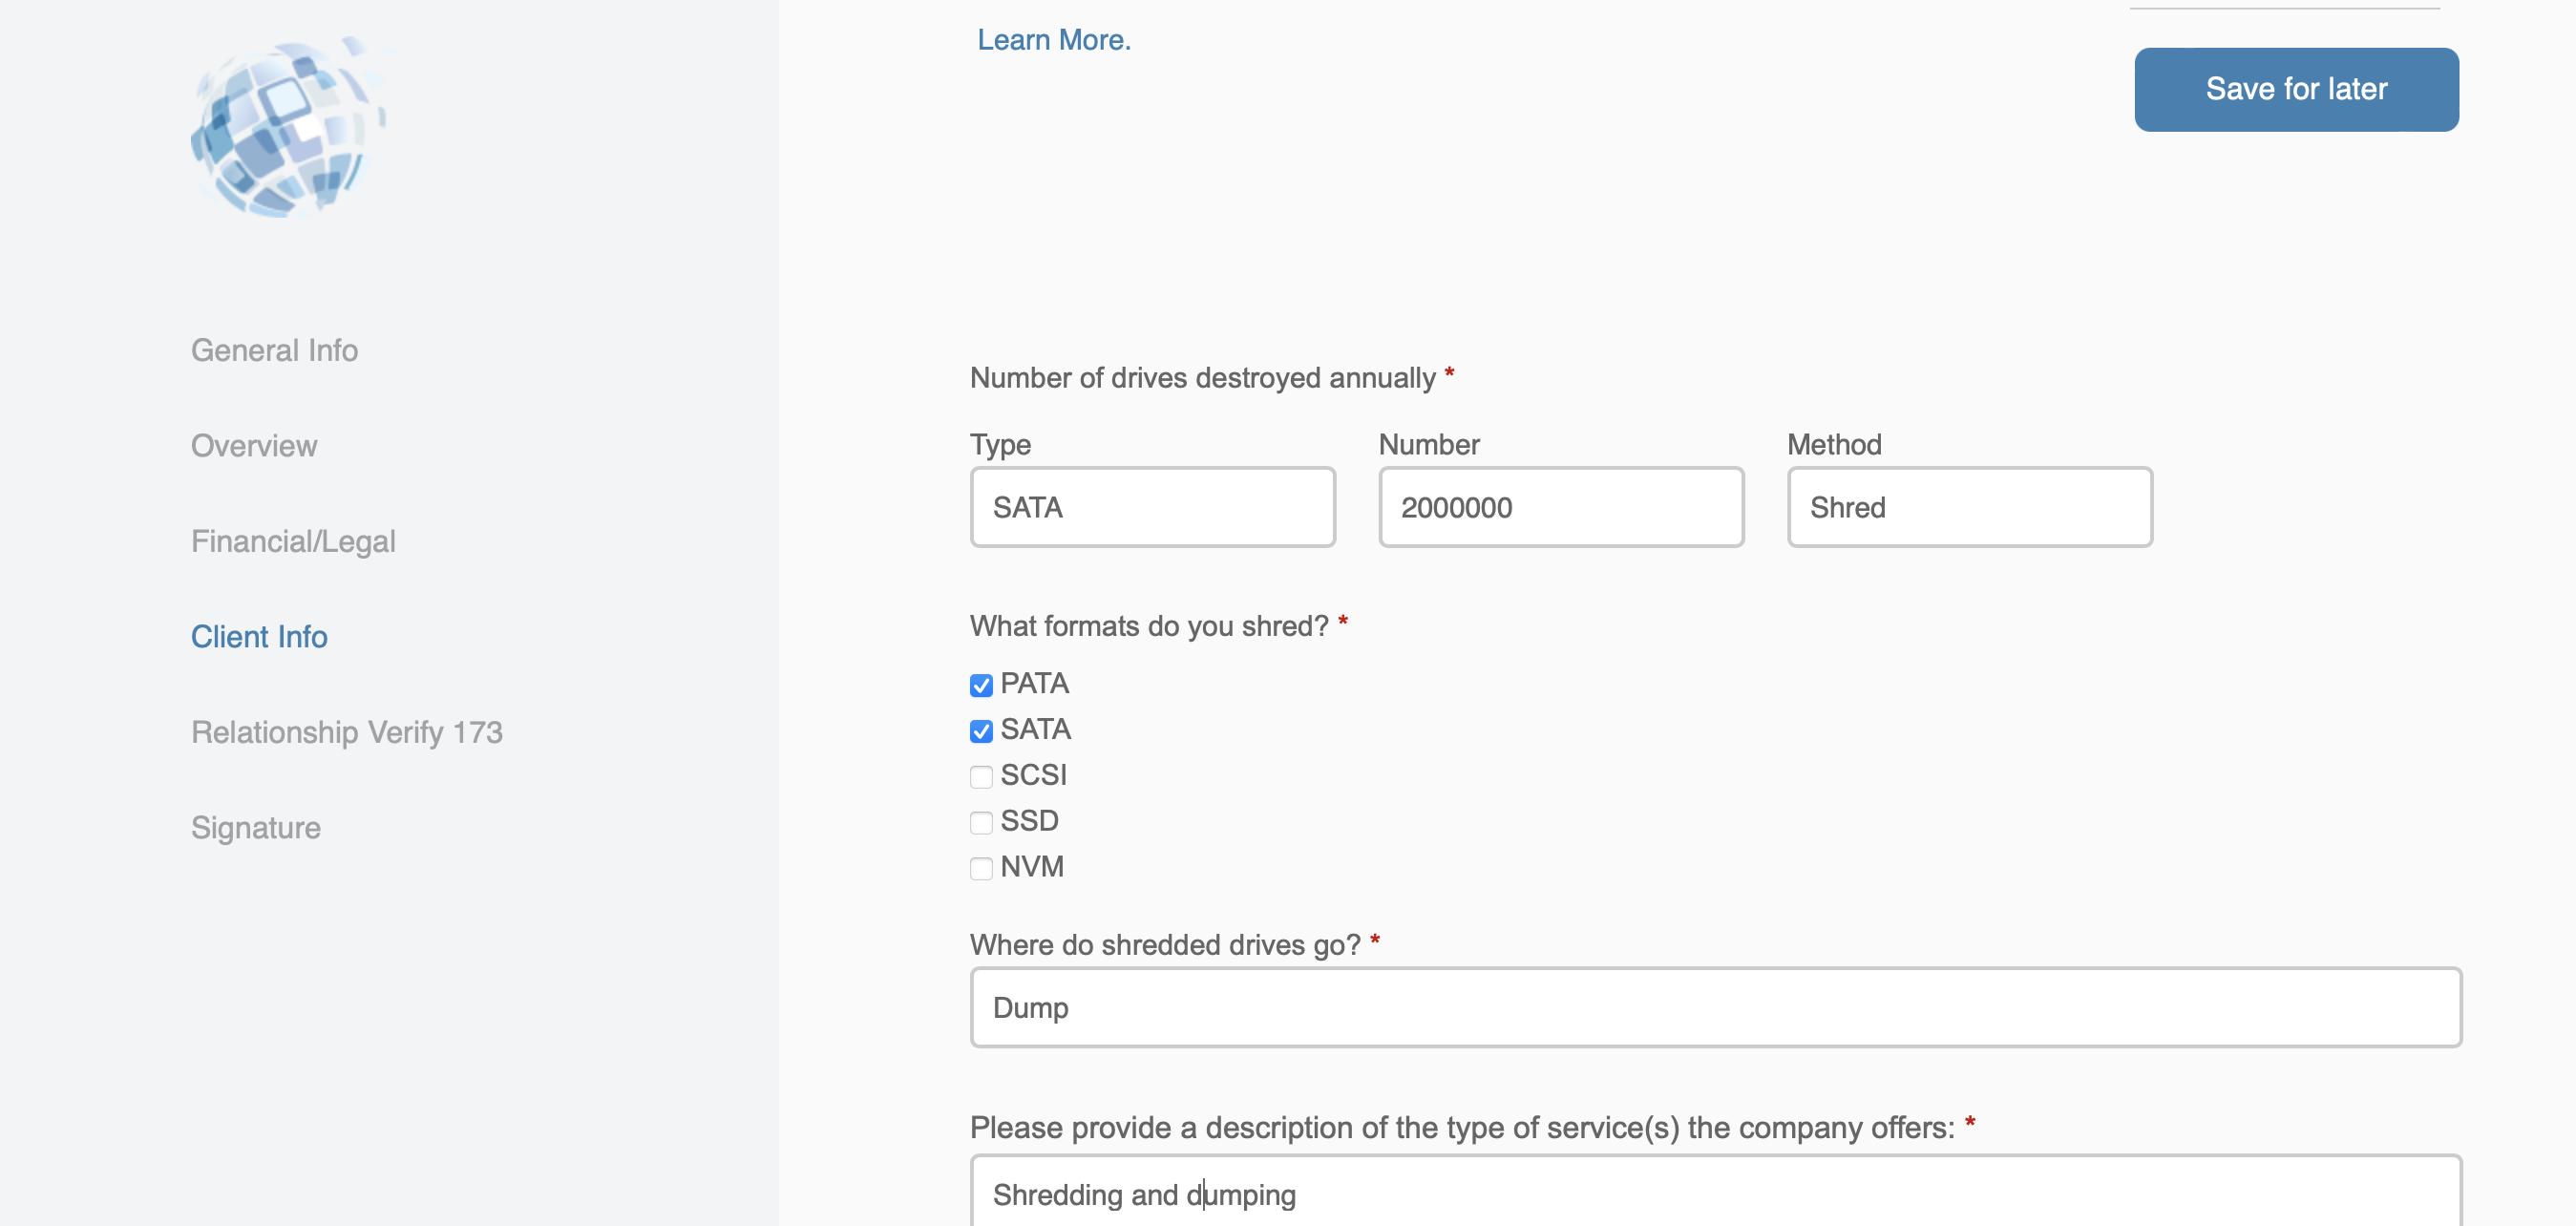
-
On the Relationship page, enter the names of the workers
and the worker information that will be completing the work on the
project.

-
On the Signature page, verify the information in the
questionnaire is correct and enter your name.
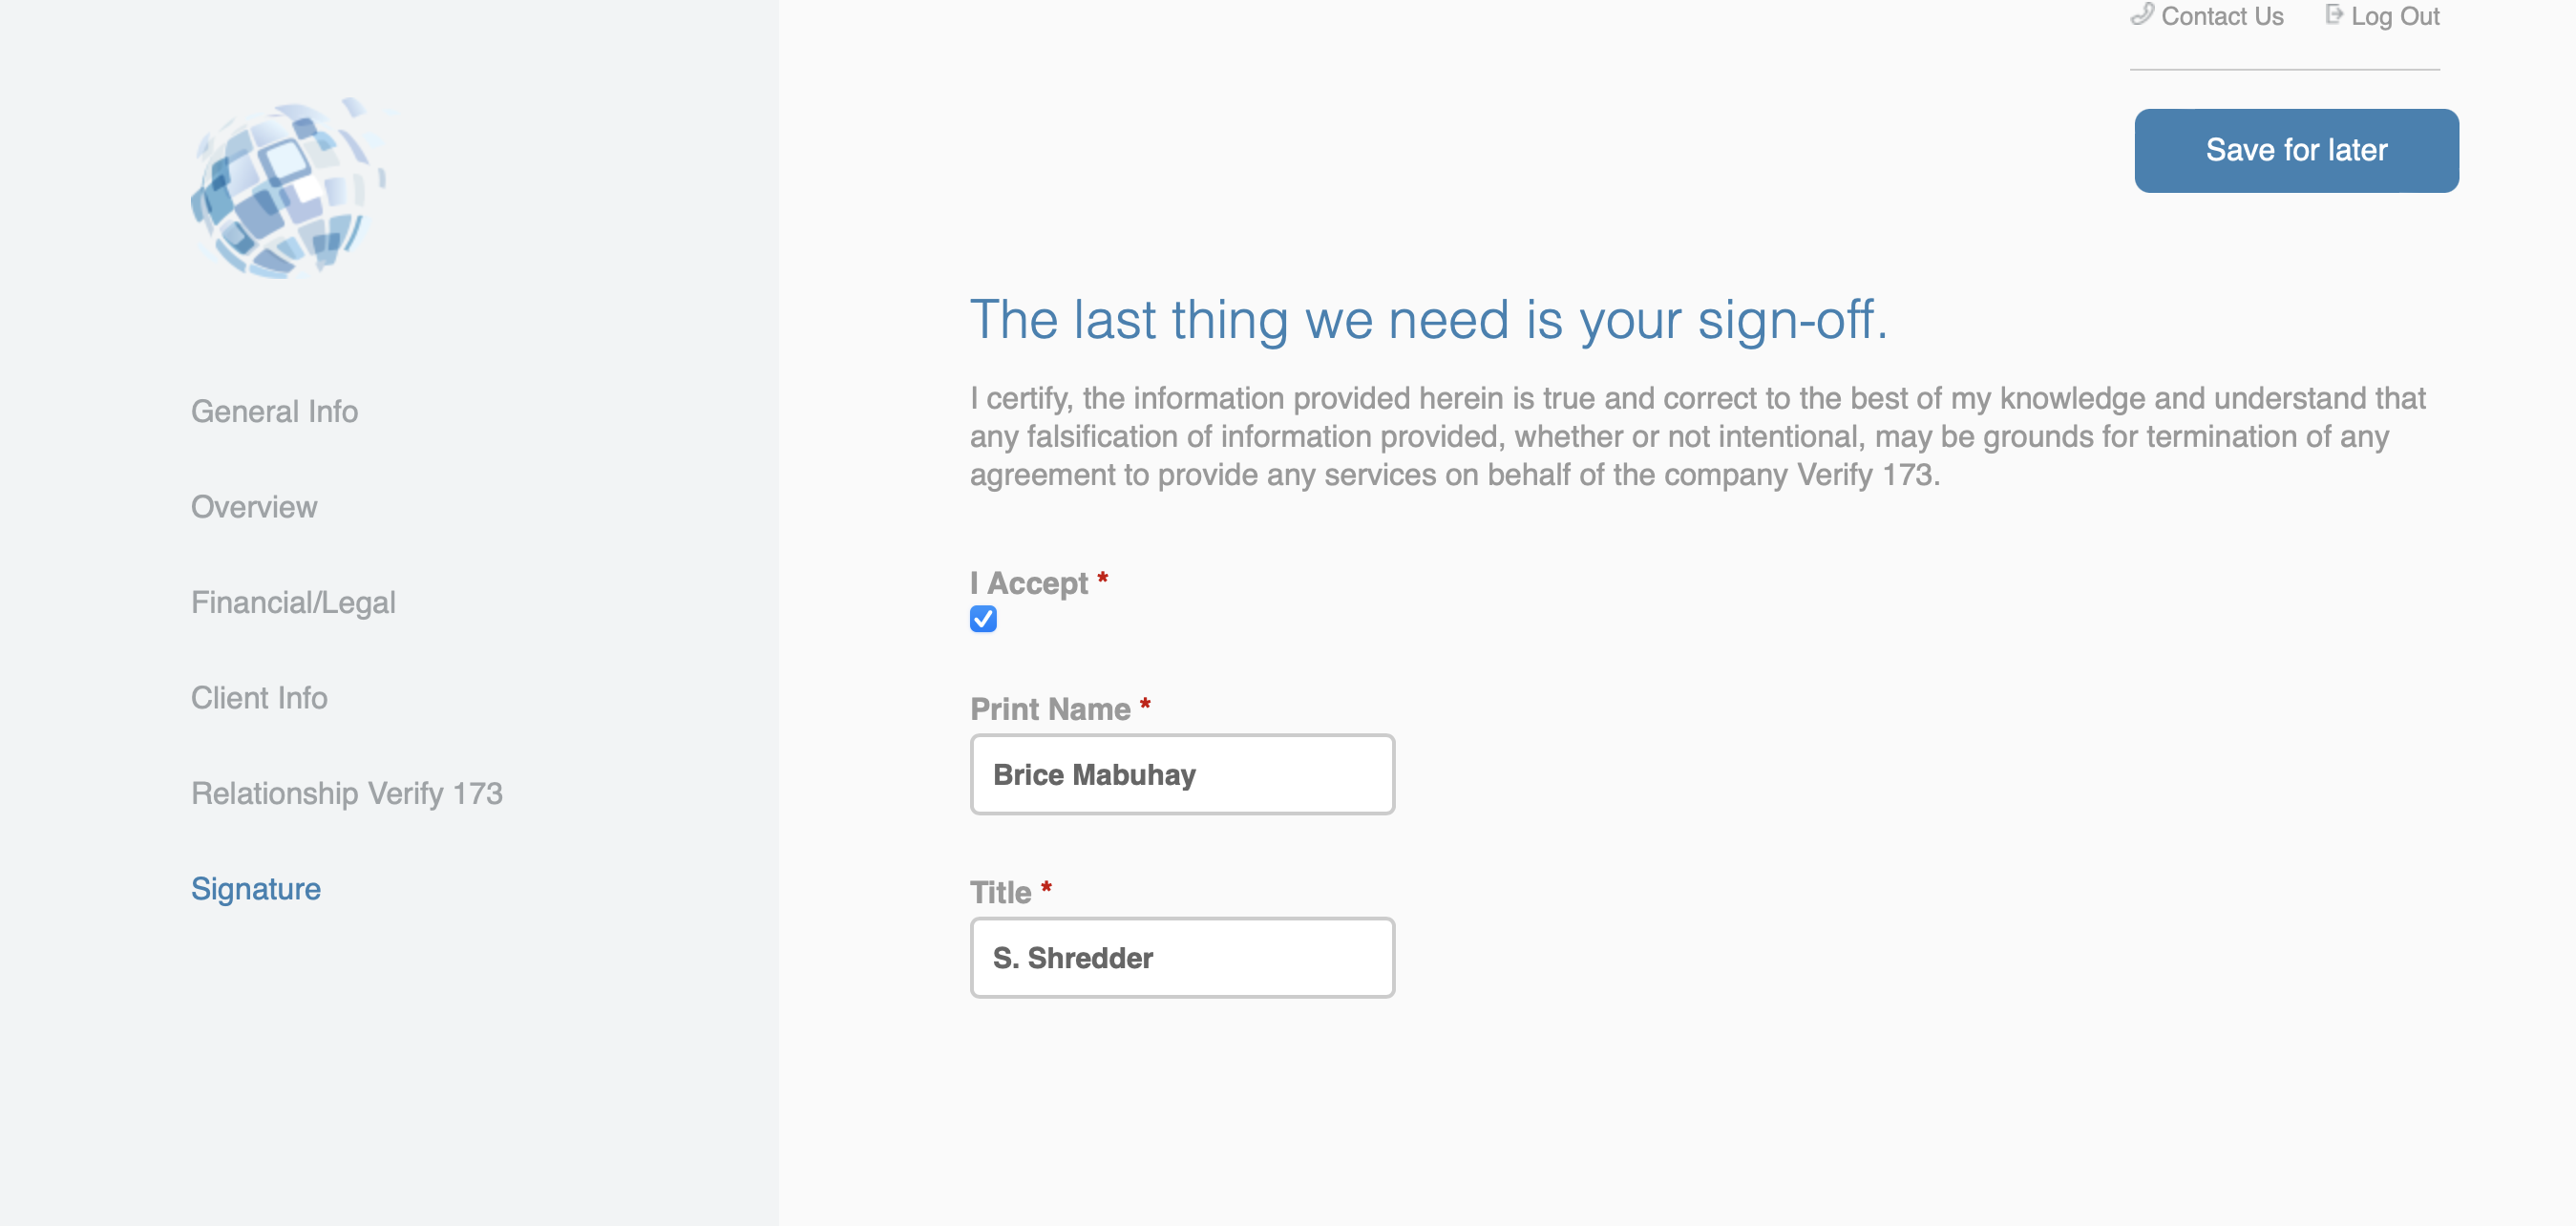
The information is sent to the Magnit Score Desk for review. For more information about business validation, contact your Program Representative.
Respond to an Questionnaire
If one of your client organizations has requested information and/or quote details, you can respond by adding them to the request. Questionnaire functionality is enabled for project request/engagements, and require you to add your estimations to the request. Once submitted, they are reviewed by the client organization and the MSP organization assigned to the project.
In addition to email notifications sent to you requesting a quote, you can view requests on your Home page. Requests that require you to submit a quote have a due date, and appear in the Status column of the View section.
If you know the request is going to require a quote. you can also locate the request on the Requisition page, and view the quote due date.
For more information about how to complete the quote information, see Enter a Quote.
Enter a Quote
![]()
If the client organization has included guidelines, the sections in the quote are expanded by default (switch enabled). You can edit or remove any of the guideline information as necessary. Closing sections (switch disabled) does not remove the guideline information from the quote.
- Locate the request using the search functionality, or click the request on the Home page with a due date.
- Click Quotes.
-
In the request details, click Quotes.
If you are entering a new quote, this section is empty.
If you have not submitted a quote, click Add Quote. If you have already submitted a quote, your information appears on the Quotes tab.
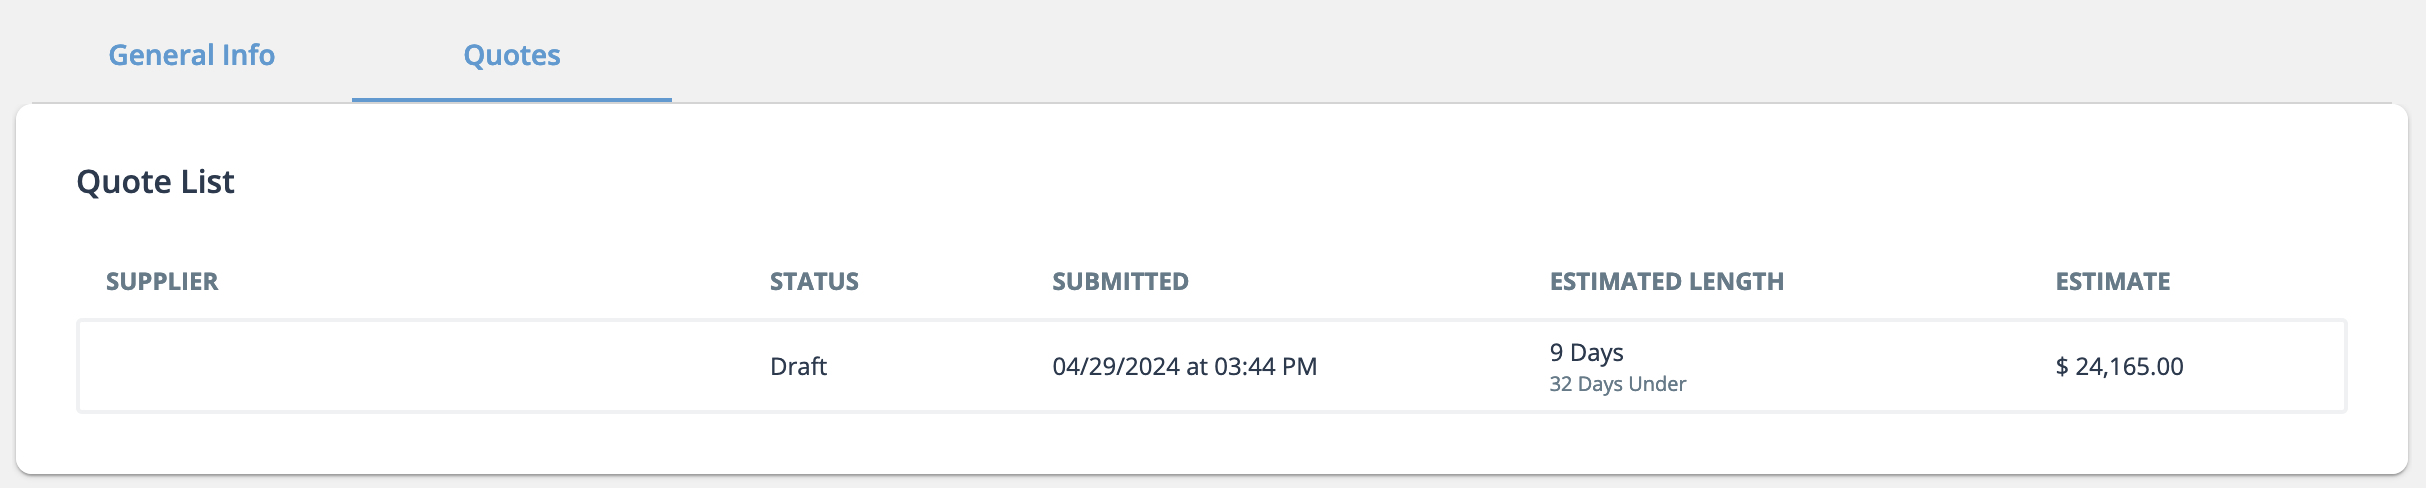
-
In the Quote Summary section, enter the following
information:
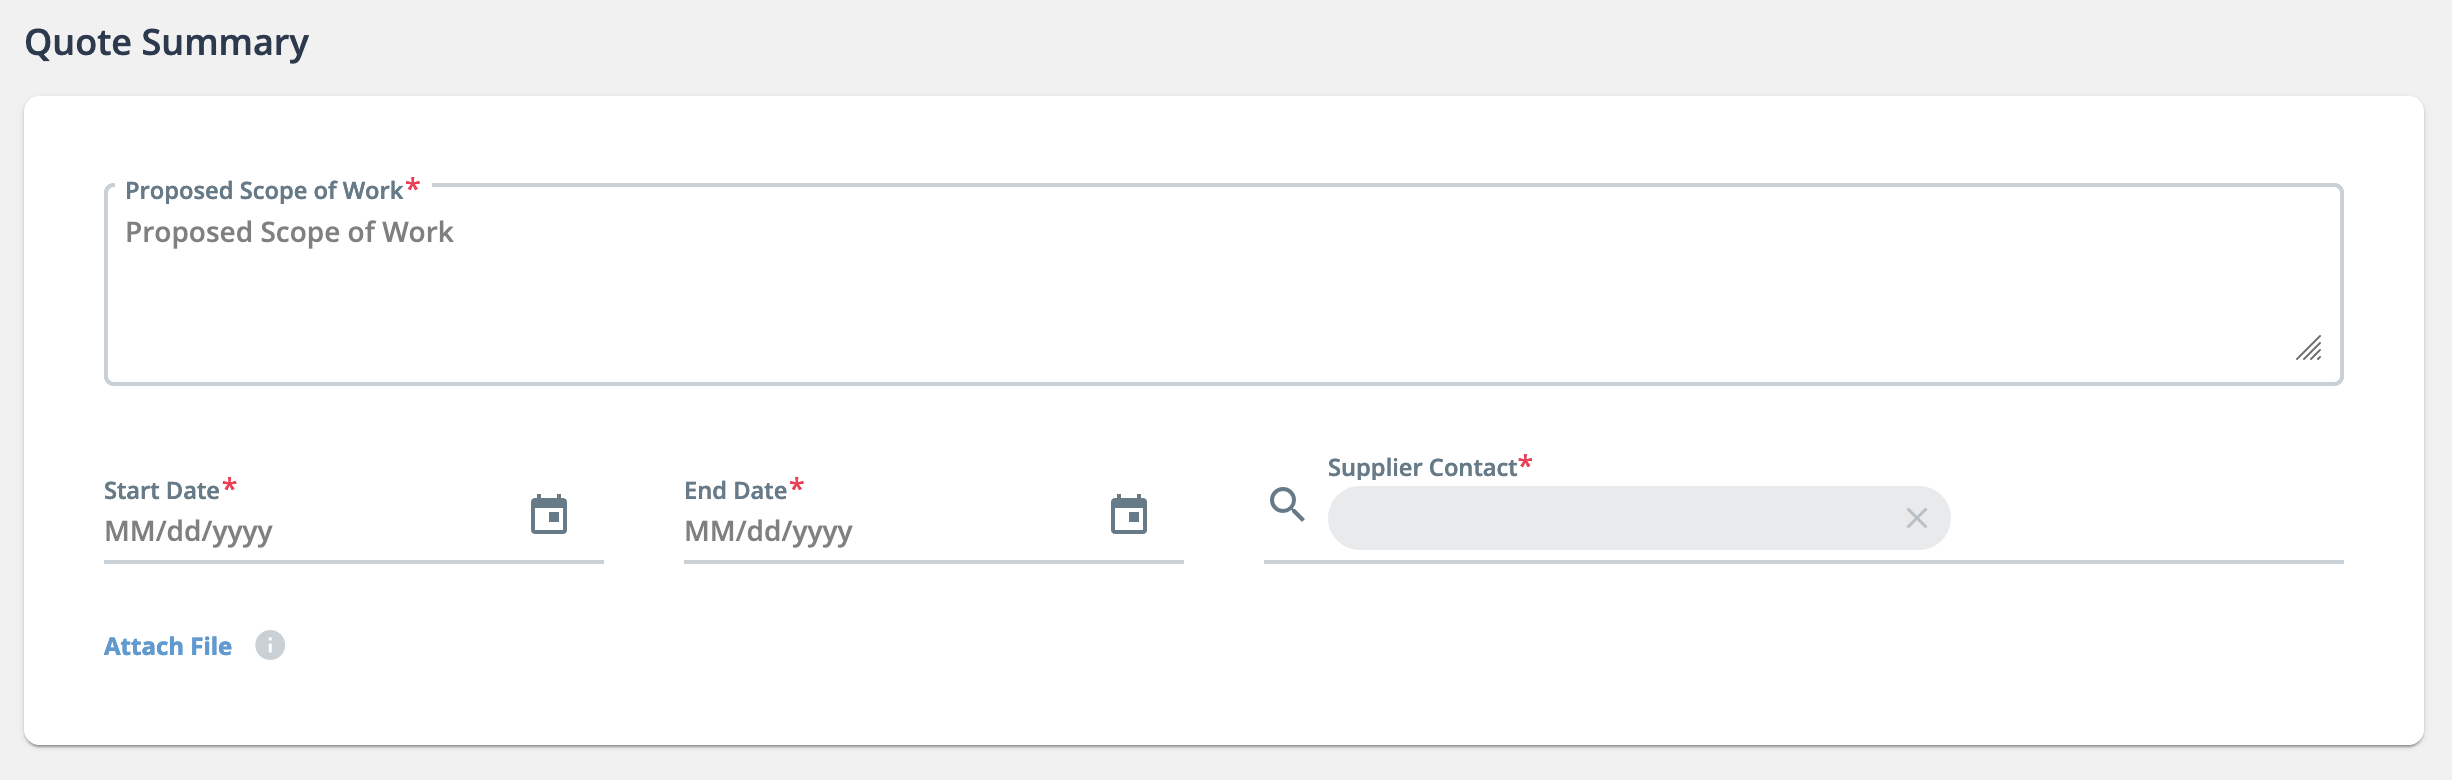
- Proposed Scope of Work
- Start Date - The start date of the project
- End Date - The end date of the project
- Supplier Contact - Enter the supplier contact. The supplier user from your supplier organization assigned to the request is automatically pre-populated in this field. You can remove the user by clicking X and typing the contact user's name. The VMS suggests user names that match the text entered.
Note:All fields in this section are required. - To add supporting documentation for the quote, click Attach File, and choose the file from your file browser.
- Expand and include any quote information that is required for your submission.
-
In the Authorized Supplier Signatory section, enter the
following required information:

- Name - The name of the supplier that is authorized to sign the Statement
of Work document. You can preview the SOW document content by navigating
to the tab and clicking
 .
. - Title - The title of the signatory
- Email - The email address of the signatory. In order to sign the SOW document, the user is required to have the correct permissions in the VMS.
- Name - The name of the supplier that is authorized to sign the Statement
of Work document. You can preview the SOW document content by navigating
to the tab and clicking
-
If the client organization has configured an optional questionnaire, the
Request for Information section appears under the
signatory information.
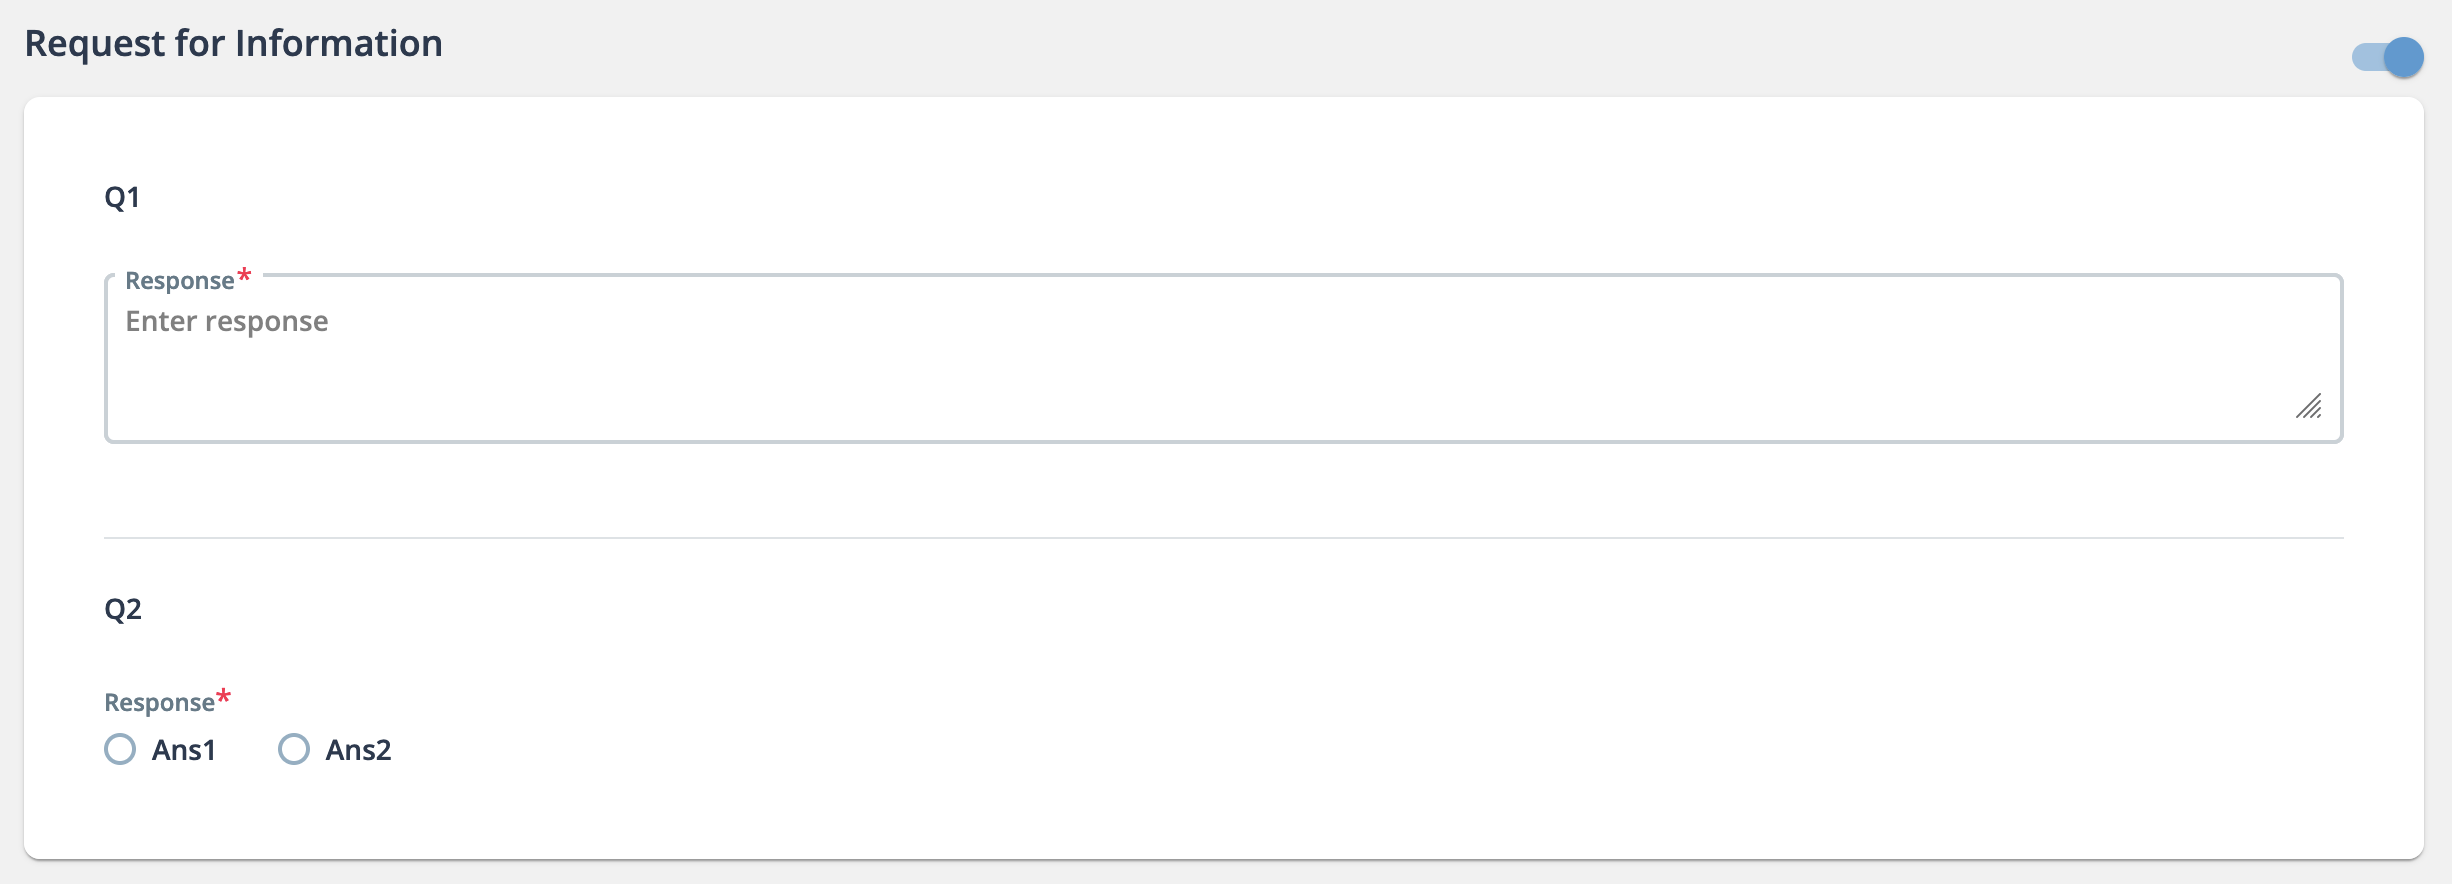
Questions can require text input, or selection of pre-configured answers.
-
Click
 .
.
Set Up Interviews with Candidates
When an interview request is configured, you can contact your worker, and confirm a proposed time. You can also withdraw a candidate for any reason for a pending interview.
- Navigate to the Home page in the Supplier view.
-
Click Requisition.
Note:If you are filling a new request, you can access new/open requests in the View section on the Home page. For more information about this section, see Home Page.
-
Use the search functionality to locate the request to fill. For more
information about the search feature, see Searching Through Requisition Data.
Note:To list all requests in all statuses for a client organization, do not configure any parameters and click.
- Click the blue request number in the Req# column for the request to fill.
- On the request page, click Interview.
- In the table, locate the candidate. You can use the First/Prev/<page_number>/Next/Last buttons to toggle the table view.
-
Click
 .
.
-
Review the interview details. You can edit the client manager contact
information by clicking .
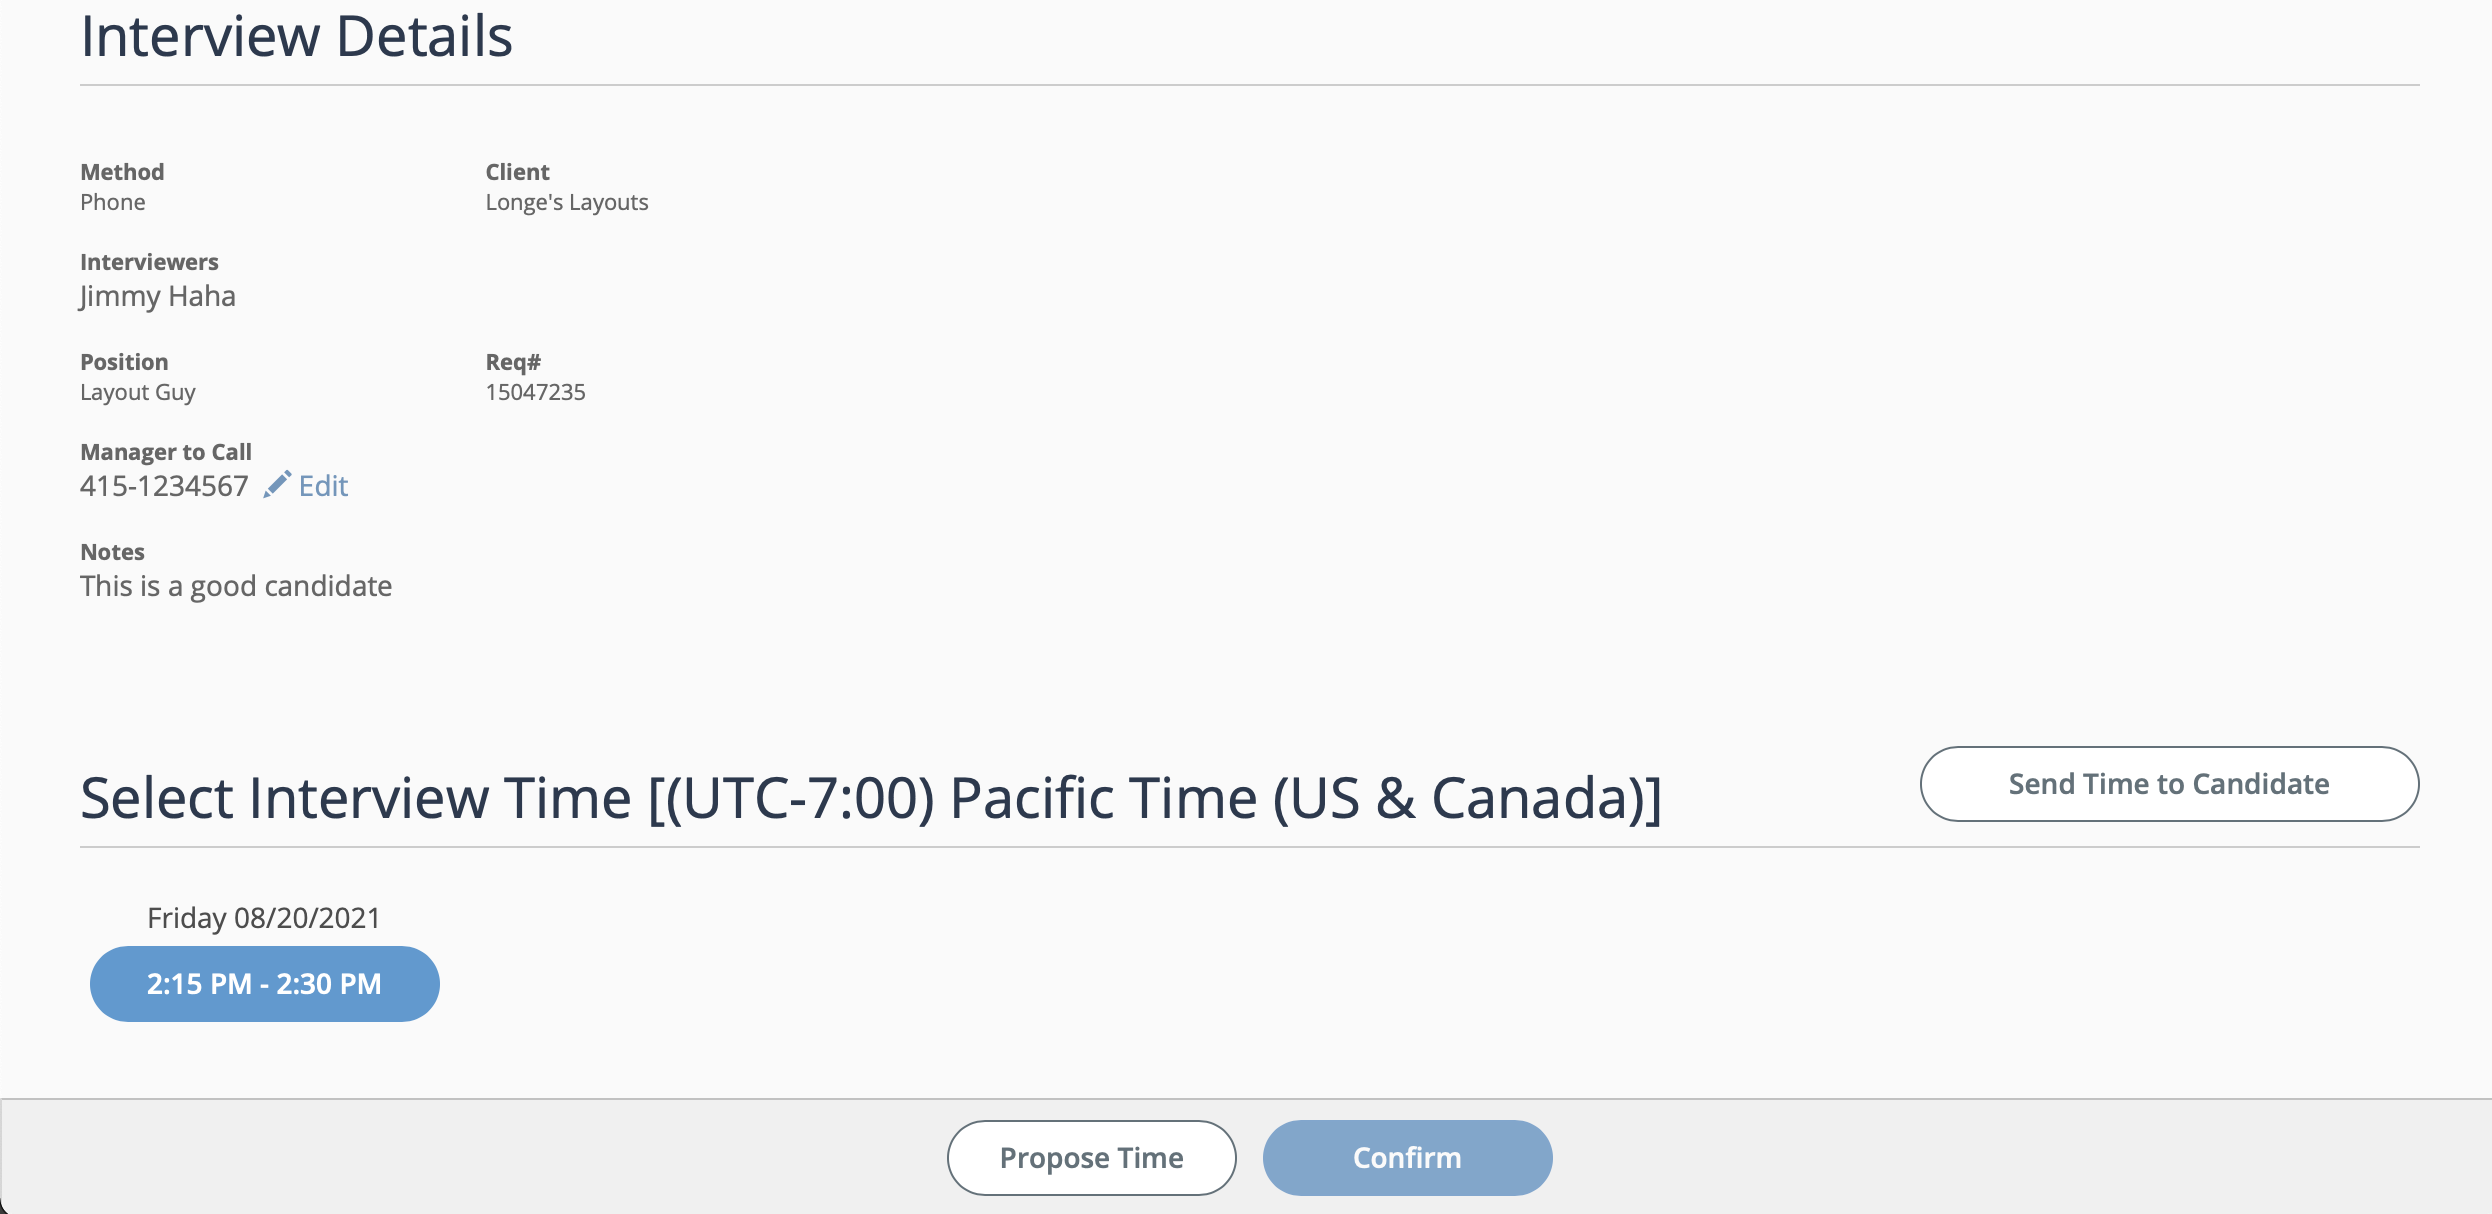
-
Select an interview time by clicking the button with the appropriate
times.
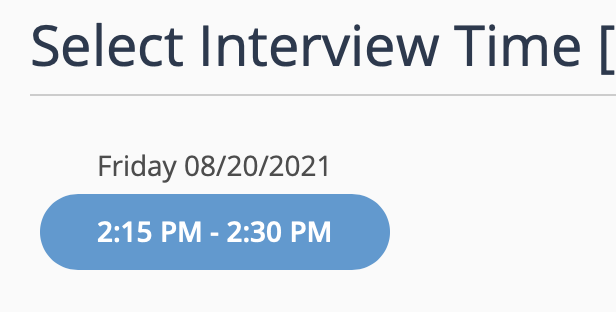
If you need to configure a new interview time, click
 , and in the calendar, select the timespan, and
then click
, and in the calendar, select the timespan, and
then click  . Both the MSP and the client manager are
notified of the time.
. Both the MSP and the client manager are
notified of the time. -
After you select a time, click
 .
.
-
After confirmation, click
 . The candidate is notified by email.
Alternately, you can complete the following actions in this section:
. The candidate is notified by email.
Alternately, you can complete the following actions in this section:
 - Opens the scheduler calendar. You can
also access this action from the candidates table
(Interview tab).
- Opens the scheduler calendar. You can
also access this action from the candidates table
(Interview tab). - Cancels the interview. You can
also access this action from the candidates table
(Interview tab, then
- Cancels the interview. You can
also access this action from the candidates table
(Interview tab, then  ).
).
Confirm Interview
- Navigate to the Home page in the Supplier view.
-
Click Requisition.
Note:You can also set the View drop down to New Requisitions and locate the request in the View: section of the Home page.
- Locate the request by using the search functionality. For more information about search, see Searching Through Requisition Data.
- On the request information page, click Interview.
-
Locate the candidate in the Candidate Name column, and
click .
- Review the details of the interview.
- Click on the suggested interview time (or propose a new time).
-
Click .
Confirm Financials
Once a request is filled, confirm the financial information on the engagement.
Financial information is input by the MSP assigned to the engagement. The worker cannot enter time or expenses until the MSP completes this information. By confirming the information, you agree with the information input by the MSP.
- Navigate to the Home page in the Supplier view.
- Click Requisition.
- Locate the filled request/engagement in the table, and click the blue engagement number text. You can also use the search functionality to locate the engagement.
- In the Financials section, review the details.
-
In the Financials section (blue) header, click .
- In the Effective Date field, enter the effective date. The effective date must be the start date of the engagement. This date might be in the past or future.
- In the Justification field, enter text that describes the justification.
-
Click
 .
.
Engagements Page
After requests have been filled (workers added, financials configured, contracts signed), they are converted to engagements. You can view engagement data on the Engagements page.

You can use the same filter functionality as the Requests page (see Searching Through Requisition Data).
Billing Page
Worker's billing items can be reviewed on the Billing page. You can view all items, use the search to locate a particular billing item to review, or add a billing item for a worker.
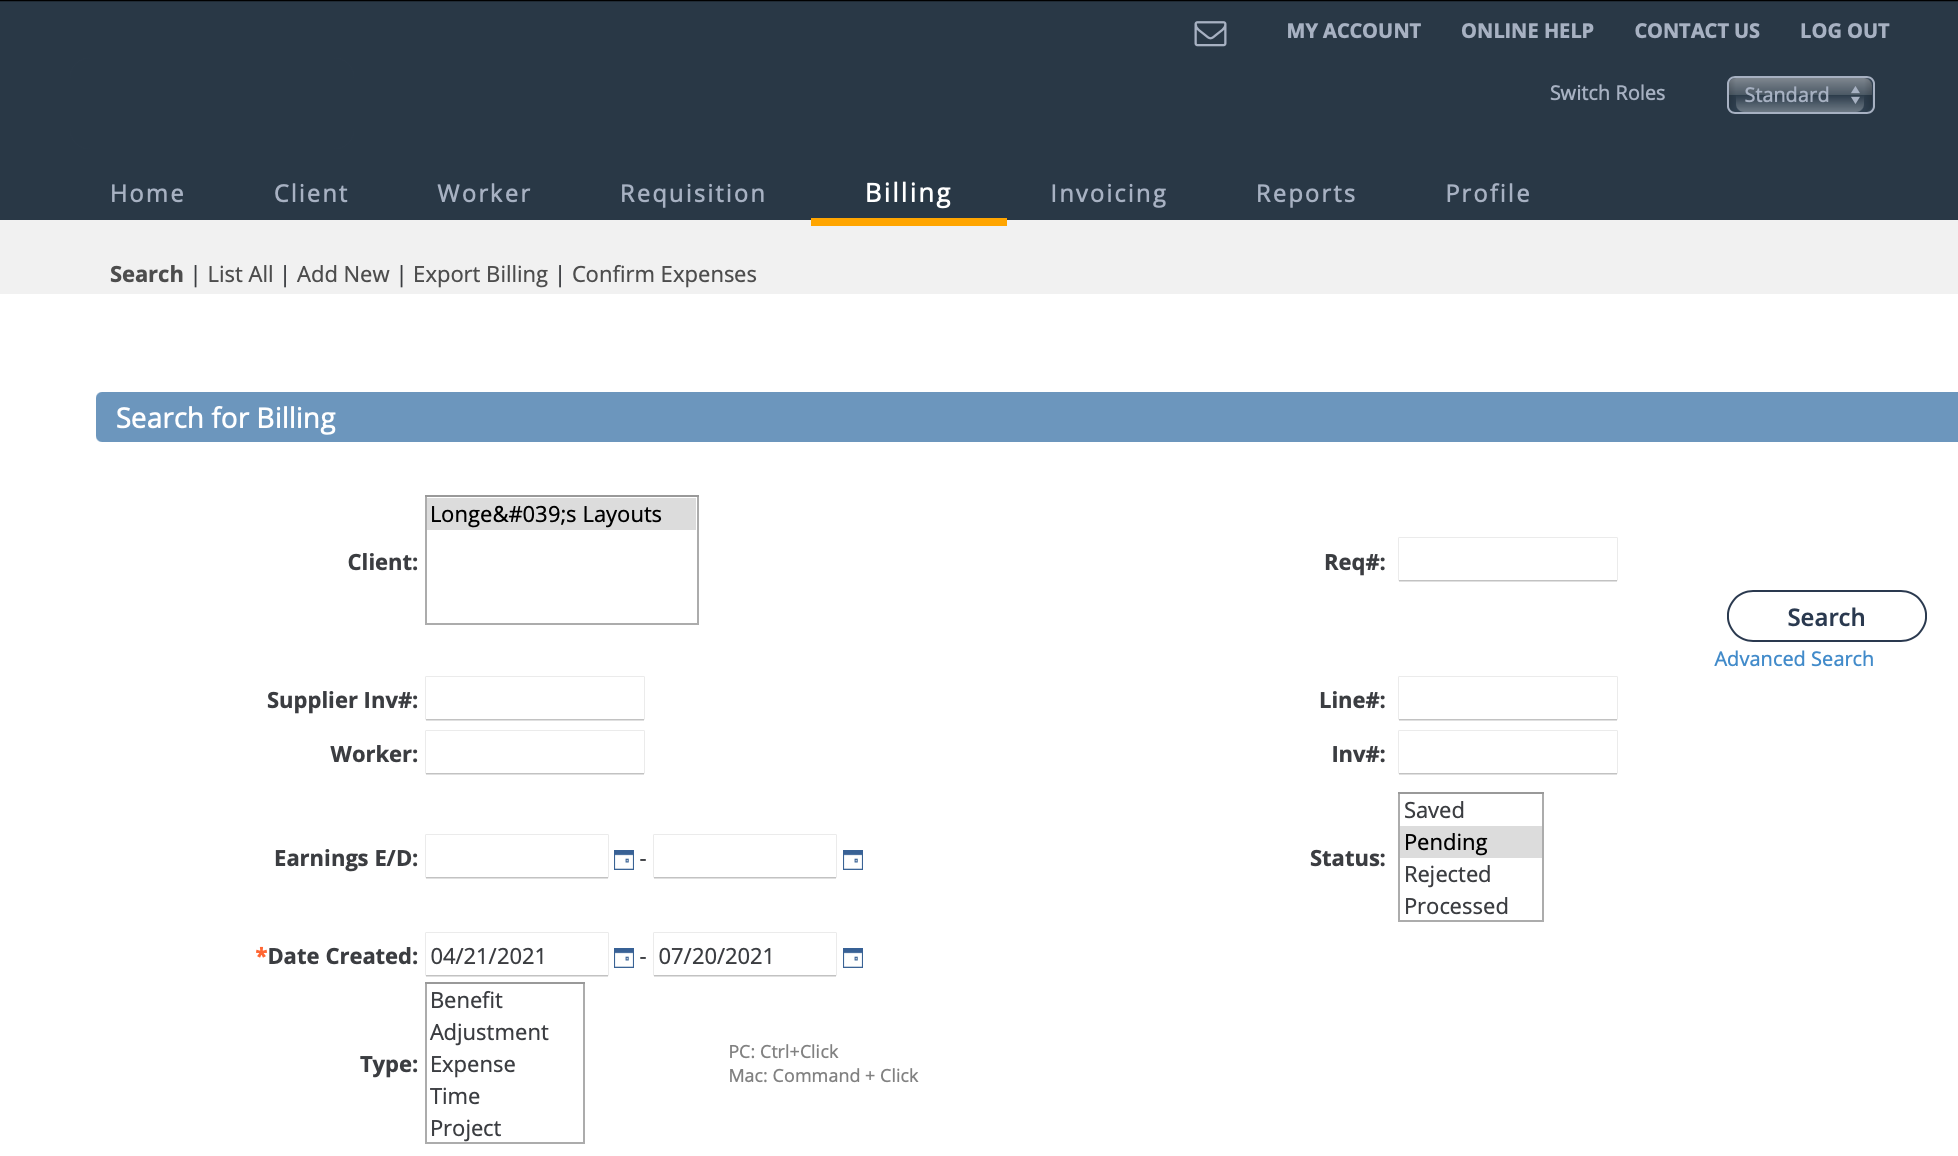
- Search - use the search functionality to locate billing items. You can use parameters to filter your search. For more information about using the search, see Searching Through Requisition Data.
- List All - Displays a complete of billing items in all statuses. This view
cannot be filtered.
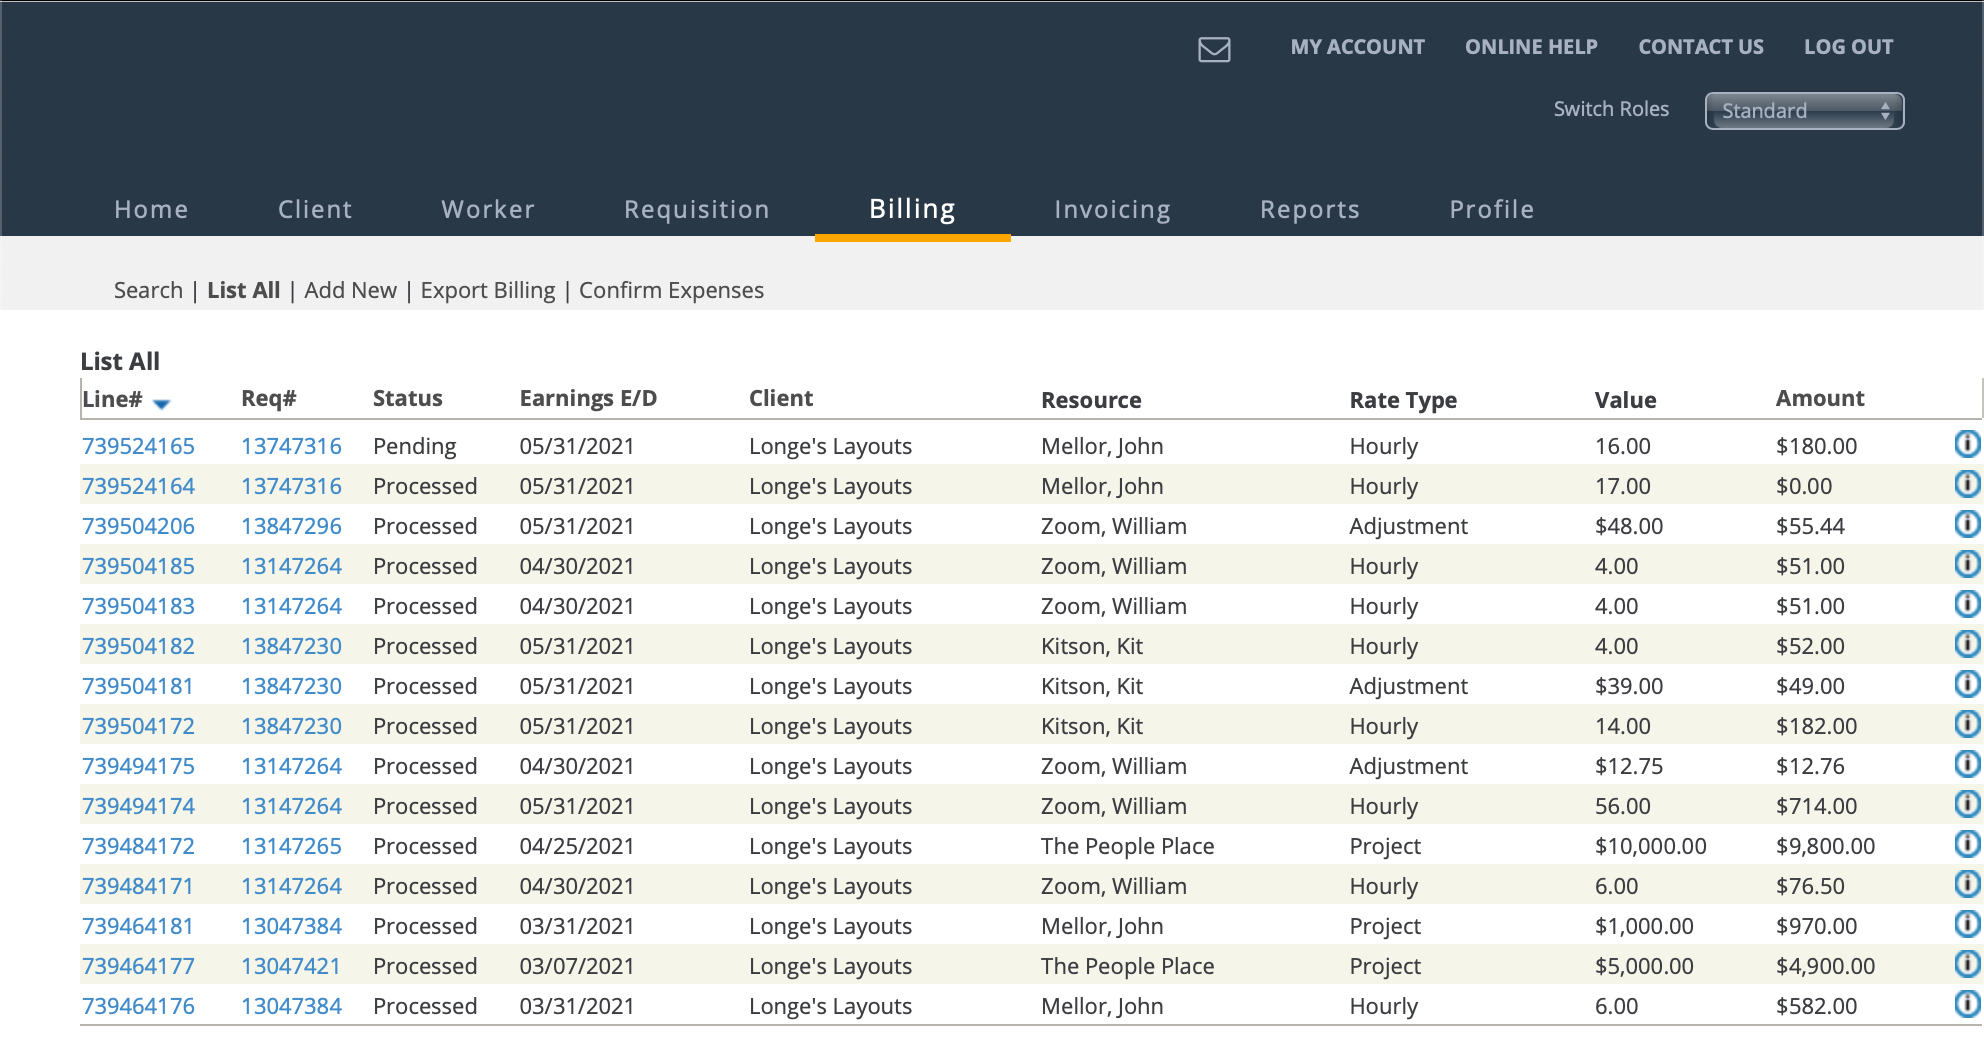
Click the information icon to expand the line for more detail.
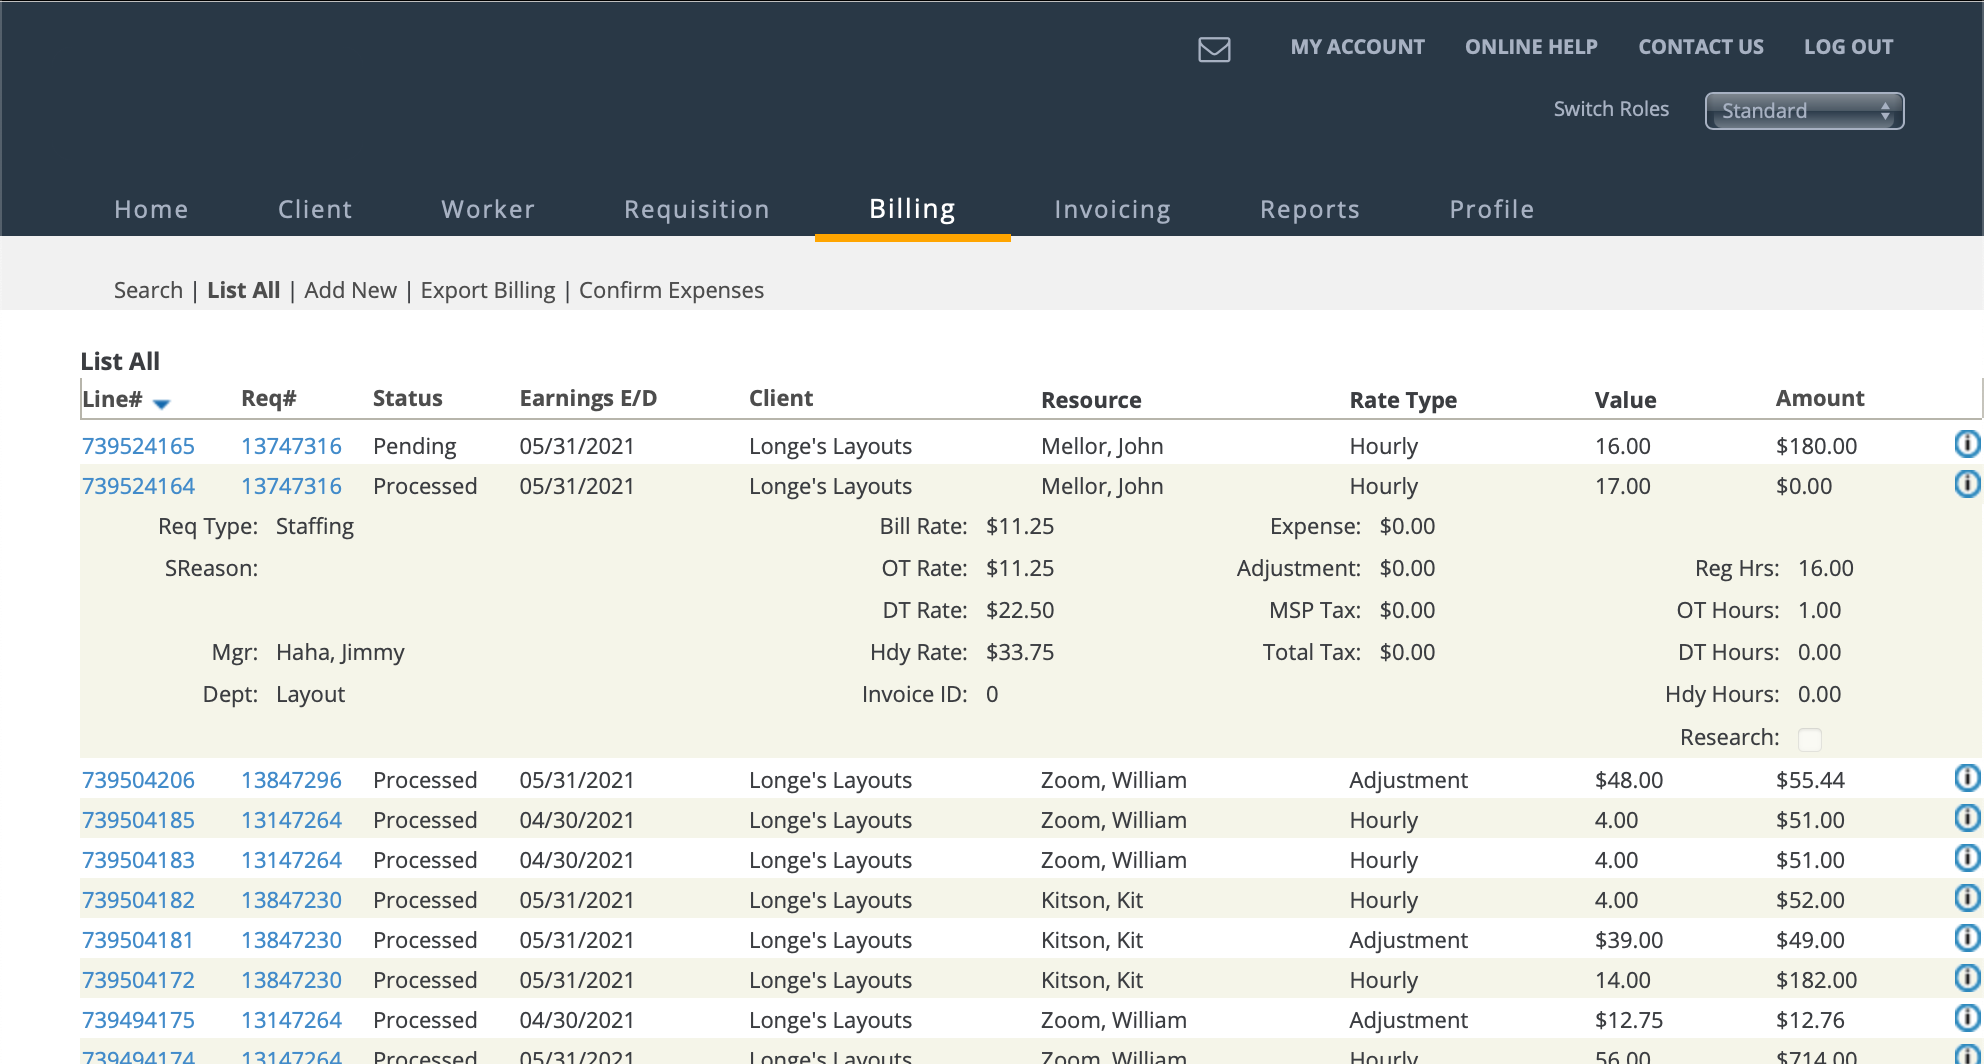
You can also click the line item number (blue text) in the Line# column to view the billing item in more detail. For more information about billing line detail, see Billing Item Detail.
- Add New - Create a billing item for a worker or project. For more information about this task, see New Billing for Worker.
- Export Billing - Export billing items as a data package that can be compiled into a report. For more information about reporting, see Reporting.
- Confirm Expenses - Confirm expenses for engagements. For more information about this task, see Confirm Expenses.
Billing Item Detail
| Area | Field | Description |
|---|---|---|
| Billing GenInfo | Line# | The individual line number for the billing item. |
| Inv# | The invoice number, if the billing item is associated with an
invoice. You can also export billing items as report. For more information about this task, see Export Billing. |
|
| Alternate Supplier Inv # | The alternate invoice number. | |
| Supplier Inv# | The original supplier invoice number. | |
| Up Fee# | The up fee invoice number. | |
| Client Check# | The client check number associated with the billing. | |
| AP Check# | The AP check number. | |
| Comments | Any text comments added to the billing item. | |
| Type | The category of billing for the billing item. | |
| Earning E/D | The earnings end date. | |
| Status | The status of the billing. | |
| Billing Status Reason | The given reason (system reason) for the status. | |
| Supplier Submit Date | The date that supplier alternate invoice # was added to the billing item. | |
| Down Fee Inv# | The down fee invoice number. | |
| Research | Check box (selected) indicating that the billing item is marked for research (further investigation). | |
| Billing Transfer (sub area) | Transfer Queue | Check box (selected) indicating that the billing item is in a
transfer queue. Transfer queues refer to the process of transferring the billing information to a back end system for tax calculation (if enabled) and financial recording. |
| Transferred | Check box (selected) indicating that the billing item has completed the transfer process. | |
| Errored | Check box (selected) indicating that there was an error in the transfer process. | |
| Pending Transfer Confirmation | Check box (selected) indicating that the application is awaiting confirmation from an external system of receipt of the billing item. | |
| Payment Queue | Check box (selected) indicating that the billing item is in a payment queue. | |
| Errored Reason | If the transfer process errored for any reason, the system generated text describing the error. | |
| Financials This information is configured in the engagement financials. Configuration of financial information is completed by an MSP user. |
Rate Application | The rate application |
| Work Period | The work period | |
| Currency | The currency for the engagement | |
| Time Entry Interface | The timecard defined for the engagement | |
| OT Rule | The overtime rule | |
| Supplier FLSA Classification | The Fair Labor Standards Act classification of the work performed in the engagement. | |
| Billing Elements (sub area) This area displays the amounts in each category defined for the billing item. |
Regular Hours | Any regular hours |
| OT Hours | Any overtime hours | |
| DT Hours | Any double time hours | |
| Holiday Hours | Any holiday hours | |
| Expenses | Any expenses associated with the billing item. Expenses accrued by a worker must be confirmed before they are processed. | |
| Adjustment | Any adjustment amount | |
| Pay Supplier | The amount that is paid to the supplier (vendor). | |
| Non Billable | Check box (selected) indicating that the billing item is marked as non-billable to the client. | |
| MSP Down Amount | Any down amount paid the to the MSP organization managing the client organization's account. | |
| Volume Discount | Any volume discount, as defined on the engagement. | |
| Prompt Pay | Any prompt pay discount. | |
| Tax | Taxes generated and assigned to the billing item. Taxes can be system generated, or if your user account has the correct permission, you can edit/modify taxes for billing items. |
|
| Billing Parameters (sub area) | Table that displays the breakdown of amounts and values for the individual billing item. | |
| Dates of Interest Note: A blank field indicates that the
billing item has not reached a point in the process to acquire a
timestamp. |
Date/Time Created | Date and time that the billing item was added to the system. |
| Date/Time Exported | Date and time that the billing item was exported. For more information about exportation, see Export Billing. | |
| Date Client Posted | ||
| Date Status Pending | If the billing item is in a 'Pending' status, the date and time that it was placed in that status. | |
| Date Posted to Client GL | The date and time that the billing item was posted to the client's general ledger. | |
| Date Escalated | The date that the billing item was escalated. | |
| Date Invoiced | The date and time that the billing time was added/consolidated to an invoice. | |
| Date Client Paid | The date and time that the client organization remitted payment for the billing item. | |
| Date sent to PeopleSoft | The date and time the billing item was sent to the PeopleSoft system for processing. | |
| Operational Parameters | Filter Billing | Displays the user types and views in which the billing item is accessible. For example, if this field is set t o 'MSP : Supplier', then both the MSP and the vendor are able to view the billing details. |
| Detail List | Time Card Details | Displays the time card entries configured for the billing item. These details can be created by multiple different users. |
New Billing for Worker
As a supplier/vendor, you can submit billing on behalf of a worker associated with your organization. You can also add billing on behalf of another supplier/vendor organization to a client organization that you contract with.
You add billing for work completed, or expenses incurred directly tied to a requisition. Adjustments can also be added if a worker is missing hours, or incorrectly enters time on a timesheet. All information for the billing should be added to the billing configuration. Once rebilling is submitted, it is moved to a 'Pending' status. Approvals may be required based on the client organization's Approval Routing workflow configuration.
The types of billing that can be submitted is specified in your supplier organization's service type contract with the MSP organization. If you need to enter a particular billing type and cannot, contact your Program Representative.
It should be noted that workers, the service providers (MSP), or client managers can enter billing. You may not be required to add billing for engagements. You care required to have permission to add billing set on your user account as well.
Submit Timecard for Worker
- The timecard displayed for an engagement is set in the engagement's Financials section.
- Options displayed on a timecard are based on the timecard type. Some options are required to submit the billing.
- The entire timecard must be filled out. If entries display, they require information for submission.
- If you are adding billing for a project worker, and this section is blank, it could be due to a missing or incorrect timecard configuration on the project. Contact your Program Representative.
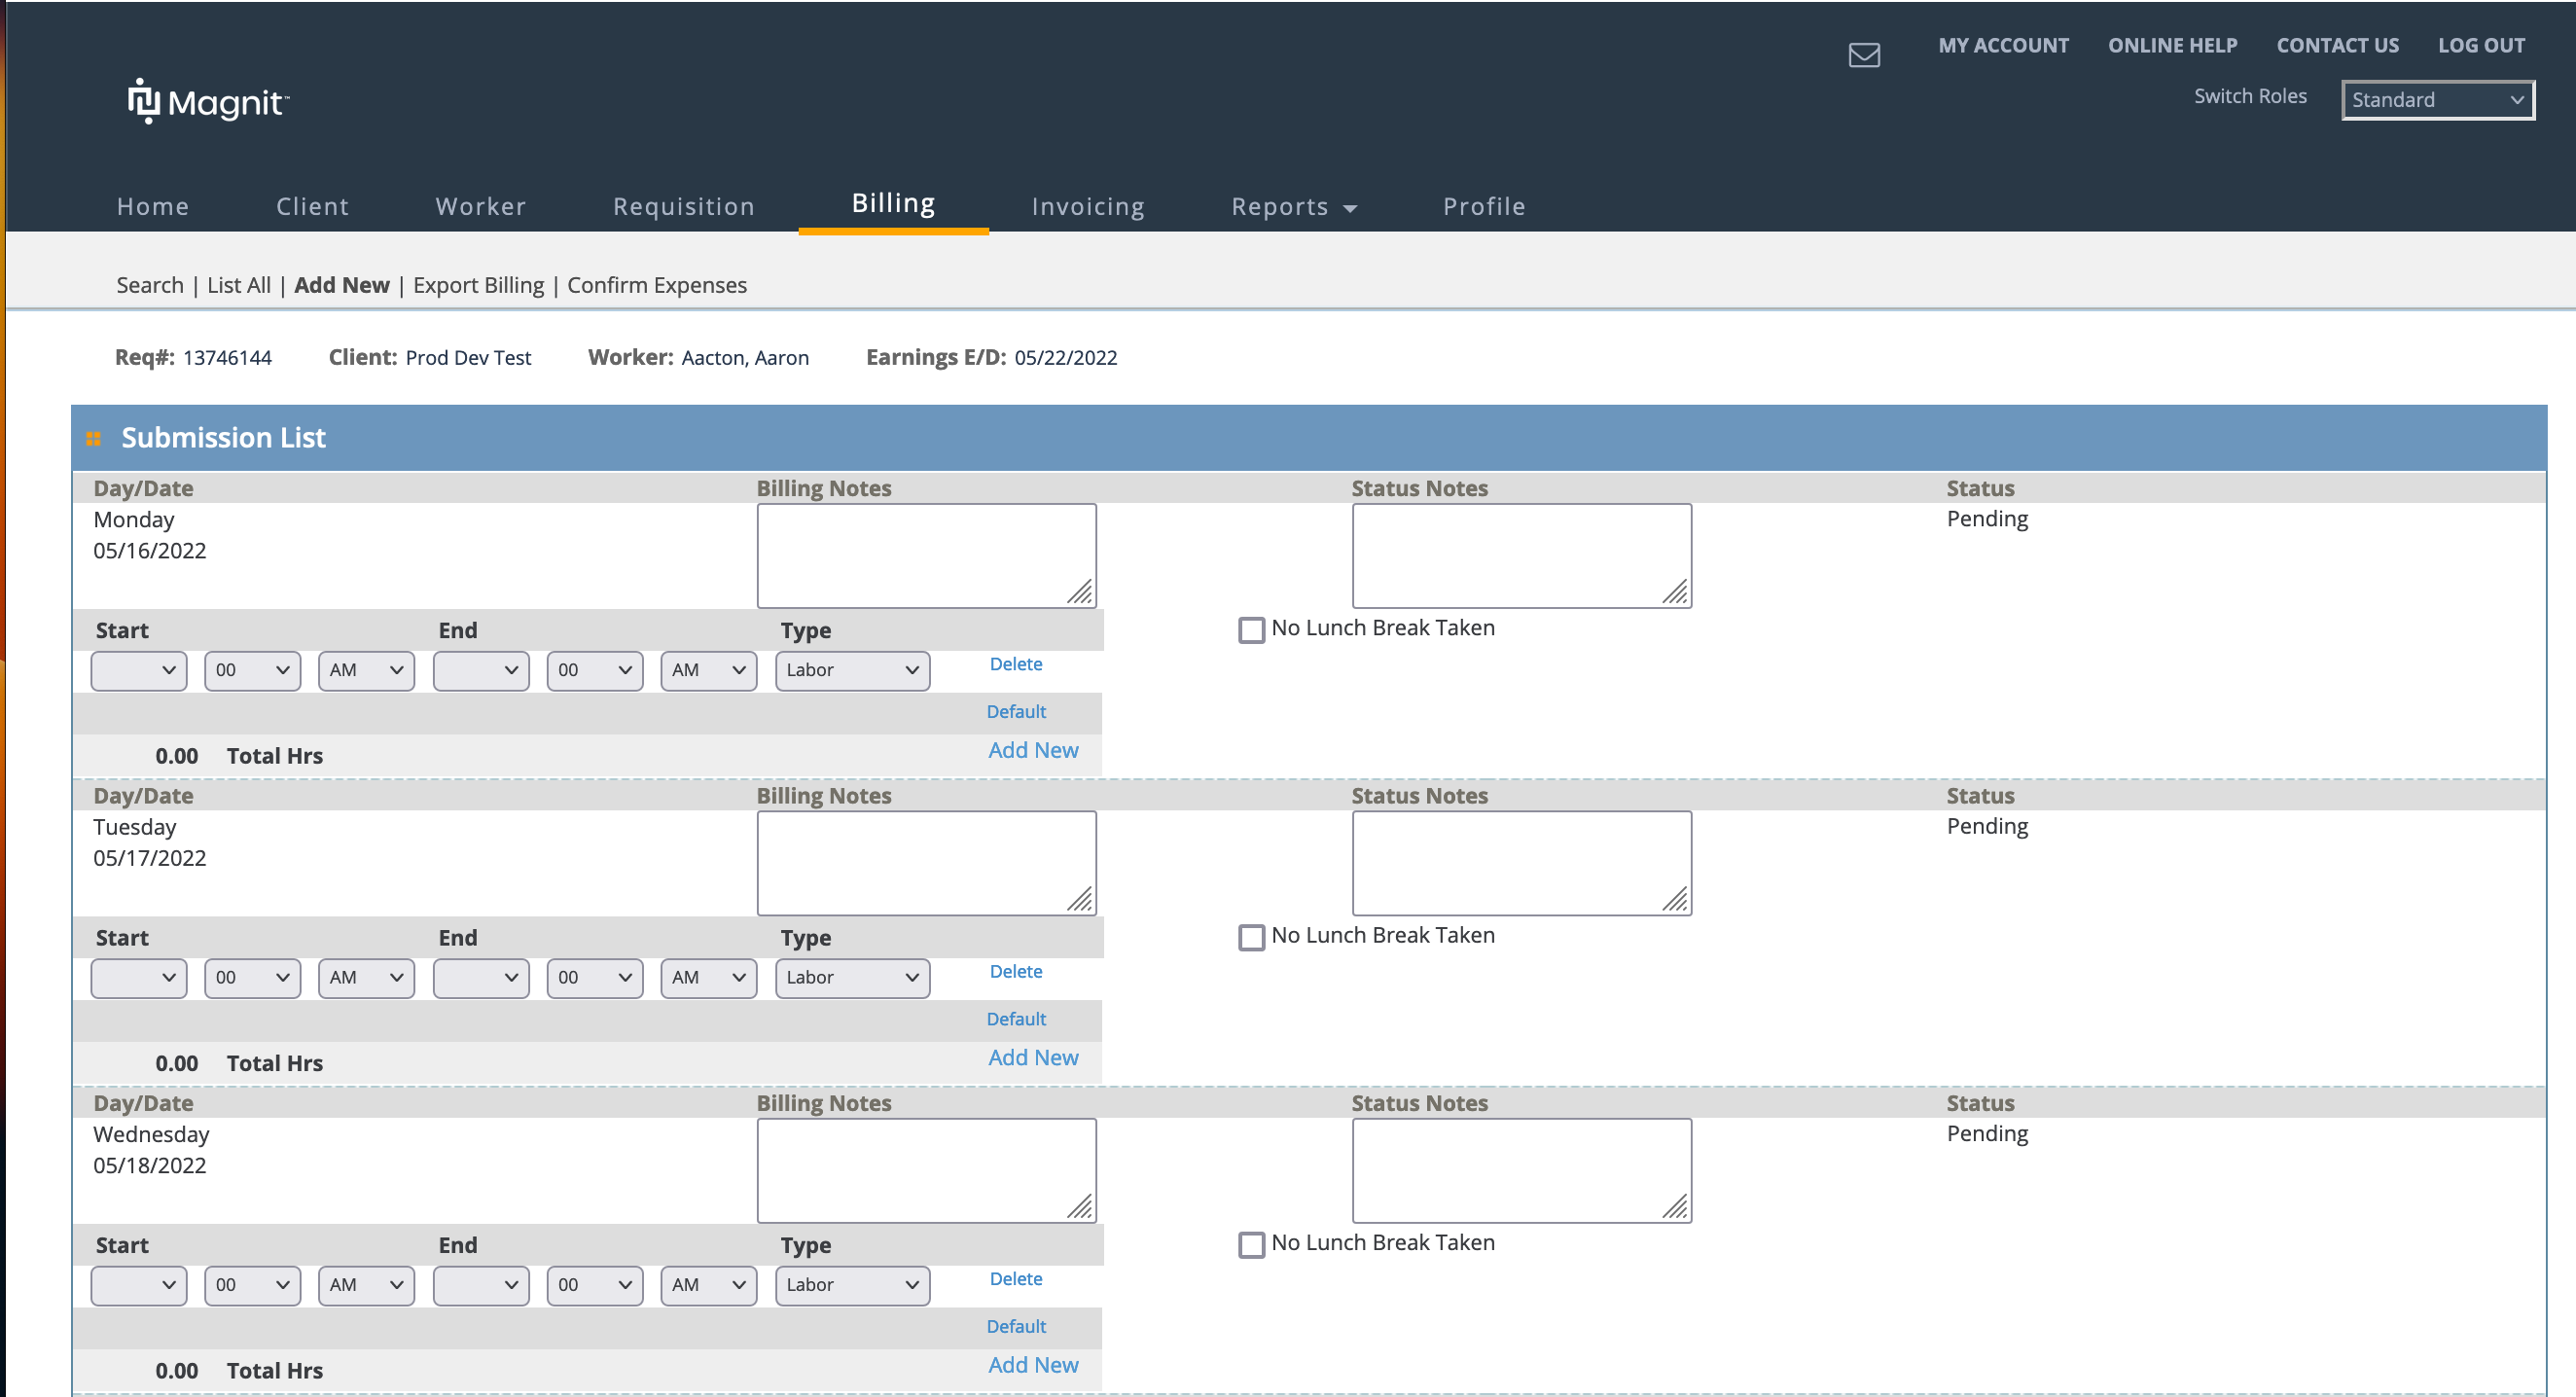
- Navigate to the Home page in the Supplier view.
- Click the Billing tab.
- Click the Add New sub tab.
- In the Add New Billing : Search section, select 'Worker' from the Resource Type drop down.
-
Locate the worker by entering the worker's name, or enter the engagement
number, and then click .
- From the Results table, select resource by clicking the blue name text.
-
On the Add New Billing : Requisition Selection section,
select the requisition to add the time for by clicking
Select.
Note:The worker might have more than one engagement.
- On the Add New Billing : Parameters section, from the Billing Type drop down, select Time.
-
Specify where to submit the time, as follows:
- Date Range - use the drop down to select from existing time period
ranges on the engagement. These values can be weekly, monthly, and so
on. This field only displays the current date range or future date
ranges (no past ranges).Note:This drop down is empty if the engagement has ended.
- Date Other - If you need to add time to a date range in the past, enter the known date. The application displays the time period that contains that date.
- Entire Service Period Not Worked - If you need to submit a timecard for a worker that did not work any hours during a certain time period, select this check box. You are required to submit this option with a date range or known (other) date. This option is not available for all timecard types.
- Date Range - use the drop down to select from existing time period
ranges on the engagement. These values can be weekly, monthly, and so
on. This field only displays the current date range or future date
ranges (no past ranges).
-
Click
 .
Note:If you are submitting 'Did Not Work' time, you must confirm your submission. No other action is required in this case.
.
Note:If you are submitting 'Did Not Work' time, you must confirm your submission. No other action is required in this case. - Complete the timecard fields.
-
Click .
Submit Expense for Worker
- If the expense is travel related, have the duration (days), the first day of travel (date), and the destination, the business purpose. See Travel Related Expense.
- Navigate to the Home page in the Supplier view.
- Click the Billing tab.
- Click the Add New sub tab.
- In the Add New Billing : Search section, select 'Worker' from the Resource Type drop down.
-
Locate the worker by entering the worker's name, or enter the engagement
number, and then click .
- From the Results table, select resource by clicking the blue name text.
-
On the Add New Billing : Requisition Selection section,
select the requisition to add the time for by clicking
Select.
Note:The worker might have more than one engagement.
- On the Add New Billing : Parameters section, from the Billing Type drop down, select Expense.
- Optionally, if the expense is travel related, see Travel Related Expense.
-
Click .
-
Specify where to submit the time, as follows:
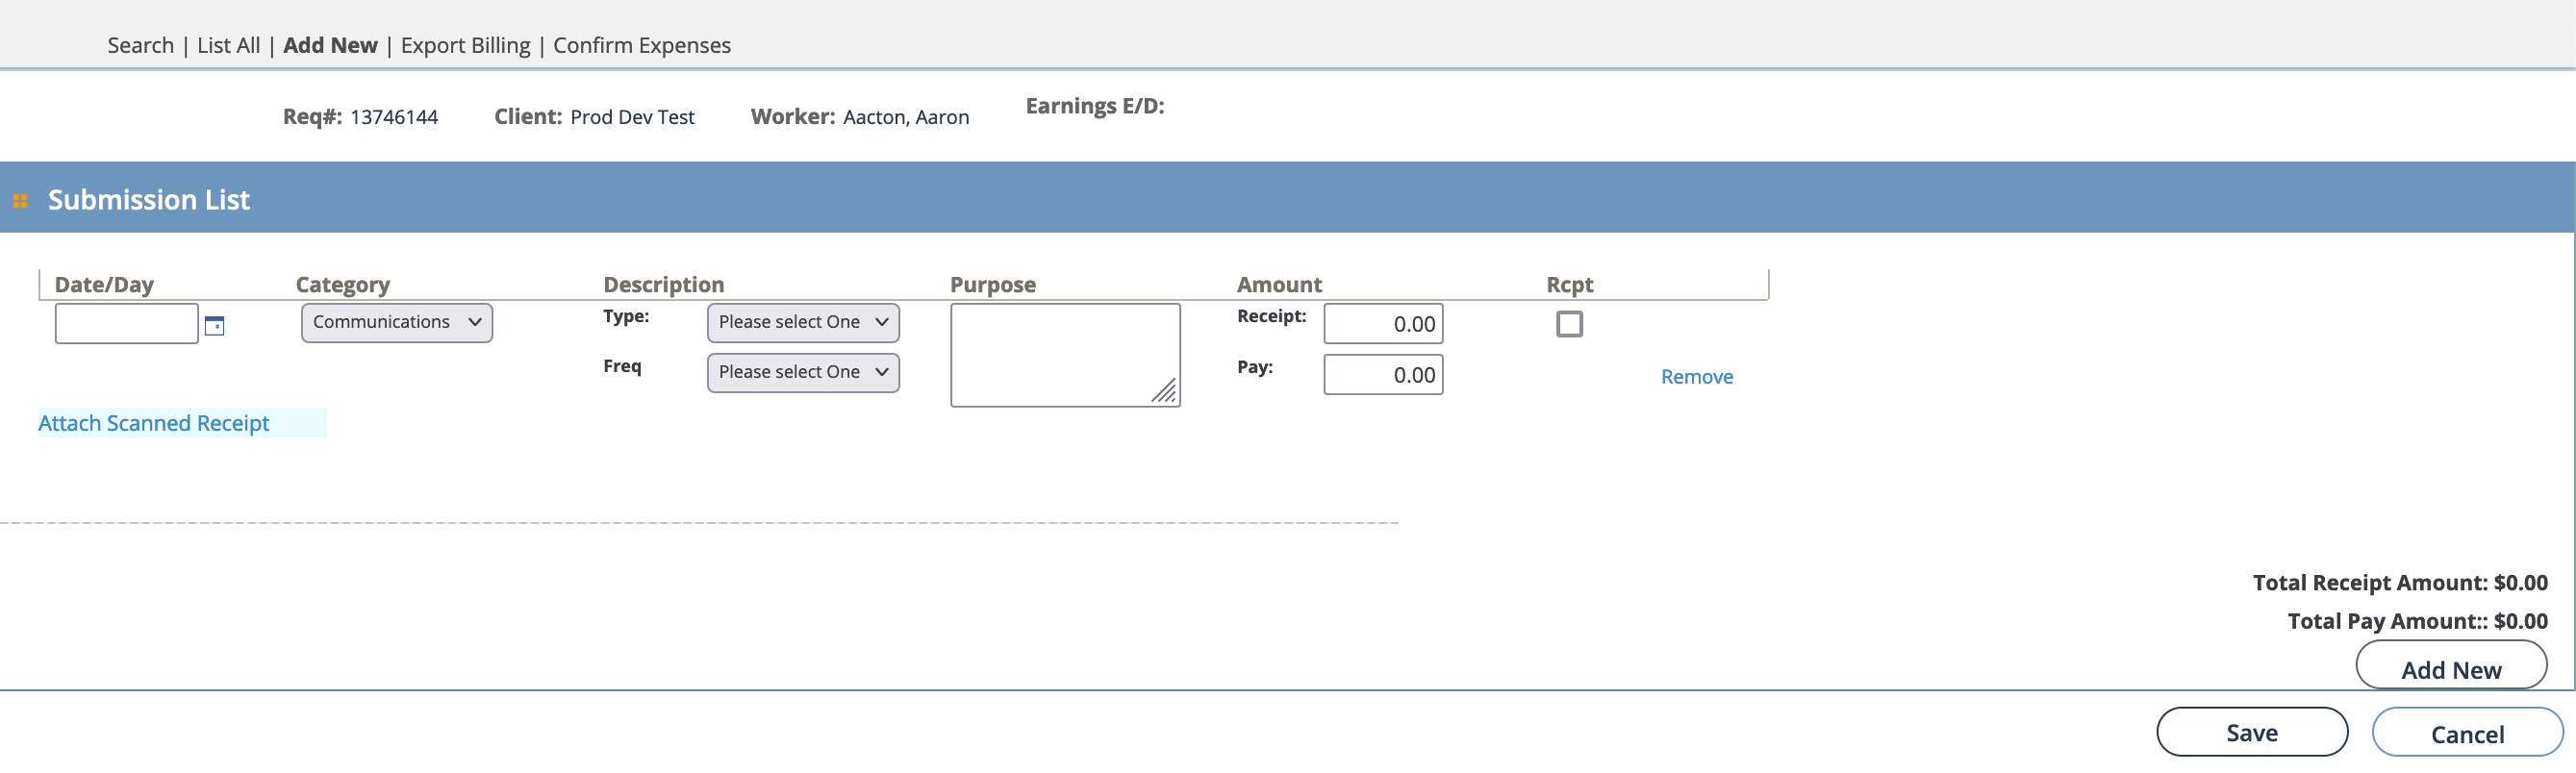
- Date/Day - Enter the date/day that the expense was incurred.
- Category - Select the category. This selection defines the options for the description. See the following table:
Note:The following descriptions only describe the default category inputs in the system. Custom categories can require additional sets of information.Category Description Fields Communications Select the Type (method) of communication, and the Freq (frequency). The frequency is the number of times the communication was made from the type of communication. Miscellaneous Use the free text box to enter a description of the expense. Parking Use the free text box to enter a description of the parking expense. Tolls Use the free text box to enter a description of the toll expense. - Purpose - Using the text box, enter the purpose for the expense.
- Amount - In the Receipt field, enter the total amount on the receipt. In the Pay field, enter the actual amount paid for the expense.
- Rcpt - Select the check box if you are attaching a receipt.
 - Click to add a receipt (file)
to the billing.
- Click to add a receipt (file)
to the billing.
-
Click .
Travel Related Expense
- Complete steps 1 - 8 in Submit Expense for Worker.
- Select the Travel Related check box.
-
Click .
-
In the Trip Info section, enter the following
information:

-
Click .
-
In the Submission List section, enter the
following:
- Day/Date - First day of travel (automatically populated from the previous page). You can modify this date as necessary.
- Category - Select the expense category.
- Purpose - The business purpose (automatically populates from the previous page). You can modify this field as necessary.
- Amount - In the Receipt field, enter the total amount on the receipt. In the Pay field, enter the actual amount paid for the expense.
- Rcpt - Select the check box if you are attaching a receipt.
- - Click to add a receipt (file)
to the billing.
-
Click .
Submit Adjustment for Worker
- You can locate the date to submit the adjustment to by searching for previously submitted billing (Billing Page).
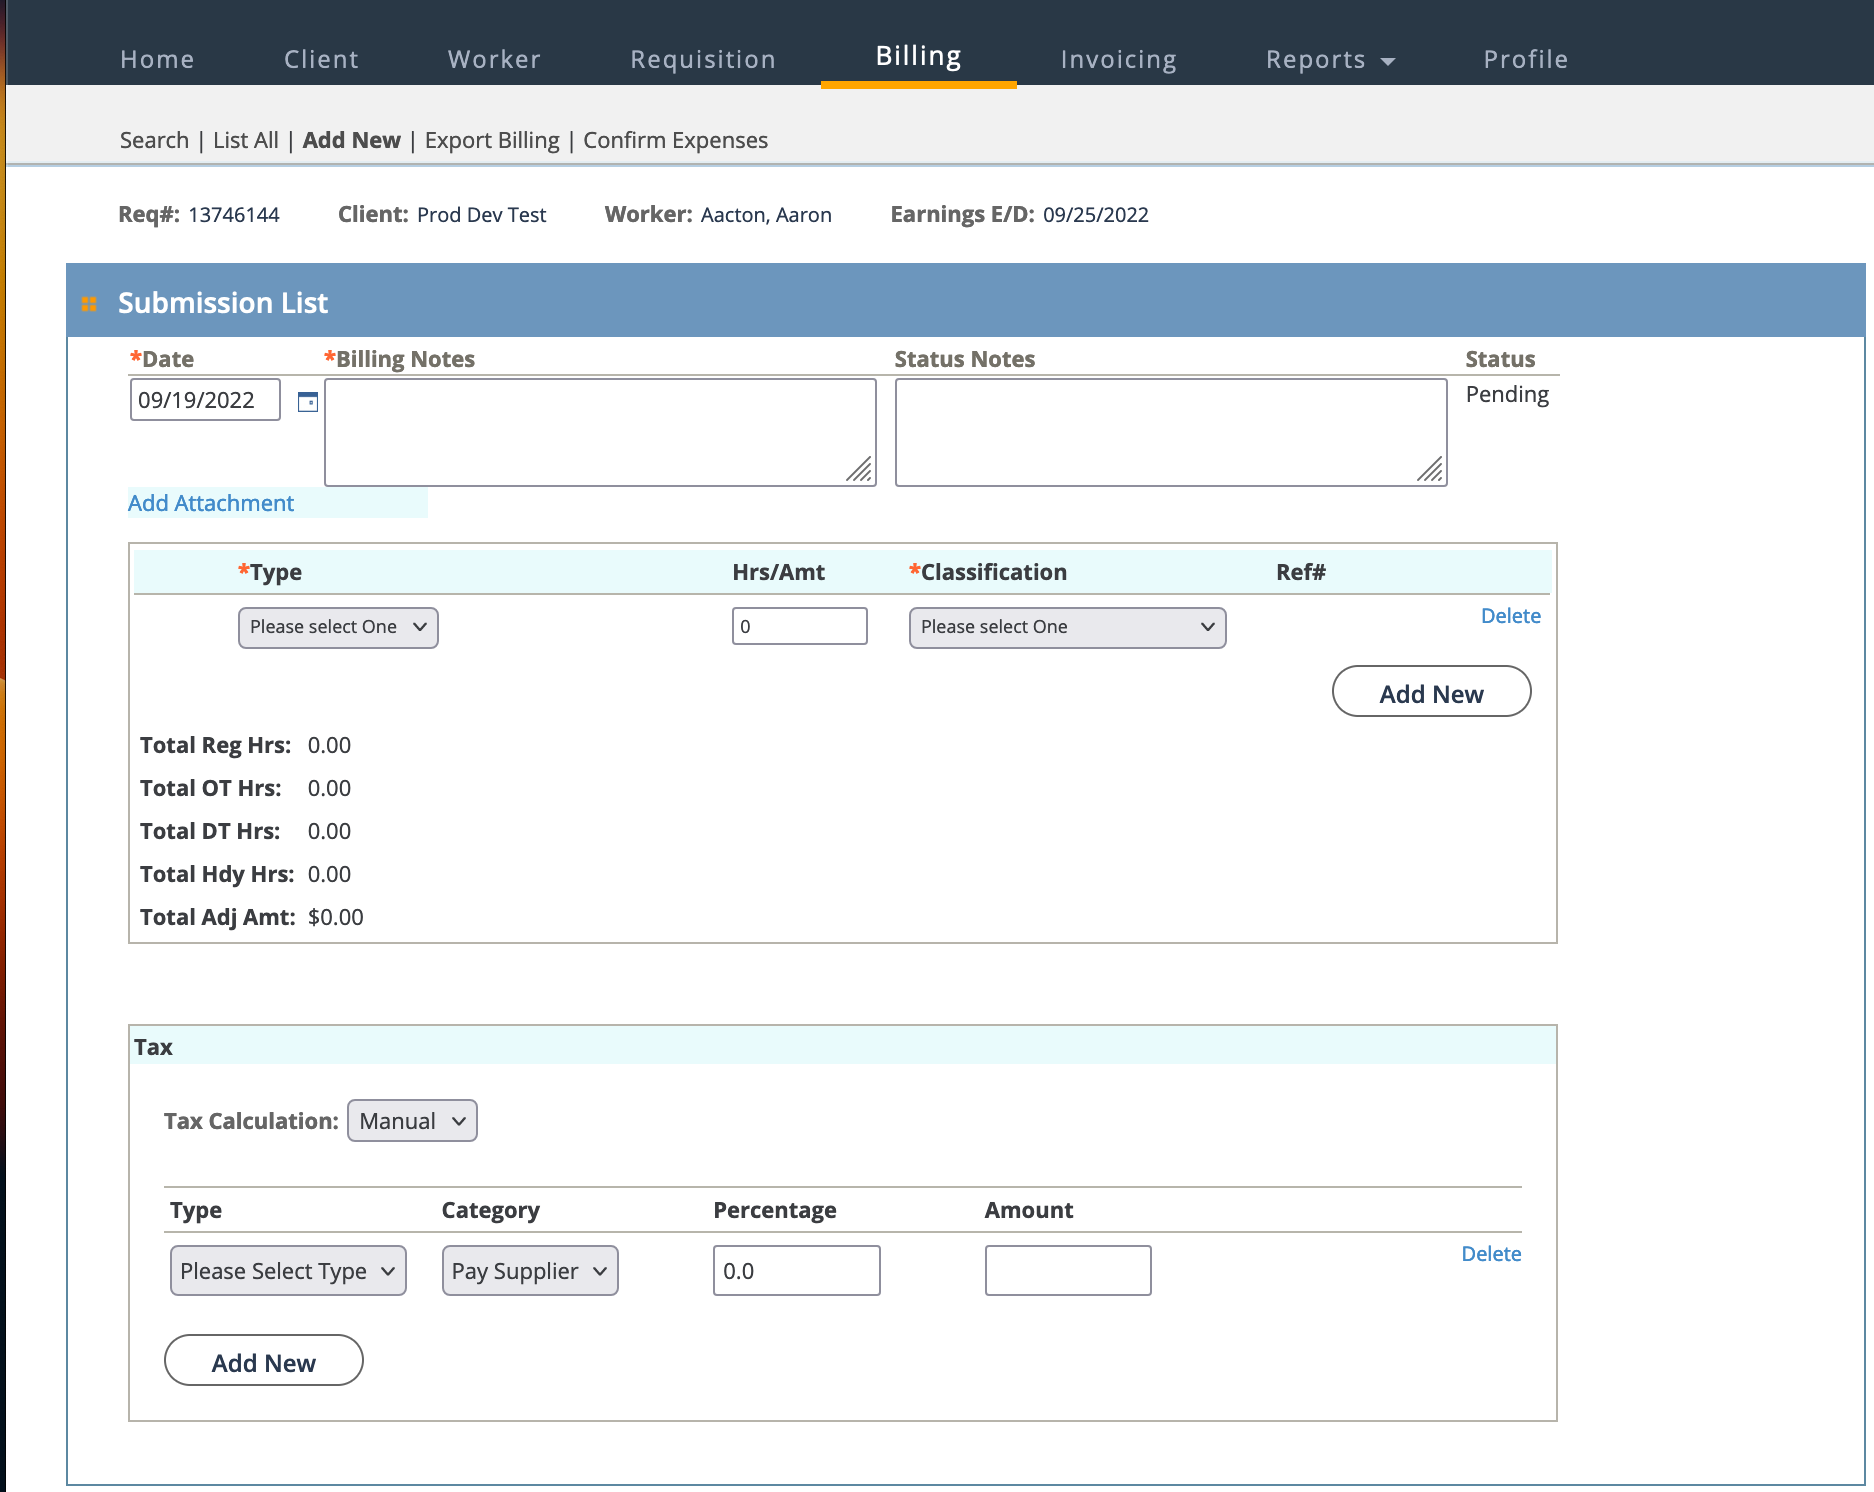
- Navigate to the Home page in the Supplier view.
- Click the Billing tab.
- Click the Add New sub tab.
- In the Add New Billing : Search section, select 'Worker' from the Resource Type drop down.
-
Locate the worker by entering the worker's name, or enter the engagement
number, and then click .
- From the Results table, select resource by clicking the blue name text.
-
On the Add New Billing : Requisition Selection section,
select the requisition to add the time for by clicking
Select.
Note:The worker might have more than one engagement.
- On the Add New Billing : Parameters section, from the Billing Type drop down, select Adjustment.
-
Specify where to submit the time, as follows:
- Date Range - use the drop down to select from existing time period
ranges on the engagement. These values can be weekly, monthly, and so
on. This field only displays the current date range or future date
ranges (no past ranges).Note:This drop down is empty if the engagement has ended.
- Date Other - If you need to add time to a date range in the past, enter the known date. The application displays the time period that contains that date.
- Date Range - use the drop down to select from existing time period
ranges on the engagement. These values can be weekly, monthly, and so
on. This field only displays the current date range or future date
ranges (no past ranges).
-
Click .
-
In the Submission List section, select or add values for
the following fields. Note that some fields are required, and some fields are
optional.
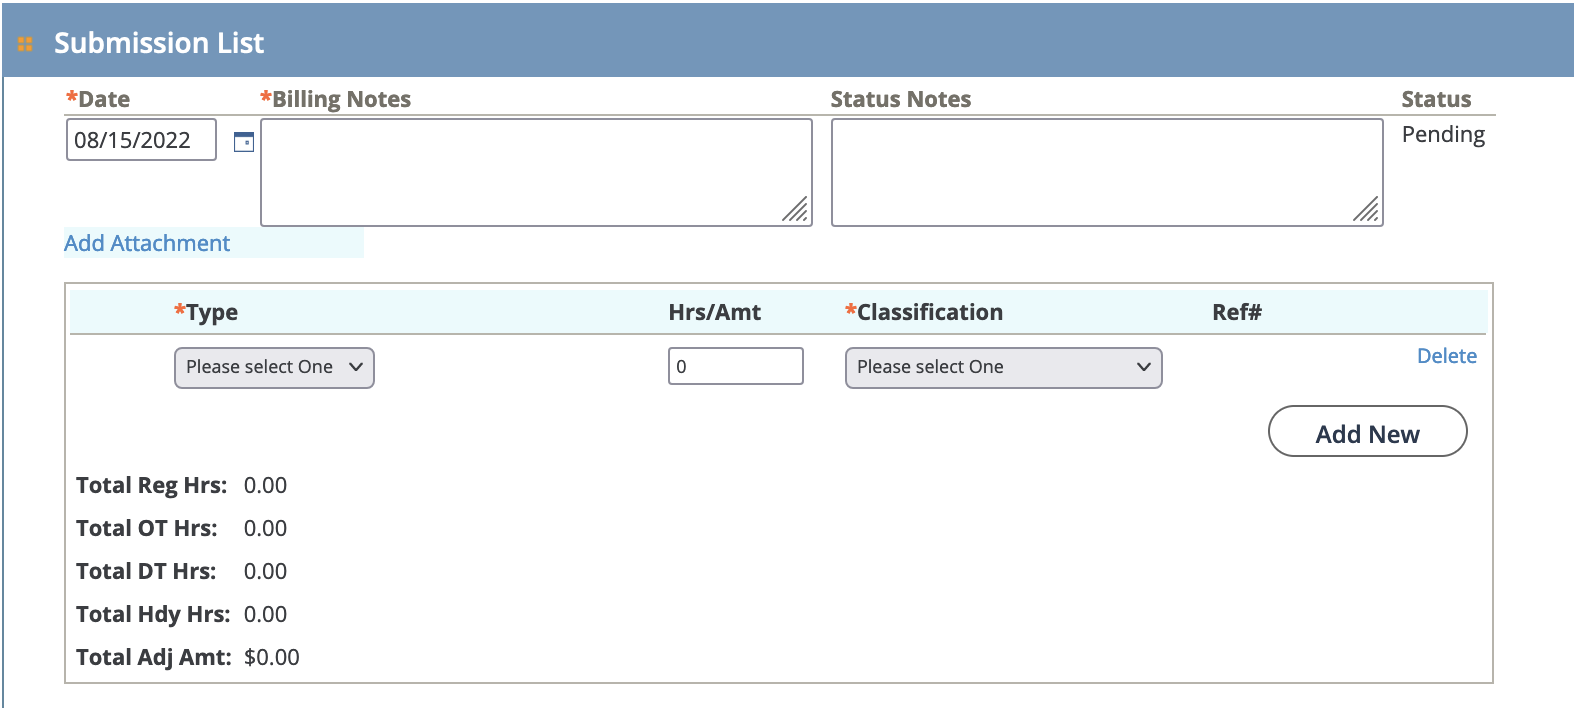
- Date - Required. Enter the date for the adjustment. This value automatically populates with the first date in the engagement's work period.
- Billing Notes - Required.
- Status Notes -
 - Click to attach a file to the
billing. Clicking this option opens a browser dialog box that allows you
to browse for a file.Note:Supporting documentation nigh be required for an adjustment billing.
- Click to attach a file to the
billing. Clicking this option opens a browser dialog box that allows you
to browse for a file.Note:Supporting documentation nigh be required for an adjustment billing.- Type - Select the billing type. This option can be time (for example, overtime hours), or a adjustment to previously submitted time.
- Hrs/Amt - Enter the number of hours, or the amount of the adjustment.
- Classification - Select the billing classification.
 - Click to add a new billing line to the
adjustment.
- Click to add a new billing line to the
adjustment.
-
In the Taxes section, add the required details:

- Type - Select the tax type.
- Category - Select the tax source.
- Percentage - Optionally enter the tax percentage of the total adjustment amount (Total Adj Amt field).
- Amount - Optionally enter the amount of the taxes.
-
Click .
Export Billing
- Navigate to the Home page in the Supplier view.
- Click Billing.
- Click Export Billing.
- In the Export Billing: Search section, from the Client field, select the client organization.
-
From the Type field, select the type of billing entered
to search. You can select multiple types by doing either Command +
Click on a Mac, or Ctrl + Click on a
PC.
If you select Time, additionally, select the type of time entered in the Rate Type field.Note:If you do not select any value in the Type field, the search results contain all reportable billing item types.
-
Use the following search parameters to filter the results:
- Exclude Pending - Select the check box to filter out billing items in the 'Pending' status.
- Exclude Pending MSP Review - Select the check box to filter out billing items that are pending MSP review.
- Exclude Rejected - Select the check box to filter out billing items that have been rejected.
- Exclude Research - Select the check box to filter out billing items that have been marked for research.
- Only Errored Items - Select the check box to only display billing items that have errored out during processing.
-
Click .
-
From the search results, select the billing items to include in the
export.

You can select all items for the export by selecting the Line# check box in the header row.
-
Click
 .
The export file is available the Reports section of the application.
.
The export file is available the Reports section of the application. - Navigate to the Reports page in the Supplier view.
-
Click .
Use the Supplier Billing Export report to display the results. For more information about this report, see Supplier Billing Export.
Confirm Expenses
The 'Payroll Processing' permission is required to view this page and complete this task.
- Navigate to the Billing page in the Supplier view.
- Click Confirm Expenses.
- On the Pending Listing Search page, enter search criteria.
- In the search results, click to the blue text (link) in the Line # column.
- On the Submission List page, click the blue link to download and open the attachment.
- Verify the amount with the stated amount for the line item.
-
Using the receipt status radio buttons, set the review status.
 Note:MSP confirmation of the receipt is required.
If you need to modify the billing line item, click
. This can be due to incorrect amount submitted
for the billing item, or to add additional business information. After
making modifications, click Save. -
Click .
Invoicing Page
The Invoicing page allows you to search and view invoices that are being processed for a client organization.
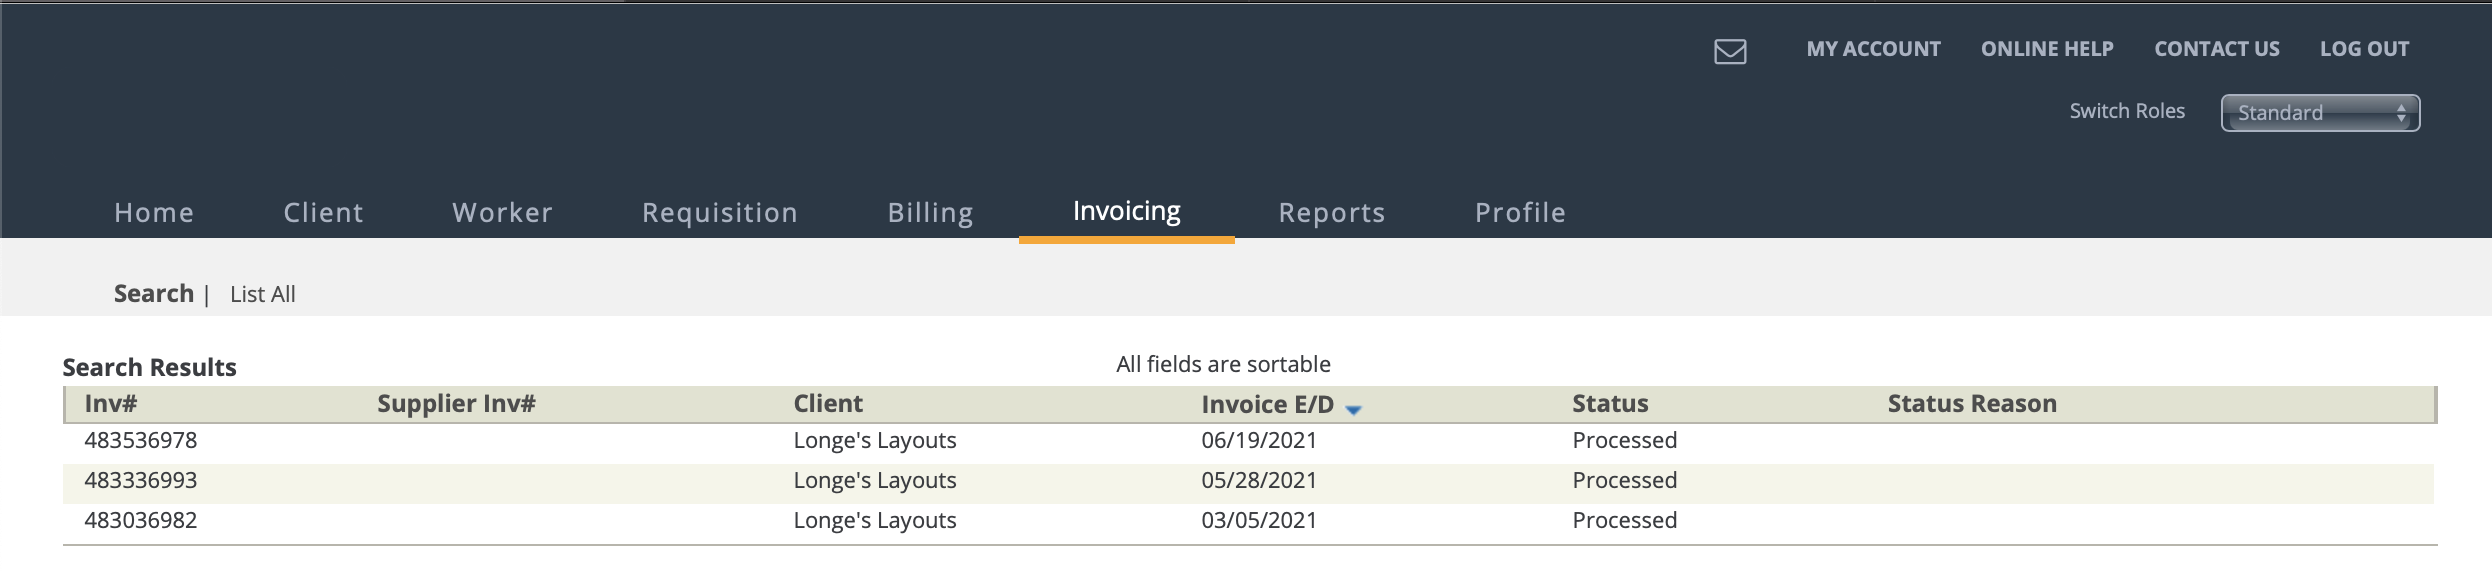
You can use the search functionality to locate a particular invoice. You can also list all invoices for a client organization.
If your supplier/vendor organization is configured to use standardized invoice templates (.pdf format), then you can click an invoice and then download the file from the invoice General Information page. See Download Invoice Document.
- Supplier Invoice Document - The services invoice. Billing associated with the invoice option, and grouped into the finalized invoice using the invoice batch process.
- MSP Down Fee - The fees invoice. Any MSP fees billed to a supplier/vendor that are associated with the billing added the invoice by the invoice batch process.
Download Invoice Document
You can download a generated invoice template for remittance. Your organization must have the functionality enabled to view and download invoice documents. If not, you can only view invoice details in the application.
- Navigate to the Home page in the Supplier view.
- Click Invoicing.
- Use the search functionality to locate the invoice.
- Click the blue invoice text to open the invoice details (General Information page).
-
If a template is generated, a button appears on the information page.

-
Click
 .
.
-
On the popup, use the buttons to select from the following options:

- Select PDF Type - Select the document type to preview or download. Only the documents types that you have configured (and have generated) display. You can only select one type of document at a time.
 - Click to view the generated
document.
- Click to view the generated
document. - Downloads the document to your local
downloads folder.
- Downloads the document to your local
downloads folder.
- The file is displayed or downloaded based on your selection in the previous step.
Reporting
The Reports page contains a number of standard and customizable reports for you to extract data from the system. Report data is updated at regular intervals, and the refresh timestamp appears at the top of each report page.
Reports are categorized by user type or interaction within the application. This section describes the reports, their uses, and the run parameters/filters that you can apply to the standard reports.
The application reporting platform includes two sets of reports, standard and customizable.
Standard reports include filters and settings that allow you to only include values for a specific data set. These reports have default outputs that can be narrowed in smaller sets for a more unique data perspective. Customizable reports (for example, the Customizable Approval Audit Report) also include report filters, but additionally organize output columns by data set, an automated report generation schedule function, and export functionality to the application's SFTP server.
Customizable reports can also be renamed and saved. All modifications to the customizable report (for example, re-ordering output columns due to business requirements) are saved and can be accessed when the report is re-run. For more information about customization, see Customize and Run a Report.
You can add reports to the My Reports section. This view is
individual to your account, and enables you to locate and run any of your commonly used
reports for the client organization. To add reports to this section, click the star icon
next to the report name (![]() ). Search functionality on the
Reporting page also allows you to locate reports. Using the
search field, enter text describing the report and use the filter options/drop downs,
and click enter/return. The tables filter
to display search results.
). Search functionality on the
Reporting page also allows you to locate reports. Using the
search field, enter text describing the report and use the filter options/drop downs,
and click enter/return. The tables filter
to display search results.
To run a standard report, configure the required settings, and filter for the information that you require in the report output. Use the History link in the Report Library to view previously ran reports. You can export the report output as a file from this view.
- Excel Workbook - Export a .xls file.Note:The file opens in Microsoft® Excel. You must save the file in a valid Excel format to preserve file features.
- CSV - Export a .csv file.
- PDF - Export a .pdf file.
Available Reports
- Billing Duration Audit Report
- Billing Line Item Report
- Billing Rate Type Detail Report - Supports BYOK encryption.
- Budgeted Funds Depletion Report
- Customizable Billing Report - Supports BYOK encryption.
- Engagement Ratio Report
- r_reports_engagement_data_export.html - Supports BYOK encryption.
- Extension Approval Tracking Report
- Interview Information Report - Customizable and Standard version available.
- Lunch Audit Report
- Overtime Billing Report
- Payment Application
- Pending Expense Report
- PO Funds Depletion Report
- Preferred vs. Non-Preferred Spend Report
- Project Position Report
- Rejected Billing Report
- Request Data Export - Supports BYOK encryption.
- Requisition Activity Overview Report
- Requisition Sourcing Report - Includes the Requisition Staffing Report and the Requisition Project Report.
- Resume Overview Report
- Supplier Billing Export
- Suppler Payment History Report
- Supplier Payment Invoice Report
- Supplier Sales Tax Upload Worksheet
- Timecard Billing Detail Report
- Weekly Activity Report
- Worker Data Export
- Worker Project Report
- Worker Staffing/Direct Hire Report
Customize and Run a Report
- Navigate to the Home page in the Supplier view.
- Click Reports, and select the client organization to report on.
- From the Report Library list, select a standard report type (Type column = 'Standard). The report page opens in a new browser tab.
-
Using the Date Range section, configure a date range and date type to report
on.
 Note:Some report date ranges are limited to a certain period of time (for example, one year).
 -
From the report filters (Additional Settings section),
select which data sets to report on.
 Note:Each report features a specific set of data filters. For more information about available filters, see the relevant report page.
 -
Click
 to generate the report. See Report Output Types.
- Navigate to the Home page in the Supplier view.
- Click Reports, and select the client organization to report on.
-
From the Report Library list, select a customizable
report type (Type column = 'Customizable'). The report
page opens in a new browser tab.
If you need to modify a saved customizable report (My Reports section), click the blue text for the report in the Report Name column.
-
From the report filters, select which data sets to report on.
 Note:Each report features a specific set of data filters. For more information about available filters, see the relevant report page.
 -
Using the date range configurations, specify a date range and date type to
report on.
Note:Some report date ranges are limited to a certain period of time (for example, one year).
-
Click
 .
.
-
In the pop up, using the menu options, configure the columns to include (or
exclude) in the report output.
Note:A red asterisk (*) indicates a required field.
The Available Columns section (left side) displays optional data fields that you can include. Optional data fields are grouped into data sets, and the table can be filtered using the Data Sets drop down. The Selected Columns section (right side) displays the data fields that are included in the output.
Use the buttons as follows:- Check box column - Select the column data to move into or from the report. You can click the check box in the header row to select all columns in the displayed data set.
 - Moves a selected data field in the
data set to the report output.
- Moves a selected data field in the
data set to the report output. - Moves a selected data field in the
data set out of the report output.
- Moves a selected data field in the
data set out of the report output. - Resets all data fields to the default
report output.
- Resets all data fields to the default
report output.
Reorder the report output using the up and down arrows in the Selected Columns section header. You cannot drag and drop data fields into position in the display table. You can locate a data field in the display using the search field at the top of either data field table.
-
Click
 .
.
The report automatically runs. You can export the output. If you anticipate any data changes, you can refresh the report page by clicking
 .
.
Schedule a Report
When reports complete, the last run report is accessed on the . Click the report name (blue text) link in the Last Scheduled Run column to access the generated report.
- Navigate to the Home page in the Supplier view.
- Click Reports, and select the client organization to report on.
- Locate the report by using the search or selecting it from the My Reports or Report Library sections.
-
Click
 .
.
-
Configure the following schedule options, using the
 to navigate to the next section:

- Export File Format - From the drop down, select the file format to be generated.
- Select Recurrence Pattern - Using the radio
buttons, select from the following:
- Daily - If you select 'Daily', configure the report to run on a daily interval in number of days, or run every weekday.
- Weekly - If you select 'Weekly', configure the report to run on a weekly interval in number of weeks, and what day of the week to run on.
- Monthly - If you select 'Monthly', configure the report to run either on a specific date of the month and interval in number of months, or on coinsurance of the day and interval of the month in number of months.
- Yearly - If you select 'Yearly', configure the report to run on an interval in number of years, on a date during that year
- Select Run Report Time - Configure the exact time to run the report (time, timezone, and so on).
- Select Range of Recurrence - Configure the start date for the scheduled task, and the end date for the task (no end date, end after a number of intervals, or on a specific date).
-
Click
 .
Note:When selecting and viewing the report, the task interval appears on the button.
.
Note:When selecting and viewing the report, the task interval appears on the button.
Share a Report
The report is shared every time the report is run. Users on the share list can access the shared report in the All filter and Shared with Me filter. You can remove users from the sharing list by accessing the pop up (steps 1-6), and de-selecting the user check box in the Selected Users section at the top of the pop up. Clicking the trash can icon removes all users.
- Navigate to the Home page in the Supplier view.
- Click the Reports tab.
- Select the client organization.
- From the My Reports section, locate the report to share.
-
Click the
 icon.
icon.
- Click Sharing Options.
-
On the pop up, configure the following:

- Select Role - Use the drop down to select the user type to share the report with.
- Search for Users - Enter text that describes the
user (name, email, and so on). The application suggests users based on
your inputs.
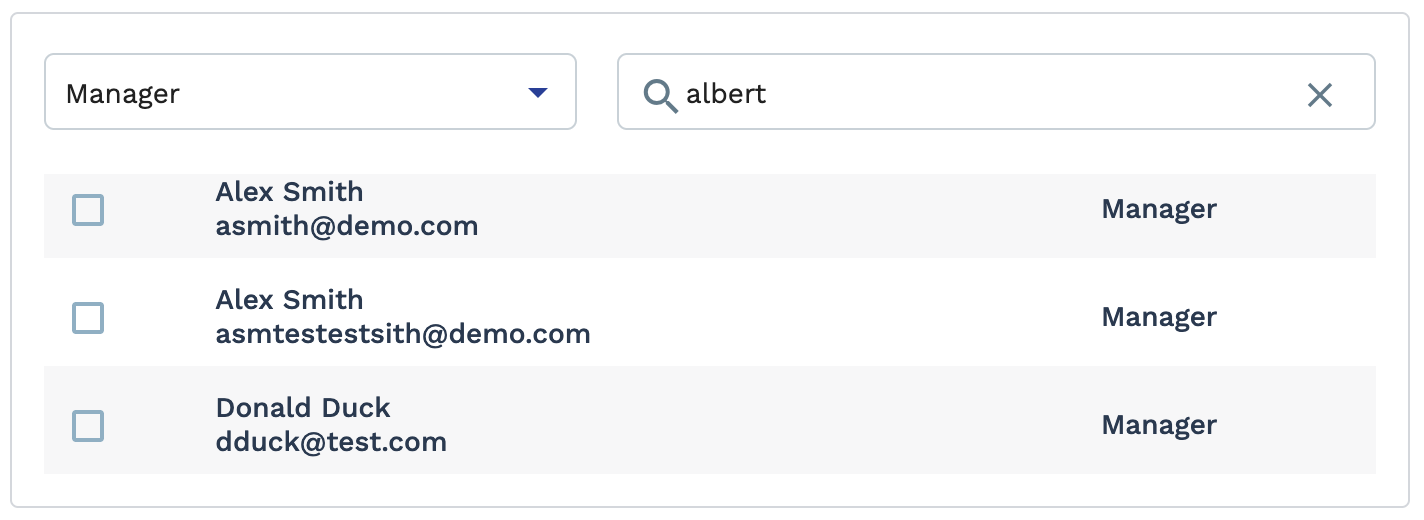
Select the check box to add the user.
-
Click .
Reporting as a Service
The Reporting as a Service (RaaS) feature in the reporting platform allows you to access certain report data via an API. You can also use the service to apply filters and add column information to your report. You can access any of the customizable reports using this service.
The RaaS endpoints are individually generated for customized reports. Once you customize and save a report, you can trigger and obtain the report data using the endpoints. To access the endpoints, navigate to your customizable report ().
A pop up opens with the endpoint information.
API development requires technical implementation completed by the client organization. For more information about the technical requirements for the endpoints, see the Magnit RaaS API Documentation document (click View API Documentation or navigate to https://magnitglobal.com/us/en/workforce-management-platform/magnit-platform-integrations/magnit-api/reporting-as-a-service.html).
Set Up a User API Key
You must generate an API key in order to authenticate and use the RaaS feature. Refer the 'Magnit RaaS API Document' for key use requirements. The API key is generated and stored for your user account (current user logged in). If you have multiple accounts, then you must generate a separate key for each of your accounts, even if your accounts are linked.
If your supplier organization uses basic authorization (username and password), you can only copy the key and secrecy value upon key generation. Other login methods (for example, 2FA) do not have this requirement. After saving the value, basic auth users can only retrieve the key and secrecy values by clicking View. A 8-digit code is sent to the email address linked to your user account. You must enter the code in the popup to retrieve your key and secrecy value.
API keys are generated with an expiration date. This date cannot be removed. After expiration, a new key must be manually generated. A key can be inactivated at any time by clicking Inactivate. If a key is inactivated, a new key must be manually generated.
- Navigate to the Home page.
- Click .
-
In the left menu, click RaaS API Keys.
Note:The table is empty the first time that you generate a key. After you generate the first key, the key information is stored in the Your Credentials table. Inactive and expired key information appears in the Audit Log table.Note:You generate a new key at any time.
-
Click
 .
You can copy the value upon generation by clicking
.
You can copy the value upon generation by clicking . Once you click
  , you must retrieve the value using the security
code method (click View).
, you must retrieve the value using the security
code method (click View).
Report Output Types
| Function | Description |
|---|---|
| HTML | Report output is displayed in the application browser
tab. Note: Running a customizable report (Run
Report icon) automatically runs this report as a
webpage. |
| Excel | Report output is compiled into a Microsoft Excel® file (.xls). |
| Report output is compiled into a .pdf. file. | |
| Unformatted Excel | Report output is compiled into a .csv
file. Note: For customizable reports, this option is either
Excel Workbook or
CSV in the Export
icon drop down. |
Billing Duration Audit Report
This report () produces data regarding gaps in billing duration.
| Field | Description |
|---|---|
| Client | From the drop down, select the client organization to filter results by. |
| Worker | Enter the name of the worker(s) whose data is included in the report. This field is set to 'All' by default. |
| Requisition Type | Select the engagement type. This field is set to 'All' by default. |
| Location | From the selection field, select the configured client location to filter by. This field is set to 'All' by default (all client locations that the supplier/vendor contracts with). |
| Time Frame | From the drop down, select the time frame for the gap to filter by. For example, if you are reporting on gaps on 2 weeks, then select '2 weeks'. |
| Summarize by | From the drop down, select how to summarize the output columns in the report. |
| Optional Columns | From the selection field, select the optional columns to include in the report output. |
Billing Line Item Report
This report () produces data regarding billing line items.
- Rate Application Type
- Status
- Status Reason
- Operational Unit
- Manager
- Manager Email
- Supplier
- Worker
- Requisition #
- Parent Project #
- Req Start Date
- Req Est. End Date
- Dept Number
- Dept Name
- Invoice Option
- Country
- State/Province
- City
- Currency
- Pay Rate
- Bill Rate
- Earnings E/D
- Days - Only displays if Rate Application Type='Per Day' or 'Prorated Per Day'.
- Regular Hours - Does not display if Rate Application Type='Per Day' or 'Prorated Per Day'.
- Total Bill
- Job Title
- GUID
- Requisition Type
- OT Hours - Does not display if Rate Application Type='Per Day' or 'Prorated Per Day'.
- DT Hours - Does not display if Rate Application Type='Per Day' or 'Prorated Per Day'.
- Holiday Hours - Does not display if Rate Application Type='Per Day' or 'Prorated Per Day'.
- Milestones
- Materials
- Position
- Expenses
- VAT
- Sales Tax
- Service Tax
- CAN Tax Type
- CAN Tax $
- GST Amount
- HST Amount
- QST Amount
- RST Amount
- PST Amount
- MSP GST Amount
- MSP HST Amount
- MSP QST Amount
- MSP RST Amount
- MSP PST Amount
- Adjustment
- Summary Total
- Grand Total
- Date
- Hours
- Non Billable Hours - Only displays Work Schedule='Professional Week'.
- Days - Only displays if Rate Application Type='Per Day' or 'Prorated Per Day'.
- Detail Bill Amount - Client bill amount.
- Type of Day Off - Only applicable for Daily and Period timecards.
- Start Time
- End Time
- Lunch
- Time Notes
- Time Cost Allocation
- Time Status
- Time Status Reason
- Time Date and Time Approved
- Time Approved By
- Expense Entry Category
- Expense Description
- Expense Purpose
- Expense Destination
- Date Expense
- Expense Quantity
- Expense Amount
- Expense Paid Amount
- Trip Expense
- Expense Note
- Expense Receipt Received
- Expense Approved
- Expense Cost Allocation
- Expense Status
- Expense Status Reason
- Expense Date and Time Approved
- Expense Approved By
- Adj.
- Adj. Classification
- Adj. Reason
- Adj. Justification
- Adj. Shift
- Adj. Date
- Adj. Day
- Adj. Regular Hour
- Adj. OT Hour
- Adj. DT Hour
- Adj. Holiday Hour
- Adj. MSP VAT Amount
- Adj. Duplicate Reason
- Adj. Cost Allocation
- Adj. Credit Cost Allocation
- Adj. Rebill Cost Allocation
- Adj. Type
- Adj. Reference Detail Item
- Adj. Note
- Adj. Status
- Adj. Status Reason
- Adj. Date and Time Approved
- Adj. Approved By
- Milestone
- Milestone Date
- Milestone Due Date
- Milestone Comment
- Milestone Amt
- Milestone Rejected Notes
- Milestone Cost Allocation
- Milestone Status
- Milestone Status Reason
- Milestone Date and Time Approved
- Milestone Approved By
- Material
- Material Date Purchased
- Material Quantity
- Material Comment
- Material Amt
- Material Rejected Notes
- Material Cost Allocation
- Material Status
- Material Status Reason
- Material Date and Time Approved
- Material Approved By
- Position
- Position Hrs Worked
- Position Comment
- Position Amt
- Position Rejected Notes
- Position Cost Allocation
- Position Status
- Position Status Reason
- Position Date and Time Approved
- Position Approved By
- Benefit Category Name
- Benefit Quantity
- Benefit Amount
- Benefit Note
- Benefit Status
- Benefit Status Reason
- Benefit Date and Time Approved
- Benefit Approved By
- Transfer Queue
- Transferred
- Errored
- Pending Transfer Confirmation
- Payment Queue
- Errored Reason
- Filter Billing
- Include Volume Discount
- Include in Billing Transfer
- Calculate Taxes
- Requisition Custom Fields - One column for every Requisition type custom field. Column header format is <custom_field_name>(<operational_unit_name>).
- Worker Custom Fields - One column for every Worker type custom field. Column header format is <custom_field_name>(<operational_unit_name>).
- VMS Billing Line#
| Field | Description |
|---|---|
| Client | From the drop down, select the client organization to filter results by. |
| Undo Withdraw | Filter the report output by workers that have had the 'Do Withdraw' action applied. |
| Manager | Select the client manager name associated with the engagement. This field is set to 'All' by default. |
| Billing Type | Select the billing item type to filter by. This field is set to 'All' by default. |
| Worker | Enter the name of the worker(s) whose data is included in the report. This field is set to 'All' by default. |
| Date Type | From the drop down, select the date type. You can select from the
following:
This setting is used in conjunction with From date and To date fields. You specify a date range based on the end date type. |
| Earnings E/D | From the drop down, select the earnings end date to filter by. You can configure a date
range. Select Date Range From-To, and then use the
From and To fields to configure
dates. You can also click the calendar icon to open a calendar pop up that allows you to select the date. |
| Client | From the drop down, select the client organization to filter results by. |
| From date | Enter the beginning date for the date range. You can also click the calendar icon to open a calendar pop up that allows you to select the date. |
| To date | Enter the end date for the date range. You can also click the calendar icon to open a calendar pop up that allows you to select the date. |
| Summarize by | From the drop down, select how to summarize the output columns in the report. |
| Include Time Detail Information | Select the check box to include information (Detail field) from a time entry. |
| Include Expense Detail Information | Select the check box to include information (Detail field) from an expense entry. |
| Include Adjustment Detail Information | Select the check box to include information (Detail field) from an adjustment entry. |
| Include Milestone Detail Information | Select the check box to include information (Detail field) from a milestone entry. |
| Include Material Detail Information | Select the check box to include information (Detail field) from a materials entry. |
| Include Position Detail Information | Select the check box to include information (Detail field) from a position entry. |
| Include Benefit Detail Information | Select the check box to include information (Detail field) from a benefit entry. |
| Include Work Order/ SOW Detail Information | Select the check box to include work order or SOW information from a project billing entry. |
| Include VMS Billing Fields | Select the check box to include VMS specific billing fields. |
| Include Shift Details | Select the check box to include information (Detail field) from a shift entry. |
| Include Multiple and Piece Rate Information | Select the check box to include multiple and piece rate information. |
| Include Credit /Rebill Fields | Select the check box to include information (Detail field) from a time entry. |
Bill Rate Information
- Worker #
- Worker Name
- Requisition #
- Requisition Type
- Date Filled
- Job Title
- Currency
- Original Hourly Rate
- Old Bill Rate
- New Bill Rate
- Date Effective
- Submitter
- Date Submitted
- Reason
- Reason Reduction
- Rate Increase
- Savings
- Cost
- Current Hourly rate
- Length of Project in Hours
| Filter | Display |
|---|---|
| Worker | Enter the name of the worker(s) whose data is included in the report. This field is set to 'All' by default. |
| Date Type | Select the date type to filter the report output by. The only options for this field is 'None' or 'Effective Date'. |
| From date | Enter the beginning date for the date range. You can also click the calendar icon to open a calendar pop up that allows you to select the date. |
| To date | Enter the end date for the date range. You can also click the calendar icon to open a calendar pop up that allows you to select the date. |
Billing Rate Type Detail Report
The Billing Rate Type Detail Report supports BYOK encryption. If the client organization has enabled the encryption feature, only supported reports are available. For more information about the encryption feature, contract your Program Representative.
If the client organization has a parent/child business organization configured, users can report across all of the organizations they are associated with.
The report produces the following columns:- Line ID
- Billing Line Type
- Date Worked
- Rate Type
- Rate
- Rate Application Type
- Units
- Billing Cost Allocation Fields
- Supplier
- Requisition ID
- Worker
- Job Title
- Earnings E/D
- Supplier Payment
- Supplier Payment with cost allocation only calculates in the report for billing items with Status='Processed' on an invoice with Status='Locked', or the billing item is added to the Cost Allocation Estimation in the application. Otherwise, this field displays the Detail Bill Amount value.
- For Period-OT where there are multiple cost allocations per day, then this field displays the prorated value of the day based on the number of hours.
- Invoice Date
- Invoice
- Time Status
- Supplier Bill Rate
- Worker ID - Identifier number from the worker's profile.
See Profile.
- Prim. PO Number - Purchase order number
- Billing Notes - Any notes added to the billing item
- Status Notes - Any notes added for the status of the billing item
| Field | Description |
|---|---|
| Worker | Enter the name of the worker(s) whose data is included in the report. This field is set to 'All' by default. |
| Supplier | Filter the report output by the supplier/vendor on the engagement. This field is set to 'All' by default. |
| Billing Status | Filter the report output by the status assigned to the billing item. This field is set to 'All' by default. |
| Detail Status | Filter the report output by the time status on the billing item. You
can filter by the following:
If no filter is applied when running the report, the system includes billing items in the 'Approved', 'Pending', and 'Processed' statuses by default. |
| Invoice | Select the invoice to filter by. This field is set to 'All' by default. |
| Earnings E/D | From the drop down, select the earnings end date to filter by. You can configure a date
range. Select Date Range From-To, and then use the
From and To fields to configure
dates. You can also click the calendar icon to open a calendar pop up that allows you to select the date. |
| Invoice E/D | From the drop down, select the invoice end date to filter by. You can configure a date range.
Select Date Range From-To, and then use the
From and To fields to configure
dates. You can also click the calendar icon to open a calendar pop up that allows you to select the date. |
| Billing Item Type | Filter the report output by billing item type. Only item types that
are configured for the client organization display in this field. This field is set to 'All' by default. |
| Date Approved | From the drop down, select the date that the billing was approved to filter by. You can
configure a date range. Select Date Range From-To, and then
use the From and To fields to
configure dates. You can also click the calendar icon to open a calendar pop up that allows you to select the date. |
| Date Created | From the drop down, select the date that the billing was created to
filter by. You can configure a date range. Select Date Range
From-To, and then use the From
and To fields to configure dates.
You can also click the calendar icon to open a calendar pop up that allows you to select the date. |
Billing Report
This report () produces data regarding billing information from invoiced timecards.
- Client Name
- Line #
- Status
- Status Reason
- Supplier
- Worker
- Requisition #
- Country
- State/Province
- City
- PO #
- Bill Rate
- Earning E/D
- Currency
- Milestones
- Materials
- Position
- Rate Type Application
- Days
- Reg Hrs
- OT Hrs
- DT Hrs
- Hdy Hrs
- Exp
- VAT
- Sales Tax
- GST Amount
- CGST Amount
- IGST Amount
- MSP CGST Amount
- MSP SGST Amount
- MSP IGST Amount
- HST Amount
- QST Amount
- RST Amount
- MSP GST Amount
- MSP HST Amount
- MSP QST Amount
- MSP RST Amount
- MSP PST Amount
- Adj
- VDisc %
- VDisc $
- PPay %
- PPay $
- MSP Sup %
- MSP Sup $
- Invoice #
- Inv Date
- AP Inv#
- Sup Inv #
- Total Pay
- OT Pay
- OT Multiplier
- DT Rate
- DT Multiplier
- Filter Billing
- Requisition Custom Fields - Included if Include custom fields information check box is selected.
- Grand Total
- Units Worked
- Piece Bill Rate
- Piece Pay Rate
- Multiple Rate
- Date Worked
- Days
- Start Time
- End Time
- Hours
- Regular Hours (Detail)
- Non Billable Hours - Displays only if 'Professional Week' is set in the work schedule.
- OT Hours (Detail)
- DT Hours (Detail)
- Client Bill Amount (Detail)
- Start Lunch
- End Lunch
- Lunch
- Notes
- Time Status
- Time Status Reason
- Tome Date and Time Approved
- Time Approved By
- Time Cost Allocation
- Work Performed in the US? - Only displays for engagements where the work location is outside of the US.
- Milestone
- Milestone Date
- Milestone Due Date
- Milestone Comment
- Milestone Amt
- Milestone Status
- Milestone Status Reason
- Milestone Date and Time Approved
- Milestone Approved By
- Milestone Cost Allocation
- Timeframe to complete milestone from
- Timeframe to complete milestone to
- Hours Worked
- Material
- Material Date Purchased
- Material Quantity
- Material Comment
- Material Amt
- Material Status
- Material Status Reason
- Material Date and Time Approved
- Material Approved By
- Material Cost Allocation
- Position
- Position Earnings E/D
- Position Hrs Worked
- Position Comment
- Position Amt
- Position Notes
- Position Status
- Position Status Reason
- Position Date and Time Approved
- Position Approved By
- Position Cost Allocation
- Category
- Description
- Purpose
- Amount
- Expense Date
- Create Date
- Receipts Received
- Notes
- Expense Status
- Expense Status Reason
- Expense Date and Time Approved
- Expense Approved By
- Expense Cost Allocation
- Adj. Classification
- Adj. Reason
- Adj. Justification
- Adj. Shift
- Date Adj.
- Day Adj.
- Adj. Reg. Hour
- Adj. OT Hour
- Adj. DT Hour
- Adj. Hol. Hour
- Adj. Amount
- Duplicate Reason
- Adj. Type
- Ref Detail Itemid
- Adj. Note
- Adj. Status
- Adj. Status Reason
- Adj. Date and Time Approved
- Adj. Approved By
- Adj. Cost Allocation
- Category Name
- Quantity
- Amount
- Note
- Date Benefit
- Benefit Status
- Benefit Status Reason
- Benefit Date and Time Approved
- Benefit Approved By
- Date Worked
- Shift type
- Shift Value
- Shift Rate Regular
- Shift Rate OT
- Shift Rate DT
- Shift Hours
- Shift Hours OT
- Shift Hours DT
- Detail Bill Amount
| Field | Description |
|---|---|
| Client | From the drop down, select the client organization to filter results by. |
| Worker | Enter the name of the worker(s) whose data is included in the report. This field is set to 'All' by default. |
| Invoice | Select the invoice to filter by. This field is set to 'All' by default. |
| Supplier Invoice | Select the supplier invoice to filter by. This field is set to 'All' by default. |
| Date Type | From the drop down, select the date type. You can select from the
following:
This setting is used in conjunction with From date and To date fields. You specify a date range based on the end date type. |
| From date | Enter the beginning date for the date range. You can also click the calendar icon to open a calendar pop up that allows you to select the date. |
| To date | Enter the end date for the date range. You can also click the calendar icon to open a calendar pop up that allows you to select the date. |
| Include Time Details | Select the check box to include time (billing item detail) in the report output. |
| Milestone Details | For project engagements, select the check box to include milestone information in the report output. |
| Material Details | For project engagements, select the check box to include materials information in the report output. |
| Position Details | For project engagements, select the check box to include position
information in the report output. Note: This information does not include
project worker information. |
| Expense Details | Select the check box to include expense information in the report output. |
| Adjustment Details | Select the check box to include adjustment billing item information in the report output. |
| Benefit Details | Select the check box to include benefit billing item information in the report output. |
| Shift Details | Select the check box to include shift information in the report output. |
| Multiple and Piece Rate | Select the check box to include multiple rate or piece rate (whichever is associated with the billing item) in the report output. |
| Custom Fields | Select the check box to include billing custom field names and values in the report output. |
| Client Organization Custom Fields | Select the check box to include Manager type custom field name and values in the report output. |
| Do not display 'Rejected' Details | Select the check box to exclude rejected billing items in the report output. |
| Billing Item Type | From the selection field, select the billing item types to filter by. This field is set to 'All' by default. |
| Summarize by | From the drop down, select how to summarize the output columns in the report. |
| Optional Columns | From the selection field, select optional columns for the report output. |
Budgeted Funds Depletion Report
This report () produces data regarding funds depletion for active engagements, by either purchase order or budgeted amount.
- Worker
- Supplier
- Requisition #
- Requisition Type
- Start Date
- Estimated End Date
- End Date
- Bill Rate
- Currency
- Initial Budgeted Amount
- Total Budget Amount
- Available Amount
- Expires On
- Billing to Date
- Average Weekly Billing
- Est. Wks Remaining
- % Of Funds Used
- VAT to Date
- Additional Fund Amount - Calculated field ((Available Amount + Billing to Date) - Initial Amount).
- PO #
- Requisition # - This field is repeated per unique PO Line # / Requisition # combination.
- PO Line # - This field is repeated per unique PO Line # / Requisition # combination.
- UOM - This field is repeated per unique PO Line # / Requisition # combination.
- Worker - This field is repeated per unique PO Line # / Requisition # combination.
- Supplier - This field is repeated per unique PO Line # / Requisition # combination.
- Requisition Type - This field is repeated per unique PO Line # / Requisition # combination.
- Start Date - This field is repeated per unique PO Line # / Requisition # combination.
- Estimated End Date - This field is repeated per unique PO Line # / Requisition # combination.
- End Date - This field is repeated per unique PO Line # / Requisition # combination.
- Bill Rate - This field is repeated per unique PO Line # / Requisition # combination.
- PO Amount - This field is repeated per unique PO Line # / Requisition # combination.
- PO Available Amount - This field is repeated per unique PO Line # / Requisition # combination.
- PO Billing to Date - This field is repeated per unique PO Line # / Requisition # combination. This field is the sum of Bill Client Amount for all processed billing line items.
- Average Weekly Billing - This field is repeated per unique PO Line # / Requisition # combination.
- PO Est. Wks Remaining - This field is repeated per unique PO Line # / Requisition # combination.
- PO % Of Funds Used - This field is repeated per unique PO Line # / Requisition # combination.
- Additional Amount - This field is repeated per unique PO Line # / Requisition # combination. This is a calculated field ((Available Amount + Billing to Date) - PO Amount). Amount billed is based on processed billing items.
- PO Total Amount - This is a calculated field (Available Amount + Billing to Date). Amount billed is based on processed billing items.
- Currency
- PO Amount
- PO Available Amount
- Billing to Date
- Average Weekly Billing
- Est. Wks Remaining
- % Of Funds Used
- VAT to Date
- PO Start Date
- PO End Date
- Primary
- Status
- Additional Fund Amount - This is a calculated field ((Available Amount + Billing to Date) - Initial Amount. Amount billed is based on processed billing items.
- PO Total Amount - This is a calculated field (Available Amount + Billing to Date) . Amount billed is based on processed billing items.
| Field | Description |
|---|---|
| Client | From the drop down, select the client organization to filter results by. |
| Type of Funds | Use the filter to select the type of funds to report on (Budget Amount or PO Amount |
| Worker | Enter the name of the worker(s) whose data is included in the report. This field is set to 'All' by default. |
| Requisition Type | Select the engagement type. This field is set to 'All' by default. |
| Requisition Status | Select the status of the engagement to report on. |
| Invoice Option | Select the invoice option for the engagement. This field is set to 'All' by default. See c_invoicing.html. |
| Percentage Used Greater than | Use the drop down to select the amount of the budget used (percentage). You can only select increments of 10 (10%, 20%, and so on). |
| Active PO's Only | Select the check box to filter the report output by active purchase orders. |
| Primary PO's Only | Select the check box to filter the report output by primary purchase orders. |
| Summarize by | From the drop down, select how to summarize the output columns in the report. |
| Select Columns | Select the columns to include in the report. |
Customizable Billing Report
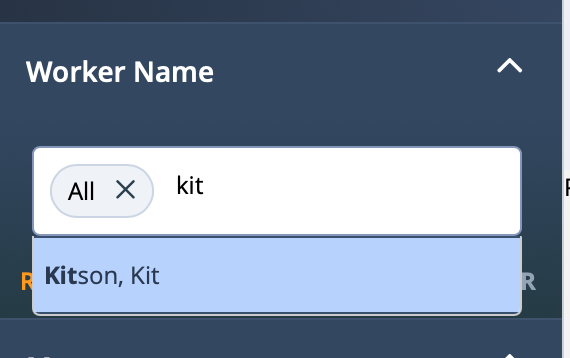
Begin typing, for example, the last name of the person (worker, manager, and so on). If you enter the first name of the person, the system does not automatically suggest a name.
The Billing Rate Type Detail Report supports BYOK encryption. If the client organization has enabled the encryption feature, only supported reports are available. For more information about the encryption feature, contract your Program Representative.
If the client organization has a parent/child business organization configured, users can report across all of the organizations they are associated with.
- General Info section:
- Status
- Billing Status Reason - If timecard status is 'Saved' or 'Processed', this field is empty.
- Line #
- Worker
- Job Title
- Country
- City
- State/Province
- Worker #
- Engagement#
- Pay Rate
- Mark Up
- Bill Rate
- Rule Description
- OT Multiplier
- OT Rate
- DT Multiplier
- DT Rate
- Holiday Multiplier
- Holiday Rate
- Supplier
- MSP Sup %
- Operational Unit
- Manager
- Dept Lvl 1
- Dept Lvl 2 - Displays if sub-departments are configured for a parent department.
- Dept #
- Currency
- Rate Application Type
- Earnings E/D
- Start Date
- Period Billed
- Days worked in Period
- Days
- Reg Hrs
- OT Hrs
- DT Hrs
- Leave Hrs
- Billable Leave Hours - PTO hours if client organization has leave tracking enabled.
- Milestones
- Materials
- Position
- Exp
- Adj - Only viewable to suppliers where the billing filter is set to viewable by supplier.
- Supplier VAT
- MSP Cli $
- MSP Sup $
- Total Pay Supplier
- Invoice #
- Inv Date
- Invoice E/D
- Job Category
- Units Worked
- Concatenated as <piece_type_name>|<units_worked>.
- Sum of units for each piece type or multiple rate for a work week period.
- Piece Bill Rate - Concatenated as <piece_type_name>|<piece_type_bill_rate>.
- Piece Pay Rate - Concatenated as <piece_type_name>|<piece_type_pay rate>.
- Multiple Rate
- Concatenated as <multiple_rate_name>|<bill_rate>|<number_of_hours>|<rate_type> or <multiple_rate_name>|<bill_rate>|<number_of_days>|<rate_type>.
- Daily rate displays in number of days.
- Hourly rate displays in number of hours.
- Rate type is the sum total amount for each rate type.
- Work Address
- Work City/Town
- Work State/Province
- Work Postal Code
- Work Country
- Work Building Code
- Offsite Address
- Offsite City/Town
- Offsite State/Province
- Offsite Country
- General Comment
- Credited By Bill
- Rebilled By Bill
- Date Credited
- Credit For Bill
- Rebill For Bill
- Miscellaneous section
- MSP Sales Tax Down Amount
- MSP VAT Down Amount
- MSP GST Down Amount
- MSP CGST Down Amount
- MSP SGST Down Amount
- MSP IGST Down Amount
- MSP HST Down Amount
- MSP QST Down Amount
- MSP RST Down Amount
- MSP PST Down Amount
- MSP Consumption Tax Down Amount
- MSP Service Tax Down Amount
- Pay GST Amount
- Pay CGST Amount
- Pay SGST Amount
- Pay IGST Amount
- Pay HST Amount
- Pay QST Amount
- Pay RST Amount
- Pay PST Amount
- Pay Sale Tax
- Pay VAT
- Pay Consumption Tax
- Pay Service Fee
- VDisc $
- PPay $
- Raw Bill
- Sup Inv#
- Client Inv #
- PO #
- Internal Supplier Reference
- Down Fee Inv #
- GUID
- Engagement Start Date
- Engagement Estimated End Date
- Engagement Actual End Date
- Did Not Work
- Time Entry Interface
- Billing Item Type
- Check #
- Release Date
- Payment Type
- WO/SOW #
- WO/SOW Title
- Research
- Time Detail section
- Date Worked
- Days
- Start Time
- End Time
- Hours
- Regular Hours
- Non Billable Hours
- OT Hours
- DT Hours
- Client Bill Amount - Detail amount per day.
- Multiple Rate
- Concatenated as <multiple_rate_name>|<bill_rate>|<number_of_hours>|<rate_type> or <multiple_rate_name>|<bill_rate>|<number_of_days>|<rate_type>.
- Daily rate displays in number of days.
- Hourly rate displays in number of hours.
- Displays as total hours per day worked, with each day line displaying the multi rate value.
- All rates for an operational unit display, but only rates with time entered have value.
- Piece Bill Rate
- Concatenated as <piece_type_name>|<piece_type_bill_rate>|<units_worked>.
- For multiple piece types logged for a single day, displays concatenated values, separated by a comma.
- All rates for an operational unit display, but only rates with time entered have value.
- Start Lunch
- End Lunch
- Lunch
- Notes
- Time Status
- Time Status Reason
- Time Date and Time Approved
- Time Created By
- Time Cost Allocation
- Did Not Work
- Milestone Detail section
- Milestone
- Milestone Date
- Milestone Due Date
- Milestone Comment
- Milestone Amt
- Milestone Status
- Milestone Status Reason
- Milestone Created By
- Milestone Cost Allocation
- Material section
- Material
- Material Date Purchased
- Material Quantity
- Material Comment
- Material Amt
- Material Status
- Material Status Reason
- Material Created By
- Material Cost Allocation
- Position section
- Position
- Position Earnings E/D
- Position Hrs Worked
- Position Comment
- Position Amt
- Position Notes
- Position Status
- Position Status Reason
- Position Created By
- Position Cost Allocation
- Expense section
- Category
- Description - Concatenated as <mileage>, <from>, <destination>, <second_destination>.
- Purpose
- Amount
- Expense Date
- Create Date
- Receipts Received
- Notes
- Expense Status
- Expense Status Reason
- Expense Created By
- Expense Canst Allocation
- Adjustment Detail section - Section only viewable to suppliers where the
billing filter is set to viewable by supplier.
- Adj. Classification
- Adj. Reason
- Adj. Justification
- Adj. Shift
- Date Adj.
- Day Adj.
- Adj. Reg. Hour
- Adj. OT Hour
- Adj. DT Hour
- Adj. Hol. Hour
- Adj. Amount
- Duplicate Reason
- Adj. Type
- Ref Detail Itemid
- Adj. Note
- Adj. Status
- Adj. Status Reason
- Adj. Cost Allocation
- Dates of Interest section
- Date/Time Created
- Date/Time Exported
- Date Invoiced
- Date Client Posted
- Date Client Paid
- Date Status Pending
- Date Sent to PeopleSoft
- Date Posted to Client GL
- Shift Differential section
- Shift Type
- Value
- Shift Reg Rate
- Shift OT Rate
- Shift DT Rate
- Total Shift Hours
- Daily Tier section
- Daily Tier Value
- Purchase Order section
- Primary PO#
| Field | Description |
|---|---|
| Layout | Select the report layout. |
| Worker Name | Select the name of the worker to filter by. The default value for this field is 'All' by default. |
| Billing Item Status | Click a status value to filter results by. You can select multiple statuses, or select 'All'. |
| Billing Item Status Reason | Click a reason value to filter results by. You can select multiple statuses, or select 'All'. |
| Invoice Option | Select the invoice option for the engagement. This field is set to 'All' by default. See c_invoicing.html. |
| Invoice | Select the generated invoice to narrow the data set. This field is set to 'All' by default. |
| Supplier Invoice | Select the generated supplier invoice to narrow the data set. This field is set to 'All' by default. |
| Earnings E/D | From the drop down, select the earnings end date to filter by. You can configure a date
range. Select Date Range From-To, and then use the
From and To fields to configure
dates. You can also click the calendar icon to open a calendar pop up that allows you to select the date. |
| Invoice E/D | From the drop down, select the invoice end date to filter by. You can configure a date range.
Select Date Range From-To, and then use the
From and To fields to configure
dates. You can also click the calendar icon to open a calendar pop up that allows you to select the date. |
| Date Approved | From the drop down, select the date that the billing was approved to filter by. You can
configure a date range. Select Date Range From-To, and then
use the From and To fields to
configure dates. You can also click the calendar icon to open a calendar pop up that allows you to select the date. |
| Billing Item Type | Select the billing item type to filter by. This field is set to 'All'
by default. If you select 'Expense', the Description field in the report output concatenates values as 'Mileage | From | Destination | 2nd Destination'. |
Engagement Ratio Report
This report () produces data regarding resume to interview ratios, and interviews to hire ratios.
- Summary section - Summary by supplier.
- Supplier
- Category
- Category Hierarchy
- Total Requisitions
- Total Resumes
- Total Interviews
- Interview %
- Total Hired
- Hire %
- Detail section - Supplier category detail broken out by candidate hired for a
request.
- Supplier
- Category
- Category Hierarchy
- Requisition #
- Department Number
- Department
- Job Title
- Start Date
- Estimated End Date
- Manager
- Location
- Onsite
- Country
- State/Province
- City
- Address
| Field | Description |
|---|---|
| Client | From the drop down, select the client organization to filter results by. |
| Category | From the selection field, select the job categories to filter
by. Job categories appear as they are configured within an operational unit (OpUnit). There can be the same job category configured for multiple OpUnits in a client organization. This field is set to 'All' by default. |
| Requisition Type | Select the engagement type. This field is set to 'All' by default. |
| Requisition Status | Select the status of the engagement to report on. |
| Countries | Select the configured client countries to filter by. This field is set to 'All' by default. |
| States | Select the configured client states to filter by. This field is set to 'All' by default. |
| Cities | Select the configured client cities to filter by. This field is set to 'All' by default. |
| Date Type | The only option for this field is 'Date Created' (the date that the
request was created). This setting is used in conjunction with From date and To date fields. You specify a date range based on the end date type. |
| From date | Enter the beginning date for the date range. You can also click the calendar icon to open a calendar pop up that allows you to select the date. |
| To date | Enter the end date for the date range. You can also click the calendar icon to open a calendar pop up that allows you to select the date. |
| Display Location Details | Select the check box to include location information in the report. |
| Select Columns | Select the columns to include in the report. |
Interview Information Report
Report output type is determined by the button clicked after you configure your report parameters. For more information about report functions, see Report Output Types.
If the client organization has a parent/child business organization configured, users can report across all of the organizations they are associated with.
| Field | Description |
|---|---|
| Client | From the drop down, select the client organization to filter results by. |
| Location | Select the configured client organization location. |
| Candidate Last Name | Enter the candidate's last name. |
| Candidate Right Name | Enter the candidate's first name. |
| Date Type | From the drop down, select the range definition. You can select from
the following:
This setting is used in conjunction with From date and To date fields. |
| From date | Enter the beginning date for the date range. You can also click the calendar icon to open a calendar pop up that allows you to select the date. |
| To date | Enter the end date for the date range. You can also click the calendar icon to open a calendar pop up that allows you to select the date. |
| Interview Status | Select the interview status to filter by. You can select from the
following:
|
| Requisition Status | Select the status of the engagement to report on. |
| Summarize by | From the drop down, select how to summarize the content in the
report. You can select from the following:
|
| Select Columns | Select the columns to include in the report. |
Lunch Audit Report
| Field | Description |
|---|---|
| Client | From the drop down, select the client organization to filter results by. |
| Worker | Enter the name of the worker(s) whose data is included in the report. This field is set to 'All' by default. |
| Location | From the selection field, select the configured client location to filter by. This field is set to 'All' by default (all client locations that the supplier/vendor contracts with). |
| Date Type | The only option for this field is 'Earnings E/D'. This setting is used in conjunction with From date and To date fields. You specify a date range based on the end date type. |
| From date | Enter the beginning date for the date range. You can also click the calendar icon to open a calendar pop up that allows you to select the date. |
| To date | Enter the end date for the date range. You can also click the calendar icon to open a calendar pop up that allows you to select the date. |
| Only Show No Lunch Taken | Select the check box to filter out billing items that are not marked with 'No Lunch Taken'. |
| Optional Columns | From the selection field, select the optional columns to include in the report output. |
Missing Timesheet Report
- Engagement #
- Supplier
- Worker
- Engagement Status
- Start Date
- Estimated End Date
- Actual End Date
- Missing Earnings End Date
- Worker ID
- Worker Email Address
- Rate Application
- Work Period
- Time Entry Interface
- Time Source
- Job Title
- Client Country
- Client State/Province
- Client City
- Client Building Code
- Work Country
- Work State/Province
- Work City
- Work Building Code
- Currency
- Hiring Manager
| Filter | Description |
|---|---|
| Supplier | Filter the report output by the supplier/vendor assigned to the engagement. This field is set to 'All' by default. |
| Manager | Select the client manager name associated with the engagement. This field is set to 'All' by default. |
| Requisition Type | Select the engagement type. This field is set to 'All' by default. |
| Requisition Status | Select the status of the engagement to report on. |
| Earnings E/D | From the drop down, select the earnings end date to filter by. You can configure a date
range. Select Date Range From-To, and then use the
From and To fields to configure
dates. You can also click the calendar icon to open a calendar pop up that allows you to select the date. |
| Start Date | From the drop down, filter by engagement start date. You can
configure a date range. Select Date Range
From-To, and then use the From and
To fields to configure dates.
You can also click the calendar icon to open a calendar pop up that allows you to select the date. |
| Estimated End Date | From the drop down, filter by the estimated end date for the
engagement. You can configure a date range. Select Date Range
From-To, and then use the From
and To fields to configure dates.
You can also click the calendar icon to open a calendar pop up that allows you to select the date. |
| Client Country | Filter the report output by the client country for the engagement. This field is set to 'All' by default. |
| Client State/Province | Filter the report output by the client state or province for the engagement. This field is set to 'All' by default. |
| Client City | Filter the report output by the client city for the engagement. This field is set to 'All' by default. |
Mobile Usage Metrics Report
- User Metrics
- Access Timestamp
- User Type
- User ID
- Username
- First Name
- Last Name
- Device Type
- Device Model
- App Version
- Date Only
- Month Only
- Year Only
| Filter | Description |
|---|---|
| User Type | Filter the report output by the user type. |
| Device Type | Filter the report output by the device type (iPhone, iPad, or androidPhone). |
| Access Timestamp | Filter the report output using a date range. |
Overtime Billing Report
This report () produces data regarding overtime hours and dollar amounts for a specified date range.
- Worker
- Requisition # - Sub section appears for each engagement in filtered output.
- Line #
- Earnings E/D
- Bill rate
- OT Rate
- DT Rate
- OT Hours
- OT Billing
- DT Hours
- DT Billing
- Requisition Type
- Req Start Date
- Req Est. End Date
- Req Act. End Date
- Req Bill Rate
- Req OT Rate
- Req DT Rate
| Field | Description |
|---|---|
| Client | From the drop down, select the client organization to filter results by. |
| Worker | Enter the name of the worker(s) whose data is included in the report. This field is set to 'All' by default. |
| Requisition Type | Select the engagement type. This field is set to 'All' by default. |
| Requisition Status | Select the status of the engagement to report on. |
| Date Type | From the drop down, select the date type. You can select from the
following:
This setting is used in conjunction with From date and To date fields. You specify a date range based on the end date type. |
| From date | Enter the beginning date for the date range. You can also click the calendar icon to open a calendar pop up that allows you to select the date. |
| To date | Enter the end date for the date range. You can also click the calendar icon to open a calendar pop up that allows you to select the date. |
| Summarize by | From the drop down, select how to summarize the output columns in the report. |
Pending Expense Report
This report allows you to identify expenses that are waiting for either supplier approval of receipts, or client manager final approval.
- Worker
- Requisition #
- Client
- Supplier
- MSP Name
- MSP Phone
- MSP Email
- Line #
- Expense Entry Category
- Expense Description
- Expense Destination
- Status
- Status Reason
- Purpose
- Expense Date
- Date Expense Submitted
- Quantity
- Amount
- Paid Amount
- Trip Expense
- Note
- Receipt Received
- Approved
- Cost Allocation
| Filter | Description |
|---|---|
| Client | Select the client organization for the engagement. |
| Requisition # | Select the requisition number. This field is set to 'All' by default. |
| Worker | Enter the name of the worker(s) whose data is included in the report. This field is set to 'All' by default. |
| Date Type | From the drop down, select the date type. You can select from the
following:
This setting is used in conjunction with From dateand To date fields. You specify a date range based on the end date type. |
| From date | Enter the beginning date for the date range. You can also click the calendar icon to open a calendar pop up that allows you to select the date. |
| To date | Enter the end date for the date range. You can also click the calendar icon to open a calendar pop up that allows you to select the date. |
| Status | From the drop down, select the status of the expense to filter by. |
| Include Receipt Rejected | Select the check box to include expense records where the receipt was rejected. |
| Optional Columns | Select optional columns to include in the report output. Hold the Shift key and click column names to include multiple names in the output. |
PO Funds Depletion Report
This report () produces data regarding funds depletion on purchase orders.
- Budgeted Amount section
- Department
- Worker
- Supplier
- Requisition #
- Requisition Type
- Start Date
- Estimated End Date
- End Date
- Bill Rate
- Currency
- Initial Budget Amount
- Estimated MSP Up Fee
- Budget Adjustment
- Total Budget Amount
- Available Amount
- Expires On
- Billing to Date
- Average Weekly Billing
- Est. Wks Remaining
- % of Funds Used
- VAT to Date
- Additional Fund Amount
- PO section
- PO # - Additional detail for the purchase order, broken down by PO Line
#.
- Requisition #
- PO Line #
- UOM
- Worker
- Supplier
- Requisition Type
- Start Date
- Estimated End Date
- End Date
- Bill Rate
- PO Amount
- PO Available Amount
- PO Billing to Date - Sum of Bill Client Amount for all processed billings.
- Average Weekly Billing
- PO Est. Wks Remaining
- PO % Of Funds Used - All values used in this calculation are pulled from the individual PO # (this section). Calculated as PO Billings to Date / PO Amount + Additional Fund Amount * 100.
- Additional Fund Amount - All values used in this calculation are pulled from the individual PO # (this section). Calculated as Available Amount + Billing Date - PO Amount. This value is calculated from processed billing items only.
- PO Total Amount - All values used in this calculation are pulled from the individual PO # (this section). Calculated as Available Amount + Billing Date. This value is calculated from processed billing items only.
- Currency
- PO Amount
- PO Available Amount
- Billing to Date - Sum of Bill Client Amount for all processed billings.
- Average Weekly Billing
- Est. Wks Remaining
- % Of Funds Used - Calculated as Billing to Date / PO Amount + Additional Fund Amount * 100.
- VAT to Date
- PO Start Date
- PO End Date
- Primary
- Status
- Additional Fund Amount - Calculated as (Available Amount + Billing to Date) - Initial Amount.
- PO Total Amount
- PO # - Additional detail for the purchase order, broken down by PO Line
#.
| Field | Description |
|---|---|
| Client | From the drop down, select the client organization to filter results by. |
| Type of Funds | Use the drop down to select the type of funds to report on. |
| Worker | Enter the name of the worker(s) whose data is included in the report. This field is set to 'All' by default. |
| Manager Delegate | If the report is being run by the client manager delegate, then the delegate can select additional client manager delegate assigned by the delegating client manager. |
| Requisition Type | Select the engagement type. This field is set to 'All' by default. |
| Requisition Status | Select the status of the engagement to report on. |
| Invoice Option | Select the invoice option for the engagement. This field is set to 'All' by default. See c_invoicing.html. |
| Percentage Used Greater than | Use the drop down to select the amount of the budget used (percentage). You can only select increments of 10 (10%, 20%, and so on). |
| Active PO's Only | Select the check box to filter by active purchase orders only. |
| Primary PO's Only | Select the check box to filter by primary purchase orders only. |
| Select Columns | Select the columns to include in the report. |
Preferred vs. Non-Preferred Spend Report
- Tier Number
- Number of Suppliers
- Total Spend per Tier
| Filter | Description |
|---|---|
| Date Type | Filter the report output by Invoice Period End Date. This setting is used in conjunction with From date and To date fields. You specify a date range based on the end date type. |
| From date | Enter the beginning date for the date range. You can also click the calendar icon to open a calendar pop up that allows you to select the date. |
| To date | Enter the end date for the date range. You can also click the calendar icon to open a calendar pop up that allows you to select the date. |
Project Billing Activity
- Requisition ID
- Supplier
- Manager
- Worker - Worker name that is associated with a unique position name.
- Project Detail
- Project Description
- Initial Amount
- Amount - One detail row per unique project amount.
- % Allocated
- Bill Amount
- *Billing Cost Allocation Field Value*
- Value is unique per client organization.
- Column repeats per unique occurrence of field (1-xx).
- Column only displays if Include Billing Cost Allocation Fields check box is selected in the report configuration filters.
- Balance
- Billing Item ID
- Billing Item Amount
- Billing Item Period End Date
- Approved By
- Date Approved
- Invoice ID
- Invoice Date
- Invoice Period End Date
- Payment Status
- Date Client Payment Received
- Supplier Invoice Number
- Supplier Payment
- Check Number
- Date Supplier Paid
- Requisition Custom Fields
- Column repeats per unique occurrence of field (1-xx).
- Column only displays if Include Requisition Custom Fields check box is selected in the report configuration filters.
| Filter | Description |
|---|---|
| Invoice Option | Select the invoice option for the engagement. This field is set to 'All' by default. See c_invoicing.html. |
| Date Type | From the drop down, select the date type. You can select from the
following:
This setting is used in conjunction with From dateand To date fields. You specify a date range based on the end date type. |
| From date | Enter the beginning date for the date range. You can also click the calendar icon to open a calendar pop up that allows you to select the date. |
| To date | Enter the end date for the date range. You can also click the calendar icon to open a calendar pop up that allows you to select the date. |
| Project Detail | Filter the report output by the project billing type. You can only filter by one type (for example, milestone) in the output. |
| Requisition Status | Select the status of the engagement to report on. |
| Supplier | Filter the report output by the supplier/vendor associated with the project engagement. This field is set to 'All' by default. |
| Show Requisition Custom Fields | Select the check box to include requisition custom fields in the report output. This setting is deselected by default. |
| Include Billing Cost Allocation Fields | Select the check box to include billing cost allocation custom fields in the report output. This setting is deselected by default. |
| Summarize by | From the drop down, select how to summarize the output columns in the report. |
Project Position Report
If the client organization has a parent/child business organization configured, users can report across all of the organizations they are associated with.
- Default Info section
- Request #
- Engagement #
- Position
- Position ID
- Manager
- Position Quote Amount
- Position Info section
- Position Bill Rate
- Bill Rate UOM
- Position Est. Hours
- Position Expense Amount
- Worker Count
- Current Worker Count
- Current Onsite Count
- Engagement Info section
- Engagement Name
- Engagement Status
- Operational Unit
- Supplier
- Eng. Start Date
- Eng. Est. End Date
- Eng. Actual End Date
- Date Eng. Created
- Date Eng. Pending
- Date Eng. Filled
- Date Eng. Closed
- Date Eng. Cancelled
- Eng. Country
- Eng. State/Province
- Eng. City
- Eng. Address
- Description
- Experience
- Project Deliverables
- Invoice Option
- Eng. Total Timecard Hours
| Filter | Description |
|---|---|
| Engagement Status | |
| Division | Filter the report output by a configured division. This field is set to 'All' by default. |
| Cost Center | Filter the report output by a configured cost center. This field is set to 'All' by default. |
| Supplier | Filter the report output by the supplier/vendor associated with the project engagement. This field is set to 'All' by default. |
| Manager | Select the client manager name associated with the engagement. This field is set to 'All' by default. |
| Filled Date | From the drop down, select the date that the request was filled to
filter by. You can configure a date range. Select Date Range
From-To, and then use the From
and To fields to configure dates.
You can also click the calendar icon to open a calendar pop up that allows you to select the date. |
| Engagement Start Date | From the drop down, select the date that the engagement was started
to filter by. You can configure a date range. Select Date
Range From-To, and then use the
From and To fields to
configure dates.
You can also click the calendar icon to open a calendar pop up that allows you to select the date. |
| Estimated End Date | From the drop down, select the date that the engagement was ended to
filter by. You can configure a date range. Select Date Range
From-To, and then use the From
and To fields to configure dates.
You can also click the calendar icon to open a calendar pop up that allows you to select the date. |
| Actual End Date | From the drop down, select the actual end date to filter by. You can
configure a date range. Select Date Range
From-To, and then use the From and
To fields to configure dates.
You can also click the calendar icon to open a calendar pop up that allows you to select the date. |
| Position Name | Filter the report output by the name of the position in the project. This field is set to 'All' by default. |
| Current Worker Count Date | From the drop down, select the current number of workers as of a date
to filter by. You can configure a date range. Select Date
Range From-To, and then use the
From and To fields to
configure dates.
You can also click the calendar icon to open a calendar pop up that allows you to select the date. |
| Position Quote Amount | Filter the report amount by the amount value of the position on the quote which is the maximum amount billed that can be billed. Configure a range. |
| Position Billed Amount | Filter the report output by the billed value for a position on the quote which is the amount that has been billed. Configure a range. |
| Position Balance Amount | Filter the report output by the balance value for the position on the quote which is the amount for the position - what was billed for the position. Configure a range. |
Project Tracking Detail Report
- Summary Report output
- Operational Unit
- Earnings E/D - repeated for each unique combination of Billing Cost Allocation field and client manager.
- Billing Cost Allocation Fields 1-xx - repeated for each unique combination of Billing Cost Allocation field and client manager.
- Total
- Detail Report output
- Earnings E/D - repeated for each unique combination of Billing Cost Allocation field and client manager.
- Billing Cost Allocation Fields 1-xx - repeated for each unique combination of Billing Cost Allocation field and client manager.
- Manager
- Operational Unit
- Department #
- Worker
- Supplier
- Total
- Detail section for Summary and Detail reports
- Supplier Name - One row output per unique data combination for the
supplier
- Supplier Name
- Manager
- Worker
- Invoice #
- AP Invoice #
- Earnings E/D
- Req #
- Category
- Operational Unit
- Department #
- Line #
- Timecard Status
- Rate Application Type
- Bill Rate
- Date Worked
- Days
- Regular Hours
- OT Hours
- DT Hours
- PTO Hours
- PTO Billable Hours
- Multiple Rates
- Piece Rates
- Holiday Hours
- % Allocated
- Milestone Amount
- Material Amount
- Position Amount
- Expense Amount
- Adjustment Amount
- Sales Tax
- Bill Amount
- Worker Notes
- Product/Project (PPSID) Expense Type
- Project Task Expense Type
- Billable Expense Type
- Billing Cost Allocation Fields 1-xx
- Project Worker Eng #
- Supplier Name - One row output per unique data combination for the
supplier
| Filter | Description |
|---|---|
| Billing Cost Allocation Name | Select Project Code or Project/Product Name from the drop down. |
| Billing Cost Allocation Value | Depending on your selection in the Billing Cost Allocation Name filter field, select the correct billing allocation value or values to filter by. |
| Division | Filter the report output by a configured division. This field is set to 'All' by default. |
| Cost Center | Filter the report output by a configured cost center. This field is set to 'All' by default. |
| Work Location | Select the location or locations to filter the output by. You can
select multiple locations. This field is set to 'All' by default. |
| Worker | Enter the name of the worker(s) whose data is included in the report. This field is set to 'All' by default. |
| Manager | Select the client manager name associated with the engagement. This field is set to 'All' by default. |
| Supplier | Select the supplier/vendor of the project workers. You can select
multiple entities. This field is set to 'All' by default. |
| Invoice | Select the invoice to filter by. This field is set to 'All' by default. |
| Status | Select the status for the project to filter the output by. You can
select multiple statuses. This field is set to 'All' by default |
| Status Reason | Select the value set in the Reason field on the engagement. |
| Date Type | From the drop down, select the date type. You can select from the
following:
This setting is used in conjunction with From date and To date fields. You specify a date range based on the end date type. |
| From date | Enter the beginning date for the date range. You can also click the calendar icon to open a calendar pop up that allows you to select the date. |
| To date | Enter the end date for the date range. You can also click the calendar icon to open a calendar pop up that allows you to select the date. |
| Summarize by | From the drop down, select how to summarize the output columns in the report. |
Rejected Billing Report
- Worker
- Requisition #
- Requisition Type
- Manager
- Location
- Client
- Line #
- Day
- Start
- End
- Hours
- Lunch
- Currency
- Expenses
- Worker Notes
- Rejected Notes
- Rejected By
- Rejected Date/Time
- Resolved
- MSP
| Filter | Description |
|---|---|
| Client | From the drop down, select the client organization to filter results by. |
| Worker | Enter the name of the worker(s) whose data is included in the report. This field is set to 'All' by default. |
| Group By | Select how to group the report output, by worker, by requisition, or no grouping (None). The default setting for this field is None. |
Request Data Export
The Billing Rate Type Detail Report supports BYOK encryption. If the client organization has enabled the encryption feature, only supported reports are available. For more information about the encryption feature, contract your Program Representative.
If the client organization has a parent/child business organization configured, users can report across all of the organizations they are associated with.
The report produces the following columns:
- General Info section
- Request # - Mandatory output
- Requisition Type
- Operational Unit
- Manager - Only displays if client organization is configure to display this data.
- Date Pending
- Start Date
- Est. End Date
- Job Title
- Job Code
- Glider Test Name
- Number of Positions
- Positions Remaining
- Positions Filled
- Project Name
- Bill Rate
- Pay Rate
- Cost Estimation (Initial Budget Amount)
- State/Province
- City
- Keywords
- Glider Test Name
- Request Description section
- Days Pending
- Reason
- Reason Detail - Only displays if client organization is configure to display this data.
- Requisition Status Reason (detailed)
- Number of Suppliers
- Number of Resumes
- Number of Interviews
- Number of TN Candidates
- Number of TN Interviews
- Number of TN Invitations
- Department Parent
- Duties
- Description
- Skills
- Experience
- Education
- Position Location section
- Address
- Client Building Code
- Country
- Offsite City/Town
- Offsite Country
- Offsite State
- Onsite
- Position Schedule section
- Days to Start
- Duration in weeks
- Duration in workdays
- Hours Per Day
- Hours Per Week
- Schedule Notes
- Position Financials section
- Currency
- Estimated Cost
- Max Rate
- Min Rate
- Negotiated Bill Rate
- Submitted Bill Rate
- Project Quote section
- Deliverables/Milestone Name
- Due Date
- Material Amount
- Material Balance Amount
- Material Name
- Material Price
- Material Quantity
- Milestone Amount
- Milestone Balance Amount
- Milestone Description
- Position Amount
- Position Balance (Units)
- Position Balance Amount
- Position Bill Rate
- Position Billable
- Position Description
- Position Estimated Units
- Position Expense Balance Amount
- Position Expense Description
- Position Rate Application Type
- Position Title
- Position Worker Name
- Project Deliverables
- Proposed Scope of Work
- Quote Count
- Quote Status
- Supplier
- Project Worker section
- Relationship with Supplier
- Time Entry Interface
- Time Source
- Work Period
- Worker End Date
- Worker Phone
- Worker Start Date
- Worker e-mail
- Timeline Info section
- Date Created
- Date Approved
- Date Assigned
- Date Closed
- Date Cancelled
- Date MSP Passed
- Date Reopened
- Date Request On Hold
- Date Request Off Hold
- Date of First Resume MSP Passed
- Total Number of Resumes Passed
- Resume and Interview section
- Candidate City
- Candidate Country
- Candidate Email
- Candidate Star Rating
- Candidate State
- Candidate Name
- Candidate/Resume Status
- Client Supervisor
- Comment for Supplier
- Confirmed Interview Date/Time
- Date Available
- Dates of most recent contract: From
- Dates of most recent contract: To
- Duration
- Family Member Works for Client
- Feedback By
- Feedback Date
- First Notice Date
- Glider Test Score
- Interview Comments (Mgr)
- Interview Location
- Interview Outcome
- Interview Status
- Interview Type
- Interviewers
- Interviews Cancelled
- Interviews Completed
- Interviews Confirmed
- Interviews Pending
- Last Notice Date
- Method
- Primary Number
- Rejection By Name
- Rejection Date
- Rejection Reason
- Resume Feedback
- Resume Name
- Resume Status Reason
- Resume Submit Date
- Resume Withdrawn Reason
- Sub-Contracted Worker
- Supplier Comments
- Withdrawn By User Type
- Withdrawn Date
- DirectSouorcing/TN
- MDS Match
- TN Desired Rate
- TN Invitation Status
- TN Match & Category
- TN/MDS Candidate Email
- TN/MDS Candidate Name
- DSPRO Ideal Experience
- Degrees
- Job Titles
- Seniority Level
- Skills
- Years of Experience
| Filter | Description |
|---|---|
| Operational Unit | Filter the report output for billing items submitted for a specific operational unit (OpUnit). This field is set to 'All' by default. |
| Client | From the drop down, select the client organization to filter results by. |
| Worker | Enter the name of the worker(s) whose data is included in the report. This field is set to 'All' by default. |
| Manager | Select the client manager name associated with the engagement. This
field is set to 'All' by default. Only displays if the client organization is configured to display this data. |
| Country | Filter the report output by a configured country. This field is set to 'All' by default. |
| State/Province | Filter the report output by a configured state/province. This field is set to 'All' by default. |
| City | Filter the report output by a configured city. This field is set to 'All' by default. |
| Requisition Type | Select the engagement type. This field is set to 'All' by default. |
| Requisition Status | Select the status of the engagement to report on. |
| Date Created | From the drop down, select the date that the request was created. You
can configure a date range. Select Date Range
From-To, and then use the From
and To fields to configure dates.
You can also click the calendar icon to open a calendar pop up that allows you to select the date. |
| Date Closed | From the drop down, select the date that the request was closed. You
can configure a date range. Select Date Range
From-To, and then use the From
and To fields to configure dates.
You can also click the calendar icon to open a calendar pop up that allows you to select the date. |
| Summarize by | From the drop down, select how to summarize the output columns in the report. |
Requisition Activity Overview Report
This report () produces data regarding request/engagement activity by supplier, location, and category.
- <variable> (for Overview reports) - One row is output for each unique
combination of variable (overview or weekly) and output.
- Supplier
- Location
- Category 1-xx - Client organization job categories. One unique column per unique combination of job category and operational unit (if configured).
- Totals
- Existing Orders - Weekly reports only.
- New Requisitions - Weekly reports only.
- Cancelled Requisitions - Weekly reports only.
- Filled Requisitions - Weekly reports only.
| Field | Description |
|---|---|
| Client | From the drop down, select the client organization to filter results by. |
| Date Type | From the drop down, select the date type. You can select from the
following:
This setting is used in conjunction with From date and To date fields. You specify a date range based on the end date type. |
| From date | Enter the beginning date for the date range. You can also click the calendar icon to open a calendar pop up that allows you to select the date. |
| To date | Enter the end date for the date range. You can also click the calendar icon to open a calendar pop up that allows you to select the date. |
| Requisition Type | Select the engagement type. This field is set to 'All' by default. |
| Requisition Status | Select the status of the engagement to report on. |
| Status Reason | Select the value set in the Reason field on the engagement. |
| Location | Select the configured client organization location (Overview report only). |
| Summarize by | From the drop down, select how to summarize the output columns in the report. |
Requisition Project Report
- Req #
- Start Date
- Type
- Approver Status
- Status Reason
- Headcount Approved Date
- Financial Approved Date
- Extension Approved Date
- Supplier
- Project Name
- City
- State/Province
- Country
- Operational Unit
- Department
- Department Number
- Job Category
- Quote - Quote detail per project quote
- Milestone Name
- Milestone Description
- Milestone Due Date
- Milestone Amount
- Milestone Balance Amount
- Material Name
- Material Quantity
- Material Price
- Material Amount
- Material Balance Amount
- Position Name
- Position Worker Name
- Position Bill Rate
- Postilion Estimated Hour
- Position Amount
- Position Rate Application Type
- Position Balance
- Quote Status
- Pricing Accepted
- Start Date
- Estimated End Date
- Manager Name
- Currency
| Filter | Description |
|---|---|
| Client | From the drop down, select the client organization to filter results by. |
| Date Type | From the drop down, select the date type. You can select from the
following:
This setting is used in conjunction with From date and To date fields. You specify a date range based on the end date type. |
| From date | Enter the beginning date for the date range. You can also click the calendar icon to open a calendar pop up that allows you to select the date. |
| To date | Enter the end date for the date range. You can also click the calendar icon to open a calendar pop up that allows you to select the date. |
| Requisition Status | Select the status of the engagement to report on. |
| Status Reason | Select the value set in the Reason field on the engagement. |
| Cities | Filter by cities where the project is located. Note: Supplier users
can only search through all cities. |
| States | Filter by states where the project is located. Note: Supplier users
can only search through all states. |
| Countries | Filter by countries where the project is located. Note: Supplier users
can only search through all countries. |
| Summarize by | From the drop down, select how to summarize the output columns in the report. |
| Show only Assignments over One Year in Duration | Select the check box to exclude projects under one year in duration. |
| Show Requisition Custom Fields | Select the check box to display requisition custom fields in the report output. |
| Select Columns | Select the columns to include in the report. |
Requisition Sourcing Report
- Requisition Sourcing Project Report
- Requisition Sourcing Staffing Report
Staffing Report Output
- <variable> - Name or label.
- Country
- State/Province
- City
- Requisition #
- Request Type
- MSP Contact
- Resume Name
- Resume Status
- Resume Status Reason or Resume Reject Reason or Resume Reject Feedback or Resume Withdraw Reason. Value appears depending on the value that appears on the candidate resume.
- Resume Submit Date
- Supplier Name
- First Notice Date
- Last Notice Date
- Interview Style
- Interview Date / Time
- Interview Status
- Duration
- Method
- Interview Comments
- Visible to Manager
- Date Assigned
- Requisition Status
- Status Reason
- Reason
- Date Approved
- Job Category
- Job Code
- Job Title
- Keywords
- Duties
- Skills
- Education
- Number of Positions
- Positions Remaining
- Rate Application
- Max Bill Rate
- Start Date
- Estimated End Date
- Resume Content
- Interview Count
- Days Pending
- Days Pending (M-F)
- Date Created
- Date Pending
- Date Cancelled
- MSP Contact
- MSP Phone
- Custom Fields
- Manager Custom Fields
Project Report Output
- <variable> - Name or label.
- Requisition #
- Start Date
- Status
- Status Reason
- Date Approved
- Project Name
- Country
- State/Province
- City
- On-Site
- Job Category
- Keywords
- Description
- Experience
- Project Deliverables
- Quote Count
- Supplier
- First Notice Date
- Status
- Proposed Scope of Work
- Price Estimate
- Milestone Name
- Milestone Description
- Milestone Due Date
- Milestone Amount
- Material Name
- Material Quantity
- Material Price
- Material Amount
- Position Name
- Position Worker Name
- Project Worker Eng #
- Position Bill Rate
- Position Estimated Hour
- Position Amount
- Position Rate Application Type
- Quote Status
- Date Assigned
- Start Date
- Estimated End Date
- Date Created
- Date Pending
- Date Cancelled
- MSP Contact
- MSP Phone
- Custom Fields 1-xx
- Manager Custom Fields 1-xx
- Description
- Experience
- Project Deliverables
- Quote Count
- Supplier
- First Notice Date
- Duties
- Skills
- Education
- Number of Positions
- Positions Remaining
- Rate Application
- Max Bill Rate
- Start Date
- Estimated End Date
- Resume Content
- Interview Count
- Days Pending
- Days Pending (M-F)
- Date Created
- Date Pending
- Date Cancelled
- MSP Contact
- MSP Phone
- Custom Fields
- Manager Custom Fields
Managed Services Report Output
- <variable> - Name or label.
- Country
- State/Province
- City
- Requisition #
- Requisition Status
- Status Reason
- Reason
- Date Approved
- Operational Unit
- Dept Lvl 1
- Dept Lvl 2
- Dept Lvl 3
- Dept #
- Job Category
- Job Code
- Job Title
- Keywords
- Duties
- Skills
- Education
- Number of Positions
- Positions Remaining
- Rate Application
- Max Bill Rate
- Start Date
- Estimated End Date
- Resume Content
- Interview Count
- Days Pending
- Days Pending (M-F)
- Date Created
- Date Pending
- Date Cancelled
- MSP Contact
- MSP Phone
- Custom Fields
- Manager Custom Fields
| Filter | Description |
|---|---|
| Client | From the drop down, select the client organization to filter results by. |
| Date Type | From the drop down, select the date type. You can select from the
following:
This setting is used in conjunction with From date and To date fields. You specify a date range based on the end date type. |
| From date | Enter the beginning date for the date range. You can also click the calendar icon to open a calendar pop up that allows you to select the date. |
| To date | Enter the end date for the date range. You can also click the calendar icon to open a calendar pop up that allows you to select the date. |
| Requisition Status | Select the status of the engagement to report on. |
| Status Reason | Select the value set in the Reason field on the engagement. |
| Country | Filter by countries assigned to the requisition. |
| State/Province | Filter by states or provinces assigned to the requisition. |
| City | Filter by cities assigned to the requisition. |
| Summarize by | From the drop down, select how to summarize the output columns in the report. |
| Show Requisition Custom Fields 1-xx | Only applicable to the Managed Services report. |
| Show Manager Custom Fields 1-xx | Defaults to deselected (fields not included). |
Resume Overview Report
This report () provides data regarding resume information for filled or closed engagements. The resume status drives the report output.
'Pending' Status Output
- Worker
- Client
- Requisition #
- Job Title
- Start Date
- Estimated End Date
- Supplier
- Resume Title
- Bill Rate
- Resume Status
- Date Submitted
- Interview Name
- Interview Style
- Interview Date / Time
- Interview Status
- Duration
- Method
- Manager
'Filled / Closed' Status Output
- Requisition #
- Date Submitted
- Worker
- Supplier
- Made Visible
- Interviews
- Job Title
- Start Date
- Estimated End Date
- End Date
- Hired Supplier
- Hired Worker
- First Interview Date
| Field | Description |
|---|---|
| Client | From the drop down, select the client organization to filter results by. |
| Requisition Status | Select the status of the engagement to report on. |
| Requisition Type | Select the engagement type. This field is set to 'All' by default. |
| Resume Status | Filter the report output by the status of the resume. This field controls the filter options that appear for the report. |
| Location | Filter by the location of the job where the candidate was submitted. |
| Worker | Enter the name of the worker(s) whose data is included in the report. This field is set to 'All' by default. |
| Date Type | The only option for this field is 'Date Resume Submitted'. This setting is used in conjunction with From date and To date fields. You specify a date range based on the end date type. |
| From date | Enter the beginning date for the date range. You can also click the calendar icon to open a calendar pop up that allows you to select the date. |
| To date | Enter the end date for the date range. You can also click the calendar icon to open a calendar pop up that allows you to select the date. |
| Select Columns | Select the columns to include in the report. |
Supplier Billing Export
This report () displays data for billing items submitted over a specific time period. Data is only available if it has been exported previously using the Export Billing function in the Supplier view. For more information about this task, see Export Billing.
- Client Name
- Supplier Name
- Line #
- Worker
- Date Worked
- Start Time
- End Time
- Lunch
- Day
- Hours
- Manager
- Worker
- Worker #
- Pay Group
- Job Number
- Requisition #
- Earnings End Date
- Export Date
- Rate Application
- Currency
- Bill Rate
- Pay Rate
- Regular Hours
- OT Hours
- OT Rate
- DT Hours
- DT Rate
- Holiday Hours
- Holiday Rule
- Day
- Position
- Milestones
- Materials
- Expense
- Adjustment
- Tax Type
- Tax Amount
- Vol Disc %
- Vol Disc Amount
- Prompt Pay
- Prompt Pay Amount
- MSP Fee %
- MSP Fee Amt
- Amt Pay Supplier
- Status
- Status Reason
- Grand Total
| Field | Description |
|---|---|
| Client | From the drop down, select the client organization to filter results by. |
| Billing Item Status | Click a status value to filter results by. You can select multiple statuses, or select 'None' to display all export data. |
| Export by Date | Click an export date to filter by. You can select multiple dates, or select 'None' to display all export data. |
| Invoice | Click an invoice number to filter by. Billing items can be associated with an invoice (number) once the item is processed (taxes calculated and record, and so on). |
| Date Type | From the drop down, select the ending date type. You can select the
following:
This setting is used in conjunction with From date and To date fields. You specify a date range based on the end date type. |
| From date | Enter the beginning date for the date range. You can also click the calendar icon to open a calendar pop up that allows you to select the date. |
| To date | Enter the end date for the date range. You can also click the calendar icon to open a calendar pop up that allows you to select the date. |
| Select Columns | Select the columns to include in the report. |
Suppler Payment History Report
This report () produces data regarding historical payment information to vendors/suppliers.
- Client
- Supplier
- Invoice #
- Supplier Invoice #
- AP Invoice
- Invoice Date
- Date Client Payment Received
- Payment Status
- Total Amount Due
- Invoice Amount Paid
- Total Payment
- Payment Type
- Check #
- Date Paid
- Currency
- Supplier Invoice Custom Fields 1-xx - Supplier Invoice Payment type custom fields.
| Field | Description |
|---|---|
| Client | From the drop down, select the client organization to filter results by. |
| Invoice | Select the invoice to filter by. This field is set to 'All' by default. |
| Supplier Invoice | Select the supplier invoice to filter by. This field is set to 'All' by default. |
| Division | Filter the report output by a configured division. This field is set to 'All' by default. |
| Cost Center | Filter the report output by a configured cost center. This field is set to 'All' by default. |
| <job_title> | From the selection field, select the configured job title to filter by. |
| Date Type | The only option for this field is 'Invoice E/D'. This setting is used in conjunction with From date and To date fields. You specify a date range based on the end date type. |
| From date | Enter the beginning date for the date range. You can also click the calendar icon to open a calendar pop up that allows you to select the date. |
| To date | Enter the end date for the date range. You can also click the calendar icon to open a calendar pop up that allows you to select the date. |
| Payment Status | From the selection field, select the payment status to filter by. This field is set to 'All' by default. |
| Summarize by | From the drop down, select how to summarize the output columns in the report. |
| Include Invoice Custom Fields | Select the check box to include configured invoice custom fields in the report output. |
Supplier Payment Invoice Report
This report () provides data to assist in payment through the application.
- Line # - Billing item identifier
- Supplier
- Manager
- Worker
- Worker #
- Requisition #
- Department Name
- Department #
- Location
- Earnings E/D
- Currency
- Milestones
- Materials
- Position
- Rate Application Type
- Bill Rate
- Days
- Regular Hrs
- OT Rate
- OT Hrs
- DT Rate
- DT Hrs
- Holiday Rate
- Holiday Hrs
- Expenses
- VAT
- Sales Tax
- Service Tax
- GST Amount
- CGST Amount
- SGST Amount
- IGST Amount
- MSP CGST Amount
- MSP SGST Amount
- MSP IGST Amount
- HST Amount
- QST Amount
- RST Amount
- PST Amount
- MSP GST Amount
- MSP HST Amount
- MSP QST Amount
- MSP RST Amount
- MSP PST Amount
- Adjustment
- VDisc $
- PPay $
- PrO Sup %
- PrO Sup $
- AP Inv#
- Inv Date
- WAND Inv#
- Sup Inv #
- Check #
- Release Date
- Total Pay
- Worker Custom Fields 1-xx
- Supplier Invoice Custom Fields 1-xx
- Sub-Total
| Field | Description |
|---|---|
| Client | From the drop down, select the client organization to filter results by. |
| Invoice | Select the invoice/s to filter the report by. |
| Supplier Invoice | Select the supplier invoice/s to filter the report by. |
| Include Worker Custom Fields | Select the check box to include worker custom fields. |
| Include Invoice Custom Fields | Select the check box to include invoice custom fields. |
| Optional Columns | Select the optional columns to include in the report. |
Supplier Sales Tax Upload Worksheet
This report () produces data to assist supplier/vendors in applying payment in the application.
- Client Name
- Supplier
- Invoice #
- Invoice Status
- Line #
- Requisition #
- Worker #
- Worker
- Location
- Offsite Location
- Earnings E/D
- Currency
- Milestones
- Materials
- Position
- Rate Type Application
- Bill Rate
- Days
- Reg Hrs - null if rate application is 'Per Day'
- OT Hrs - null if rate application is 'Per Day'
- DT Hrs - null if rate application is 'Per Day'
- Hdy Hrs - null if rate application is 'Per Day'
- Exp
- Total Worker Cost
- Total GP
- Sales Tax
- Requisition Custom Fields 1-xx
| Field | Description |
|---|---|
| Client | From the drop down, select the client organization to filter results by. |
| Invoice | Select the invoice that contains the rebilling items for the report. |
| Include Requisition Custom Fields | Select the check box to include custom fields from the
engagement. Note: Custom fields can contain additional allocation
information, for example. |
Survey Listing Detail Report
- Average section
- Supplier
- Question 1 - x - The output includes one column for each configured question.
- Average Score
- Details section
- Supplier
- Worker
- Requisition
- Manager Name
- Job Category
- Job Title
- Survey Type
- Survey Submitted Date
- Survey Sent Date
- Question 1 - x
- Rating 1 - x
- Response 1 - x
- Average Rating
| Field | Description |
|---|---|
| <survey_data_setting> | Filter the report output by the type of survey completed. Use the
radio buttons to select on of the following:
|
| Year | Filter by the year that the survey was completed. |
| Quarter | Filter by the year that the survey was completed. |
| Worker | Enter the name of the worker(s) whose data is included in the report. This field is set to 'All' by default. |
Timecard Billing Detail Report
- Variable - Section displayed for each unique billing item identifier in the
report.
- Billing Item ID
- Day
- Hours Worked
- Lunch
- Worker Notes
- Rejected Notes
- Status
- Project Tracking
- Date & Time Approved
- Approved By
- Supplier
- Manager
- Worker
- Job Title
- Requisition
- Requisition Type
- Department
- Location
- Currency
- Bill Rate
- Period End Date
- Regular Hours
- OT Hours
- DT Hours
- Holiday Hours
- Milestones
- Materials
- Position
- Expenses
- Sales Tax
- Adjustment
- Total Bill
- Summary Total
- Grand Total
| Filter | Description |
|---|---|
| Worker | Enter the name of the worker(s) whose data is included in the report. This field is set to 'All' by default. |
| Client | From the drop down, select the client organization to filter results by. |
| Summarize by | From the drop down, select how to summarize the output columns in the report. |
| Show Totals | Select the check box to display summarized and non-summarized totals. |
Time to Fill Report
- General Info section
- Request #
- Engagement #
- Type
- Status
- Client
- OpUnit
- Manager
- Manager Email
- Manager GUID
- Manager External ID
- Department
- Department Number
- Supplier
- Start Date
- Est. End Date
- Actual End Date
- Job Category
- Job Hierarchy
- Job Title
- Job Code
- Project Name
- Bill Rate
- OT Bill Rate
- DT Bill Rate
- Pay Rate
- Piece Bill Rate
- Piece Pay Rate
- Negotiated Bill Rate
- State/Province
- City
- Total Number of Positions
- Number of Open Positions
- Number of Remaining Positions
- Number of Suppliers
- Total Number of Resumes
- Number of Resumes MSP Pass Resumes
- Number of Interviews
- Number of Interviews (1st Round)
- Number of Interviews (2nd Round)
- Time to Fill
- Days to Fill
- Date Req Created
- Date Sent to Sourcing
- Date on Hold
- Date Off Hold
- Date 1st Resume Submitted
- Date 1st MSP Pass
- Date 1st Interview Requested
- Date 1st Interview Completed
- Date 1st Engagement Created
- Date 1st Engagement Approval Start
- Date 1st Engagement Approval Completed
- Date 1st Eng Completed Hiring/Onboarding Paperwork Received
- Date 1st Engagement Vendor Extends Offer to Candidate
- Date 1st Engagement Candidate Replies to Offer
- Date Last Resume submitted
- Date Last MSP Pass
- Date Last Interview Requested
- Date Last Interview Completed
- Date Last Engagement Created
- Date Last Engagement Approval Start
- Date Last Engagement Approval Complete
- Date Last Eng Hiring / Onboarding Paperwork Received
- Date Last Engagement Vendor Extends Offer to Candidate
- Date Last Engagement Candidate Replies to Offer
- Req Fill Date
- Multiple Rates section
- Rate are configured at the client organization level.
- Only active rates that appear in the engagement financials are included the report output.
- Rates appear as <multiple_rate_name> - <opunit_name>
| Filter | Description |
|---|---|
| Operational Unit | Filter the report output for billing items submitted for a specific operational unit (OpUnit). This field is set to 'All' by default. |
| Manager | Select the client manager name associated with the engagement. This field is set to 'All' by default. |
| Department | Filter by the department the engagement was assigned to. This field is set to 'All' by default. |
| Client Country | Filter the report output by the configured client country (work site) for the engagement. This field is set to 'All' by default. |
| State/Province | Filter the report output by the configured client state or province (work site) for the engagement. This field is set to 'All' by default. |
| City | Filter the report output by the configured client city (work site) for the engagement. This field is set to 'All' by default. |
| Requisition Type | Select the engagement type. This field is set to 'All' by default. |
| Requisition Status | Select the status of the engagement to report on. |
| Requisition Status Reason | Select the status reason of the engagement to report on. |
| Req Date Created | From the drop down, select the date that the request/engagement was
created. You can configure a date range. Select Date Range
From-To, and then use the From
and To fields to configure dates.
You can also click the calendar icon to open a calendar pop up that allows you to select the date. |
| Start Date | From the drop down, select the date that the engagement started. You
can configure a date range. Select Date Range
From-To, and then use the From
and To fields to configure dates.
You can also click the calendar icon to open a calendar pop up that allows you to select the date. |
| Filled Date | From the drop down, select the date that the engagement was filled.
You can configure a date range. Select Date Range
From-To, and then use the From
and To fields to configure dates.
You can also click the calendar icon to open a calendar pop up that allows you to select the date. |
| Closed Date | From the drop down, select the date that the engagement was closed.
You can configure a date range. Select Date Range
From-To, and then use the From
and To fields to configure dates.
You can also click the calendar icon to open a calendar pop up that allows you to select the date. |
| Est. End Date | From the drop down, select the estimated end date for the engagement.
You can configure a date range. Select Date Range
From-To, and then use the From
and To fields to configure dates.
You can also click the calendar icon to open a calendar pop up that allows you to select the date. |
| Actual End Date | From the drop down, select the actual date that the engagement was
closed. You can configure a date range. Select Date Range
From-To, and then use the From
and To fields to configure dates.
You can also click the calendar icon to open a calendar pop up that allows you to select the date. |
| Direct Sourcing / Talent Network Fill | Filter the report output by fill source. You can select from the
following:
|
| 1st Resume Submitted Date | From the drop down, select the date that the resume was submitted.
You can configure a date range. Select Date Range
From-To, and then use the From
and To fields to configure dates.
You can also click the calendar icon to open a calendar pop up that allows you to select the date. |
| 1st Engagement Creation Date | From the drop down, select the date that the engagement was created.
You can configure a date range. Select Date Range
From-To, and then use the From
and To fields to configure dates.
You can also click the calendar icon to open a calendar pop up that allows you to select the date. |
Unvoiced Line Items Report
- Worker
- Job Title
- Supplier
- Manager
- Manager Email
- Requisition #
- Req Type
- Location
- Line #
- Bill Rate
- Invoice Option
- Rate Application Type
- Earnings E/D
- Milestones
- Materials
- Position
- Days
- Regular Hours
- OT Hours
- DT Hours
- Holiday Hours
- Expenses
- Sales Tax
- Adjustment
- Status
- Status Reason
- Processed By
- GST Amount
- CGST Amount
- SGST Amount
- IGST Amount
- MSP GST Amount
- MSP CGST Amount
- MSP SGST Amount
- MSP IGST Amount
- Raw Bill
- Total Bill Amount
| Filter | Description |
|---|---|
| Worker | Enter the name of the worker(s) whose data is included in the report. This field is set to 'All' by default. |
| Manager | Select the client manager name associated with the engagement. This field is set to 'All' by default. |
| Operational Unit | Filter the report output for billing items submitted for a specific operational unit (OpUnit). This field is set to 'All' by default. |
| Cost Center | Filter the report output by a configured cost center. This field is set to 'All' by default. |
| Division | Filter the report output by a configured division. This field is set to 'All' by default. |
| Supplier | Filter the report output by supplier associated with the engagement. This field is set to 'All' by default. |
| Requisition Type | Select the engagement type. This field is set to 'All' by default. |
| Location | Filter the report output by the client location for the engagement. This field is set to 'All' by default. |
| Billing Item Status | Filter the report output by the billing status of the billing. This field is set to 'All' by default. |
| Billing Item Status Reason | Filter the report output by the status reason assigned to the billing. This field is set to 'All' by default. |
| Invoice Option | Select the invoice option for the engagement. This field is set to 'All' by default. See c_invoicing.html. |
| Summarize by | From the drop down, select how to summarize the output columns in the report. |
| Date Type | You can only set this date range filter field to Earnings
E/D or None. This setting is used in conjunction with From date and To date fields. You specify a date range based on the end date type. |
| From date | Enter the beginning date for the date range. You can also click the calendar icon to open a calendar pop up that allows you to select the date. |
| To date | Enter the end date for the date range. You can also click the calendar icon to open a calendar pop up that allows you to select the date. |
| Summarize by | From the drop down, select how to summarize the output columns in the report. |
Weekly Activity Report
- OpUnit
- Site
- Ref Wkr Begin Active
- Ref Wkr Start
- Ref Wkr End
- Ref Wkr End Active
- Rec Wkr Begin Active
- Rec Wkr Start
- Rec Wkr End
- Rec Wkr End Active
- Rec Wkr Begin Pending
- Rec Req New
- Rec Req Filled
- Rec Req Cancelled
- Rec Req End Pending
- GE Compliance Begin Pending
- GE Compliance New
- GE Compliance Complete
- GE Compliance Cancelled
- GE Compliance End Pending
- DE Compliance Begin Pending
- DE Compliance New
- De Compliance Complete
- DE Compliance Cancelled
- DE Compliance End Pending
- CCS Req Being Pending
- CCS Req New
- CCS Req Complete
- CCS Req Cancelled
- CCS Req End Pending
- STOR Req Begin Pending
- STOR Req New
- STOR Req Filled
- STOR Req Cancelled
- STOR Req End Pending
- BizDev Total # Meetings
- BizDev Total # New Mgrs
- BizDev $ Result
- Total
| Filter | Description |
|---|---|
| Operational Unit | Filter the output by operational unit. This field is set to 'All' by default. |
| Supplier Name | Filter the report output by the supplier/vendor assigned to the engagement. This field is set to 'All' by default. |
| Manager | Select the client manager name associated with the engagement. This field is set to 'All' by default. |
| Location | Filter by the client location for the engagement. This field is set to 'All' by default. |
| Week E/D | This field defaults to 'Week E/D' and cannot be changed. This setting is used in conjunction with From dateand To date fields. You specify a date range based on the end date type. |
| From date | Enter the beginning date for the date range. You can also click the calendar icon to open a calendar pop up that allows you to select the date. |
| To date | Enter the end date for the date range. You can also click the calendar icon to open a calendar pop up that allows you to select the date. |
Worker Data Export
This report () produces data in regards to workers in the application.
- Contractor GenInfo section
- Worker # (row)
- Worker # (detail)
- Document <number> - number of the document as it appears in order for the worker, for example Document 1, Document 4, and so on.
- <document_name>
- Received
- Date Issued
- Date Received
- Date Expired
- Note
- WORKER#
- Req Number - link
- Req Number - number for detail
- Type
- Status
- Operational Unit
- Manager
- Job Title
- Location
- Prefix
- First Name
- Middle Name
- Suffix
- Legal First Name
- Legal Last Name
- Nickname
- Contact section
- Work Phone
- Home Phone
- Mobile Phone
- Fax
- Location section
- Address1
- Address2
- City / Town
- State / Province
- Postal Code
- Country
- Additional Information section
- Birth Month
- Birth Day
- Emergency Contact Information section
- Name
- Address1
- Address2
- City/Town
- State/Province
- Postal Code
- Country
- Phone
- Relationship
- Pre-WAND Work History section
- Original Start Date
- Hours Worked
- Hours Worked as of
- Days Worked
- Days Worked as of
- Employment History section
- Holiday Category
- YourSource
- OT Rule
- Work Schedule
- Visa/Alien Information section
- Citizenship
- Visa Type
- Work Auth Expiration Date
- Work Authorization Number
- Work Visa Doc Name
- Other Citizenship
- Other Work Visa Doc Name
- Visa Appr for Tax Exempt - If tax exempt, then 'Y', or if non-exempt, then 'N'.
- Exempt Expr Date
- Exempt Notes
- Worker Custom Fields section
- <custom_field_name> - One row per configured custom field. If fields are encrypted, then value appears as ****. If MSP or client manager running the report has the 'View Sensitive Data' on their user account, then the report outputs decrypted data.
| Field | Description |
|---|---|
| Division | Filter the report output by a configured division. This field is set to 'All' by default. |
| Cost Center | Filter the report output by a configured cost center. This field is set to 'All' by default. |
| Client | From the drop down, select the client organization to filter results by. |
| Undo Withdraw | Filter by workers that have had the 'Undo Withdraw' action applied. |
| <job_category> | Select the job categories from job category field to filter the report by. |
| Manager | Select the client managers to filter the report by. |
| Work Location | Select the work locations to filter the report by. |
| Requisition Type | Select the engagement type. This field is set to 'All' by default. |
| Requisition Status | Select the status of the engagement to report on. |
| Include Employee Documents | Select the check box to include employee documents in the report. |
| Include Emergency Contact Information | Select the check box to include the worker's emergency contact information. |
| Include Pre-Wand Work History | Select the check box to include any configured pre-Wand work history. This information can be input by the MSP or by the supplier. |
| Include Employment Information | Select the check box to include any configured pre-Wand work history. This information can be input by the MSP or by the supplier. |
| Include Requisition Information | Select the check box to include a worker's engagement information in the report. |
| Include Visa/Alien Information | Select the check box to include a worker's visa information in the report. |
| Include Worker Custom Fields | Select the check box to include any configured worker custom fields. |
| Select Columns | Select the columns to include in the report. |
Worker Project Report
Report output type is determined by the button clicked after you configure your report parameters. For more information about report output, see Report Output Types.
| Field | Description |
|---|---|
| Client | From the drop down, select the client organization to filter results by. |
| Undo Withdraw | Filter by workers that have had the 'Undo Withdraw' action applied. |
| <job_title> | Select the job title to report on, or select 'All'. |
| Worker | Enter the name of the worker(s) whose data is included in the report. This field is set to 'All' by default. |
| Manager | Select the client manager name associated with the engagement. This field is set to 'All' by default. |
| Requisition Type | Select the engagement type. This field is set to 'All' by default. |
| Requisition Status | Select the status of the engagement to report on. |
| Invoice Option | Select the invoice option for the engagement. This field is set to 'All' by default. See c_invoicing.html. |
| Date Type | From the drop down, select the range definition. You can select from
the following:
This setting is used in conjunction with From date and To date fields. |
| From date | Enter the beginning date for the date range. You can also click the calendar icon to open a calendar pop up that allows you to select the date. |
| To date | Enter the end date for the date range. You can also click the calendar icon to open a calendar pop up that allows you to select the date. |
| Show Requisition Details | Select the check box to include the engagement details in the report output. |
| Show Only DNU / DNR | Select the check box to only include workers that are marked 'Do Not Use' or 'Do Not Return'. |
| Select Columns | Select the columns to include in the report. |
| Summarize by | From the drop down, select how to summarize the output columns in the report. |
Worker Staffing/Direct Hire Report
Report output type is determined by the button clicked after you configure your report parameters. For more information about report output, see Report Output Types.
| Field | Description |
|---|---|
| Client | From the drop down, select the client organization to filter results by. |
| Undo Withdraw | Filter by workers that have had the 'Undo Withdraw' action applied. |
| Worker | Enter the name of the worker(s) whose data is included in the report. This field is set to 'All' by default. |
| Manager | Select the client manager name associated with the engagement. This field is set to 'All' by default. |
| Requisition Type | Select the engagement type. This field is set to 'All' by default. |
| Date Type | From the drop down, select the range definition. You can select from
the following:
This setting is used in conjunction with From date and To date fields. |
| To date | Enter the end date for the date range. You can also click the calendar icon to open a calendar pop up that allows you to select the date. |
| From date | Enter the beginning date for the date range. You can also click the calendar icon to open a calendar pop up that allows you to select the date. |
| Show Requisition Details | Select the check box to include the engagement details in the report output. |
| Show Only DNU / DNR | Select the check box to only include workers that are marked 'Do Not Use' or 'Do Not Return'. |
| Select Columns | Select the columns to include in the report. |
| Summarize by | From the drop down, select how to summarize the output columns in the report. |
Worker Documents Report
- Worker Name
- Worker ID
- Home Phone
- Work Phone
- Worker Email
- Supplier
- Country
- Citizenship
- Visa Type
- Work Authorization Expiration Date
- Alien Authorization Document
- Visa Appr for Tax Exempt
- Exempt Expr Date
- Exempt Notes
- <document_title> - All document titles that appear in the client organization's Document List.
| Filter | Description |
|---|---|
| Cost Center | Filter by the cost center or department assigned at the engagement level. |
| Worker | Enter the name of the worker(s) whose data is included in the report. This field is set to 'All' by default. |
| Manager | Select the client manager name associated with the engagement. This field is set to 'All' by default. |
| Supplier | Use the drop down to select the supplier of the worker. This field defaults to 'All'. |
| Work Location | Select the location where the job was performed. This field is set to 'All' by default. |
| Requisition Type | Select the engagement type. This field is set to 'All' by default. |
| Requisition Status | Select the status of the engagement to report on. |
| Date Type | From the drop down, select the date type. You can select from the
following:
This setting is used in conjunction with From date and To date fields. You specify a date range based on the end date type. |
| From date | Enter the beginning date for the date range. You can also click the calendar icon to open a calendar pop up that allows you to select the date. |
| To date | Enter the end date for the date range. You can also click the calendar icon to open a calendar pop up that allows you to select the date. |
| Select Columns | Select the columns to include in the report. |
Supplier Profile
The Supplier Profile page displays all relevant profile information for your supplier/vendor organization, including company graphics (icon), your company tag line, and links or files to your company's portfolio. Your profile information is available for viewing by the MSP. This information can help a service provider determine if your organization is suitable based on your information and portfolio.
The page features inputs that allow you to define a supplier/vendor in the system.
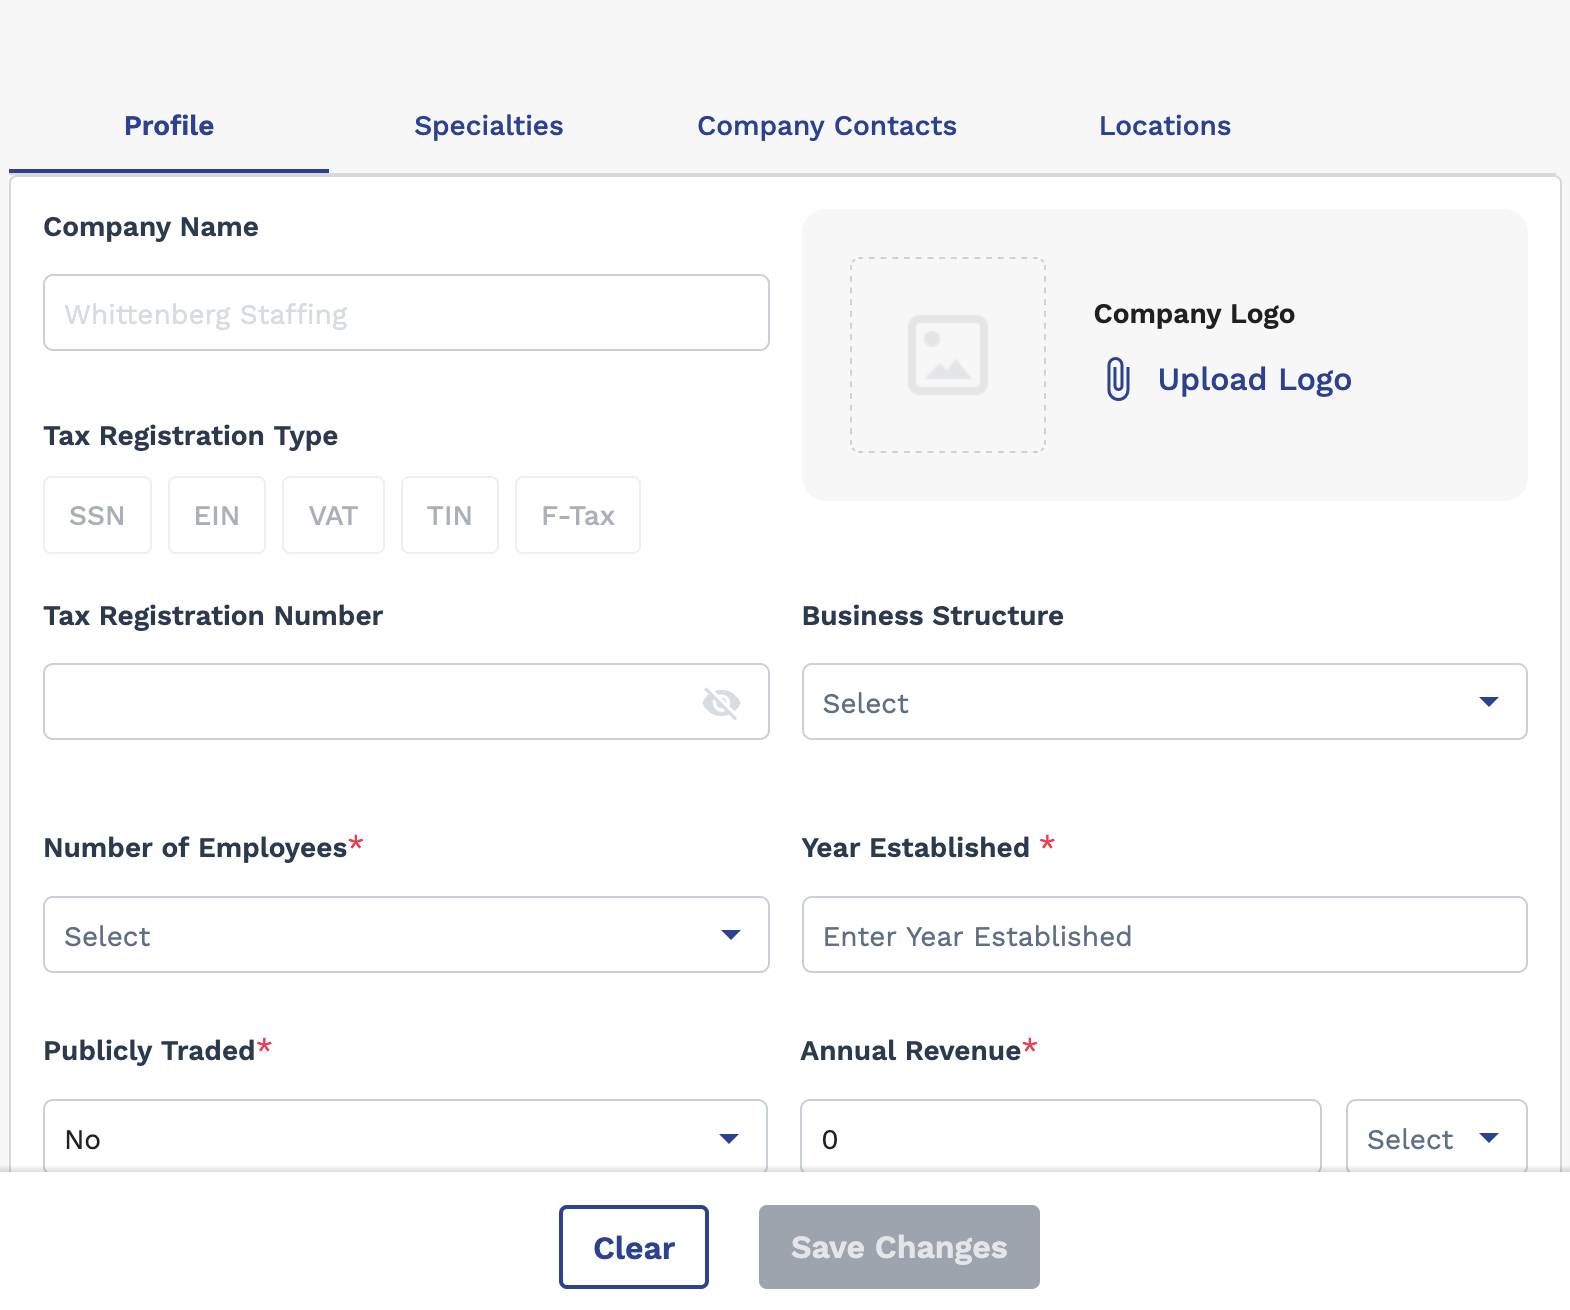
| Tab | Field | Definition |
|---|---|---|
| Profile | Company Name | The supplier/vendor organization's name in the system. |
| Company Logo | The organization's logo. | |
| Tax Registration Type | The organization's tax identifier type (usually tied to domesticity). You can only have one type defined per organization account. | |
| Tax Registration Number | The organization's tax identification number. | |
| Business Structure | The organization's business structure. | |
| Number of Employees | The number of employees in the organization. | |
| Year Established | The number of years that the organization has been doing business. | |
| Publicly Traded | The organization's public ally traded status. | |
| Annual Revenue | The organization's annual revenue (USD). | |
| Dun & Bradstreet Number | The organization's D&B number. | |
| Dun & Bradstreet Rating | The organization's D&B rating.. | |
| About Your Company | Free text describing the organization. | |
| Website | The URL to the organization's website. | |
| Select the social media site, and enter the site's URL. | ||
| The URL to an organizational portfolio. Click the add link button to add another portfolio link. | ||
| Attachments | Any additional or supporting information about the organization. | |
| Specialties | Sector/Industry | Types of sectors and industries that the organization serves in business. |
| Service Types | The types of services that the organization provides. | |
| Company Contacts | Organizational users. | |
| Locations | The locations that the organization serves. | |
Direct Deposit
You can add direct deposit information to your supplier/vendor account to receive payment transfers from a client organization. Permission is required in order to view and modify this page.
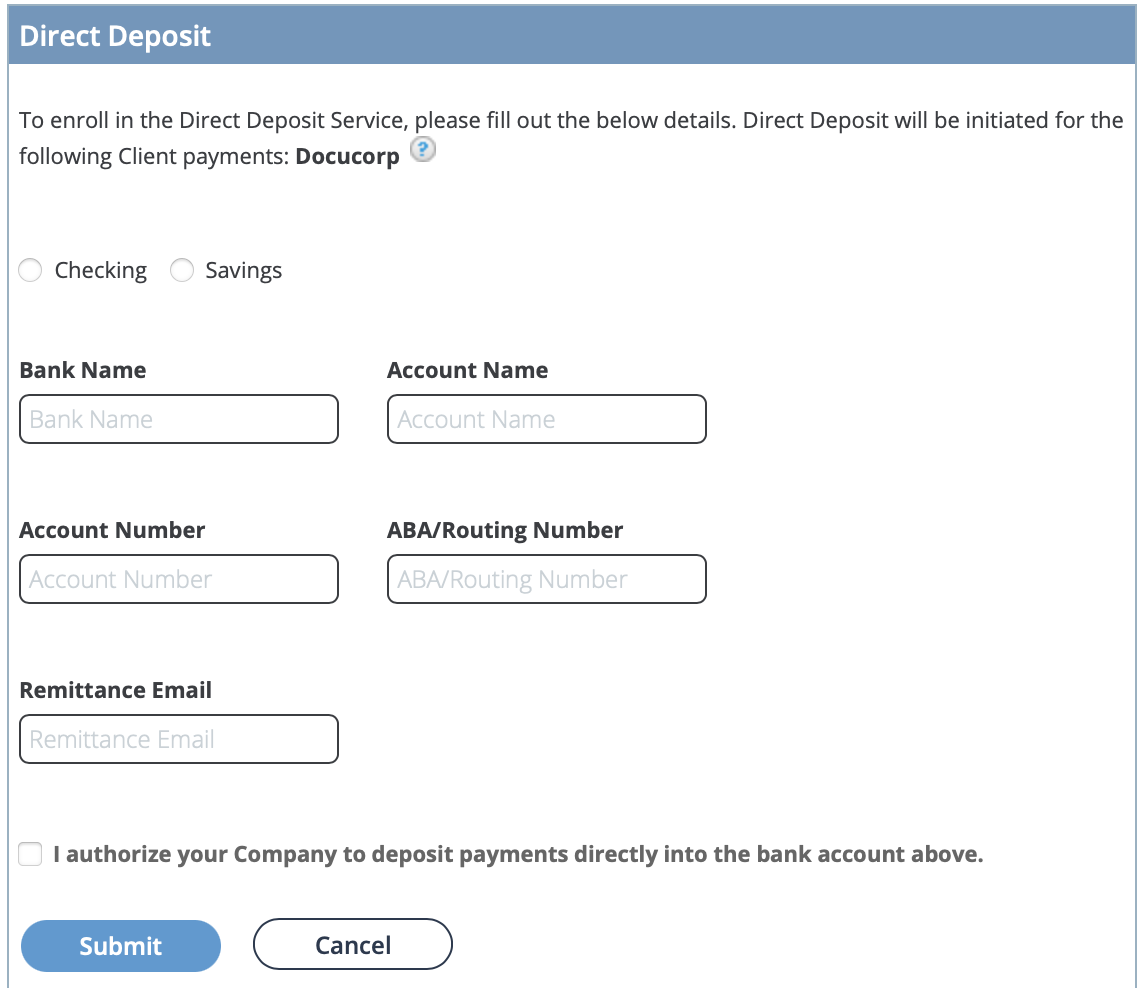
To add direct deposit information, navigate to , and click ![]() . Enter the relevant information on the page and
click
. Enter the relevant information on the page and
click ![]() .
.
Financial Information Page
The Financial Information page displays organizational payment (bank) information. The 'Bank Admin' permission is required view and edit this page.
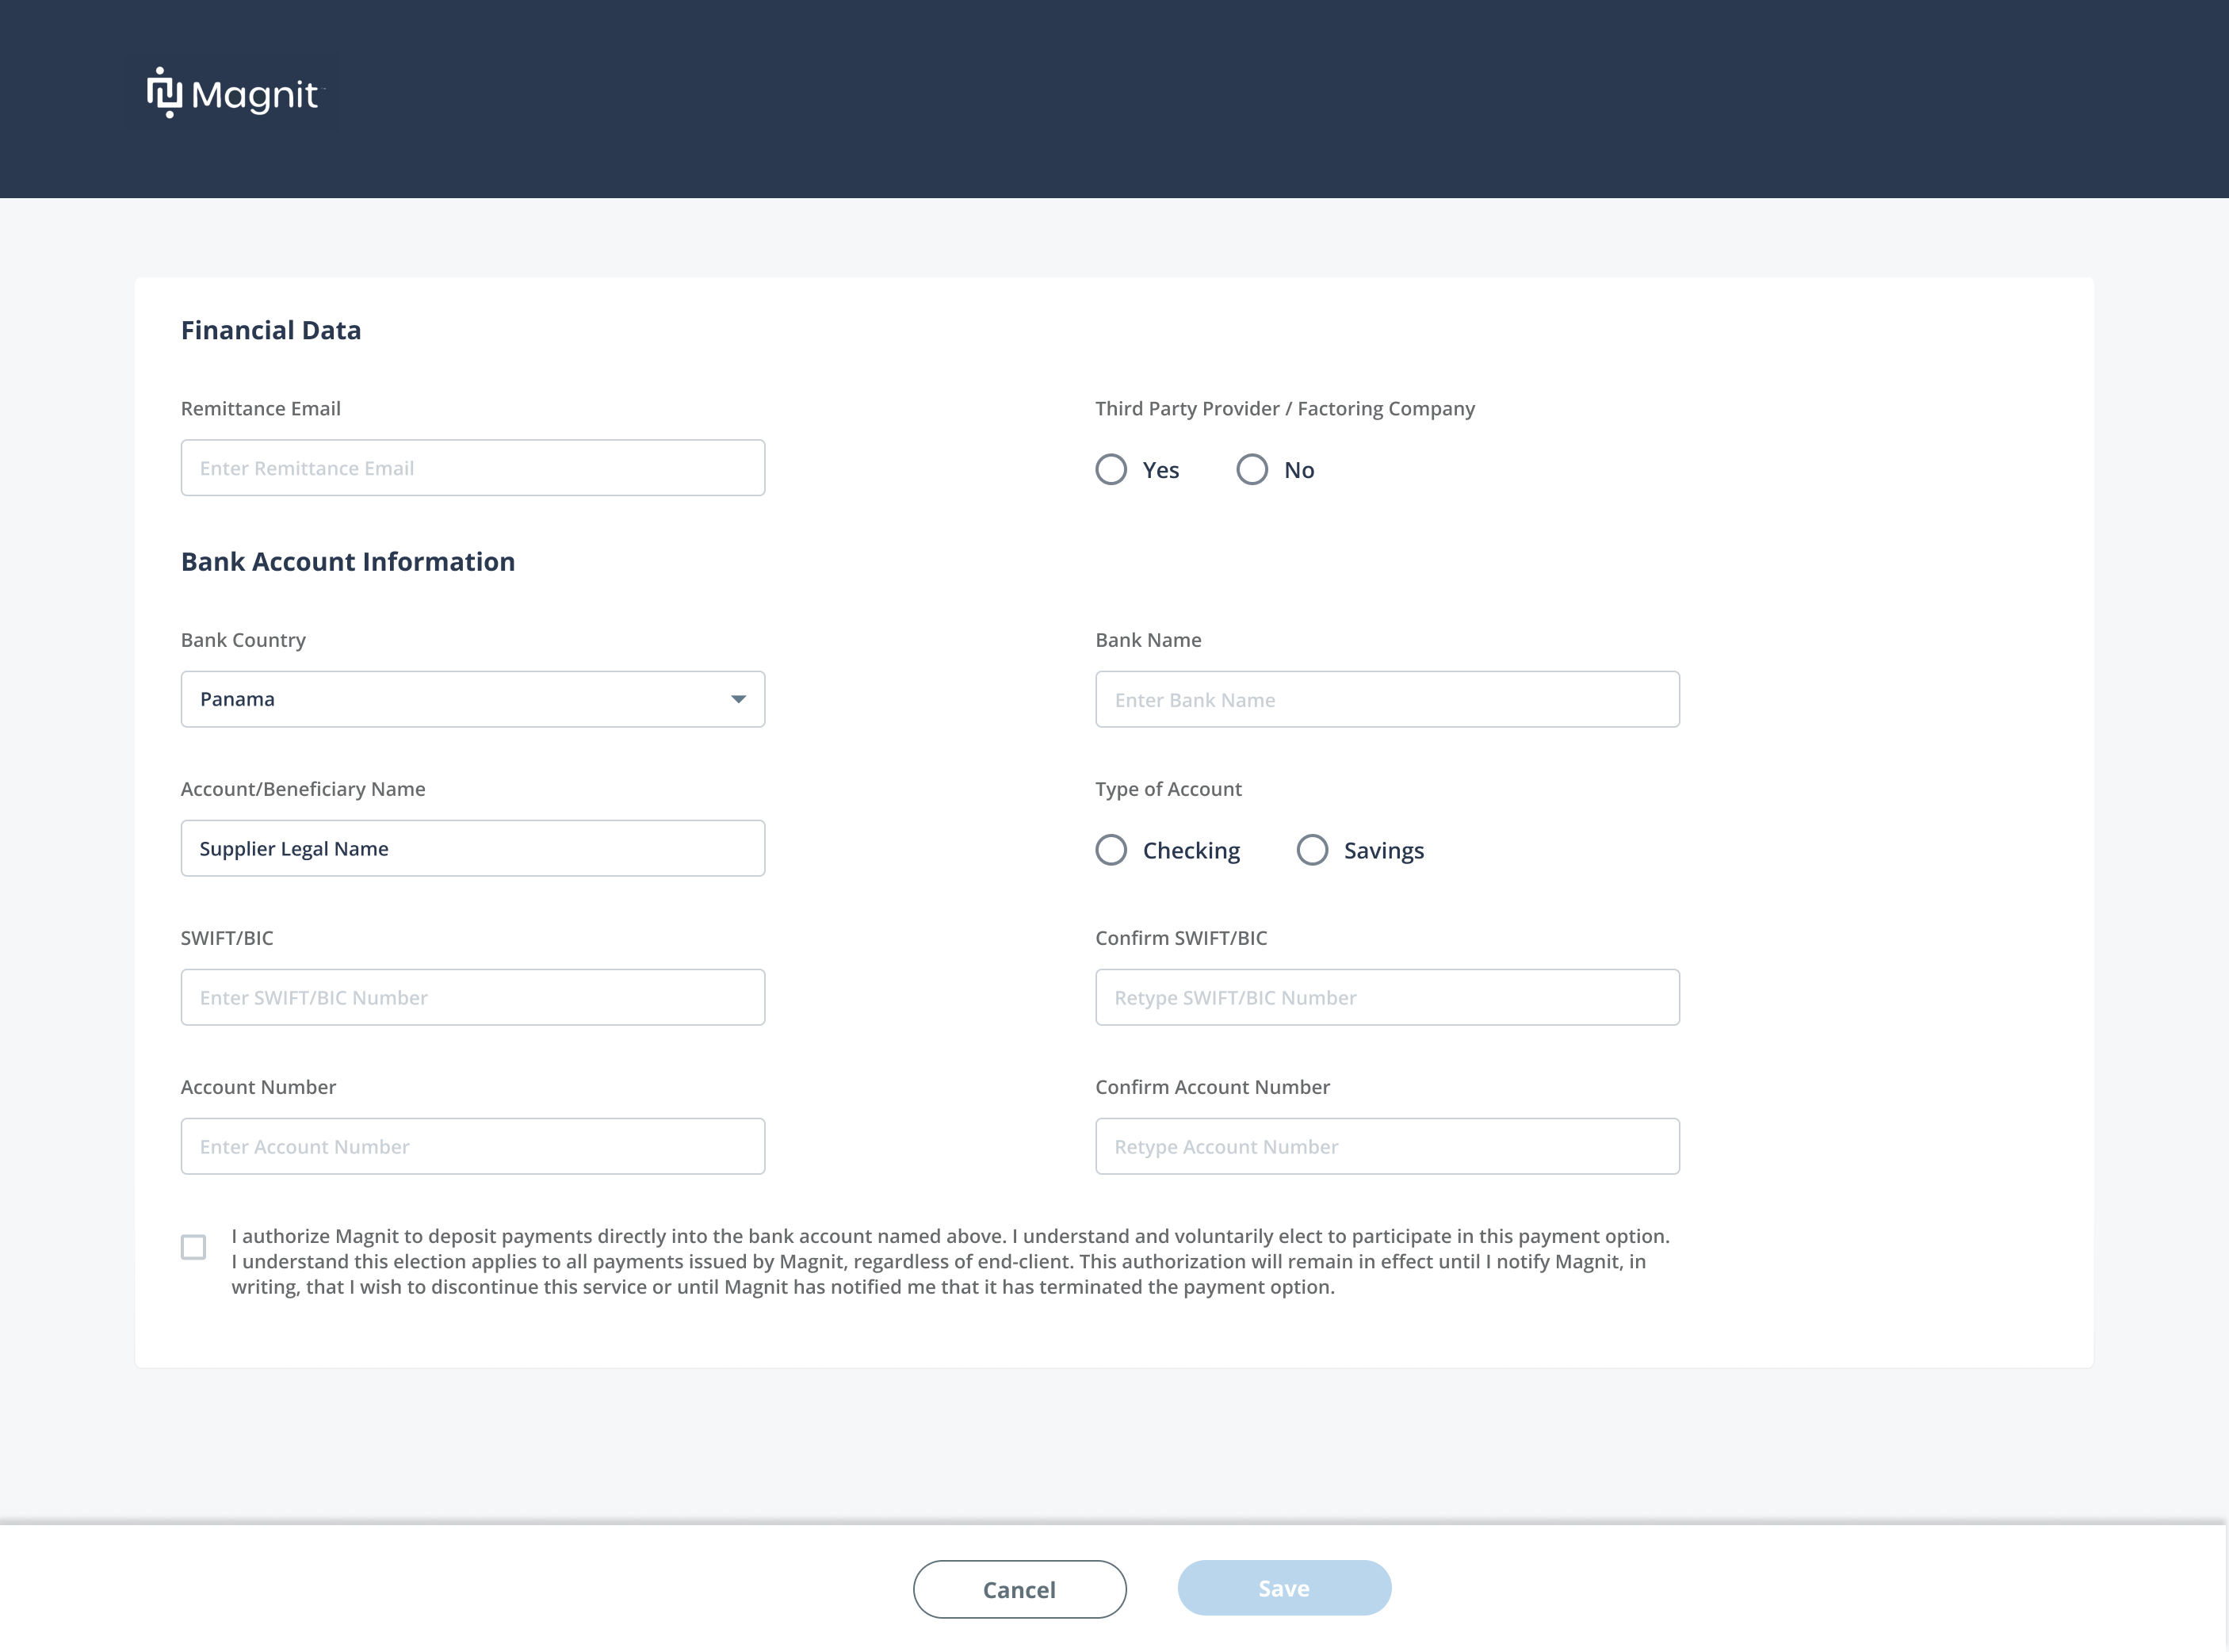
- Remittance email - Used for contact information.
- Third Party Provider / Factoring Company
- Bank Account Information
You can access your organization's information and edit as necessary. See Supplier Bank Account.
Supplier Bank Account
- Bank Name
- Account / Beneficiary Name - This value is the supplier organization's legal name.
- Type of Account - Checking or
Savings.Note:If you select 'Sweden' from the Bank Country drop down, you can select Giro, PlusGiro, or OCR as well. See the below table for input details.Note:If you select 'Netherlands' from the Bank Country drop down, 2 sections appear: G Account and C Account (optional). See the below table for input details.
- Authorization - Selecting the checkbox authorizes Magnit Global to make direct deposits to the configured bank account.
| Region | Field | Format |
|---|---|---|
| SEPA | SWIFT/BIC | Required. Format is:
|
| IBAN | Required. Format is:
|
|
| MENA | SWIFT/BIC | Required. Format is:
|
| IBAN | Required. Format is:
|
|
| Account Number | Required. Numeric values only, 7 to 12 digits. | |
| Sub-Saharan Africa | SWIFT/BIC | Required. Format is:
|
| Account Number | Required. Numeric values only, 7 to 12 digits. | |
| Countries without IBAN | SWIFT/BIC | Required. Format is:
|
| Account Number | Required. Numeric values only, 8 to 24 digits. | |
| United States | Account Number | Required. Numeric values only, maximum 17 digits. |
| ABA/Routing Number | Required. Numeric values only, 9 digits only. | |
| Sweden | SWIFT Code | Required. Format is:
|
| IBAN | Required. Format is:
|
|
| Enter Bankgiro | Available if Type of Account is
'Sweden'. Required. Format is:
Example: 1234567 |
|
| Enter Plusgiro | Available if Type of Account is
'Sweden'. Required. Format is:
Example: 45678 |
|
| Enter OCR | Available if Type of Account is
'Sweden'. Required. Format is:
Example: 45678 |
|
| Netherlands | SWIFT Code | Required. Format is:
|
| IBAN | Required. Format is:
|
|
| Canada | SWIFT/BIC | Required. Format is:
|
| Account Number | Required. Numeric values only, 7 digits only. | |
| Bank Code | Required. Numeric values only, 3 digits only. | |
| Branch Code | Required. Numeric values only, 5 digits only. | |
| United Kingdom | SWIFT/BIC | Required. Format is:
|
| IBAN | Required. Format is:
|
|
| Account Number | Required. Numeric values only, 8 digits only. | |
| Sort Code | Required. Numeric values only, 6 digits only. | |
| Denmark | SWIFT/BIC | Required. Format is:
|
| IBAN | Required. Format is:
|
|
| Account Number | Required. Numeric values only, 10 digits only. | |
| Bank/Branch Routing/Sort Code | Required. Numeric values only, 4 digits only. | |
| Norway | SWIFT/BIC | Required. Format is:
|
| IBAN | Required. Format is:
|
|
| Account Number | Required. Numeric values only, 6 digits only. | |
| Bank/Branch Routing/Sort Code | Required. Numeric values only, 4 digits only. | |
| Finland | SWIFT/BIC | Required. Format is:
|
| IBAN | Required. Format is:
|
|
| Account Number | Required. Numeric values only, 7 to 12 digits. | |
| Memo/Reference | Required. Numeric values only, 4 to 20 digits. | |
| Poland | SWIFT/BIC | Required. Format is:
|
| IBAN | Required. Format is:
|
|
| Bank Sort Code | Required. Numeric values only, 8 digits only. | |
| Account Number | Required. Numeric values only, 16 digits only. | |
| Americas | SWIFT/BIC | Required. Format is:
|
| Account Number | Required. Numeric values only, 7 to 12 digits. | |
| European Union | SWIFT/BIC | Required. Format is:
|
| IBAN | Required. Format is:
|
|
| Account Number | Required. Numeric values only, 12 to 30 digits. | |
| Mexico | SWIFT/BIC | Required. Format is:
|
| Clabe | Required. Format is:
|
|
| Costa Rica | SWIFT/BIC | Required. Format is:
|
| IBAN | Required. Format is:
|
|
| Beneficiary Tax ID Number | Required. Numeric values only, 9 to 12 digits. | |
| Bank Routing Code | Required. Numeric values only, 9 digits only. | |
| APAC with IBAN | SWIFT/BIC | Required. Format is:
|
| IBAN | Required. Format is:
|
|
| Account Number | Required. Numeric values only, 7 to 12 digits. | |
| APAC | SWIFT/BIC | Required. Format is:
|
| Account Number | Required. Numeric values only, 7 to 12 digits. |
Documents Page
The Documents page displays your supplier/vendor organization's documents in regard to client organizations that you are providing services for.
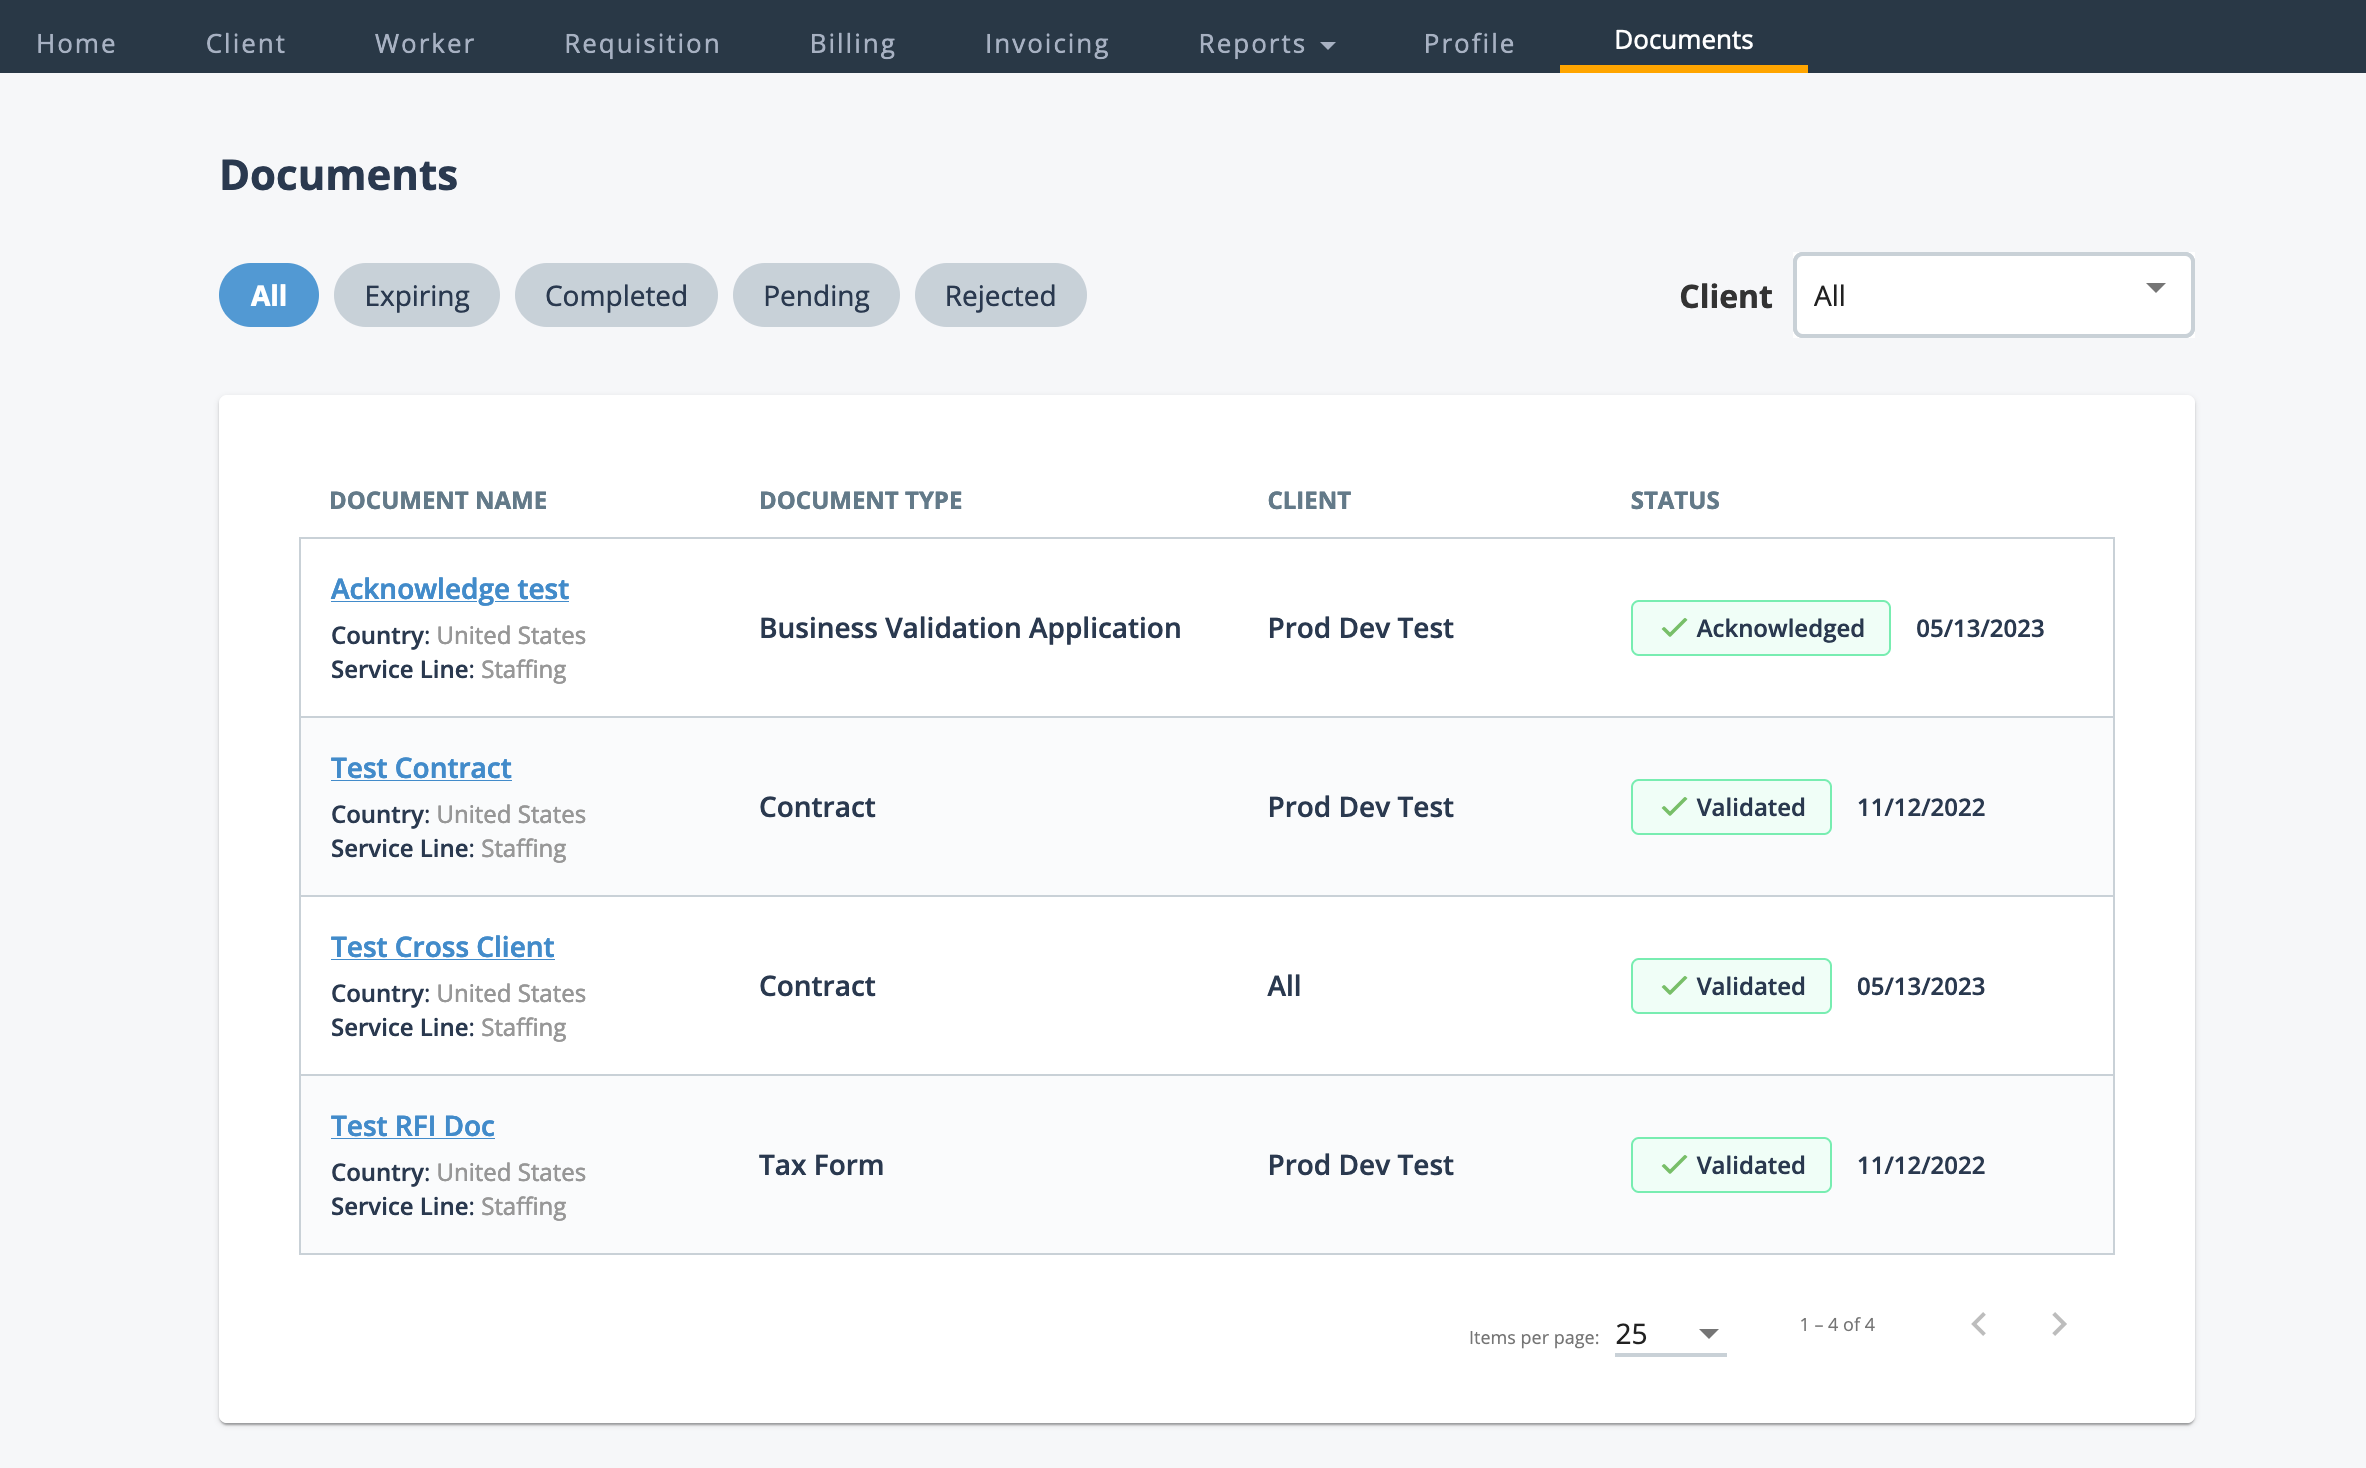
This page (and tab) are only accessible to users with document management permissions. If you do not have permission, this page and the navigation are hidden.
- Status pills - Click each pill under the Documents header to filter the view by document status. The default view is 'All'.
- Client drop down - Filter the view by client organization.
You can access the document details by clicking the link for the document. The document details page displays all relevant details about the document.
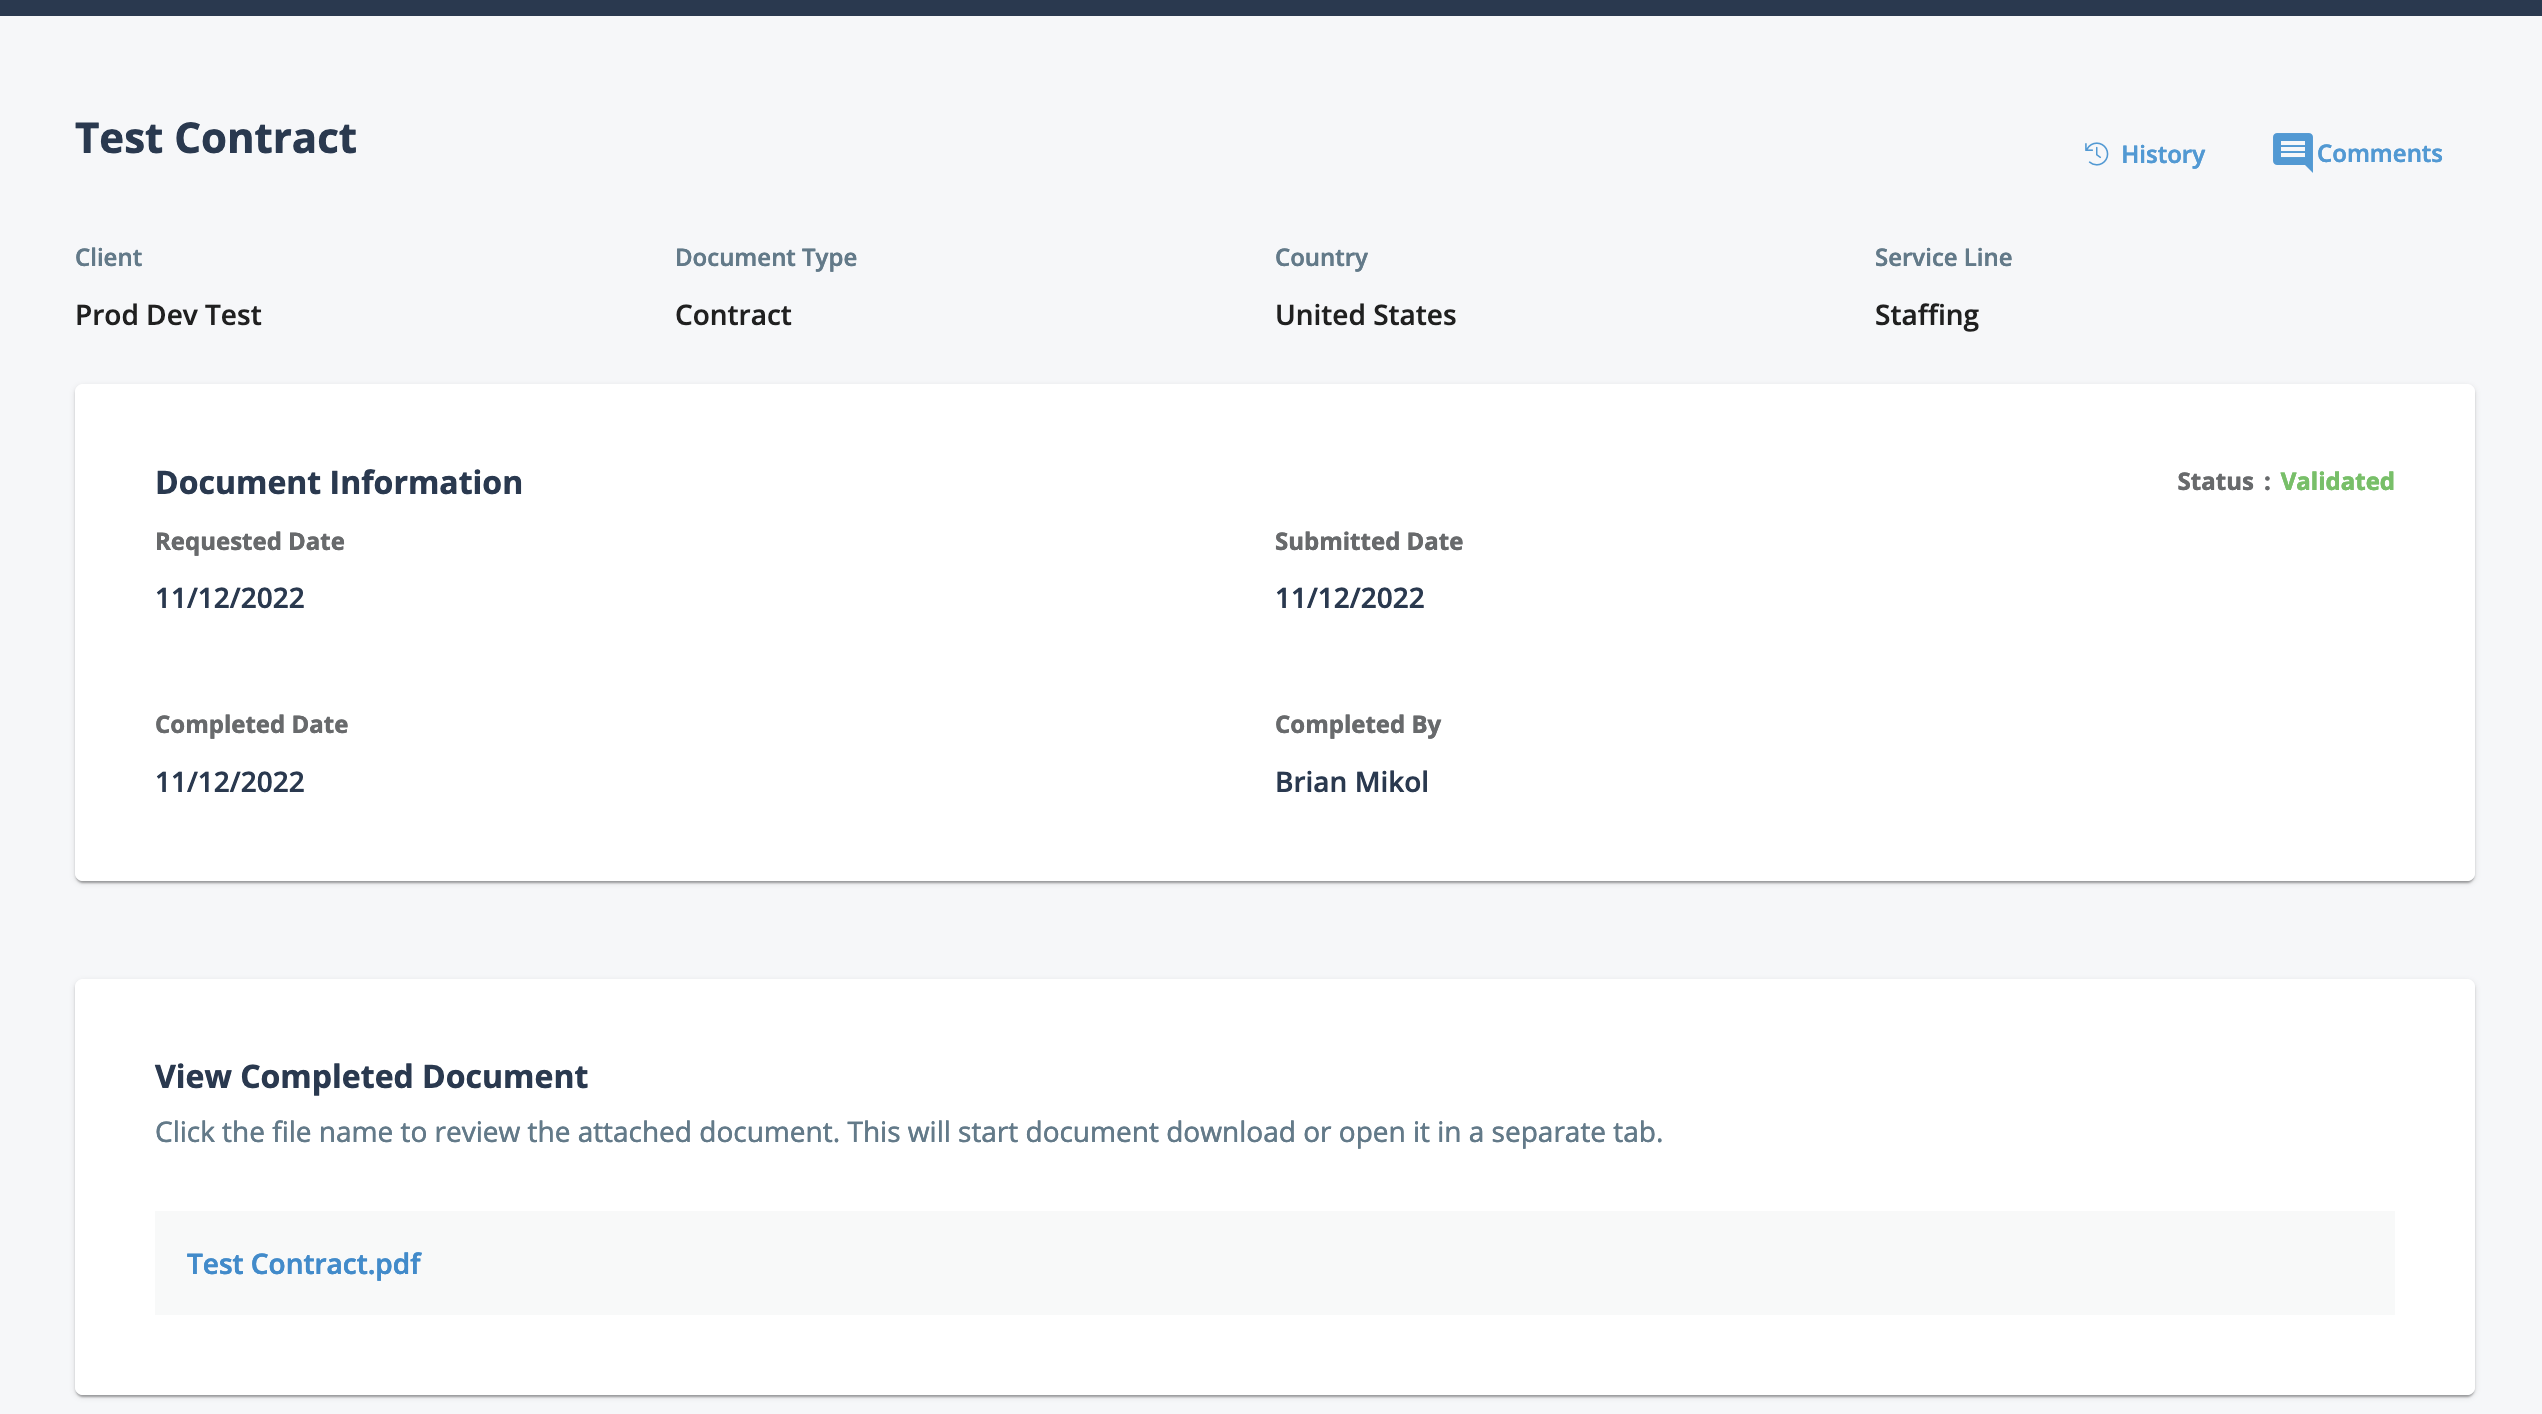
Clicking the History link opens a popup where you can view the
history of changes on the document. You can also add comments to the document using the
Comments feature. Comments are added to the document only. To
add comments, click Comments, or click the
Comments tab on the popup. After adding text to the comments
field, click ![]() .
The comment is sent to the MSP contact that is managing the document workflow for the
MSP Organization.
.
The comment is sent to the MSP contact that is managing the document workflow for the
MSP Organization.
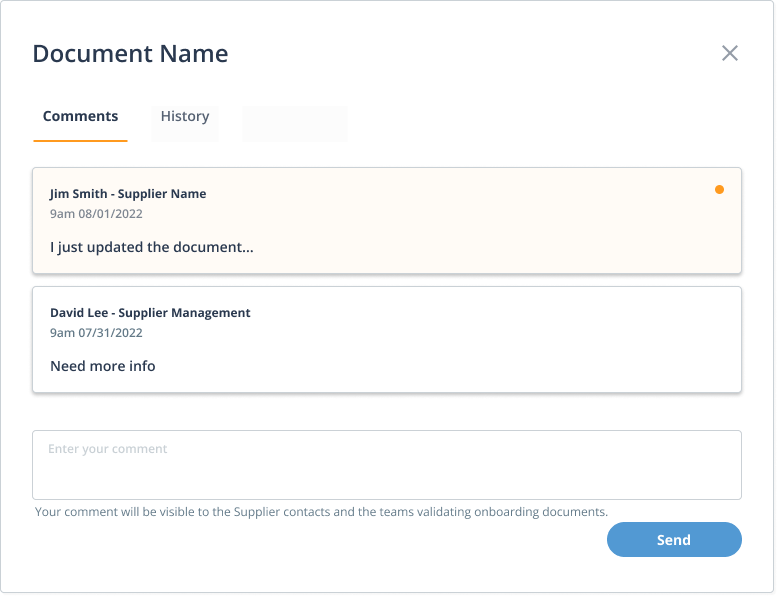
You can access the document file by clicking the blue name link in the View Completed Document section.
Document Status Filters
| Status | Description |
|---|---|
| Displays all documents. | |
| Displays documents that have a set expiration date prior to the
current date, and currently expired documents. You can filter the view in this table by setting a date range. Clicking the Expiring Documents link in the Action Items table on the Home page opens this sub tab. If a
document is expiring (or has expired), you can upload a new version
of the document by opening the document details, scrolling to the
Document Management section, and clicking
|
|
Displays documents with the following statuses:
|
|
| Displays documents that are pending action | |
| Displays documents that have been rejected. |
Supplier Onboarding
Your supplier organization can complete the onboarding process with the MSP organization using the Magnit VMS Onboarding module. The module allows you to interact with assigned documents that are required before you can begin submitting candidates or proposals for a client organization.
The Onboarding module walks you through all of the documents that the MSP organization and client organization require. When you log into your account (new or existing organizations), if you have documents pending, the onboarding pages prompt you to complete actions. If you have numerous client organizations that you are onboarding for, you select the client to access those documents. If you have accessed the VMS prior to the onboarding process, you can use settings on the onboarding pages to skip to your account, complete the onboarding documents at a later time, and continue reviewing requests for your existing accounts. If you are a new supplier in the VMS, you must complete onboarding before you are granted access.
For more information about the workflow, see Onboarding Workflow.
You are presented with two types of documents, required and optional. Required documents can be documents that are requested by the client organization (RFI content, proof of insurance, certifications, and so on). These documents are uploaded directly to the web application, and are visible to the MSP organization. Some required documents must be downloaded, filled out, and uploaded. Other required documentation is downloaded, and you must acknowledge that you received it. Optional documents are made available for you to download from the onboarding module document summary page.
There are two document permissions that are assigned to a user in your supplier organization. The 'Document Signatory' permission is added to a user account so that user can electronically sign documents using an integration with DocuSign®. Users are notified via email that their signature is required. The 'Document Management' permission is added to a user account to grant access to the document summary page, allowing them to download/upload, and acknowledge receipt of documents. The 'Document Signatory' permission also grants a user access to the view and associated actions in the Onboarding module.
Once the onboarding is complete for a client organization, you can
click ![]() ,
and access your application Home page.
,
and access your application Home page.
Onboarding Workflow
The Onboarding module is a document management tool that the MSP organization uses to help your supplier organization submit and track documents that are required to participate in a contingent workforce program. Using the module workflow reduces the time that it takes to submit and validate documents, and reduces the risk of submitting incorrect documents/versions of documents using methods outside of the VMS.
Documents that flow through the summary view are set up by the MSP organization, and can be specific to client and country. Documents that are to be submitted for a program (required and optional) appear in the workflow screens.
General Onboarding Workflow
Onboarding begins when the MSP organization triggers the module functionality for your supplier organization. After setting up your user account information and password, you log into the application. A welcome page displays, informing you that onboarding has begun, and that you need to review and/or take action on documents.
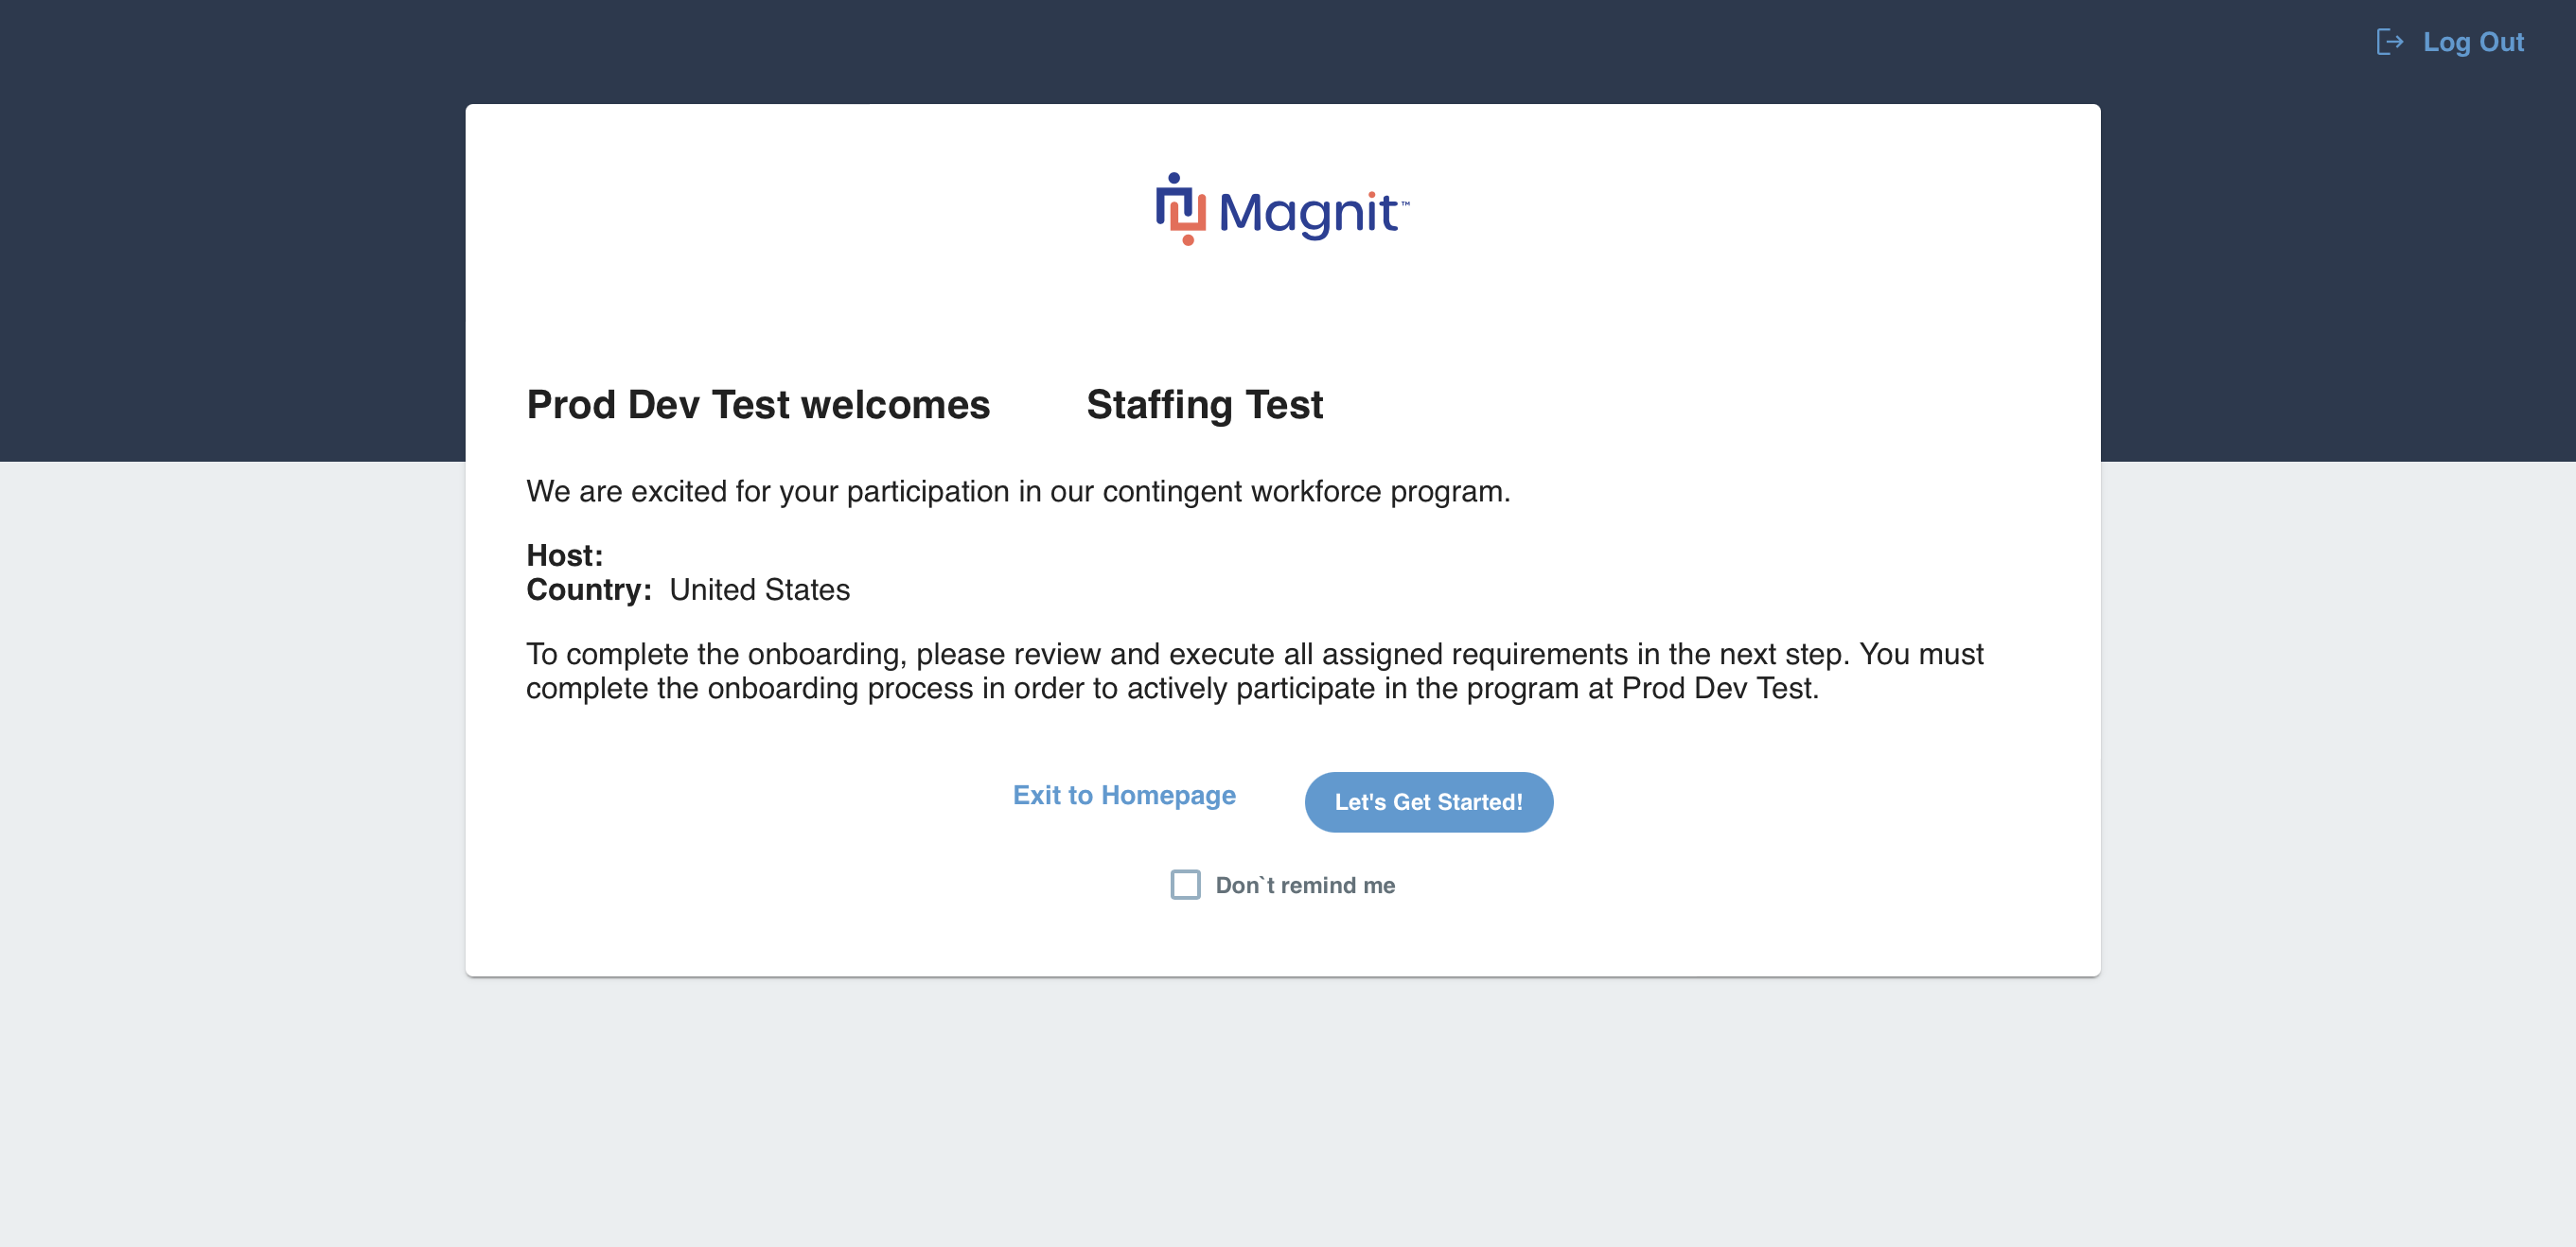
Click ![]() . The document summary page opens.
. The document summary page opens.
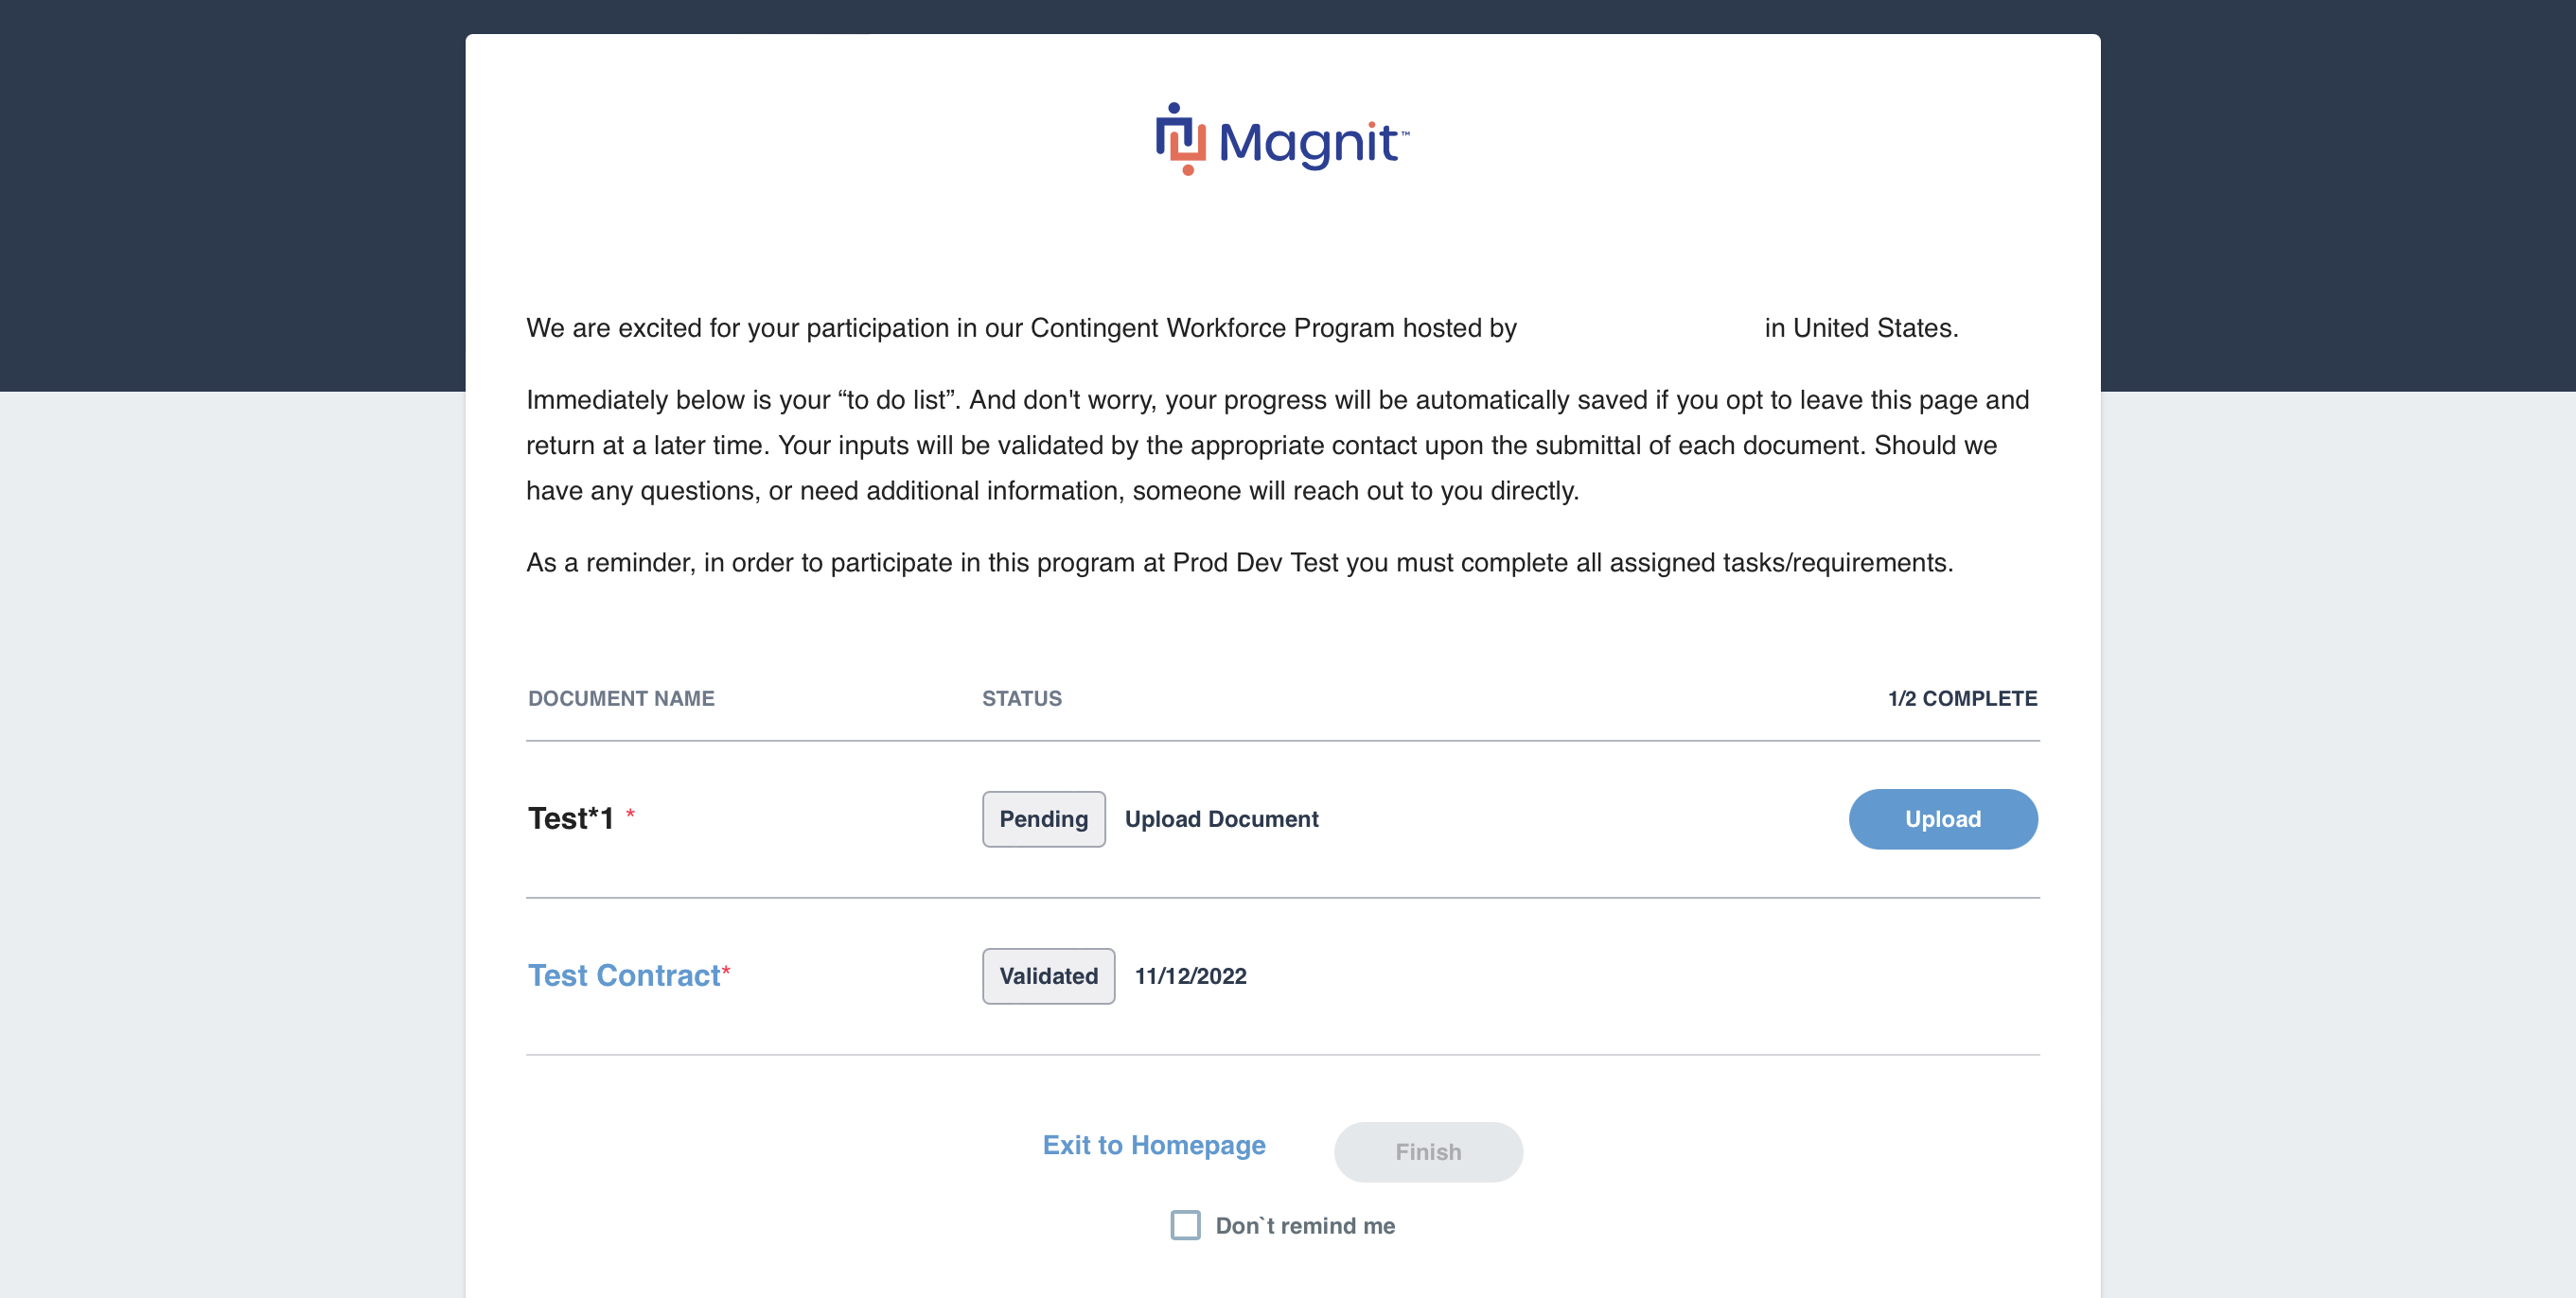
All documents that are marked 'Download' or 'Acknowledge' appear in this view. The status of each document also appears with a timestamp. If no action has been taken, no timestamp appears. Action buttons also appear for each document where action is required. If a document needs information added and remitted to the MSP/client, both the download and upload actions appear. If a document needs to be remitted, only the upload action appears. Documents that need to be reviewed have a download or acknowledge action.
Note that the 'Validated' status indicates that no further action is required for a document, however, this status can change due to the client or MSP organization revoking a document. This happens, for example, when a certification expires. In this case, you are required to upload a new/updated version of the document.
When all required actions are complete, the MSP organization validates submitted documentation and activates your supplier organization, and sets up your service lines. If your organization is onboarded for another client or country, the onboarding workflow is triggered again by the MSP organization.
Instructional Video Series
Supplier Video Series
Supplier - Welcome to Magnit VMS
Account Management
Introduction To Requisitions
Requisitions - Submitting a Worker
Supplier Managing Interviews
Supplier Reports
Generating Reports
Onboarding Workers
Reviewing Time & Confirming Expenses
Entering Time on behalf of a Worker
Viewing Invoices and Payments
Supplier Acceptance
Managed Services Request
Completing Business Validation Application
Submitting Project Billing