Overview
Welcome to the MSP view!
The MSP view is your entry into the Magnit VMS application where you perform work duties related to requests and engagements in the system. The VMS platform consolidates four user types of data to facilitate contingent workforce requisition management. Within the MSP view, you can view and edit data in a workflow, allowing you to manage requisition creation, supplier sourcing, worker on and offboarding, billing and approvals, and data reporting. Your role in the organization might focus on a subset of workflows, or all workflows.
The application supports workflow management, that is, actions and reactions to conditions that affect a worker or their data. When you act on a candidate or request, the application moves the data through client-specific configured processes. You can screen and pass through candidates for manager review, schedule interviews, fill requests, and so on. Each action taken can assign a status to an item, allowing you to track progress in the application.
The application also features standard dashboards and pages that focus on these workflow actions (for example, the Engagements page). Each of these pages organizes data specific to actions required , allowing you to focus on a specific task. The dashboards and reports present visualized versions of data.
Home Page
The Home page is the initial landing page in the application that links to other important task centers. Additionally, it has a calendar feature that gives an MSP a quick overview of the tasks that need to be done now and in the future. These actions include end of assignments and upcoming onboarding for a worker in the client organization. The Home page also includes a Broadcast Reminder section, which can be used to send notifications to related users (client managers and so on), reminding them of actions that they must take (approve timecards and so on).
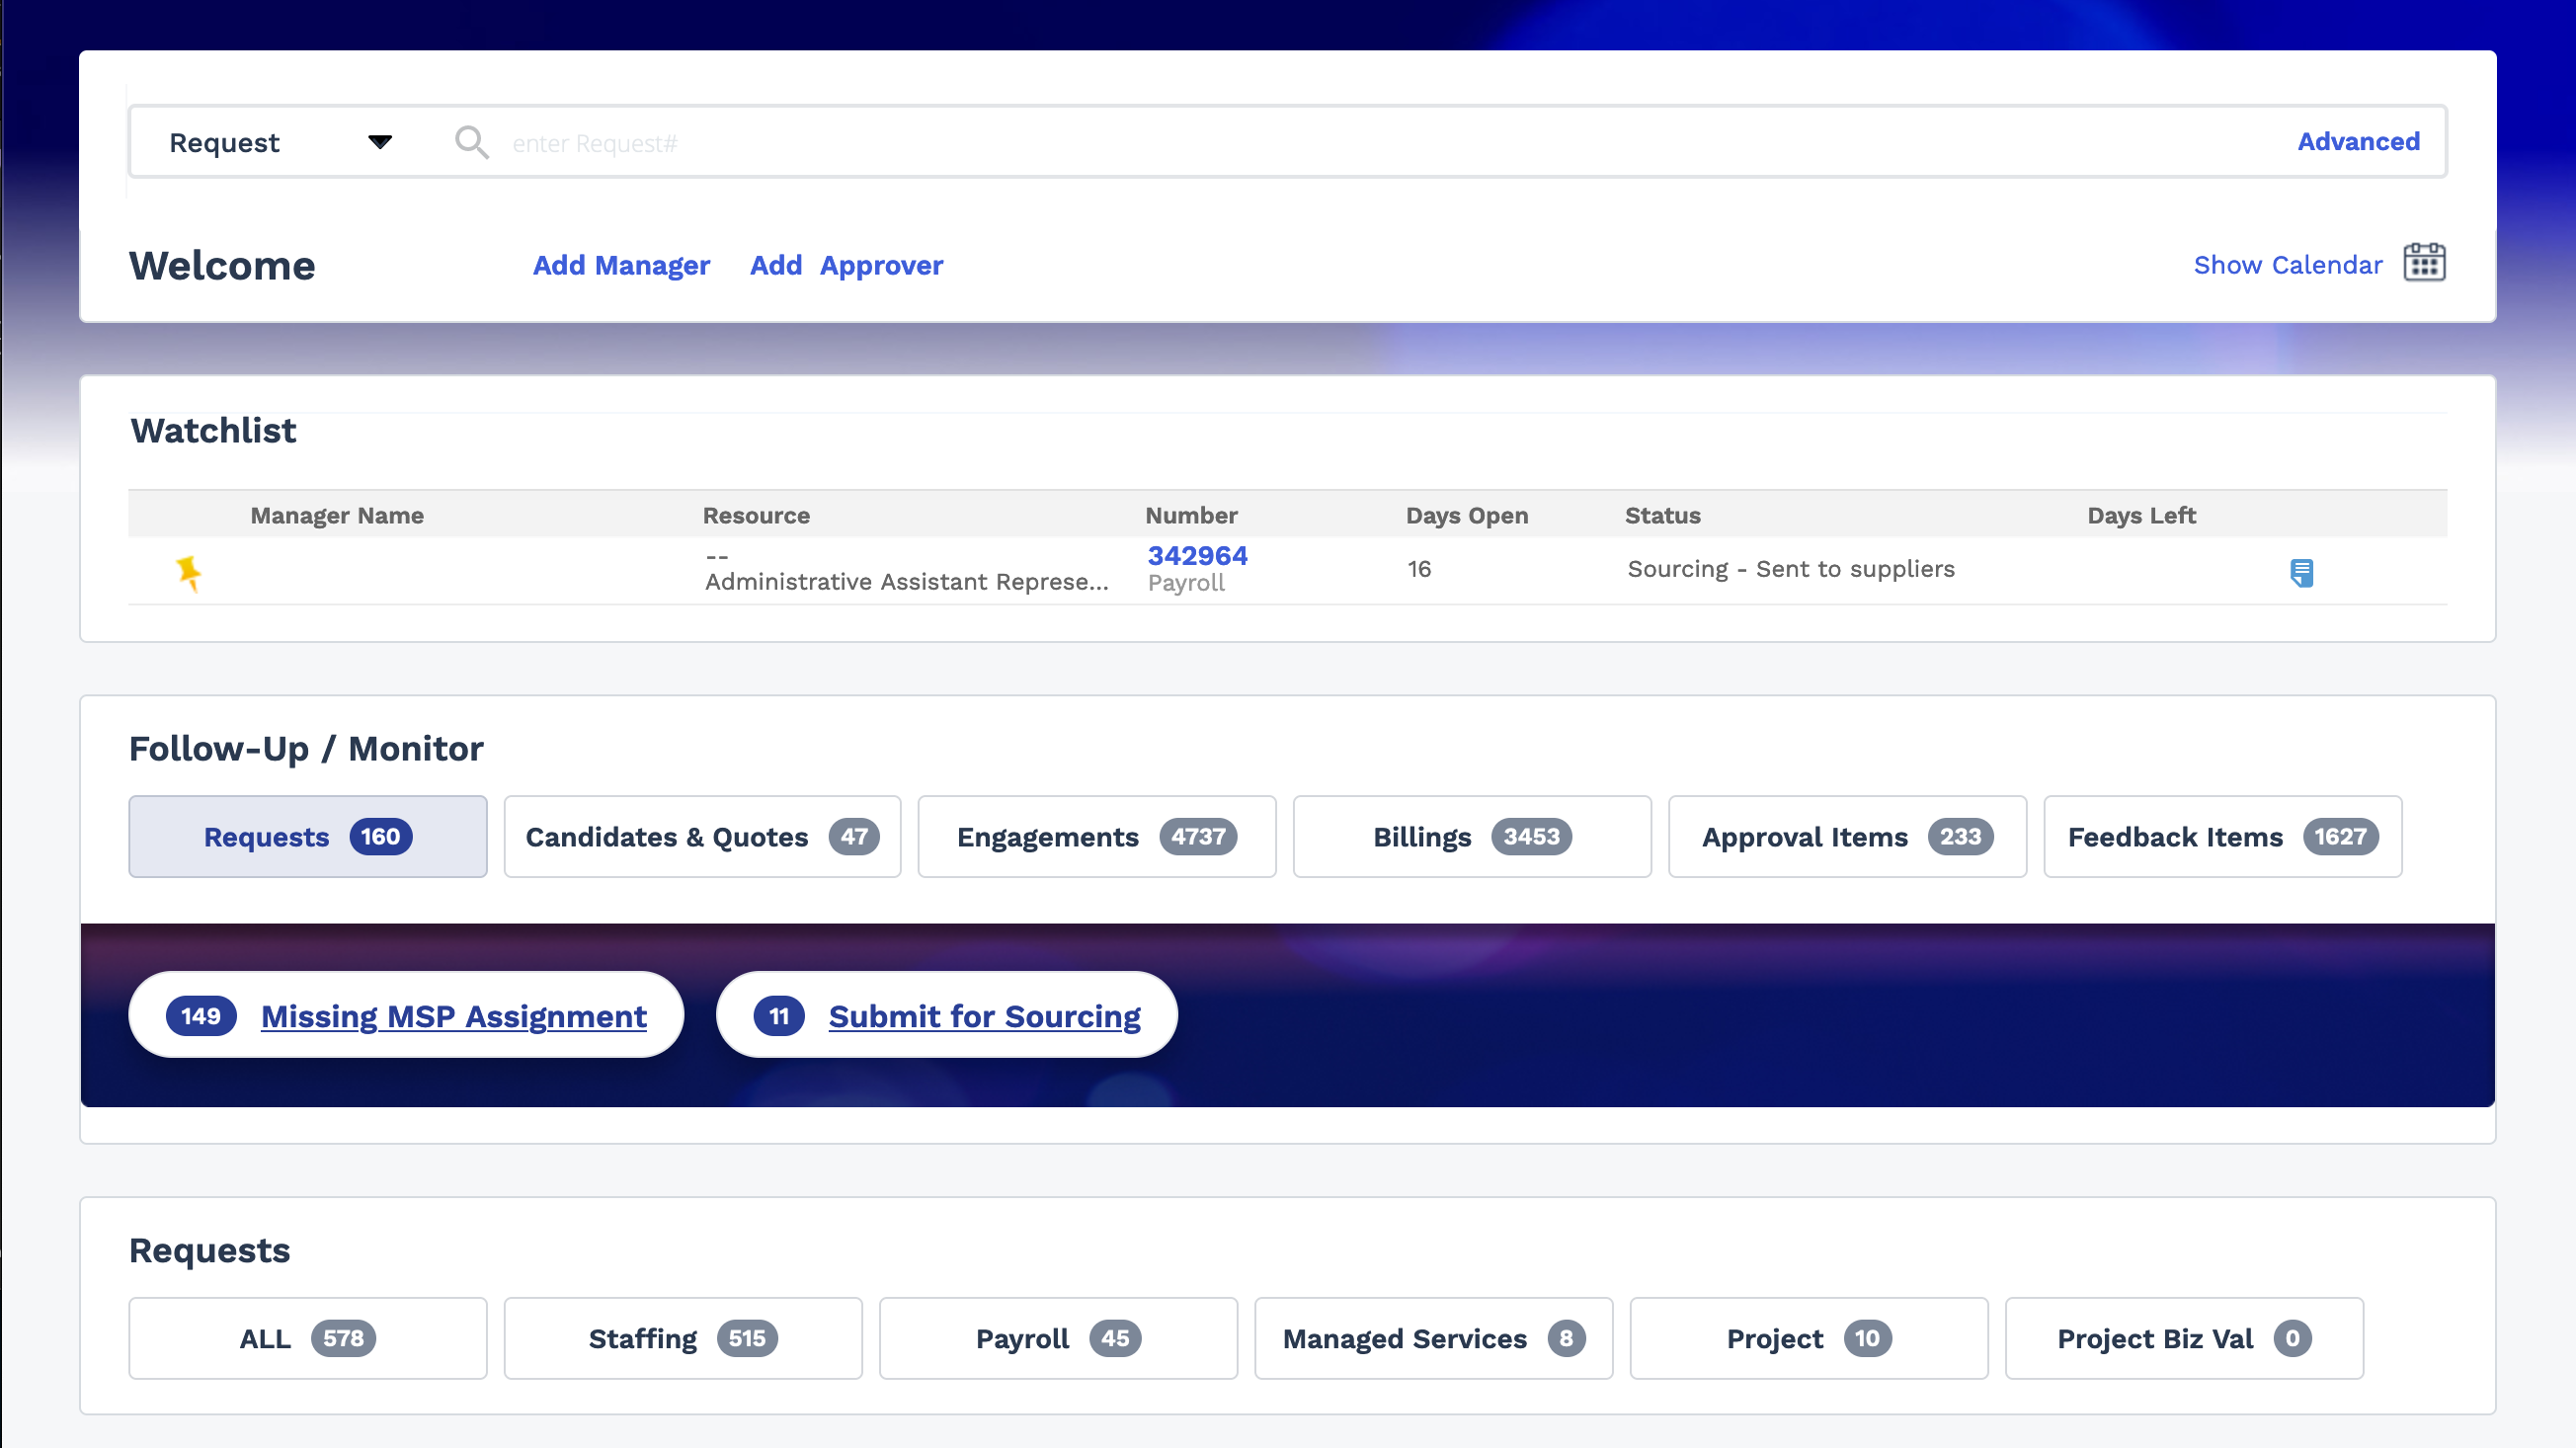
The Create Request section on the home page makes creating a request easy by allowing you to enter in the basic information to start the create request process form there.
The Watchlist view gives you the ability to flag certain data in the system and have it appear on the Home page. Since activity is marked by status indicators in the system, this section in helpful by listing the data that you flagged, and the associated status.
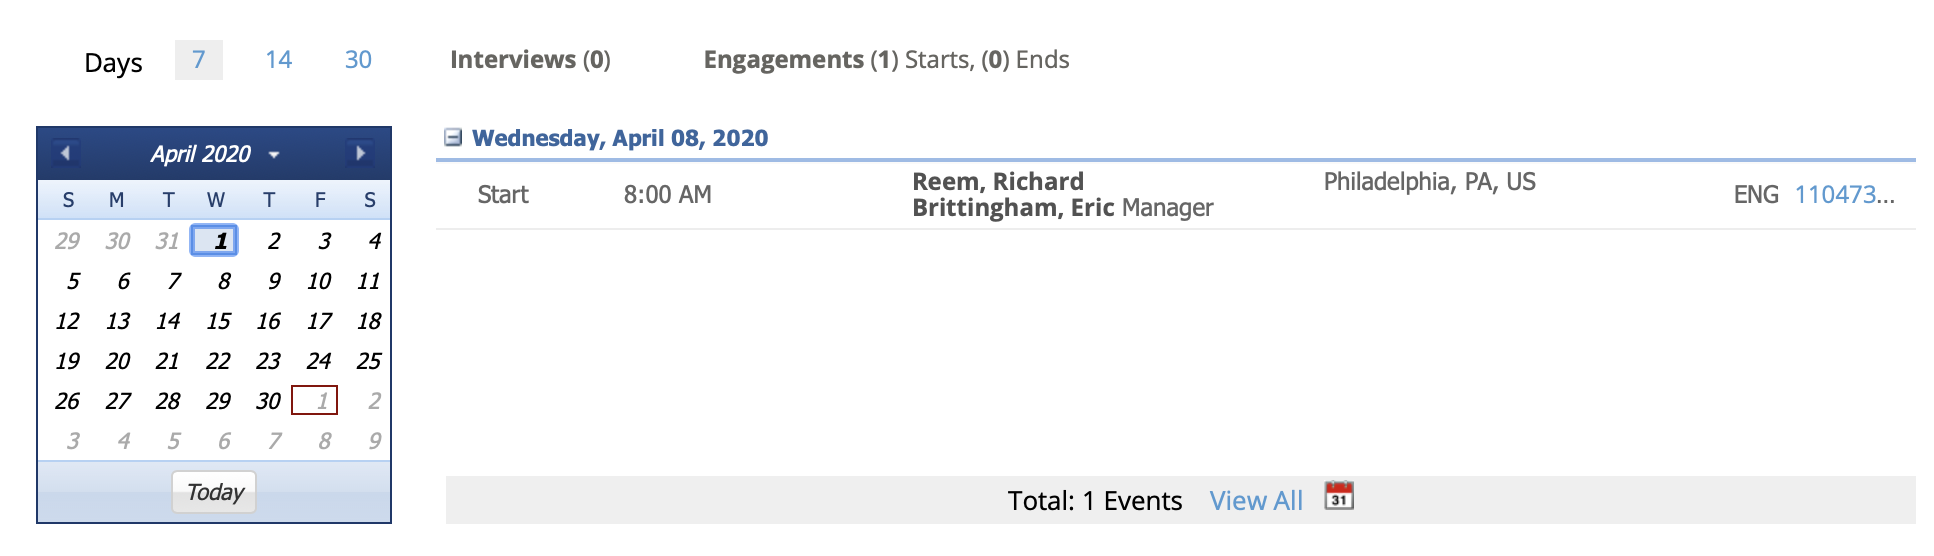
The Calendar (click Show Calendar) displays upcoming dates that might have importance in the coming future. These dates can include upcoming interviews, upcoming end of engagement date (that might require offboarding), or a new worker start date.
Search Function
You will notice that there is a lot of data associated with each requisition and worker. The application contains a robust search feature that allows you to enter the base amount of information and locate any details that you require. A search area appears at the top of each page in the MSP view.
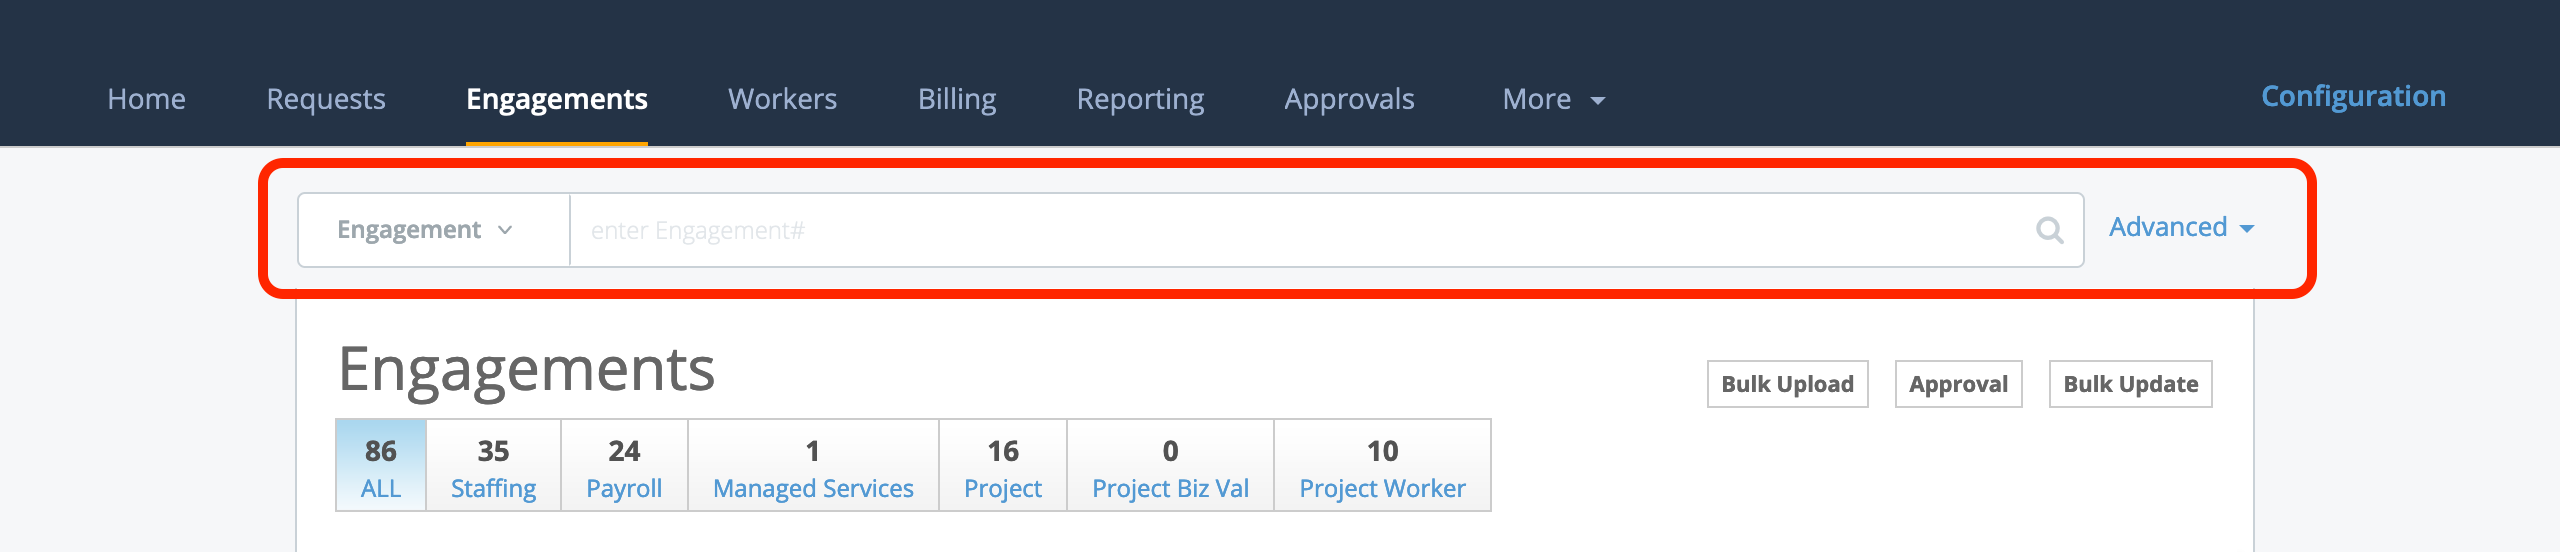
To start your search, you must select the type of data that you are looking for (for example, request, worker, engagement, and so on) form the drop down menu on the left side of the search field. It is important to note that navigating to a page in the application automatically changes this selection to the information type on the page, however, the filter can be changed on any page.
Requisition Types
- Payroll - A payroll requisition is work where the worker is already known by the client organization. In this case, the MSP organization could be the EOR, and the worker is added by the party opening the request.
- Staffing - The worker/workers were not know at the time the request was opened. Requests are sent to identified suppliers/vendors who then submit candidates to the request.
- Statement of Work (SOW, Project) - The client has a defined project scope of work, and needs an independent contractor/business organization to complete the deliverables.
- Managed Services - Headcount tracking for a client organization.
Opening Requisitions
Requisitions are assigned a number based on the status (one number for a request, and one number for a filled request, which is an engagement). This duty depends on the work rules that are established by your organization, and the client organization.
To open a request for work, navigate to the Requests page, and enter the request information under the Add Request section. Click Go to continue to the next page, and complete the remaining request details. The job categories and titles are pre-loaded into the system, but you might be required to add or edit the information that you see. Once you have entered this information, enter the position details. This includes the hiring manger and the billing approver, the work location (where the job is done), and the remote location of the worker (if applicable). Note that there can be custom fields that are configured for the client, which can be required or optional. These fields allow specific information outside of the standard position information to be reported on, and can be of any data type (date, number, selection from a drop down, and so on).
Next, enter the request schedule information. The schedule refers to the estimated start and end dates, as well as the schedule parameters. The parameters are the number of hours per day that the worker is expected to work, and the number of days per week. This is important because the job definition outlines this, and the worker's pay schedule depends on it.
Managing Candidates
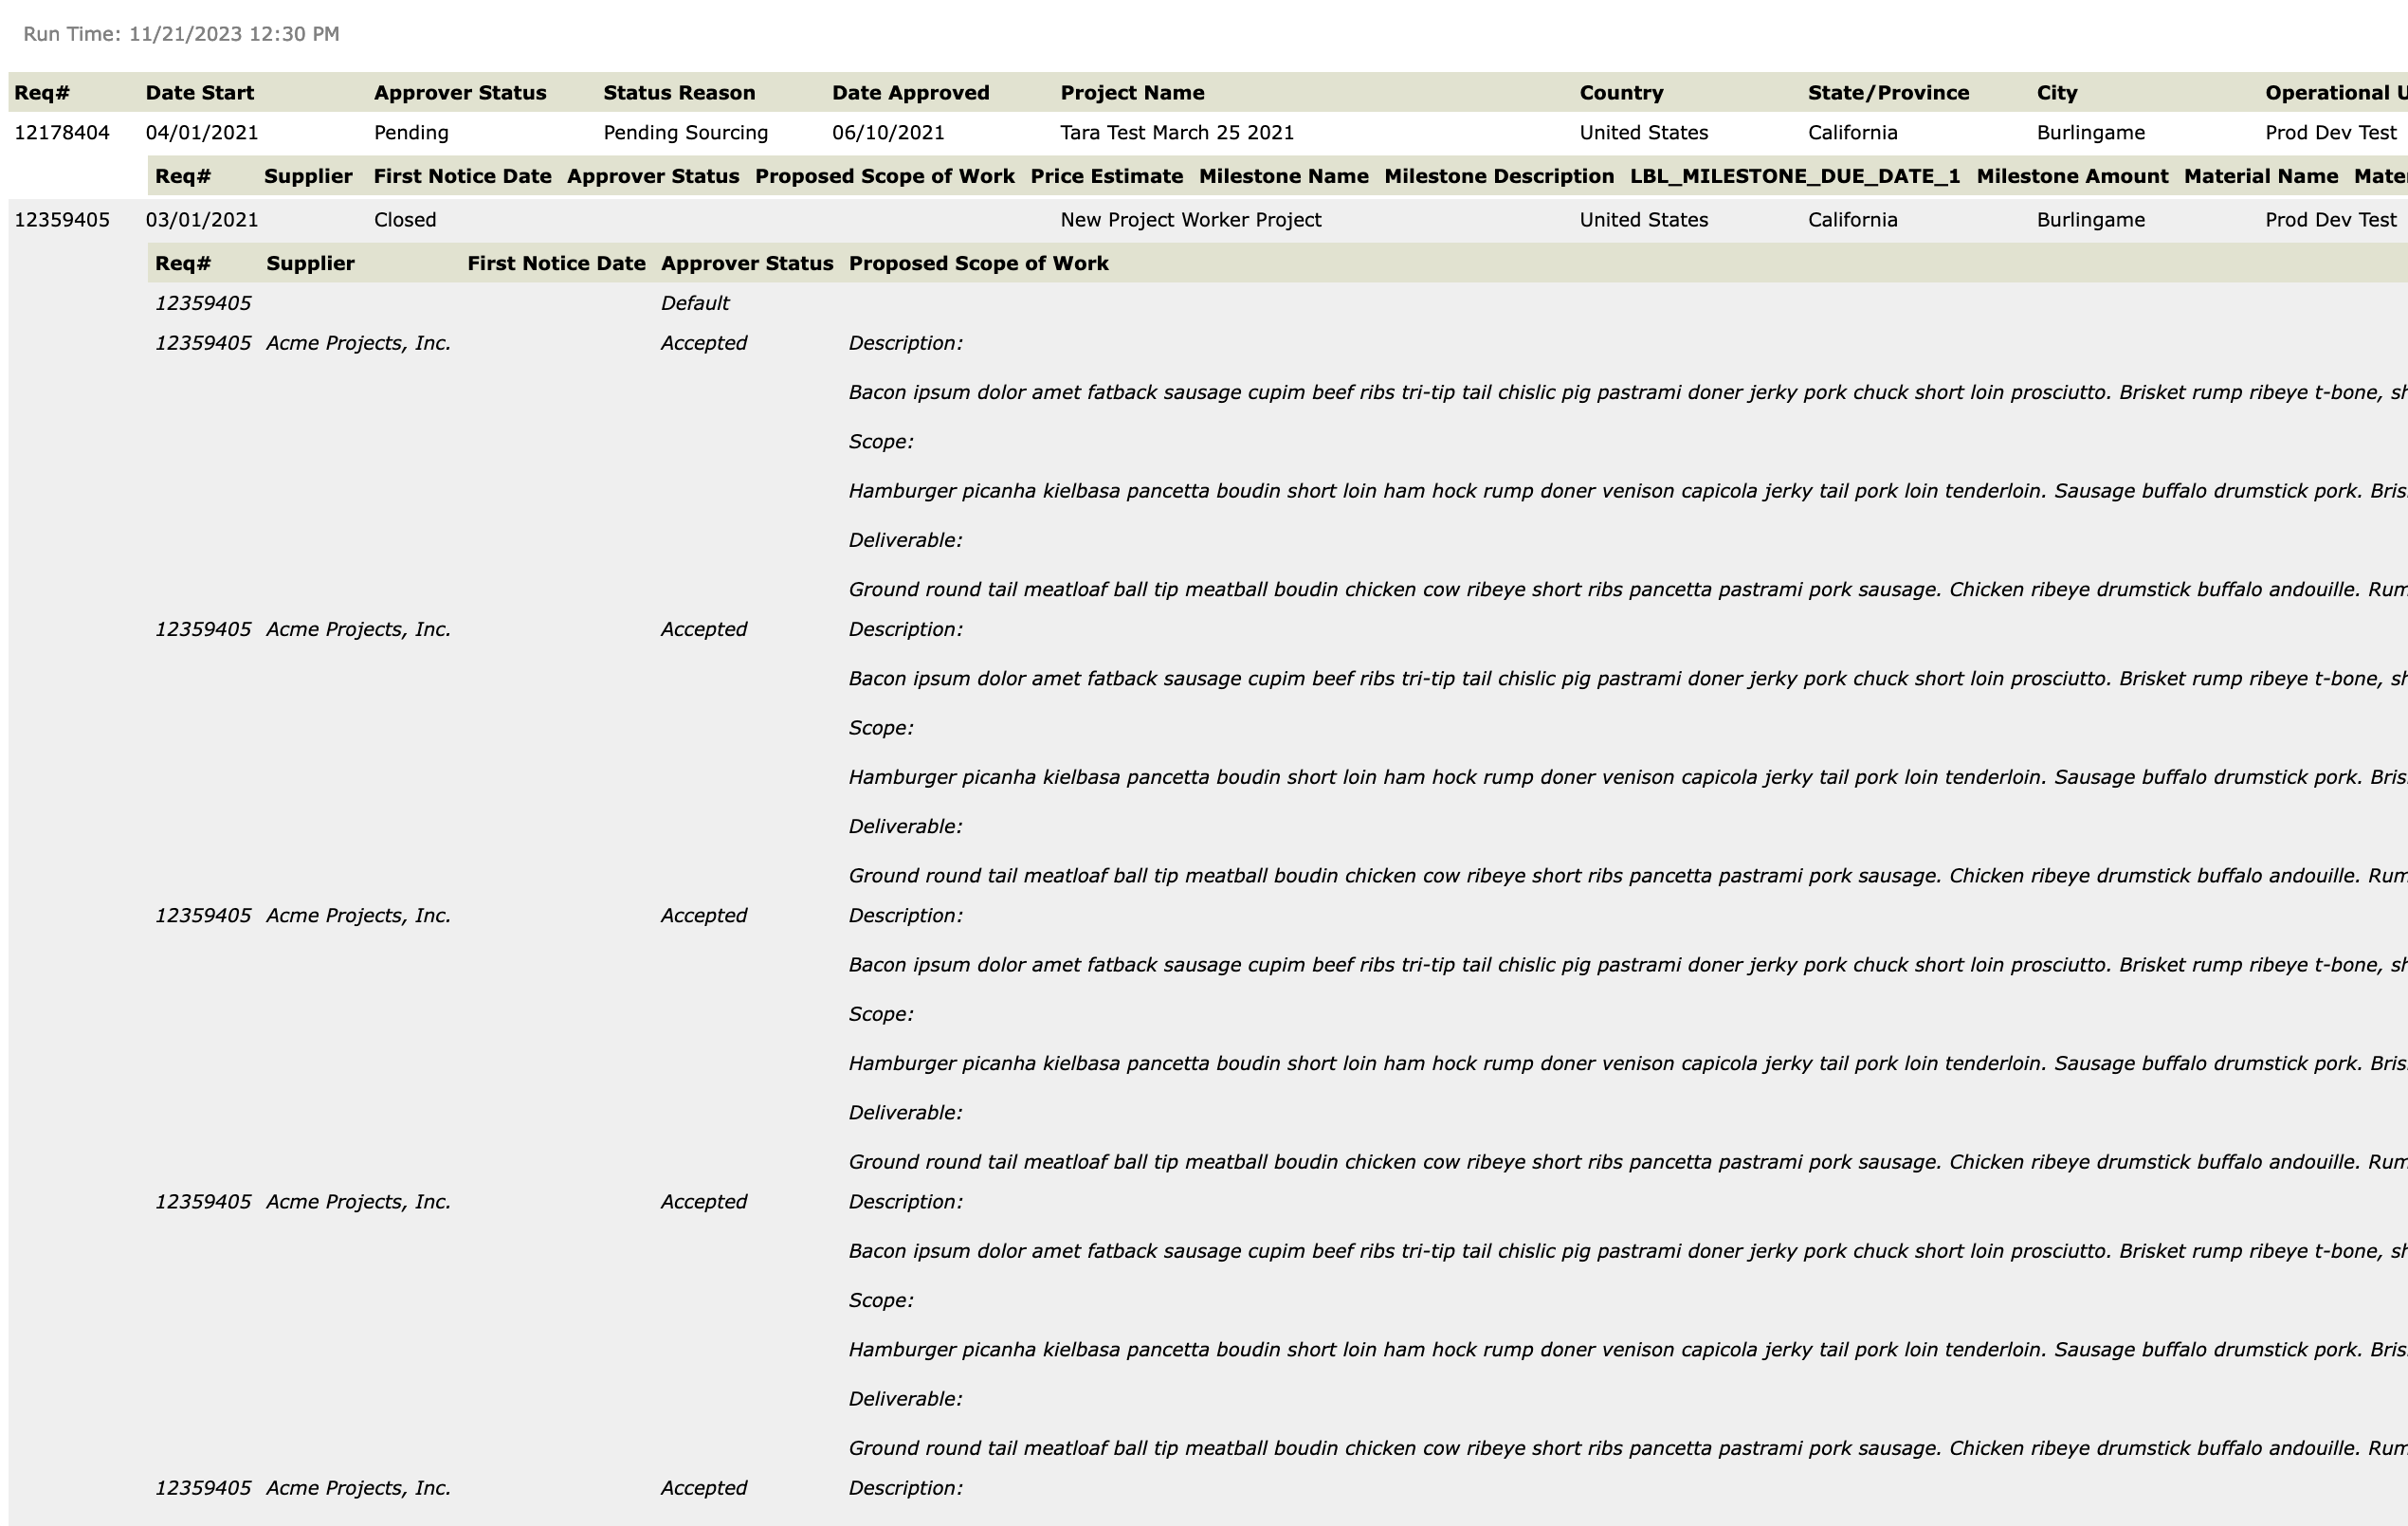
In Candidates tab on each staffing request, you can note important details like the maximum bill rate, and the number of open positions for the request. All candidates that are submitted by all suppliers to the request appear in this list. Because candidates can be in different places in terms of hiring status (and status assigned by the system), the list features buttons that filter the view so you can focus on specific actions.
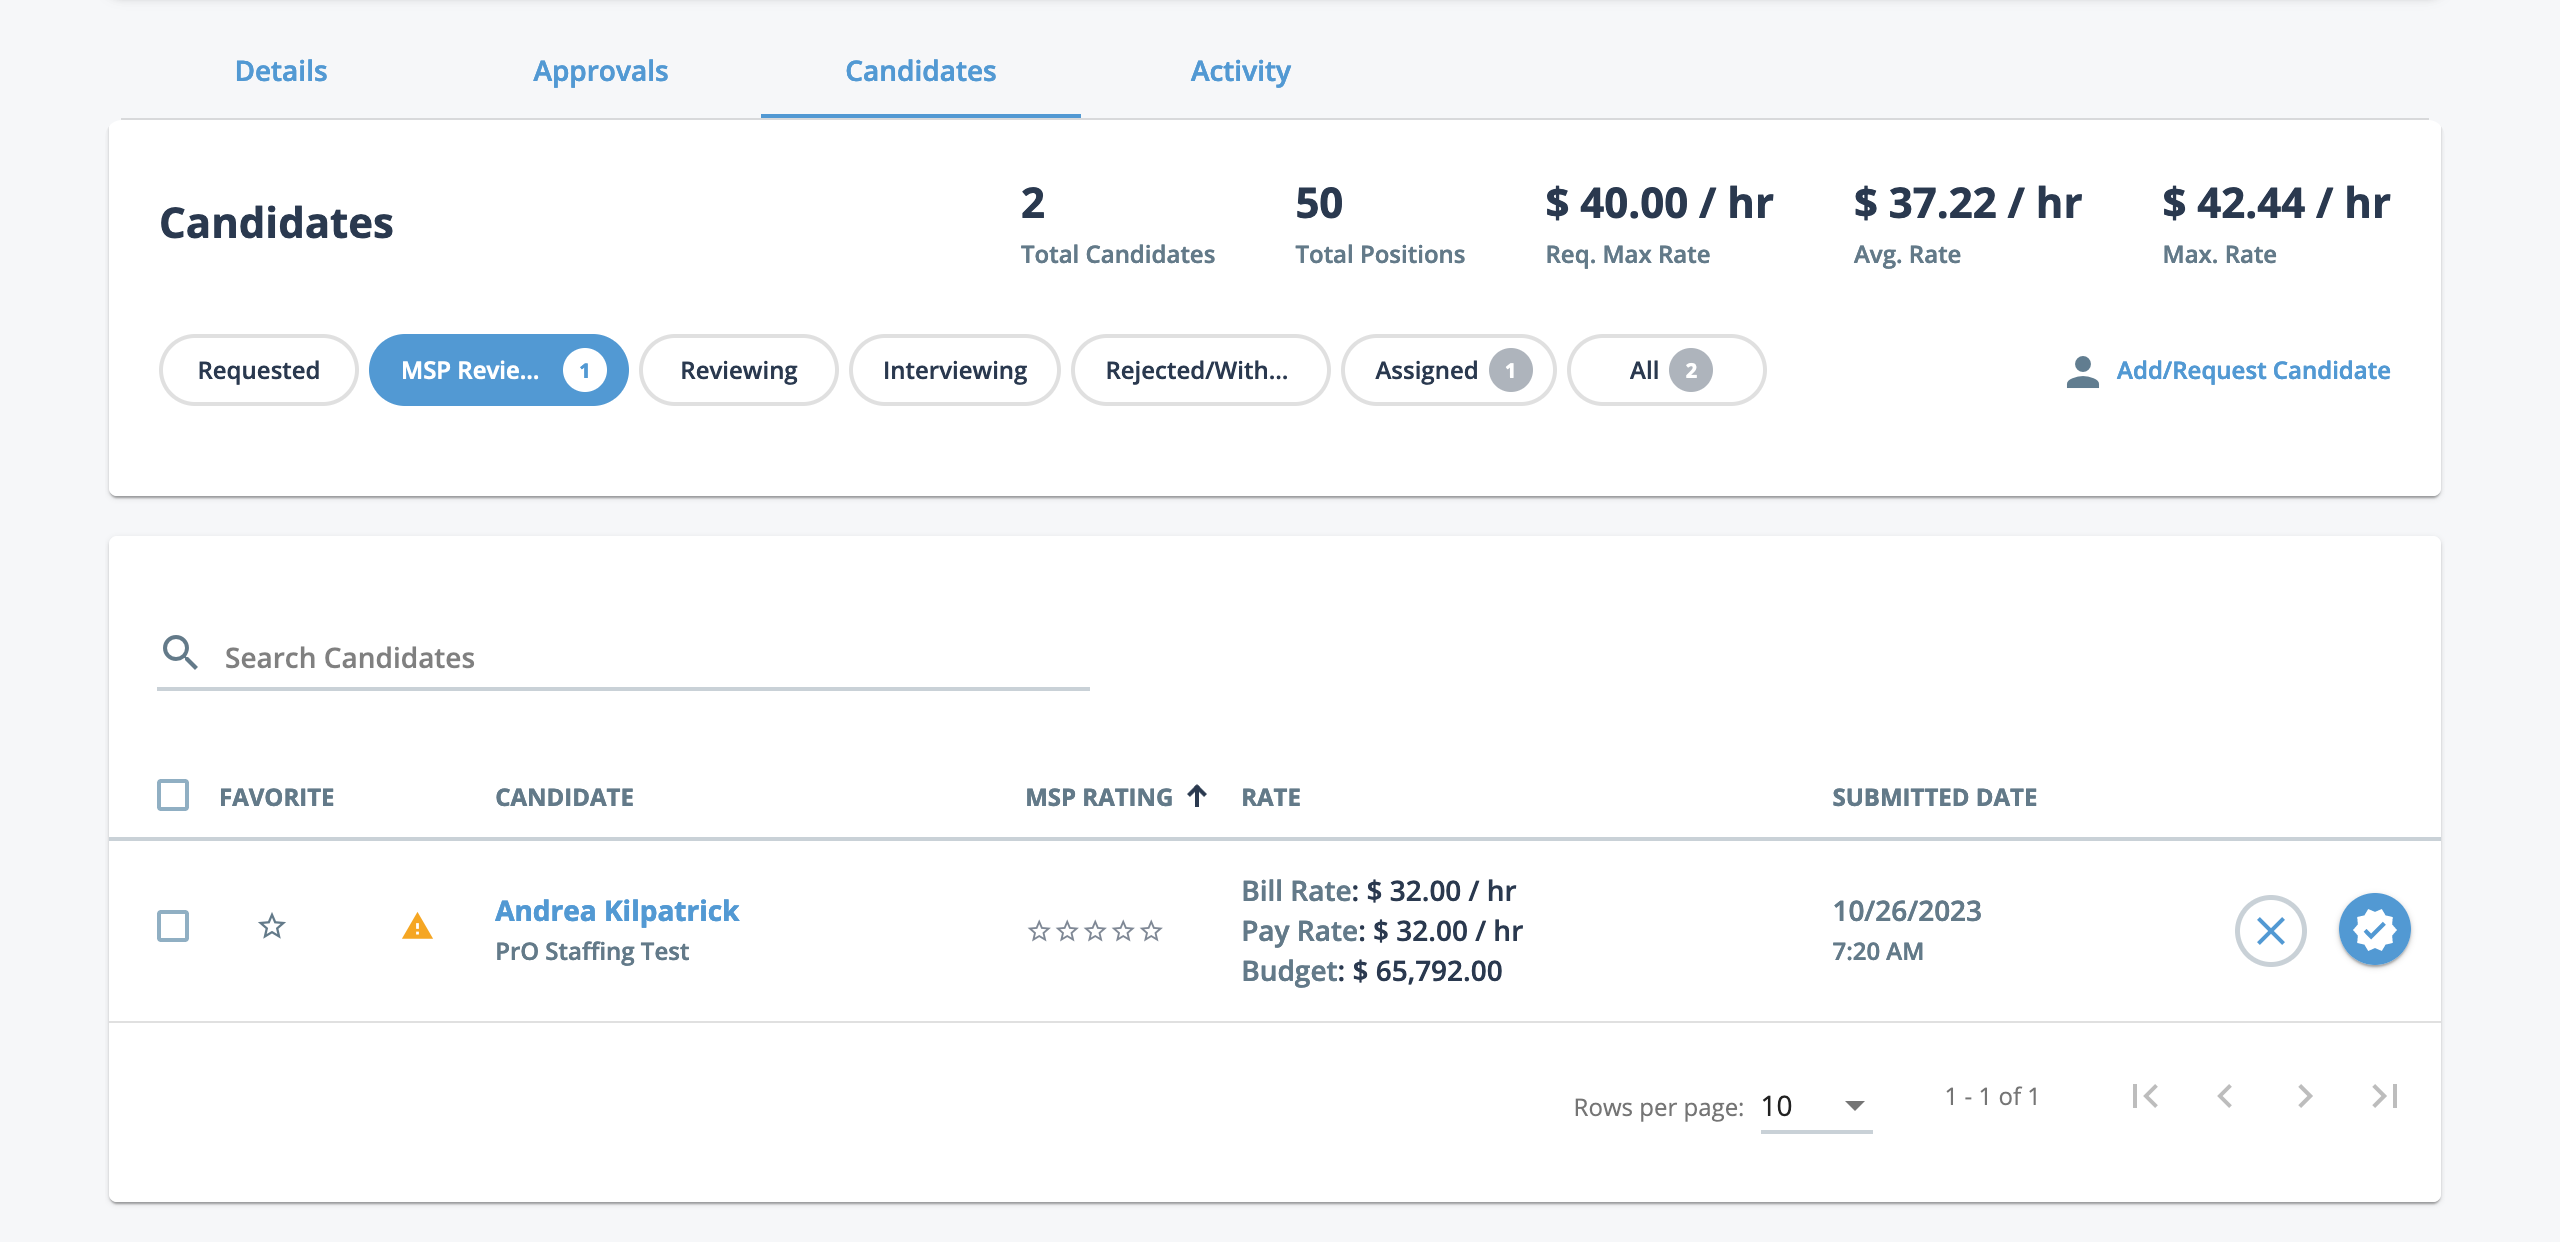
When reviewing candidates, you can click a name in the list to open their candidate profile. The profile (Candidate Details) contains the candidates resume (and physical resume document if uploaded), and the submission history for that request (candidates can be submitted to numerous requests).
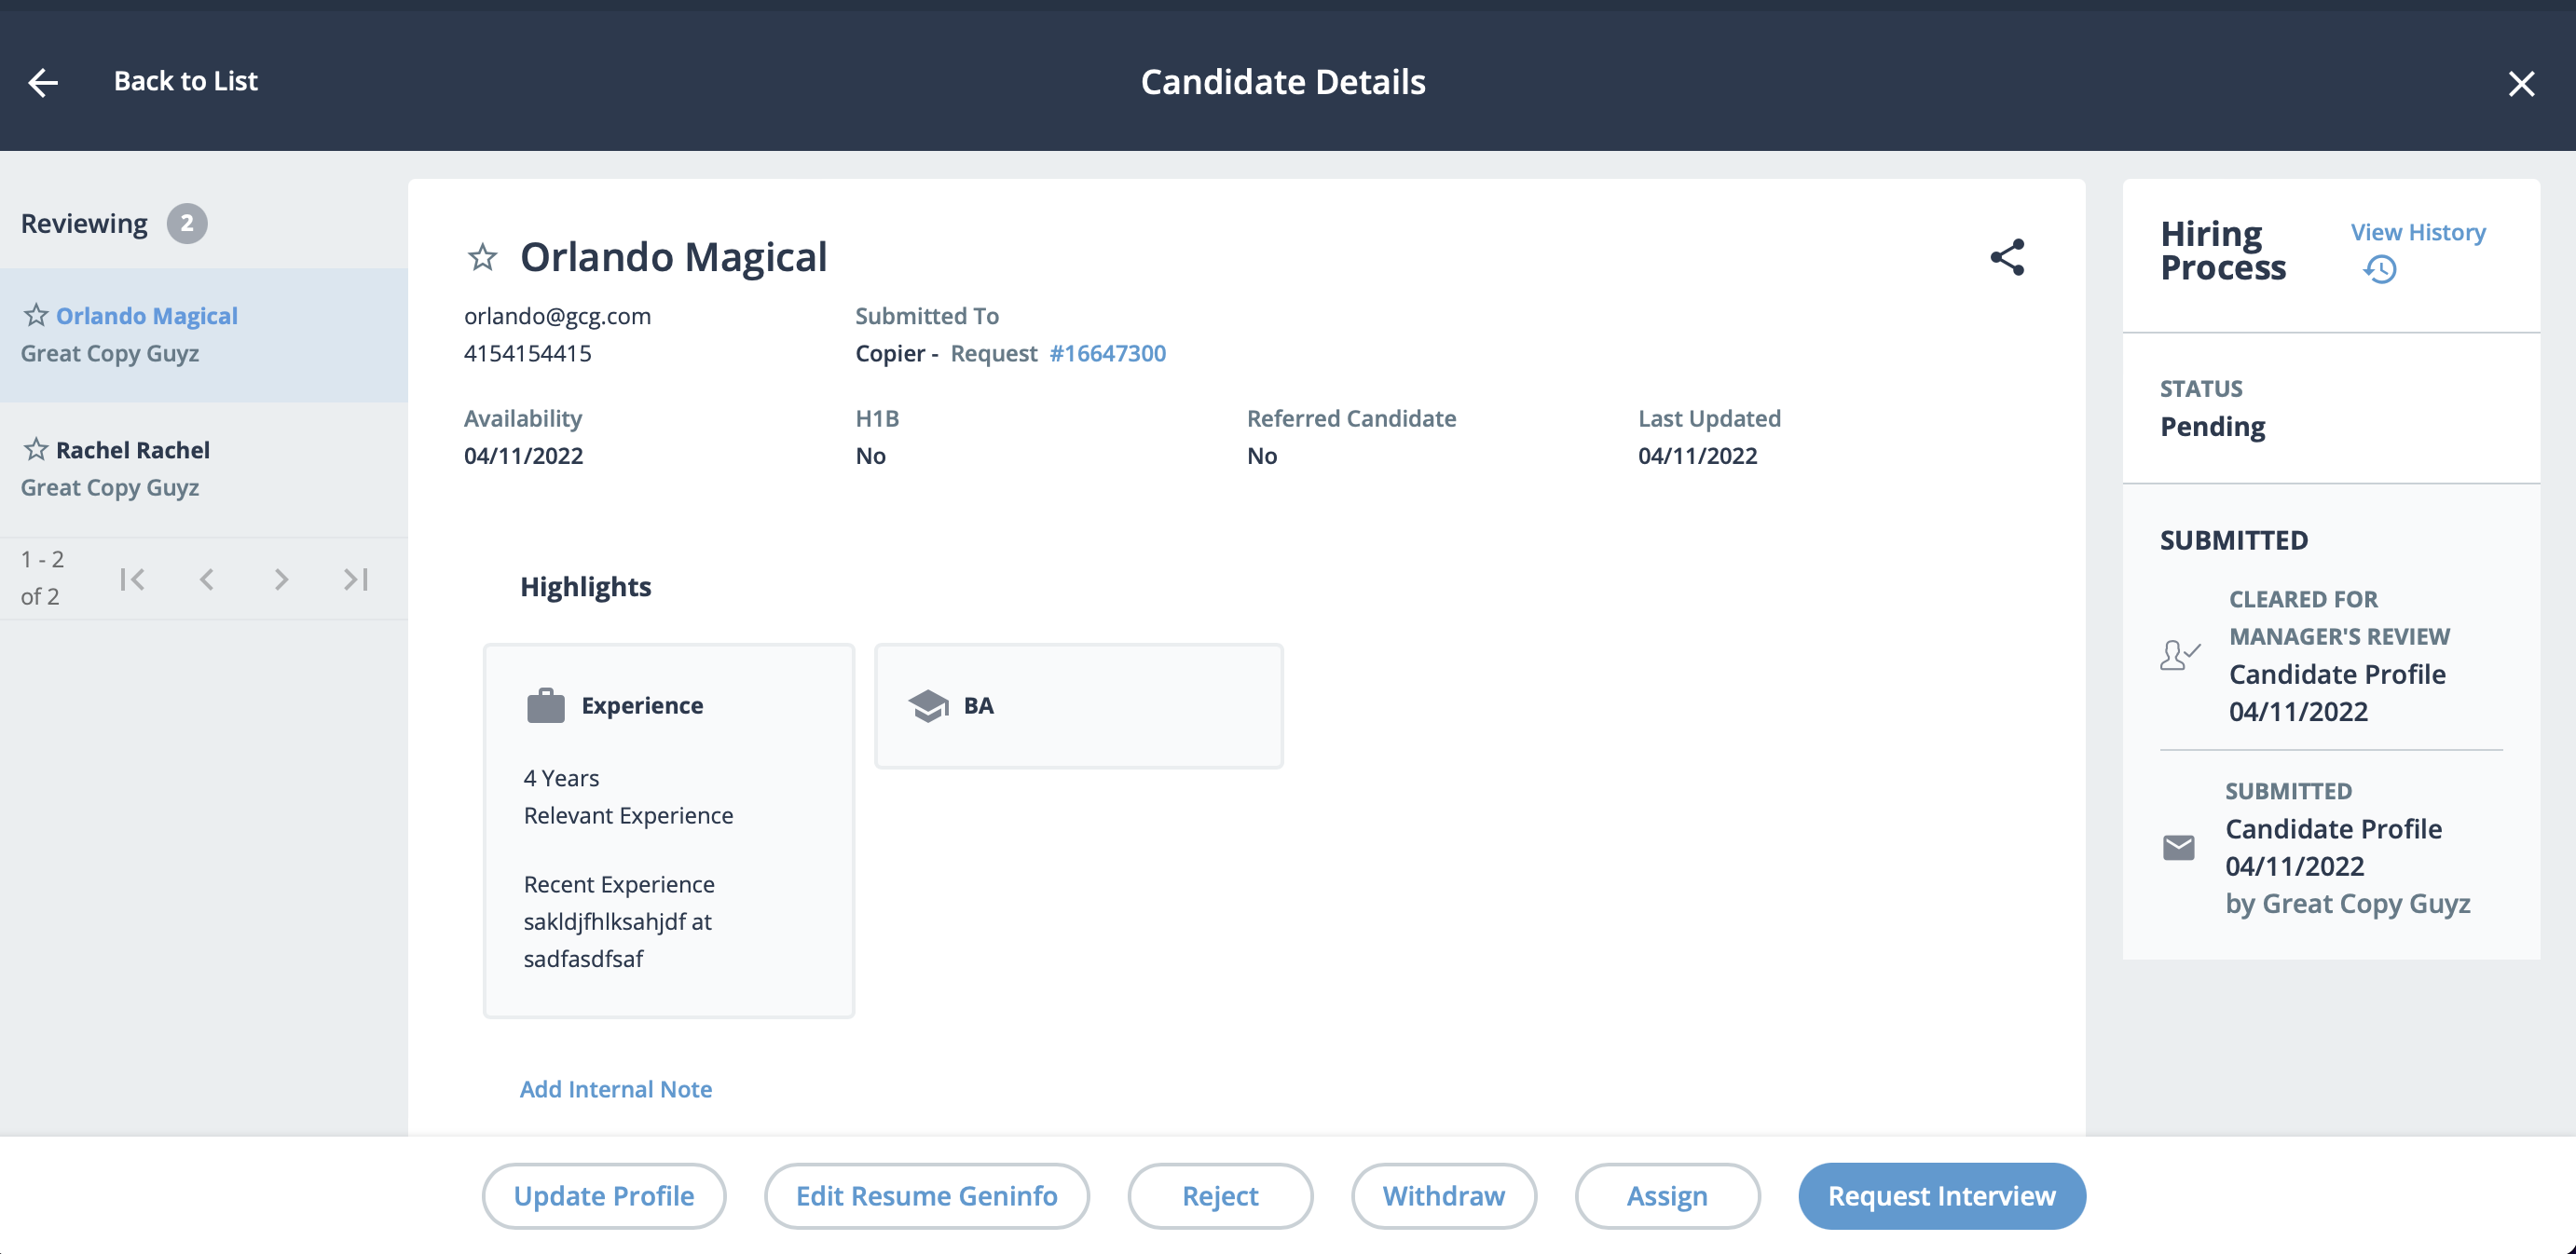
The profile also allows you to take actions on the candidate for that request. From this view you can update the candidate's profile, edit the resume information if something changes in the candidate's profile after submission, reject or withdraw a candidate from the request, assign that candidate to the open position, or set up an interview.
Interviews are set up and managed through the application to track a candidate's status. Selecting a candidate for an interview requires you to use the built in calendar function. You select a date and time schedule, and then the application sends email notifications to the MSP, the supplier/vendor, and hiring manager. An MSP can select multiple dates and times from the calendar, based on the interviewer's availability. The supplier must verify with their candidate the interview schedule. After the interview is complete, the outcome and/or feedback of the interview can be recorded in the application, and is viewable in the Candidate Details page, as well as shared with the supplier/vendor.
Once the client organization has selected the candidates that they would like to complete the work, the MSP assigns candidates to open positions on the request. Filling a position requires you to locate the request in the application, and navigate to the Candidates tab and select the candidate from the list. The number of open positions on the request decreases by one, and you then set up the engagement (filled request) including start and end dates, financials (bill rates and timecard types), and save the information in the application. The candidate is then considered a worker and can complete any required approval routing and onboarding.
Onboarding Workers
The On/Off Boarding tab in the engagement details display the configured items that are required for an individual engagement.
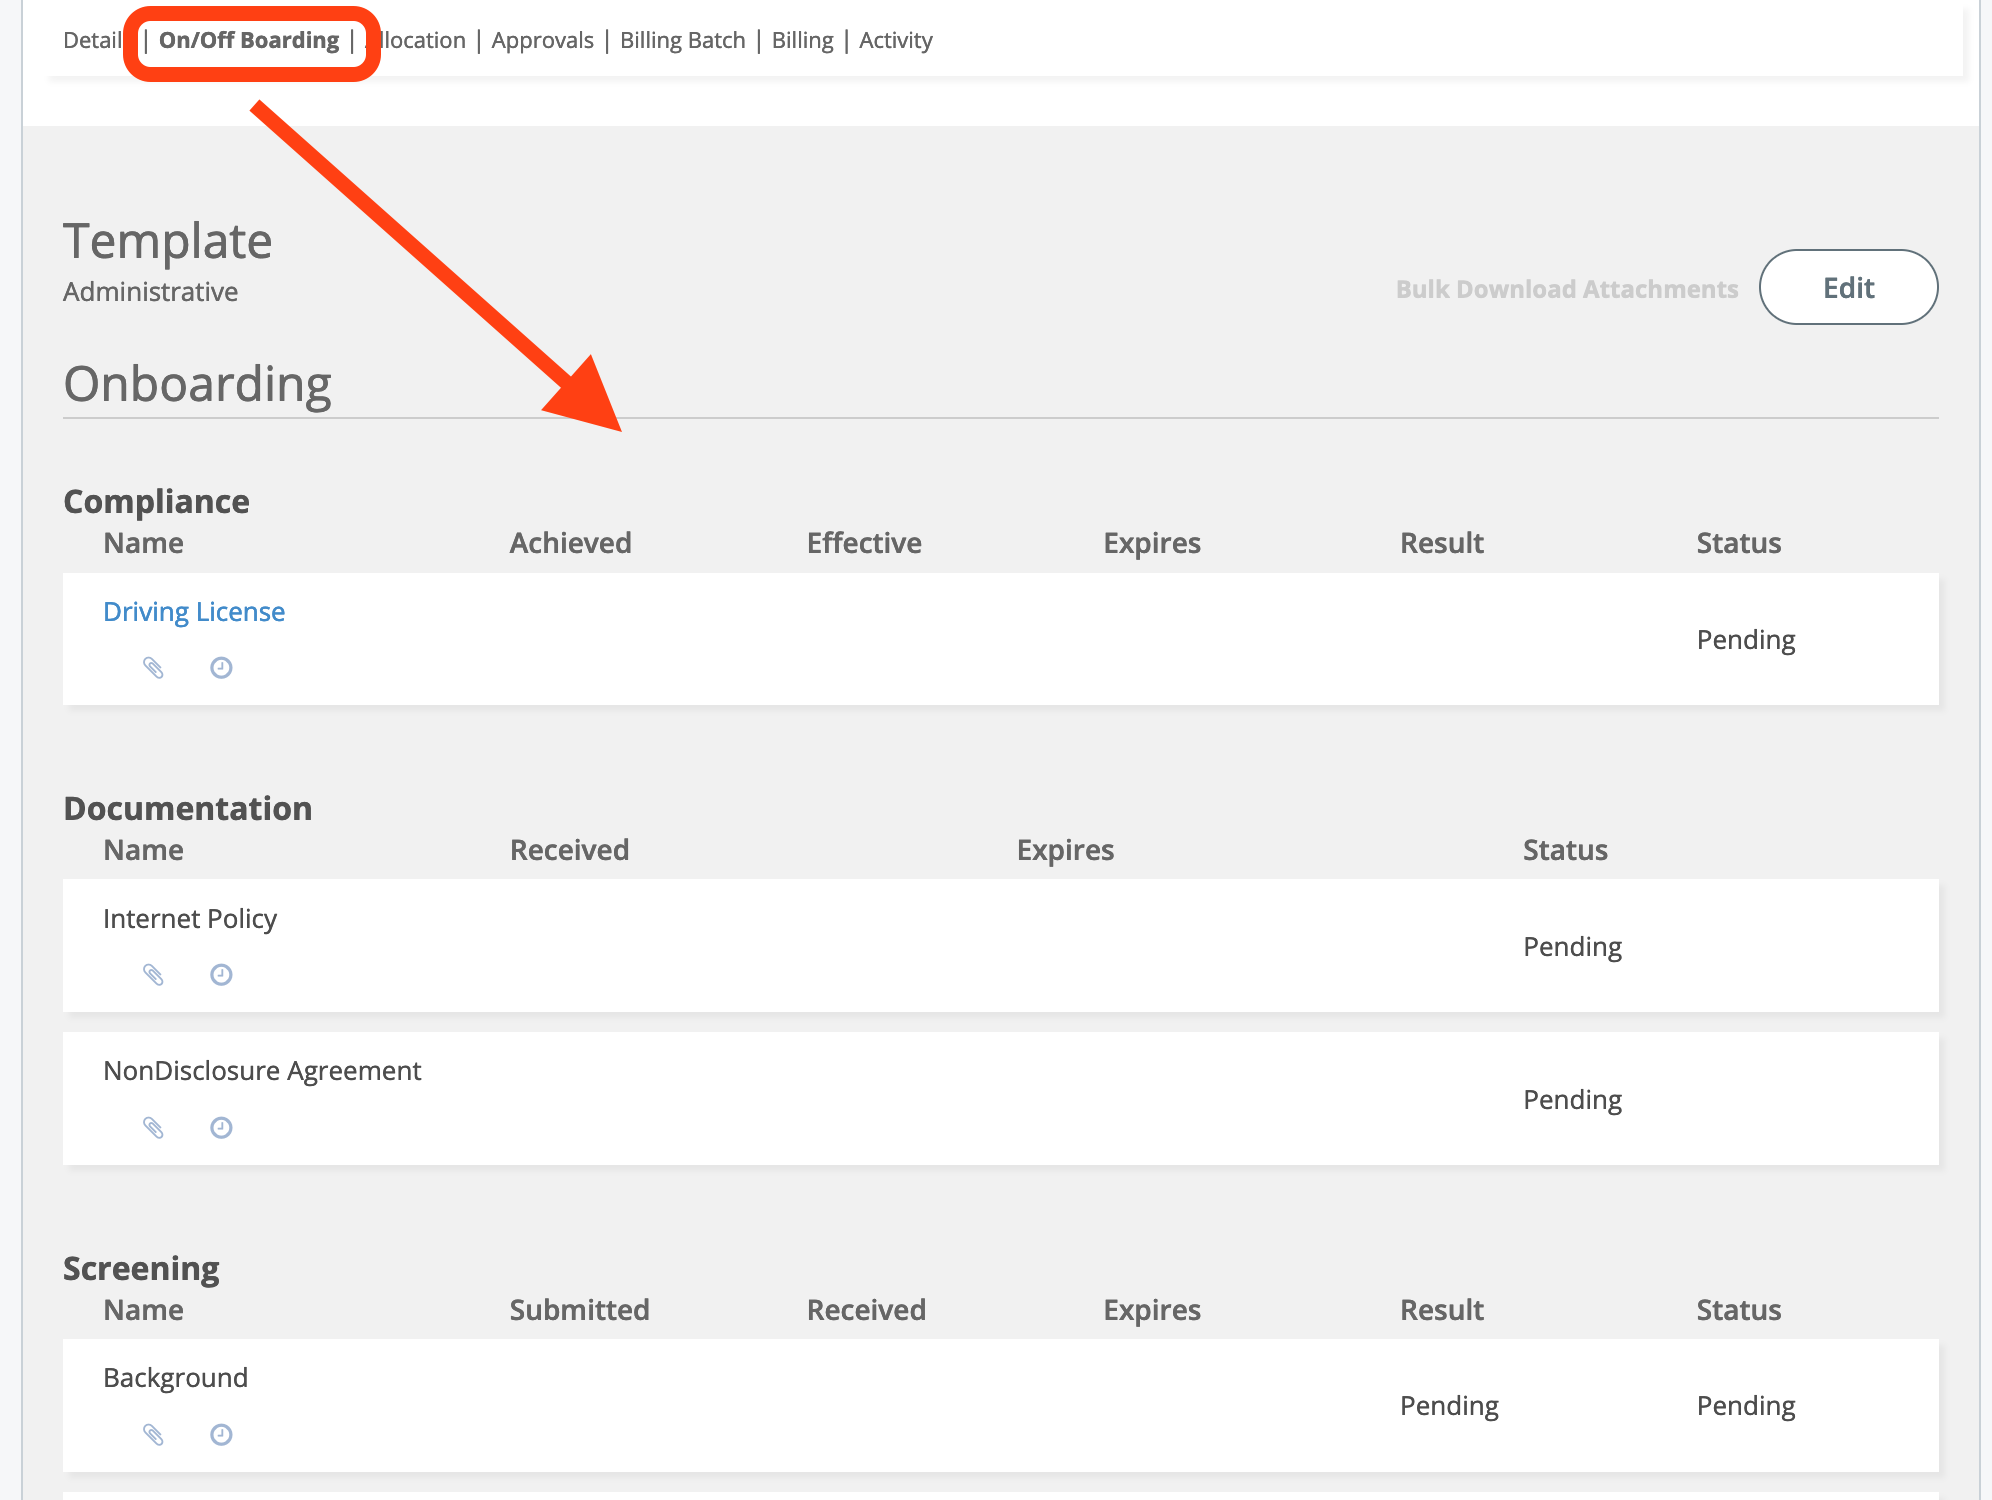
Items are managed at this level by editing the section and entering the required details for each item.
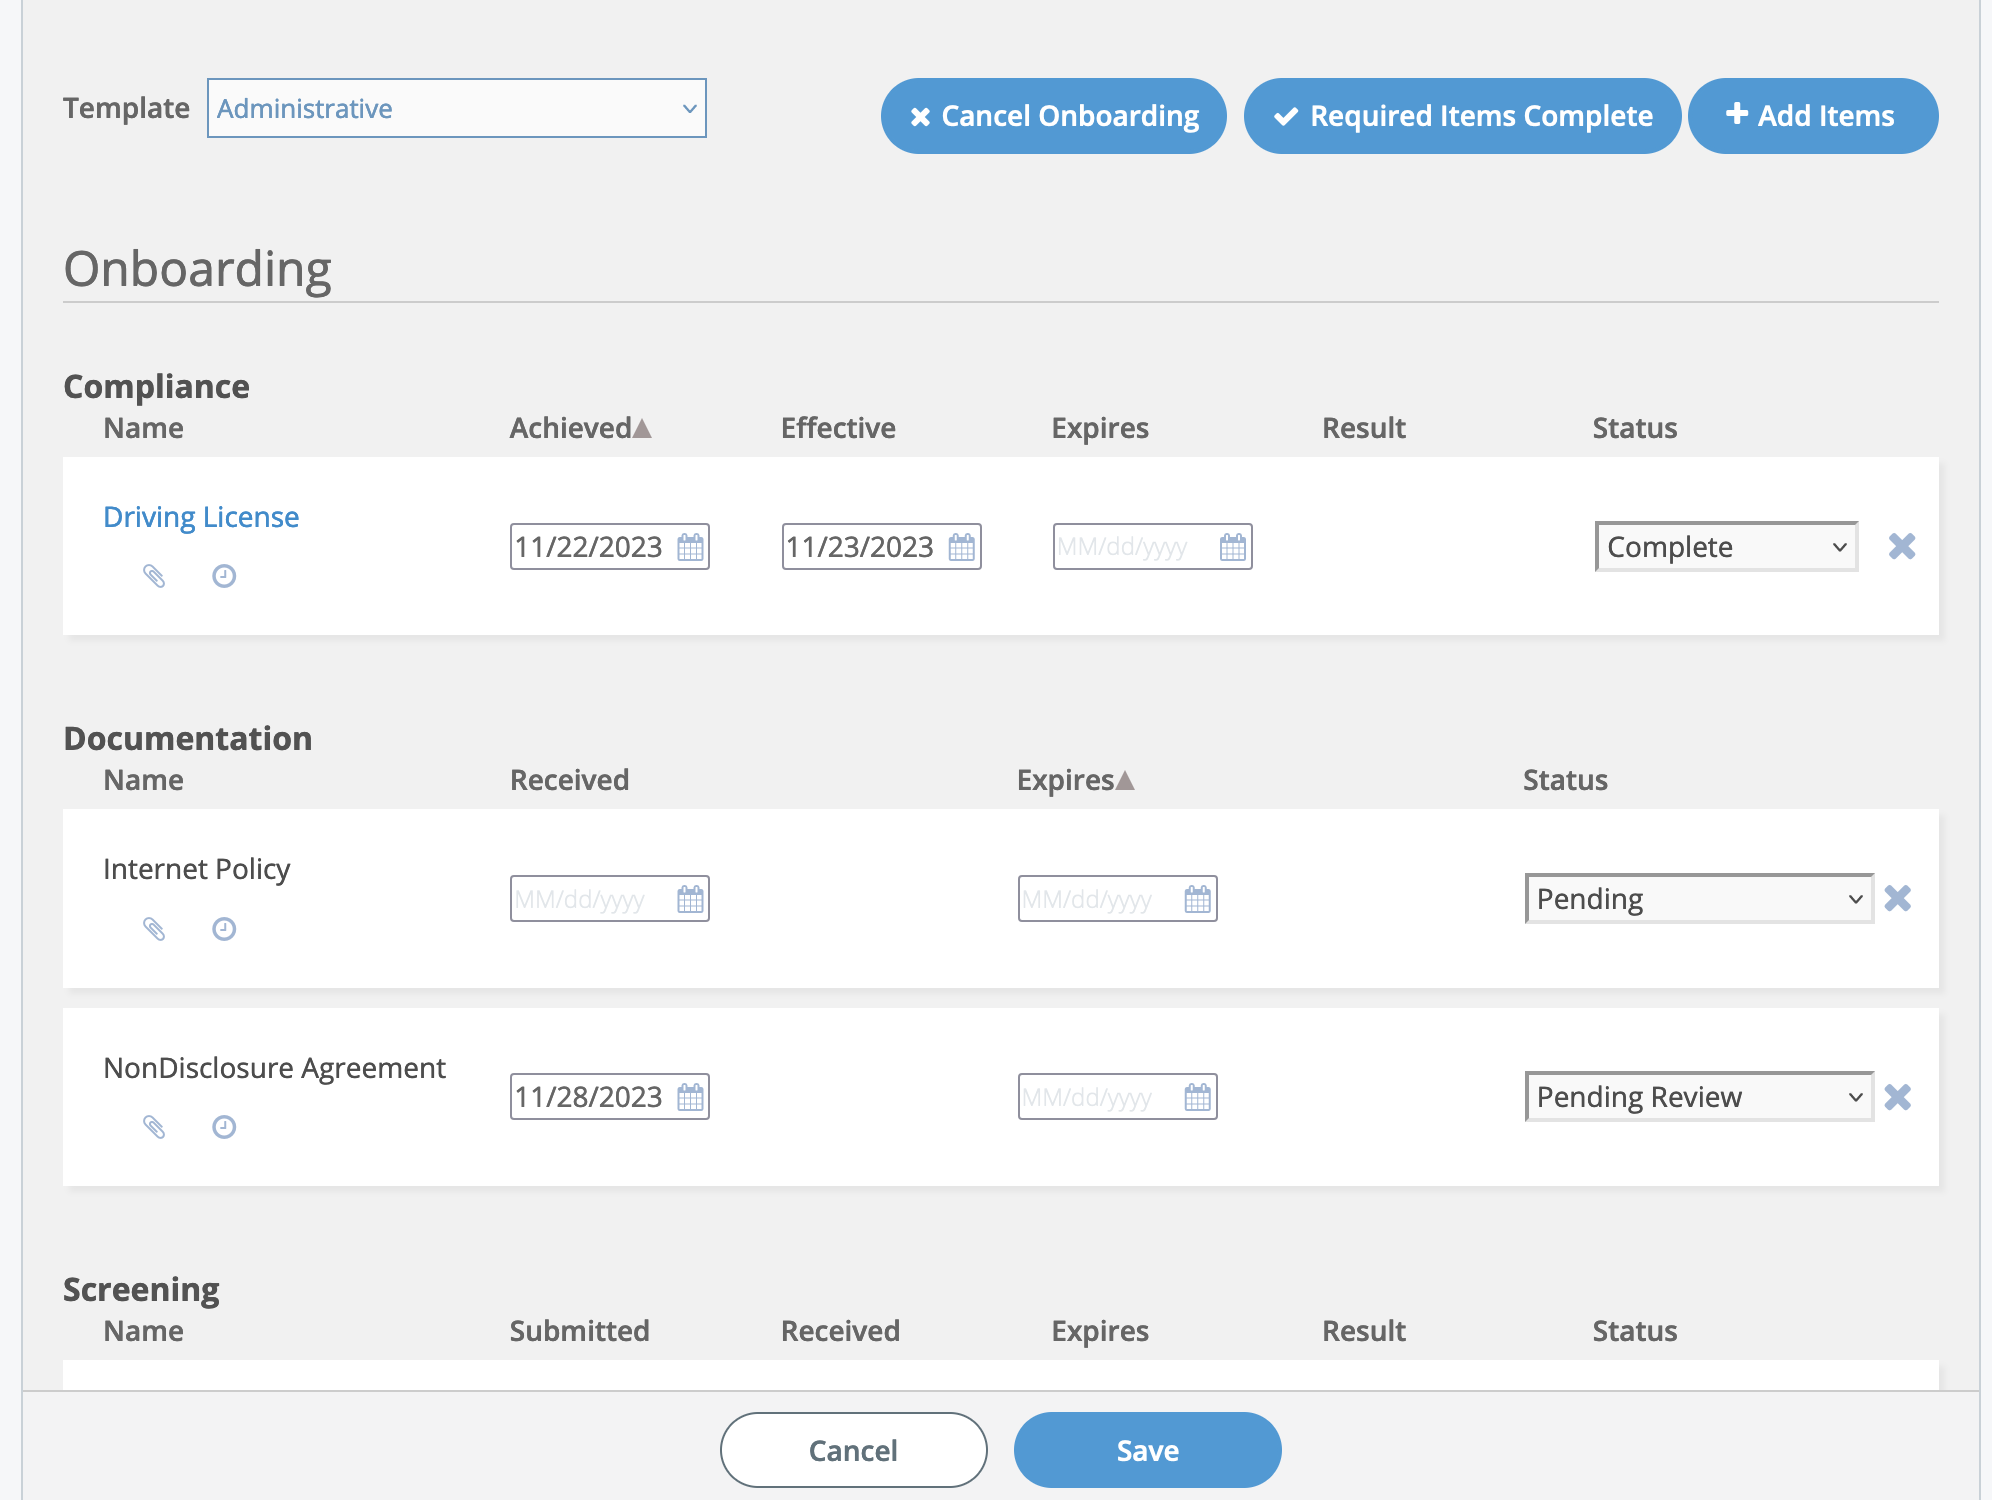
This section also displays any automatic email notifications that are sent regarding onboarding. Tracking these notifications can help you determine the status of the engagement onboarding.
In addition to the engagement level view, you can navigate to the On/Off Boarding Dashboard in the application (). This dashboard style report gives you an interactive way of locating items using various filters. The items display at the worker level, that is as one item assigned to a worker per engagement.
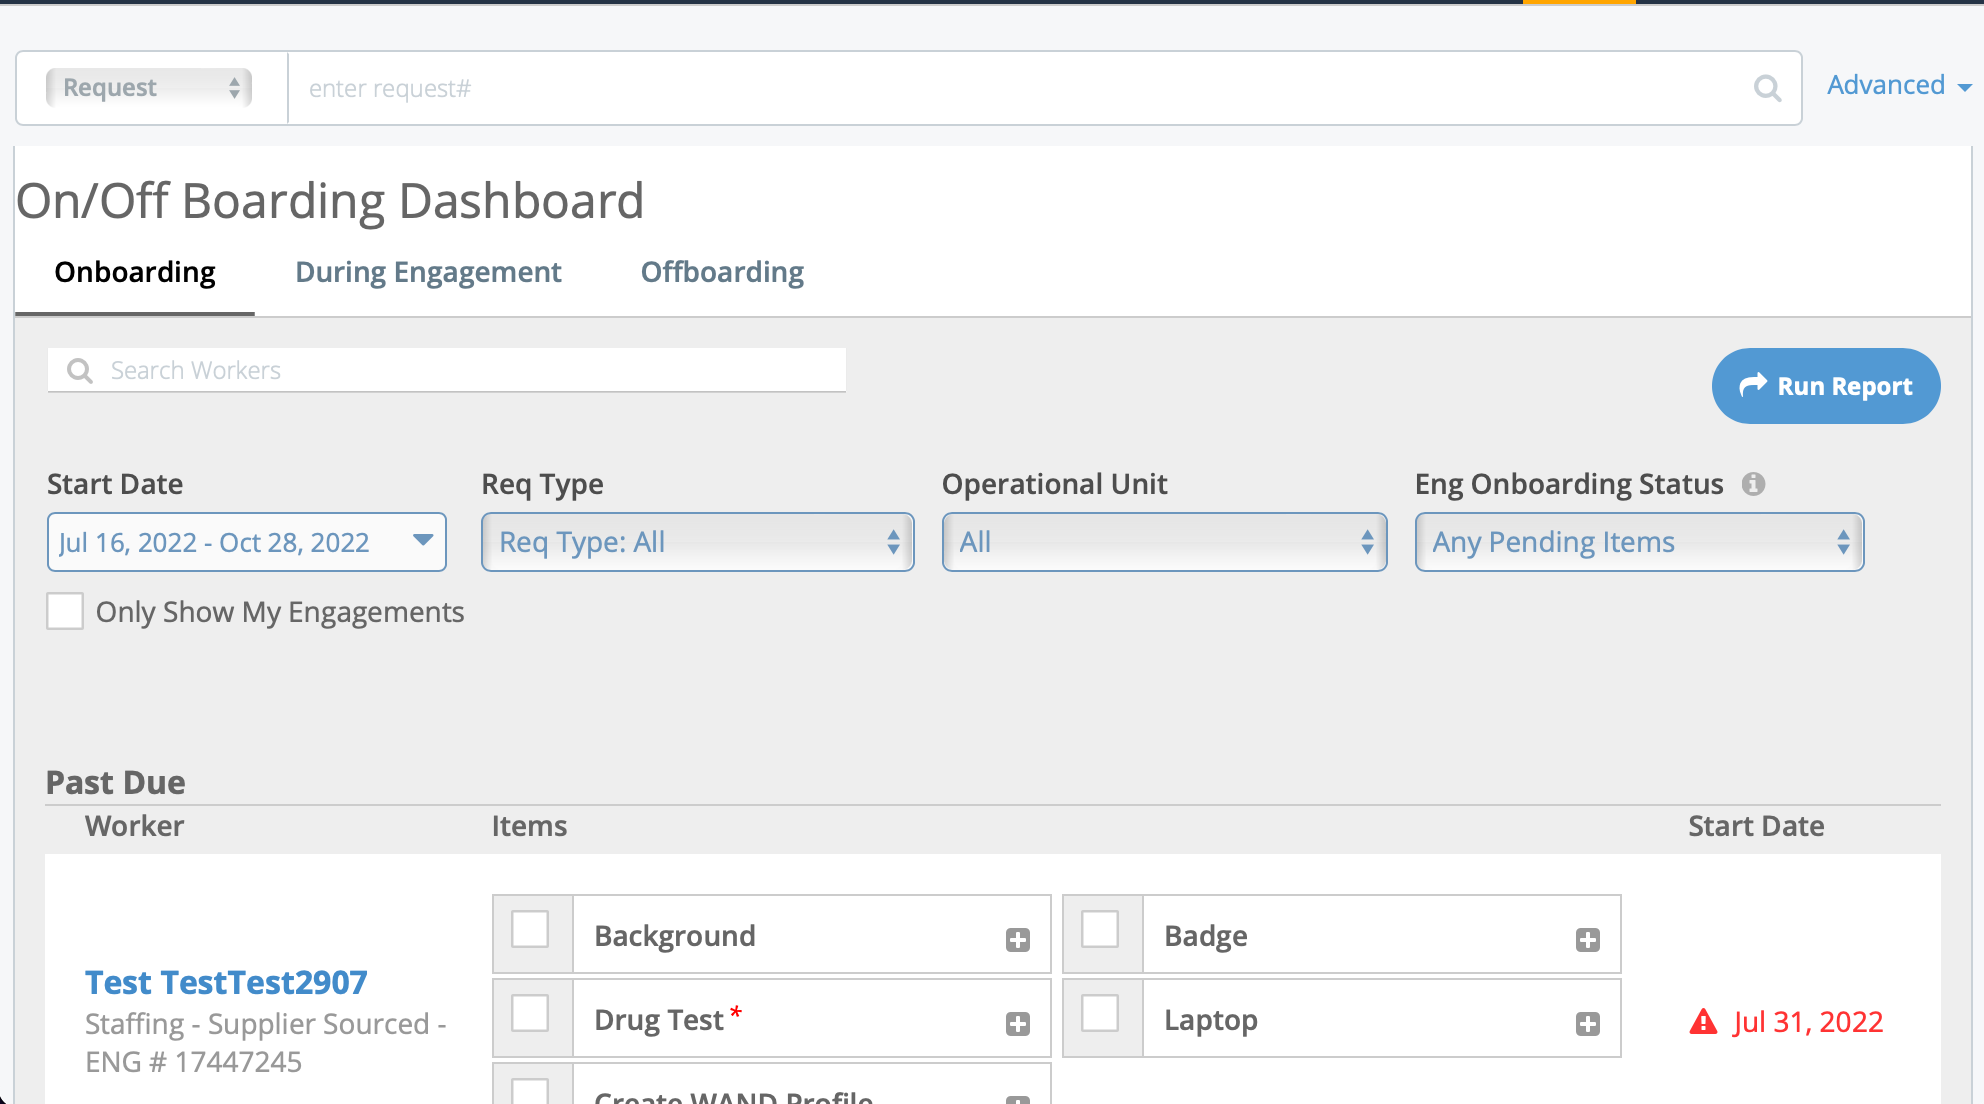
Clicking items for a worker 'completes' the item, and removes it from the list. Clicking the worker's name in this view also opens all of the items for the worker, allowing you to enter details for the item.
Managing Engagements
Filled requests are considered engagements. This means that the work has started, and billing can be added that can be later invoiced to a client organization. There is one unique engagement number per filled position. After onboarding (if required), workers can log into the worker version of the application and log time and expenses. Reviewing these items as they flow through the system could be a component of your program, or you might be required to enter time and expenses for a worker.
Managing billing in the system is done for various reasons, all of which depend on the rules defined by your program. You might be required to enter hours worked for a worker (time), correct incorrectly entered hours for a worker (adjustment), or ensure time and expenses for workers and suppliers/vendors are approved.
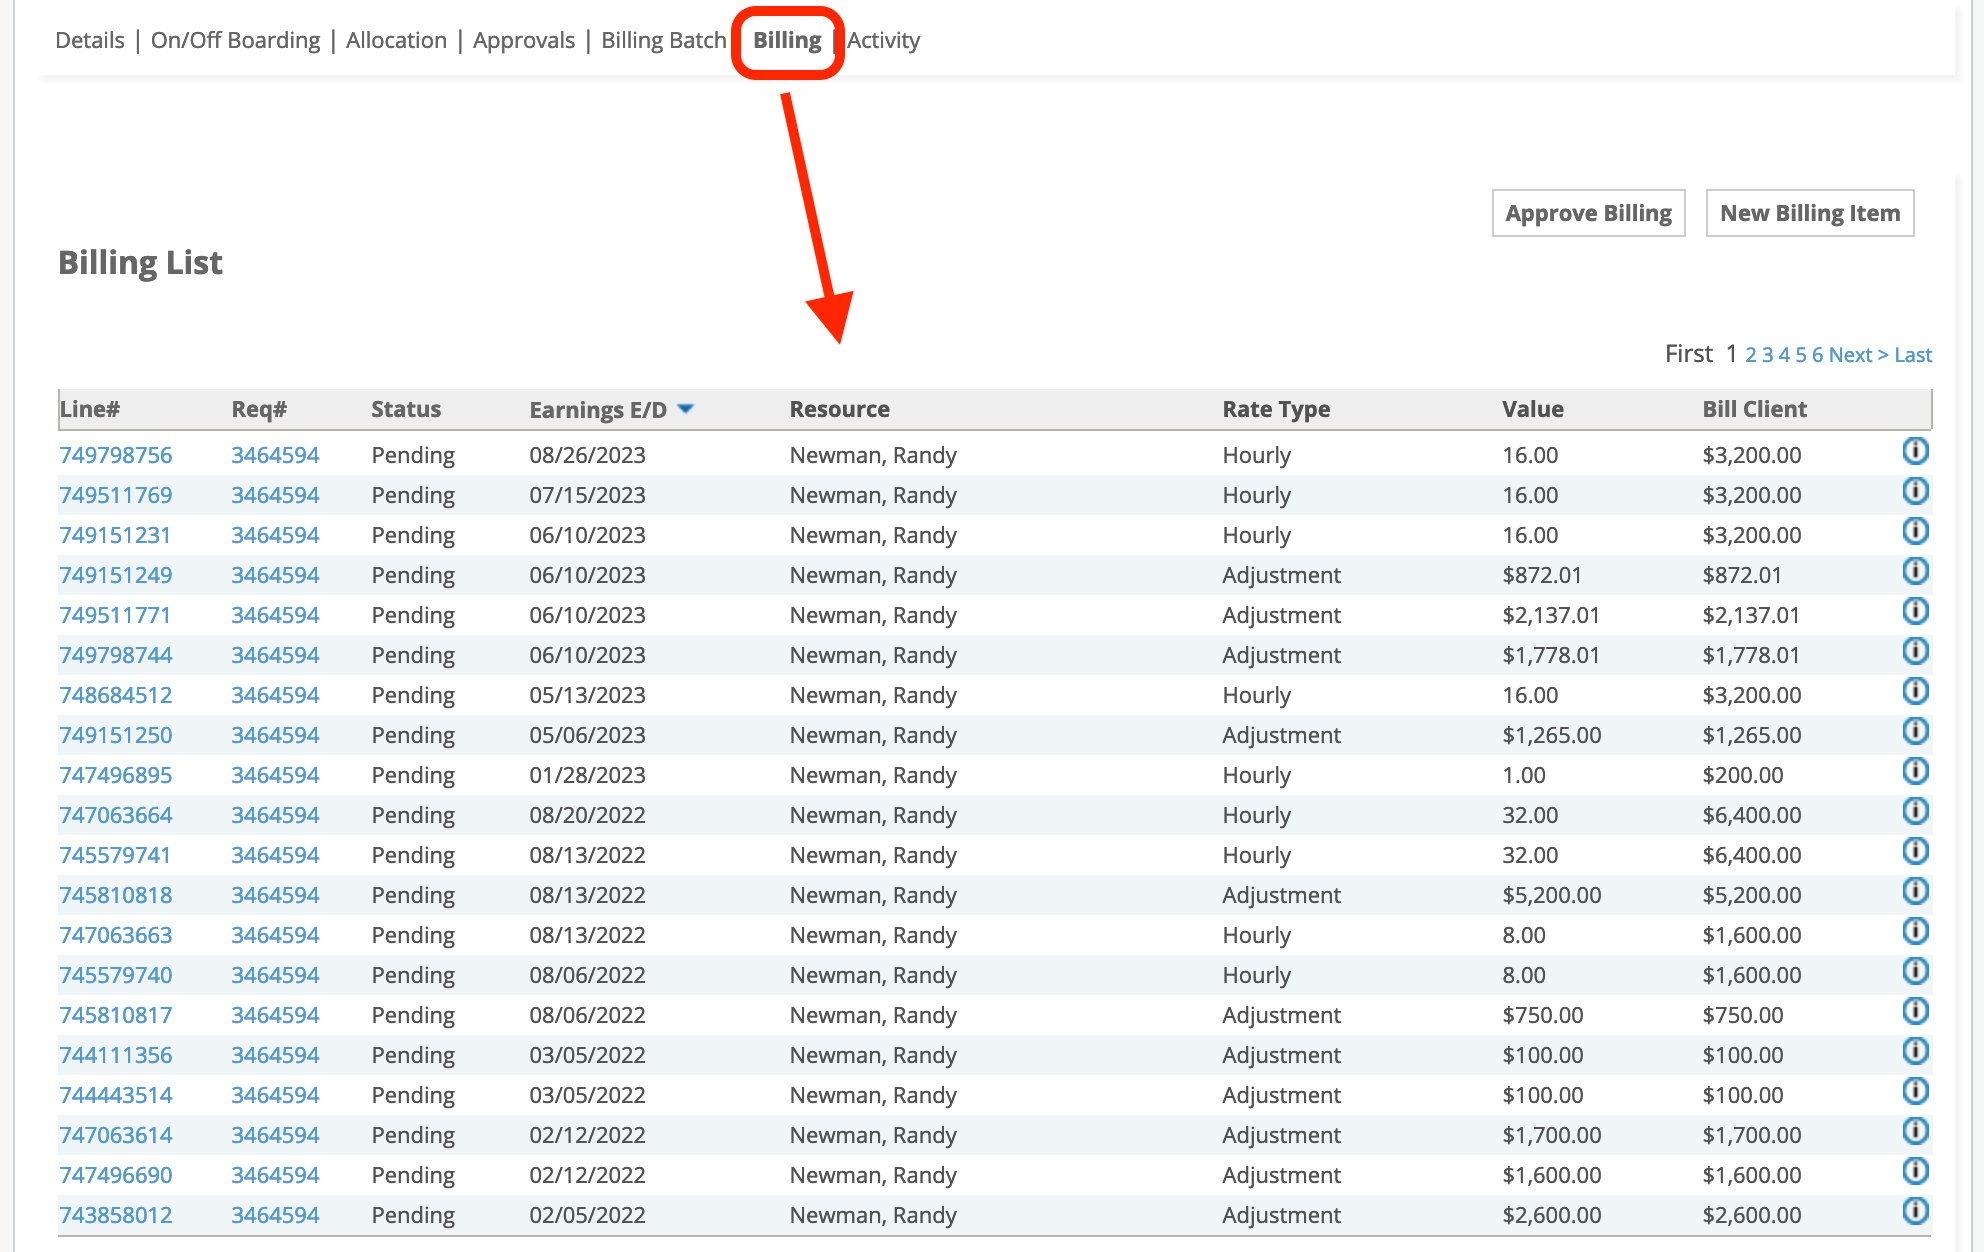
If you have permission to do so, you can enter hours for an engagement at the engagement level. To access this workflow, navigate to the engagement's billing list table (Billing tab). The Billing List table displays all existing billing for any type for the engagement. To add a new item, click New Billing Item and enter the type of billing, the date or date range for the billing.
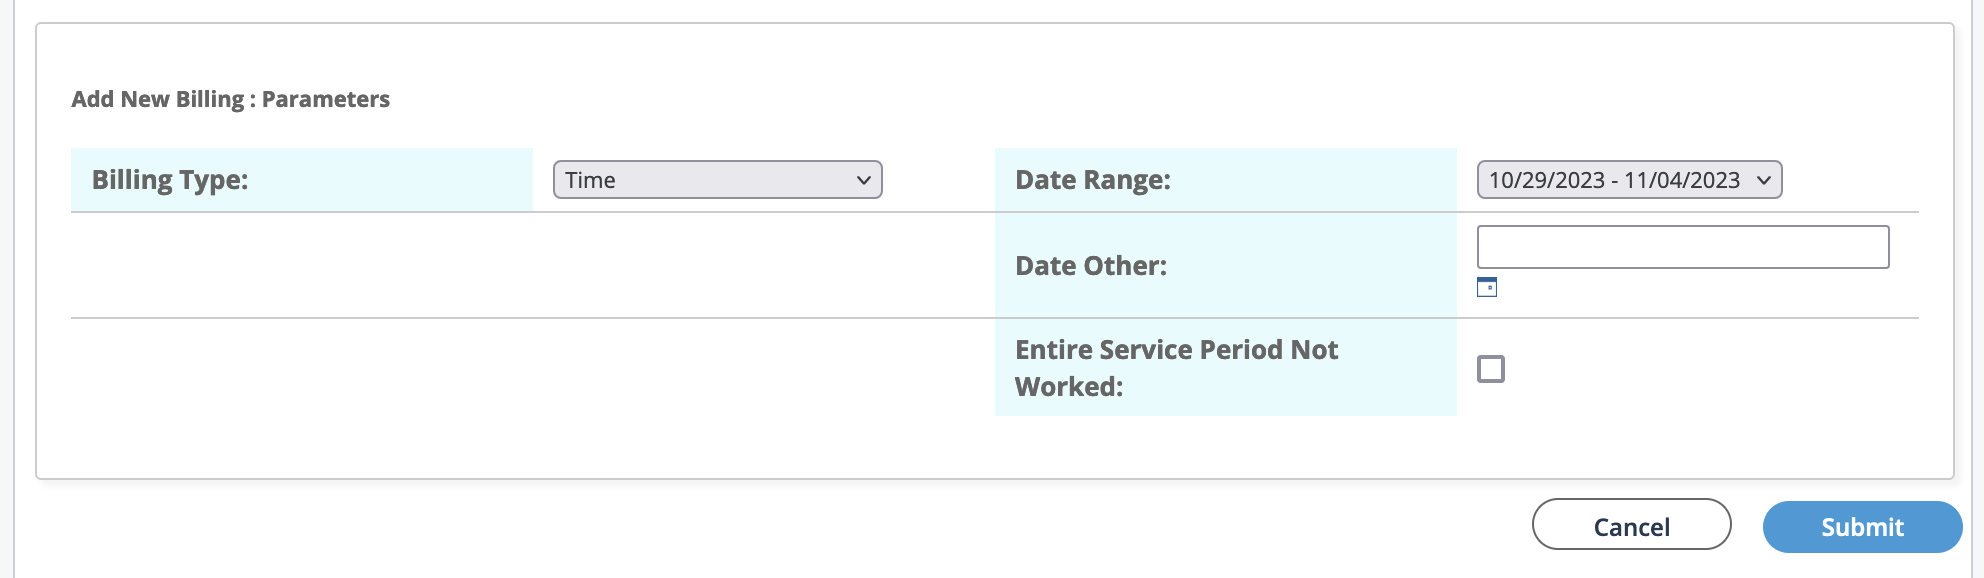
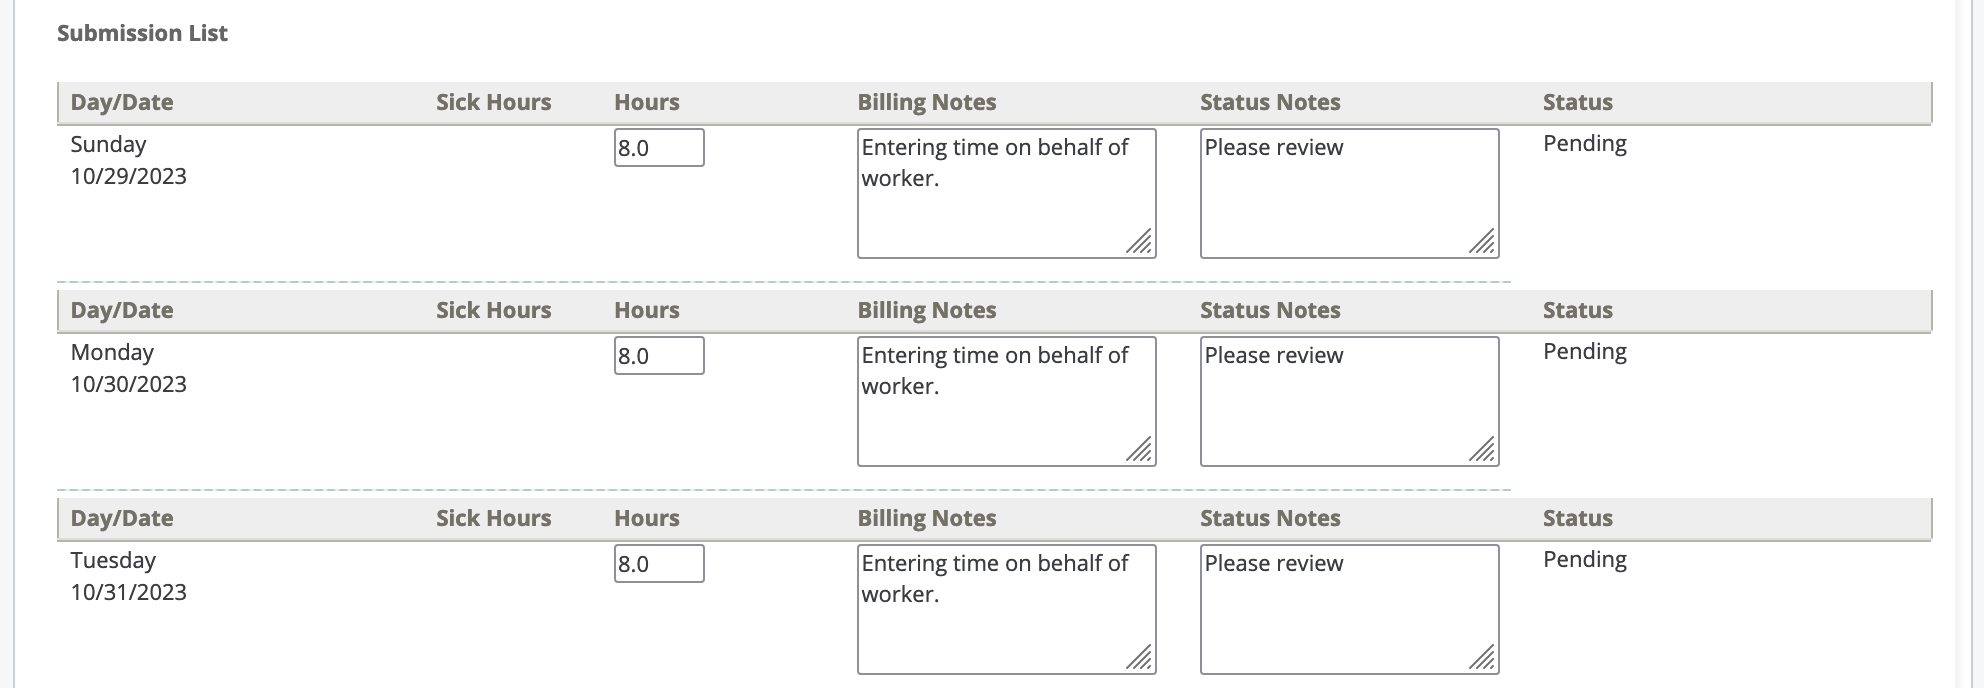
Once the billing details are entered, click Submit. You are then prompted to enter the specifics for each date.
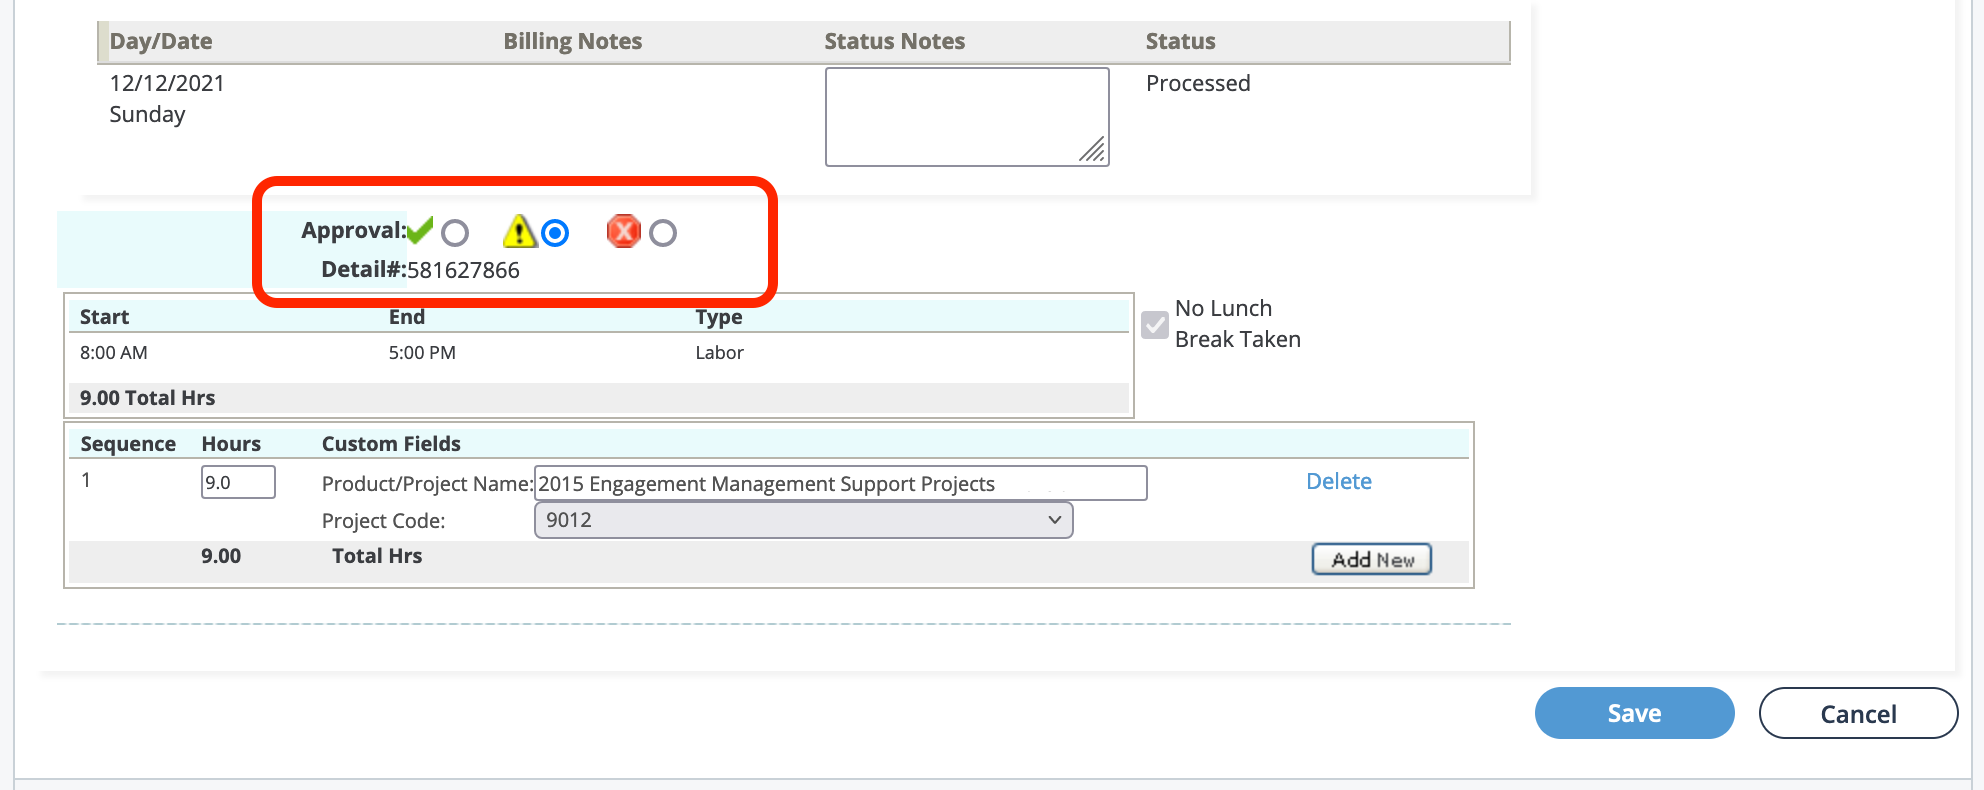
It is important to note that the dates that appear on this screen depend on the timecard type and work period set on the engagement. The timecard determines the entry format for billing (for example, hourly or daily) and other specifics (lunch breaks, time not worked, and so on). The work period determines how the billing is assessed by the system (weekly, monthly, and so on). These settings are configured on the engagement when the request is filled.
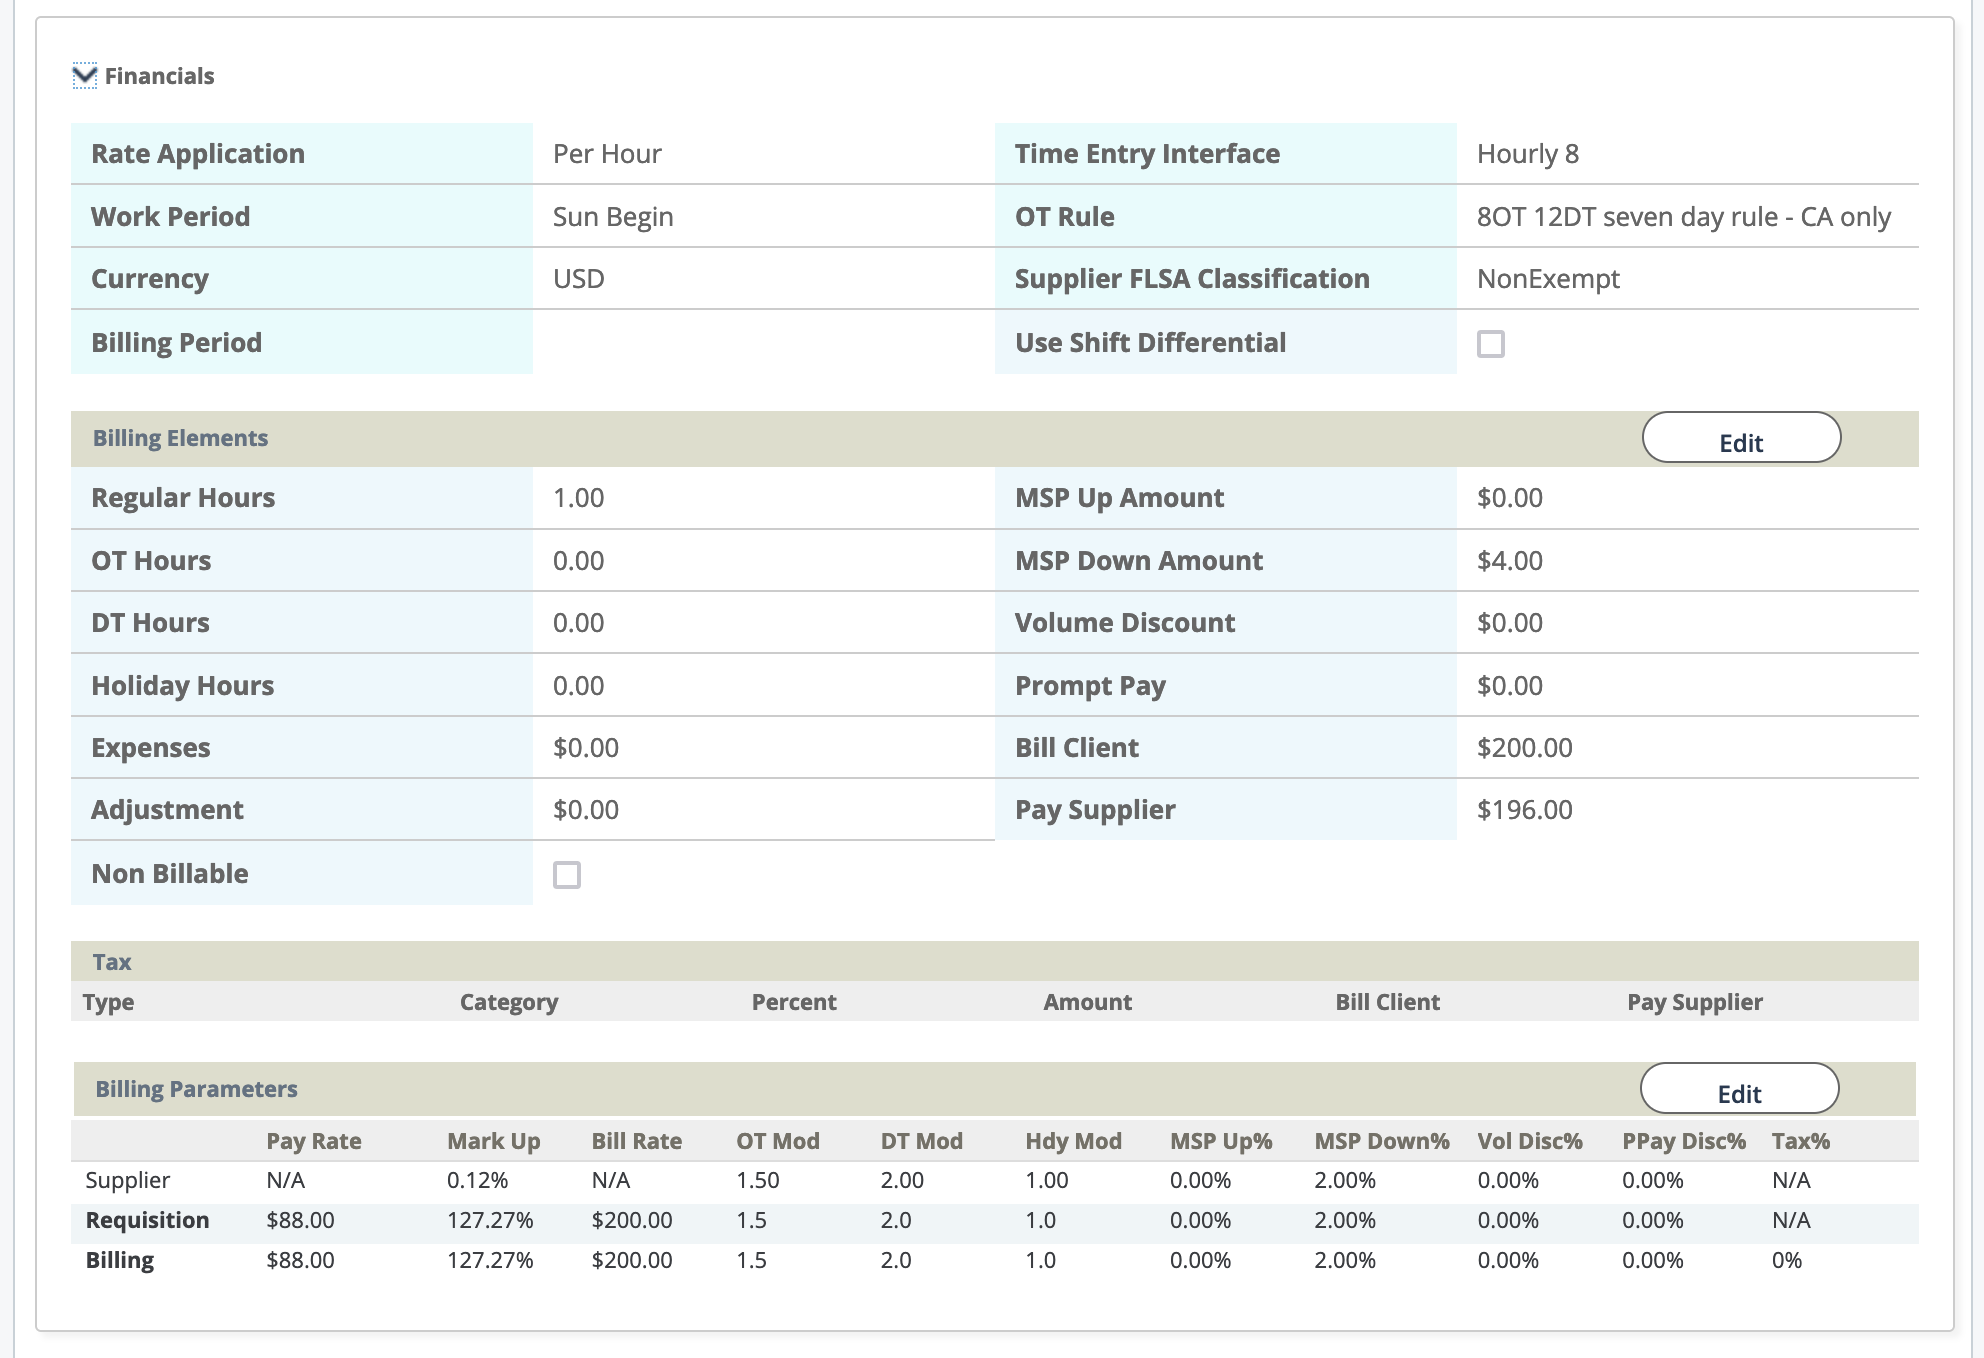
Once the billing is submitted, you can view the details by clicking the 'Line#' link in the Billing List, or anywhere you see the link in the application. Opening the billing details displays general information about the billing item, including the financial settings on the engagement, and system level information.
If your program requires you to review and approve billing, you can also access these actions from the Billing tab. To access these actions, click Approve Billing. A list of pending billing opens. Billing can be approved (or rejected) one at a time or in bulk using the check boxes next to the billing in the table.
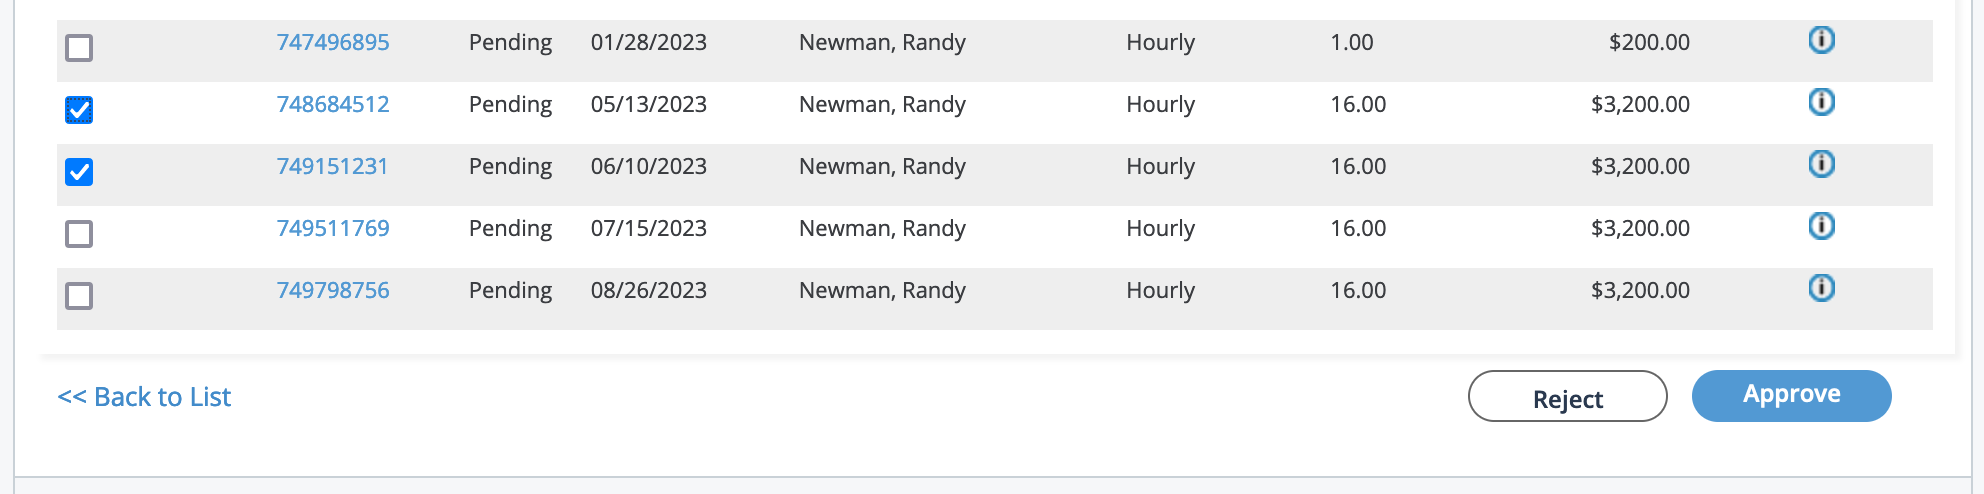
After making your selections, click Approve. If you reject billing, you can reenter and resubmit corrected billing details. If there is a variance detected by the system, a flag is applied to the billing. You can open the billing line item, and approve or reject parts or the entire line (one or two days, or the entire week, and so on).

Reports and Dashboards
The system comes with a robust reporting platform that allows you to locate details for programs that you support and compile those details into various output formats (.pdf, .csv, .xlsx, and so on). Reporting can be used to satisfy numerous organizational requirements, including compliance.
- Standard - Includes filters and settings that allow you to output only specific data.
- Customizable - Includes the same functionality as the standard reports, and also allow you to reorganize the output data. You can also save a customized report under a new name.
The reporting platform includes a library of reports that are available to you. It should be noted that reporting is data segmented, meaning that you can only report on data for programs/engagements that you are assigned to. To access your reports, click the Reporting tab in the top menu.
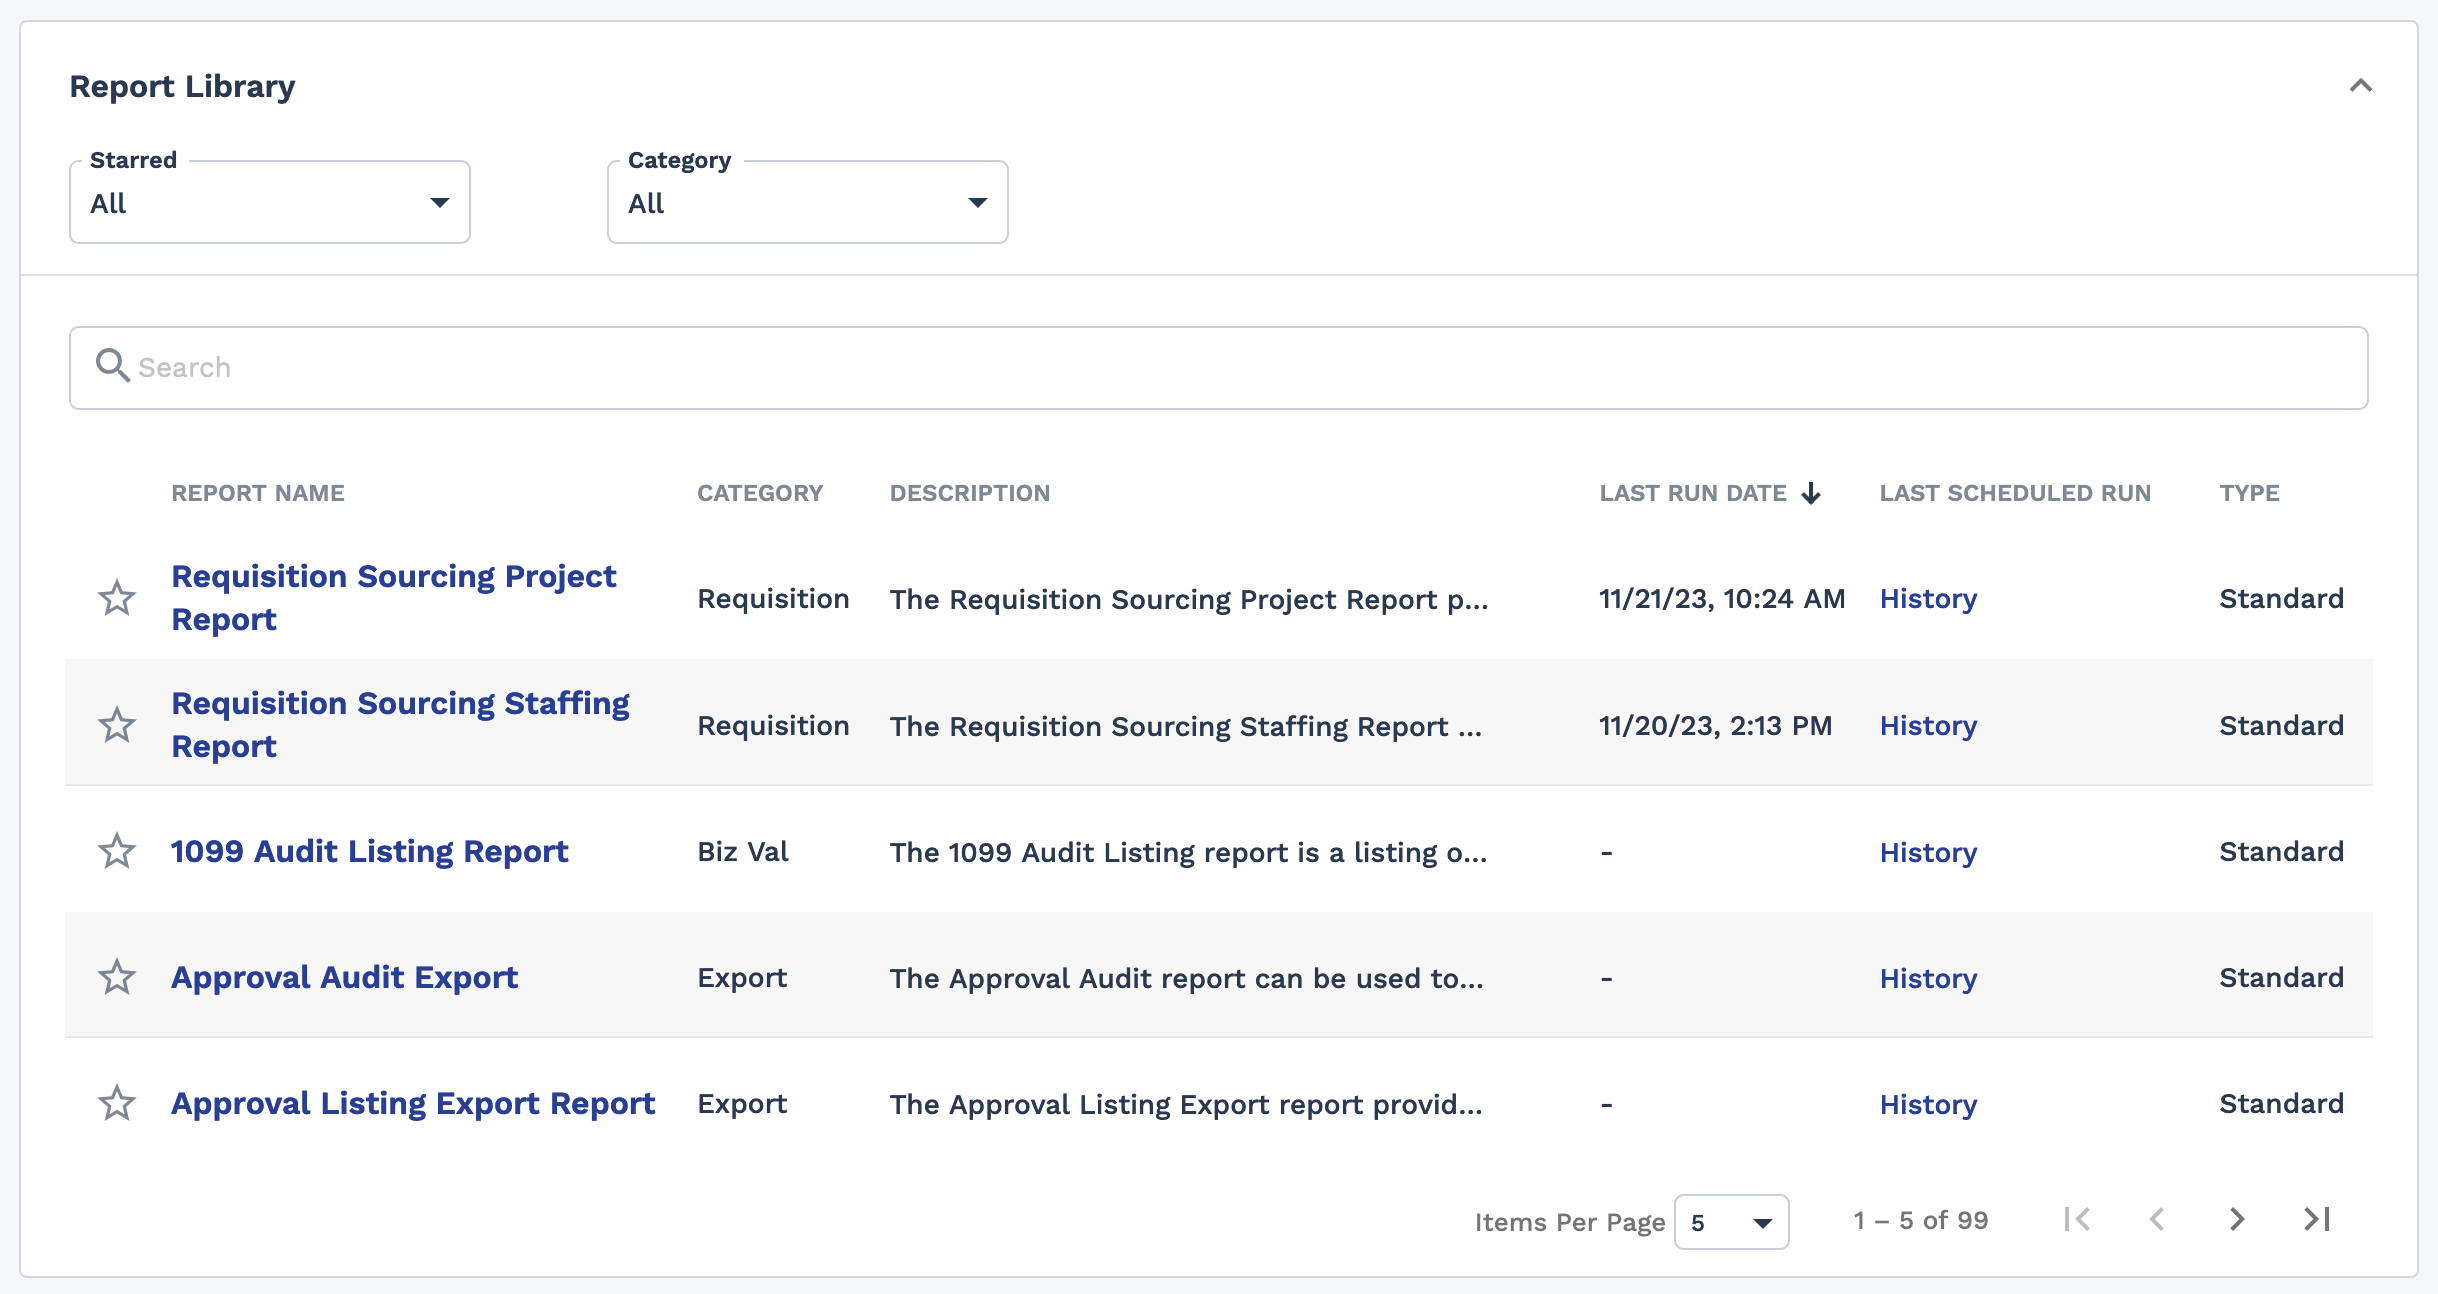
You can access each report by clicking the blue report name link. Some reports can be scheduled to run at a specific time, allowing you to prepare a large report in advance. If a report is scheduled, you can view the last run date in the table. You can also access report run history (previously run data) by clicking the blue history link in the report table row.
To run a report, open it by clicking the link. Withing each report are filters that let you only include data that you need. Filters include drop downs with preconfigured values (for the client organization) suggestive search fields that prompt you to enter text and return results based on the inputs.
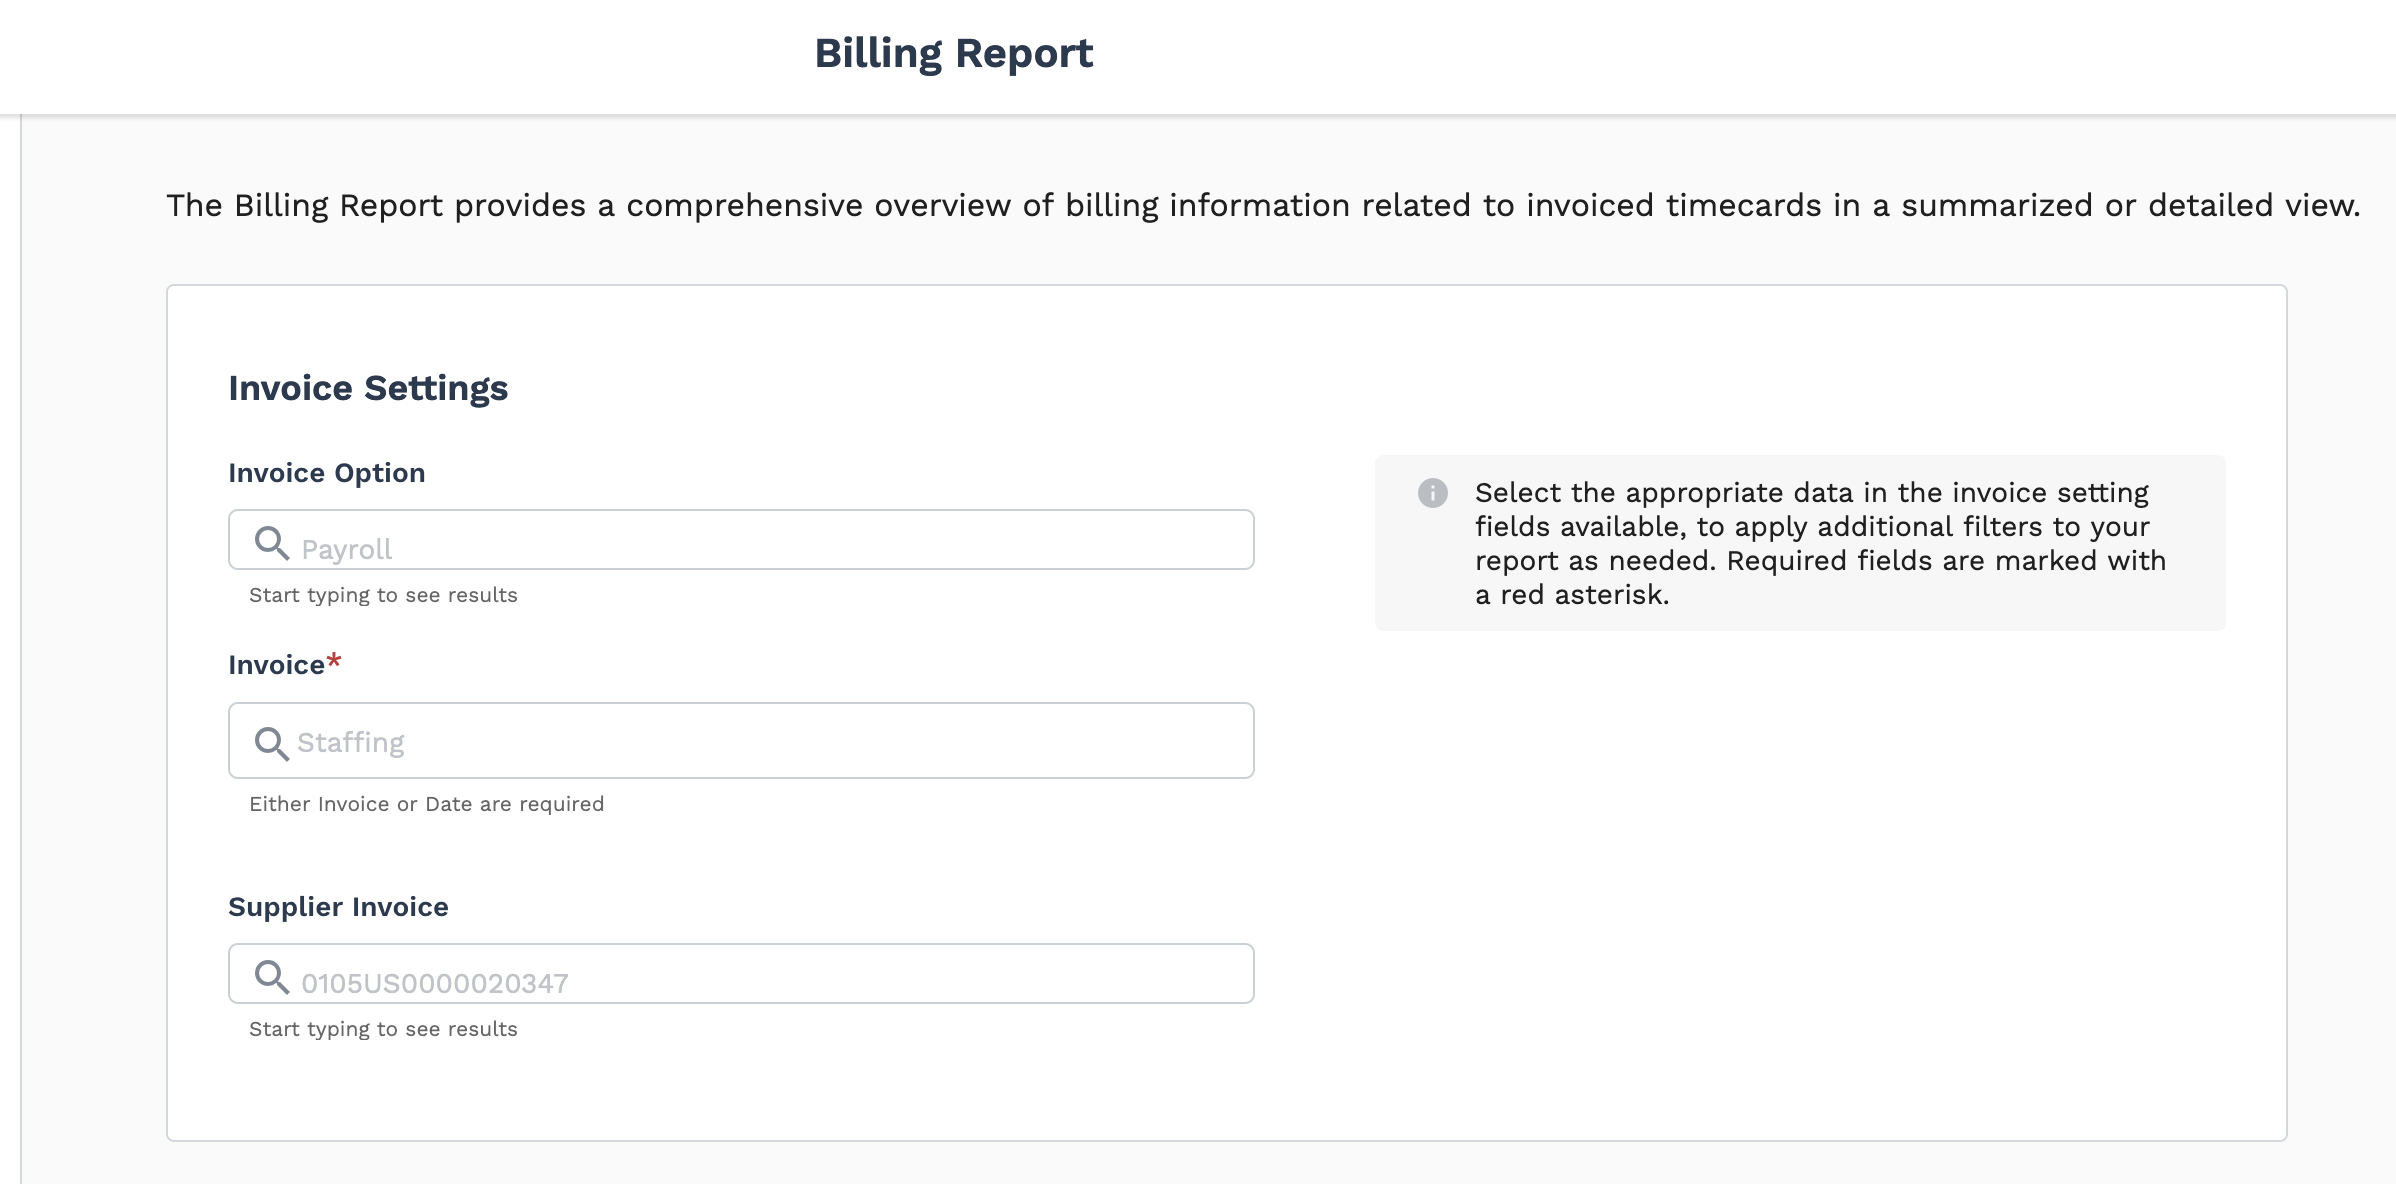
Along with the filter, you can select the report's output format.
The above image displays report output in the .html format. If you choose a file format, the file is automatically downloaded to your Downloads folder. Additionally, if you need to forward a generated report, you can schedule the run, and configure the report to be sent by email to predetermined recipients.
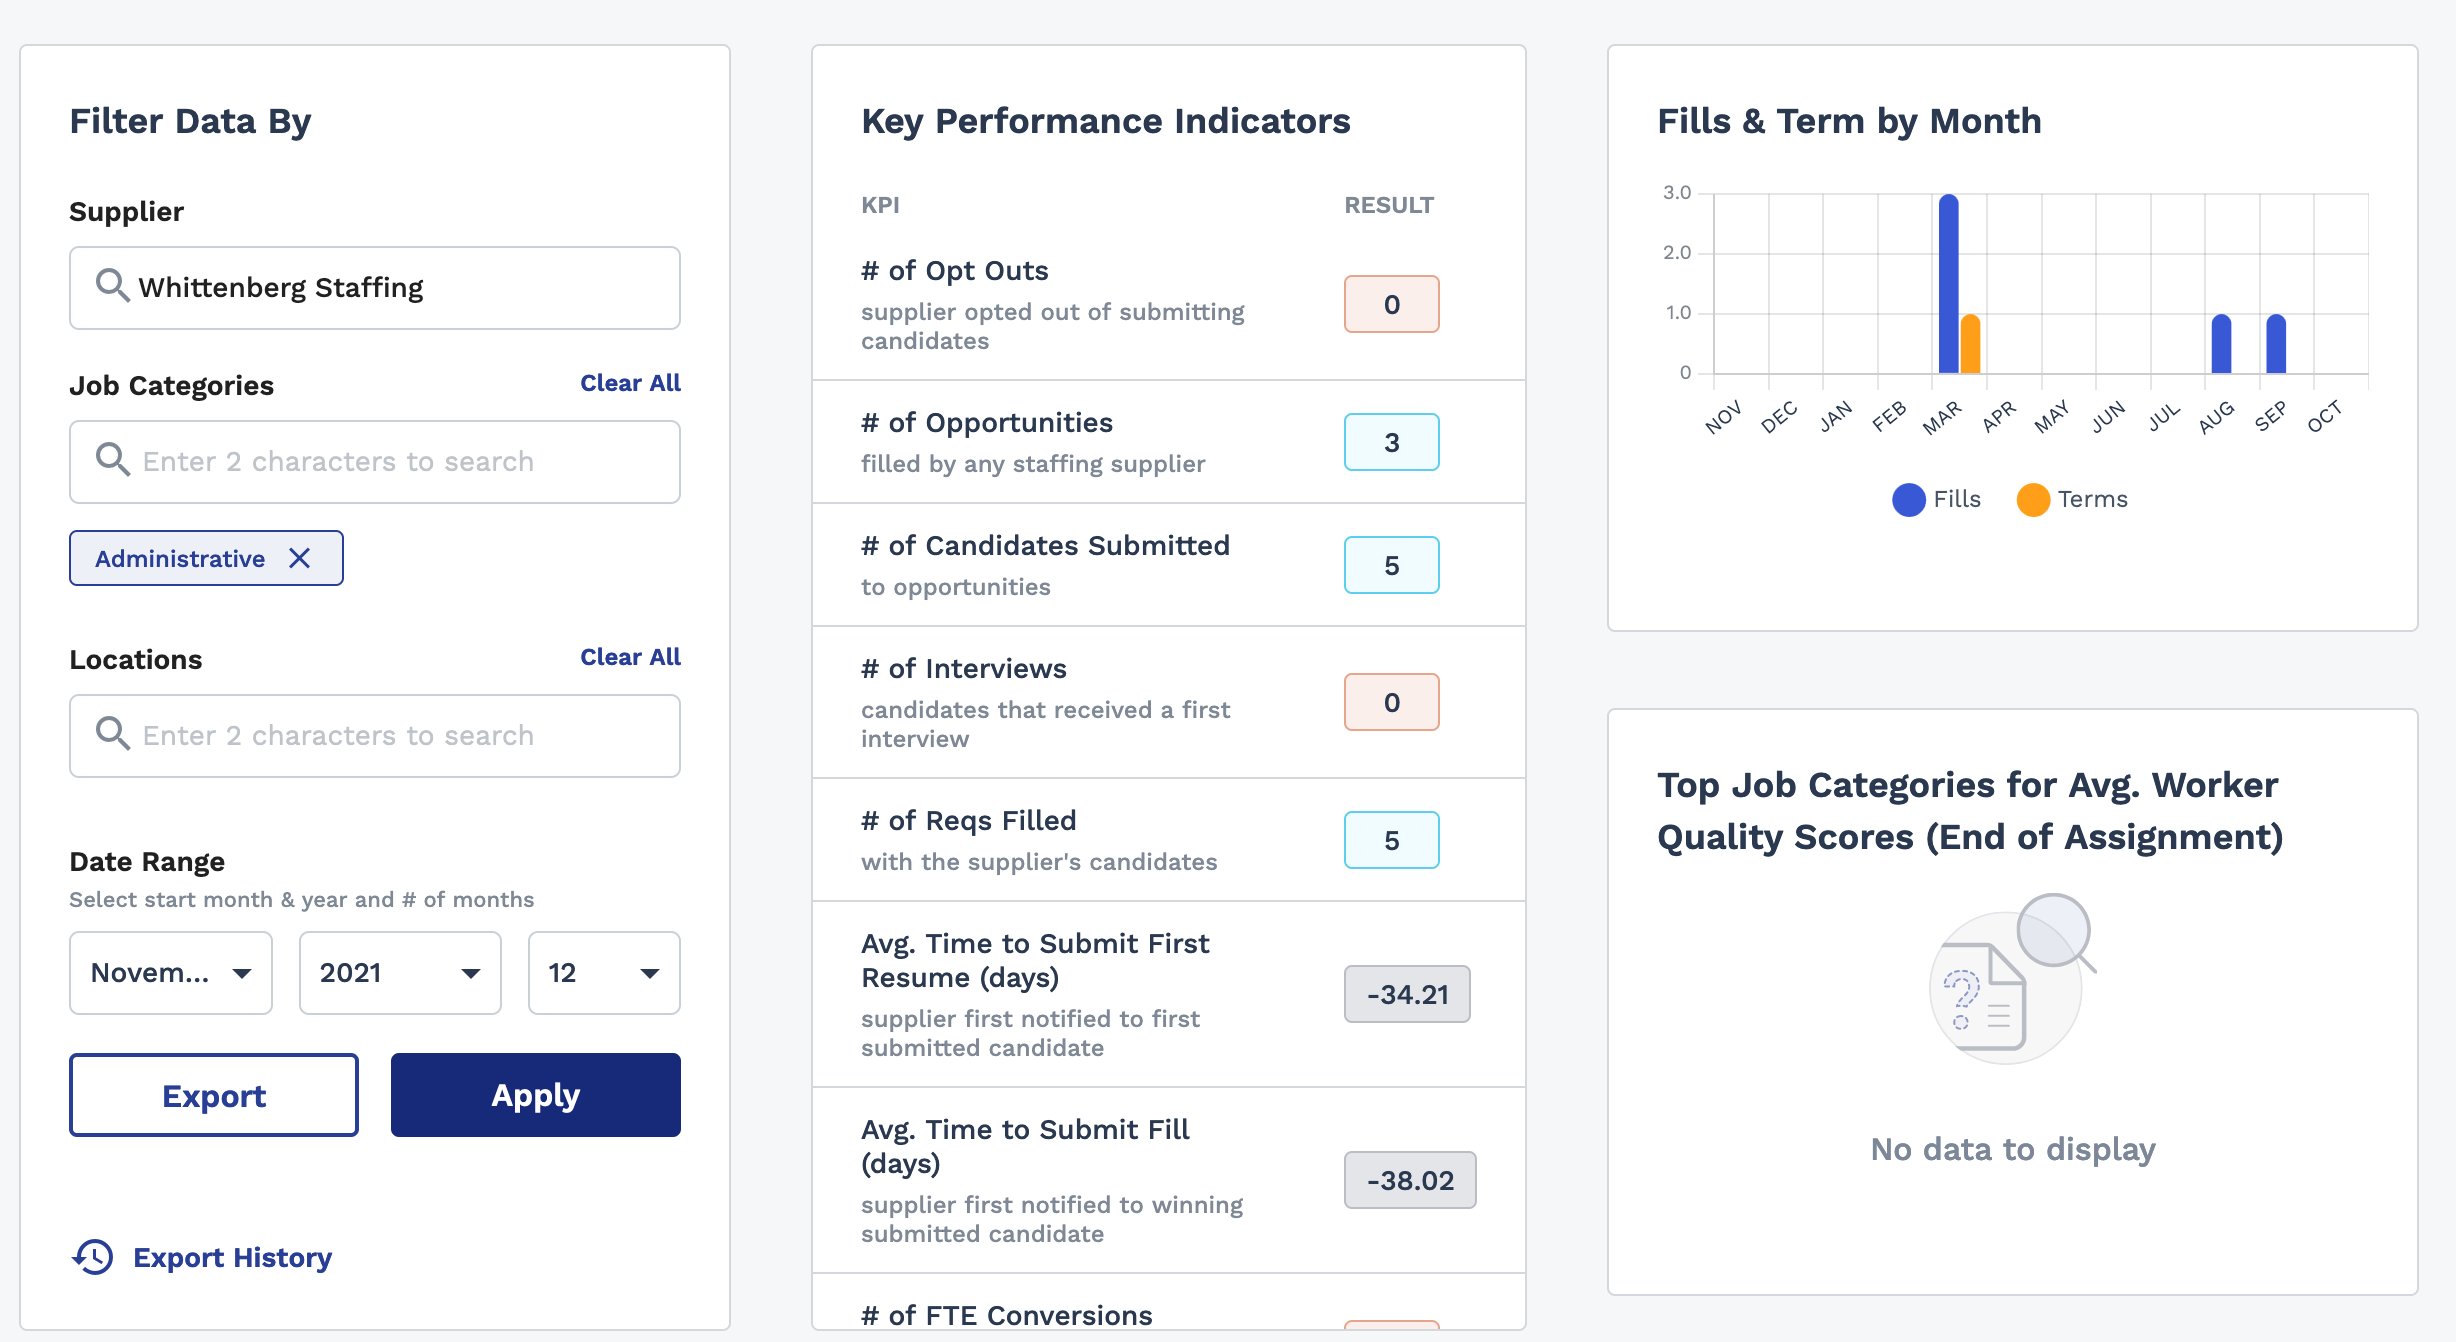
The application also features dashboard style reports with KPIs that can be modified to display required information, such as the Supplier Scorecard.
Client Organization Settings
All application functionality of controlled through the client organization's configuration. This includes all items and data that the client organization (and you) can access. If a client organization is not configured to use, say, Managed Services requisitions, then that request type is not available for selection when creating a request.
The client organization is configured when added to the system. All definitions, business units, users, and custom fields are set up before the client 'goes live'. Information is validated that it is correct, and elicits the correct responses (email notifications. Application workflow (what happens after you take an action) is also configured when a client organization is set up. These configurations include interactions with Approval Routing module, which allows specific approval triggers for client determined actions in the system (budget increases, new hires, changes to requests, and so on). All of these actions are validated before clients are allowed to interact with the application.
All configuration is performed by the implementations and product support teams. Typically MSPs (you) do not have permission to modify a client configuration. There are some specific instances where you might be required to change a configuration that is required by the client. If you need to modify a client organization's configuration settings, you need to make a request through the support portal and work with internal teams to determine if the configuration is correct and/or required.
Based on this point alone, you should familiarize yourself with your program's configuration. Your standard MSP user permissions allow you to view all related configurations for a client organization. If you think a program could benefit from a tool or workflow in the application that they are not using, please reach out to Support.
You can familiarize yourself with a client's configuration by clicking the Configuration link in the application after you log in.
Within the client's configuration you find sections for application interaction and user behavior. You can view client organization specifics, such as the client's general information including the configured countries (locations) set up in the system, MSP organization's contacts, and important addresses.
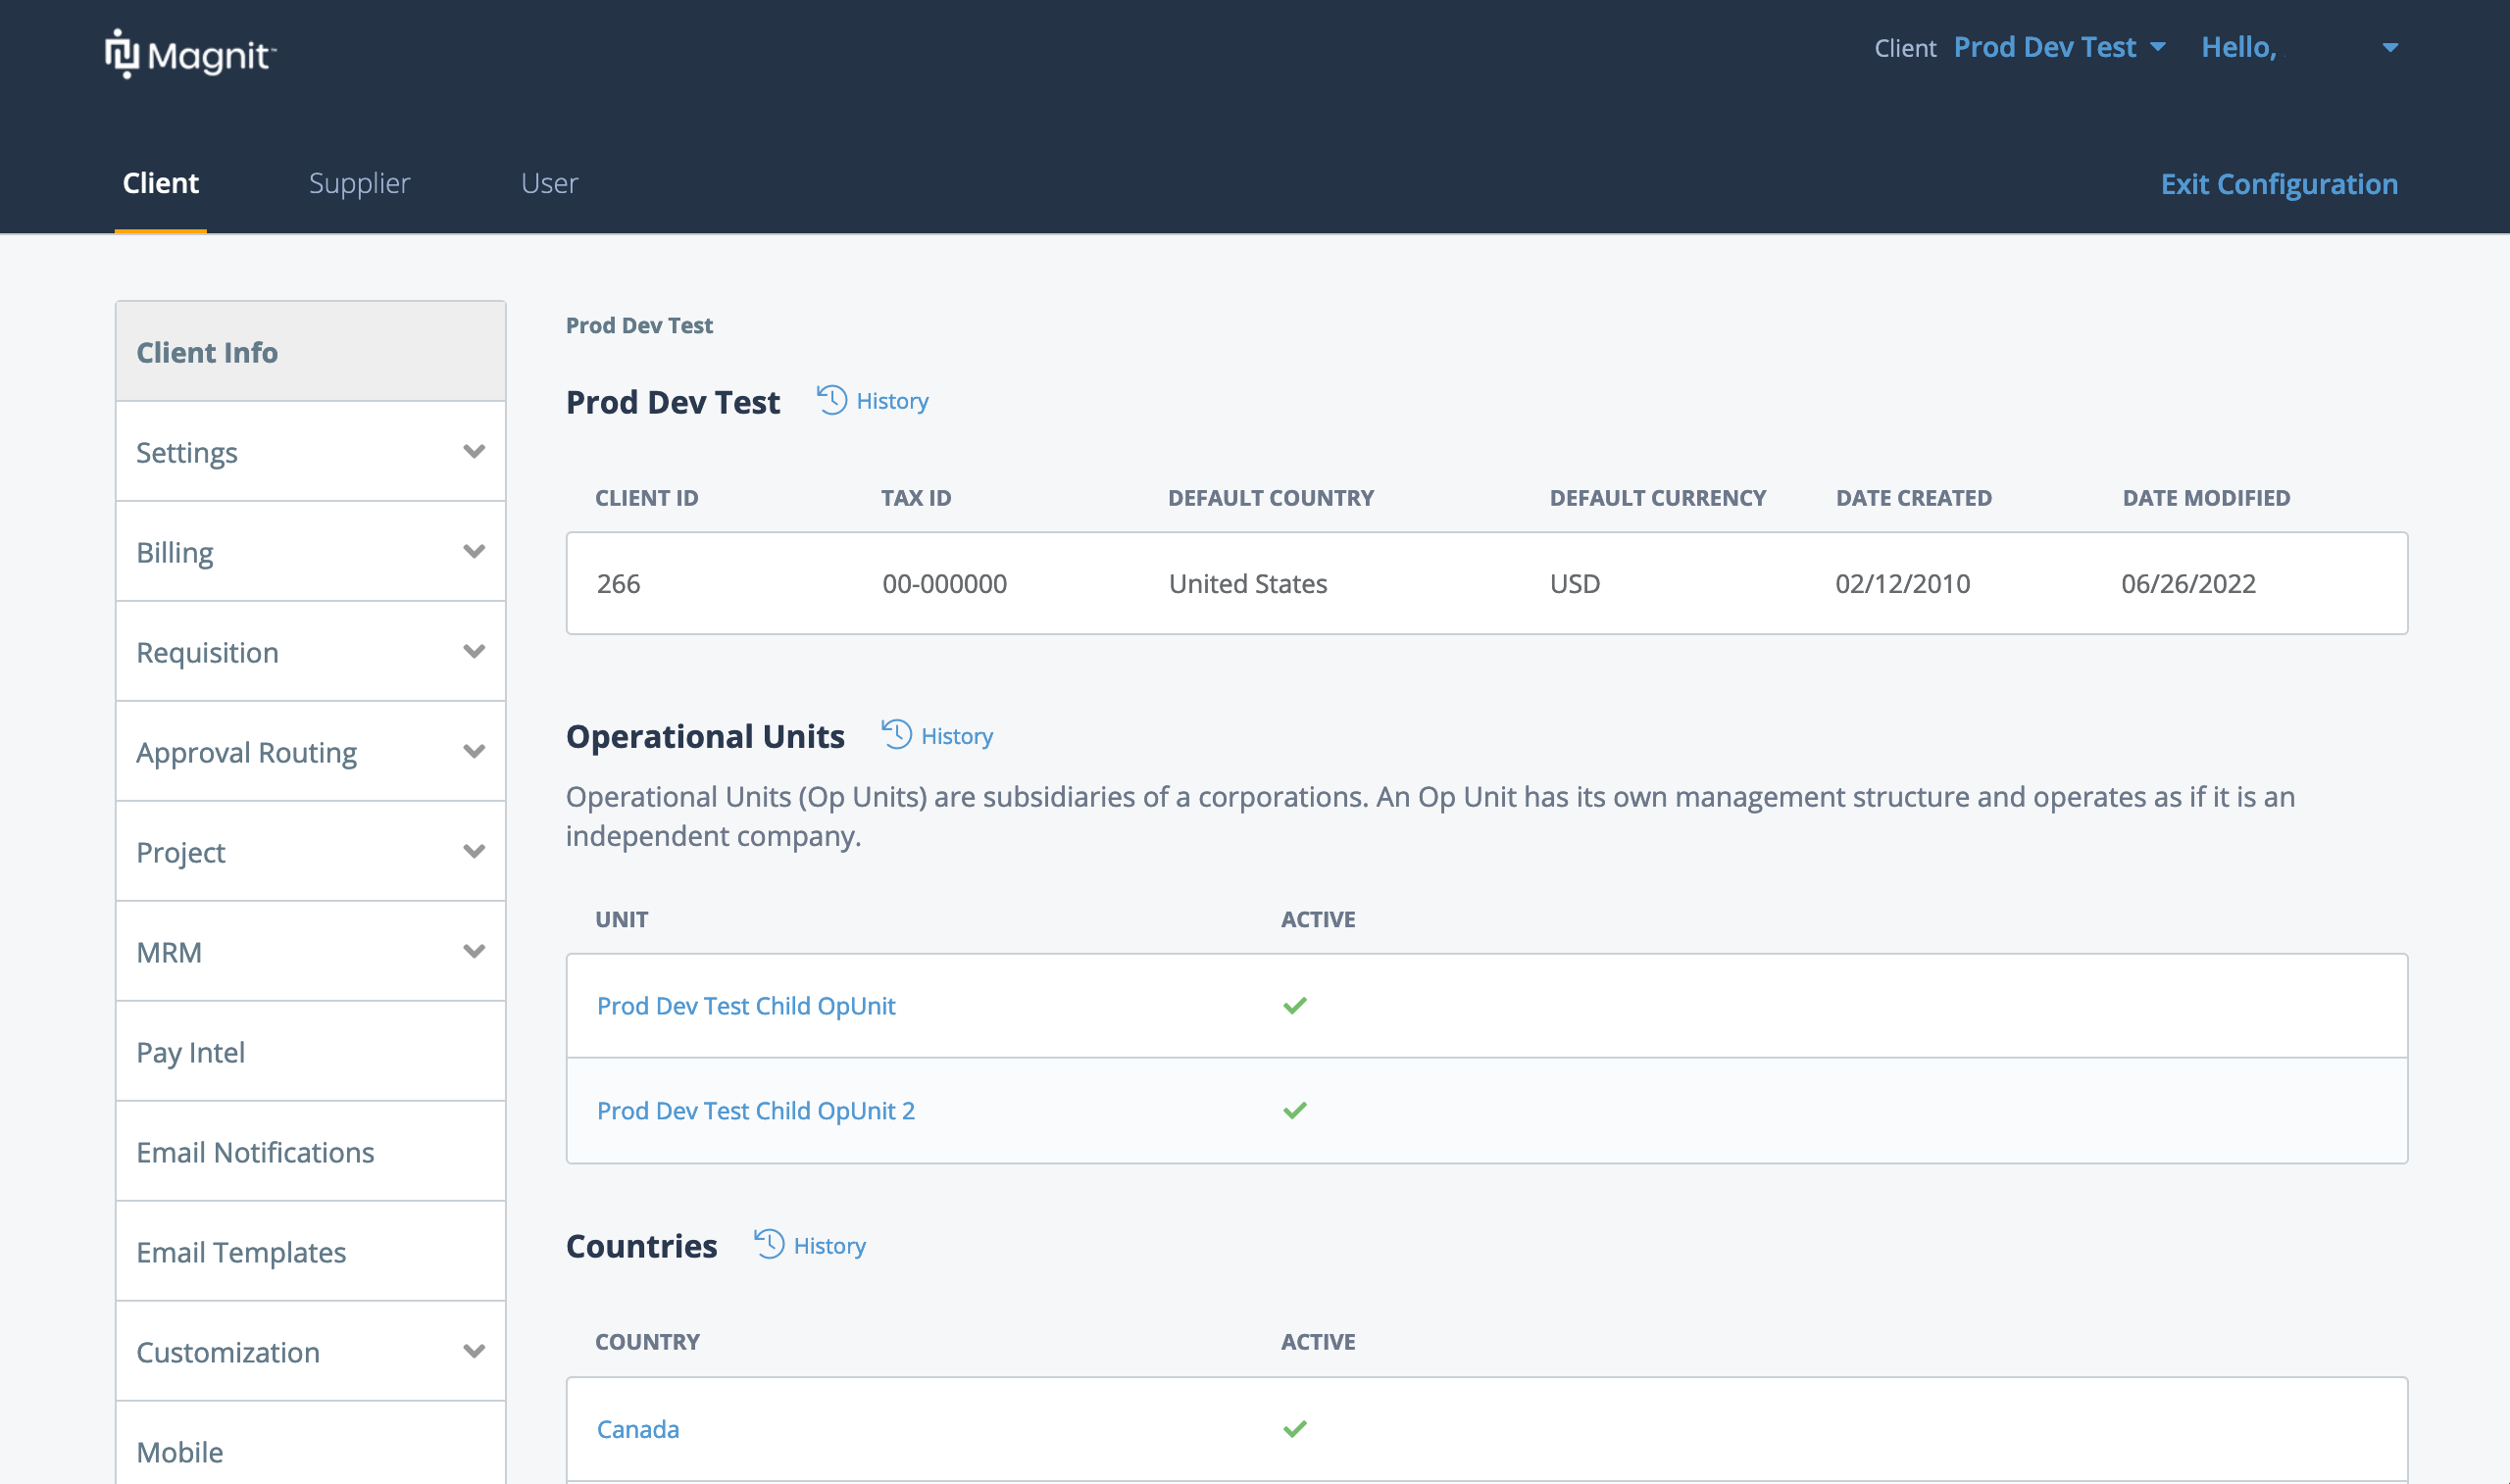
- Settings - Includes configuration settings that control what requisition types a client can use, which controls are available within each req type, controls for client manager users, general email settings, and access security settings. The Settings section is where you can view custom fields and reference lists specific to the client.
- Billing - The Billing section contains the timecard, billing, and fee/expense configurations. It also contains custom invoicing and billing options for the client.
- Requisition - Settings related to job information in requisitions, sourcing considerations, and budget configuration (funds tracking and master budgets).
- Approval Routing - Workflow and rule configuration for the Approval Routing module in the application.
- Email Notification and Email Templates - Notification behavior and template triggering settings.
- Application branding settings
- Settings for the mobile version of the application
- Data integration settings
The Configuration view features a Supplier tab and a User tab as well. The Supplier tab allows you to view all configured supplier/vendor entities associated with a client organization. Clicking a supplier name opens the supplier's general information (business, contact, and location), and the supplier's contract (agreement) details. The supplier agreement is a data collection that describes how the supplier can interact with requisitions in the system, specific to each requisition type. This information is important to review because it determines how a supplier/vendor appears while sourcing a job request.
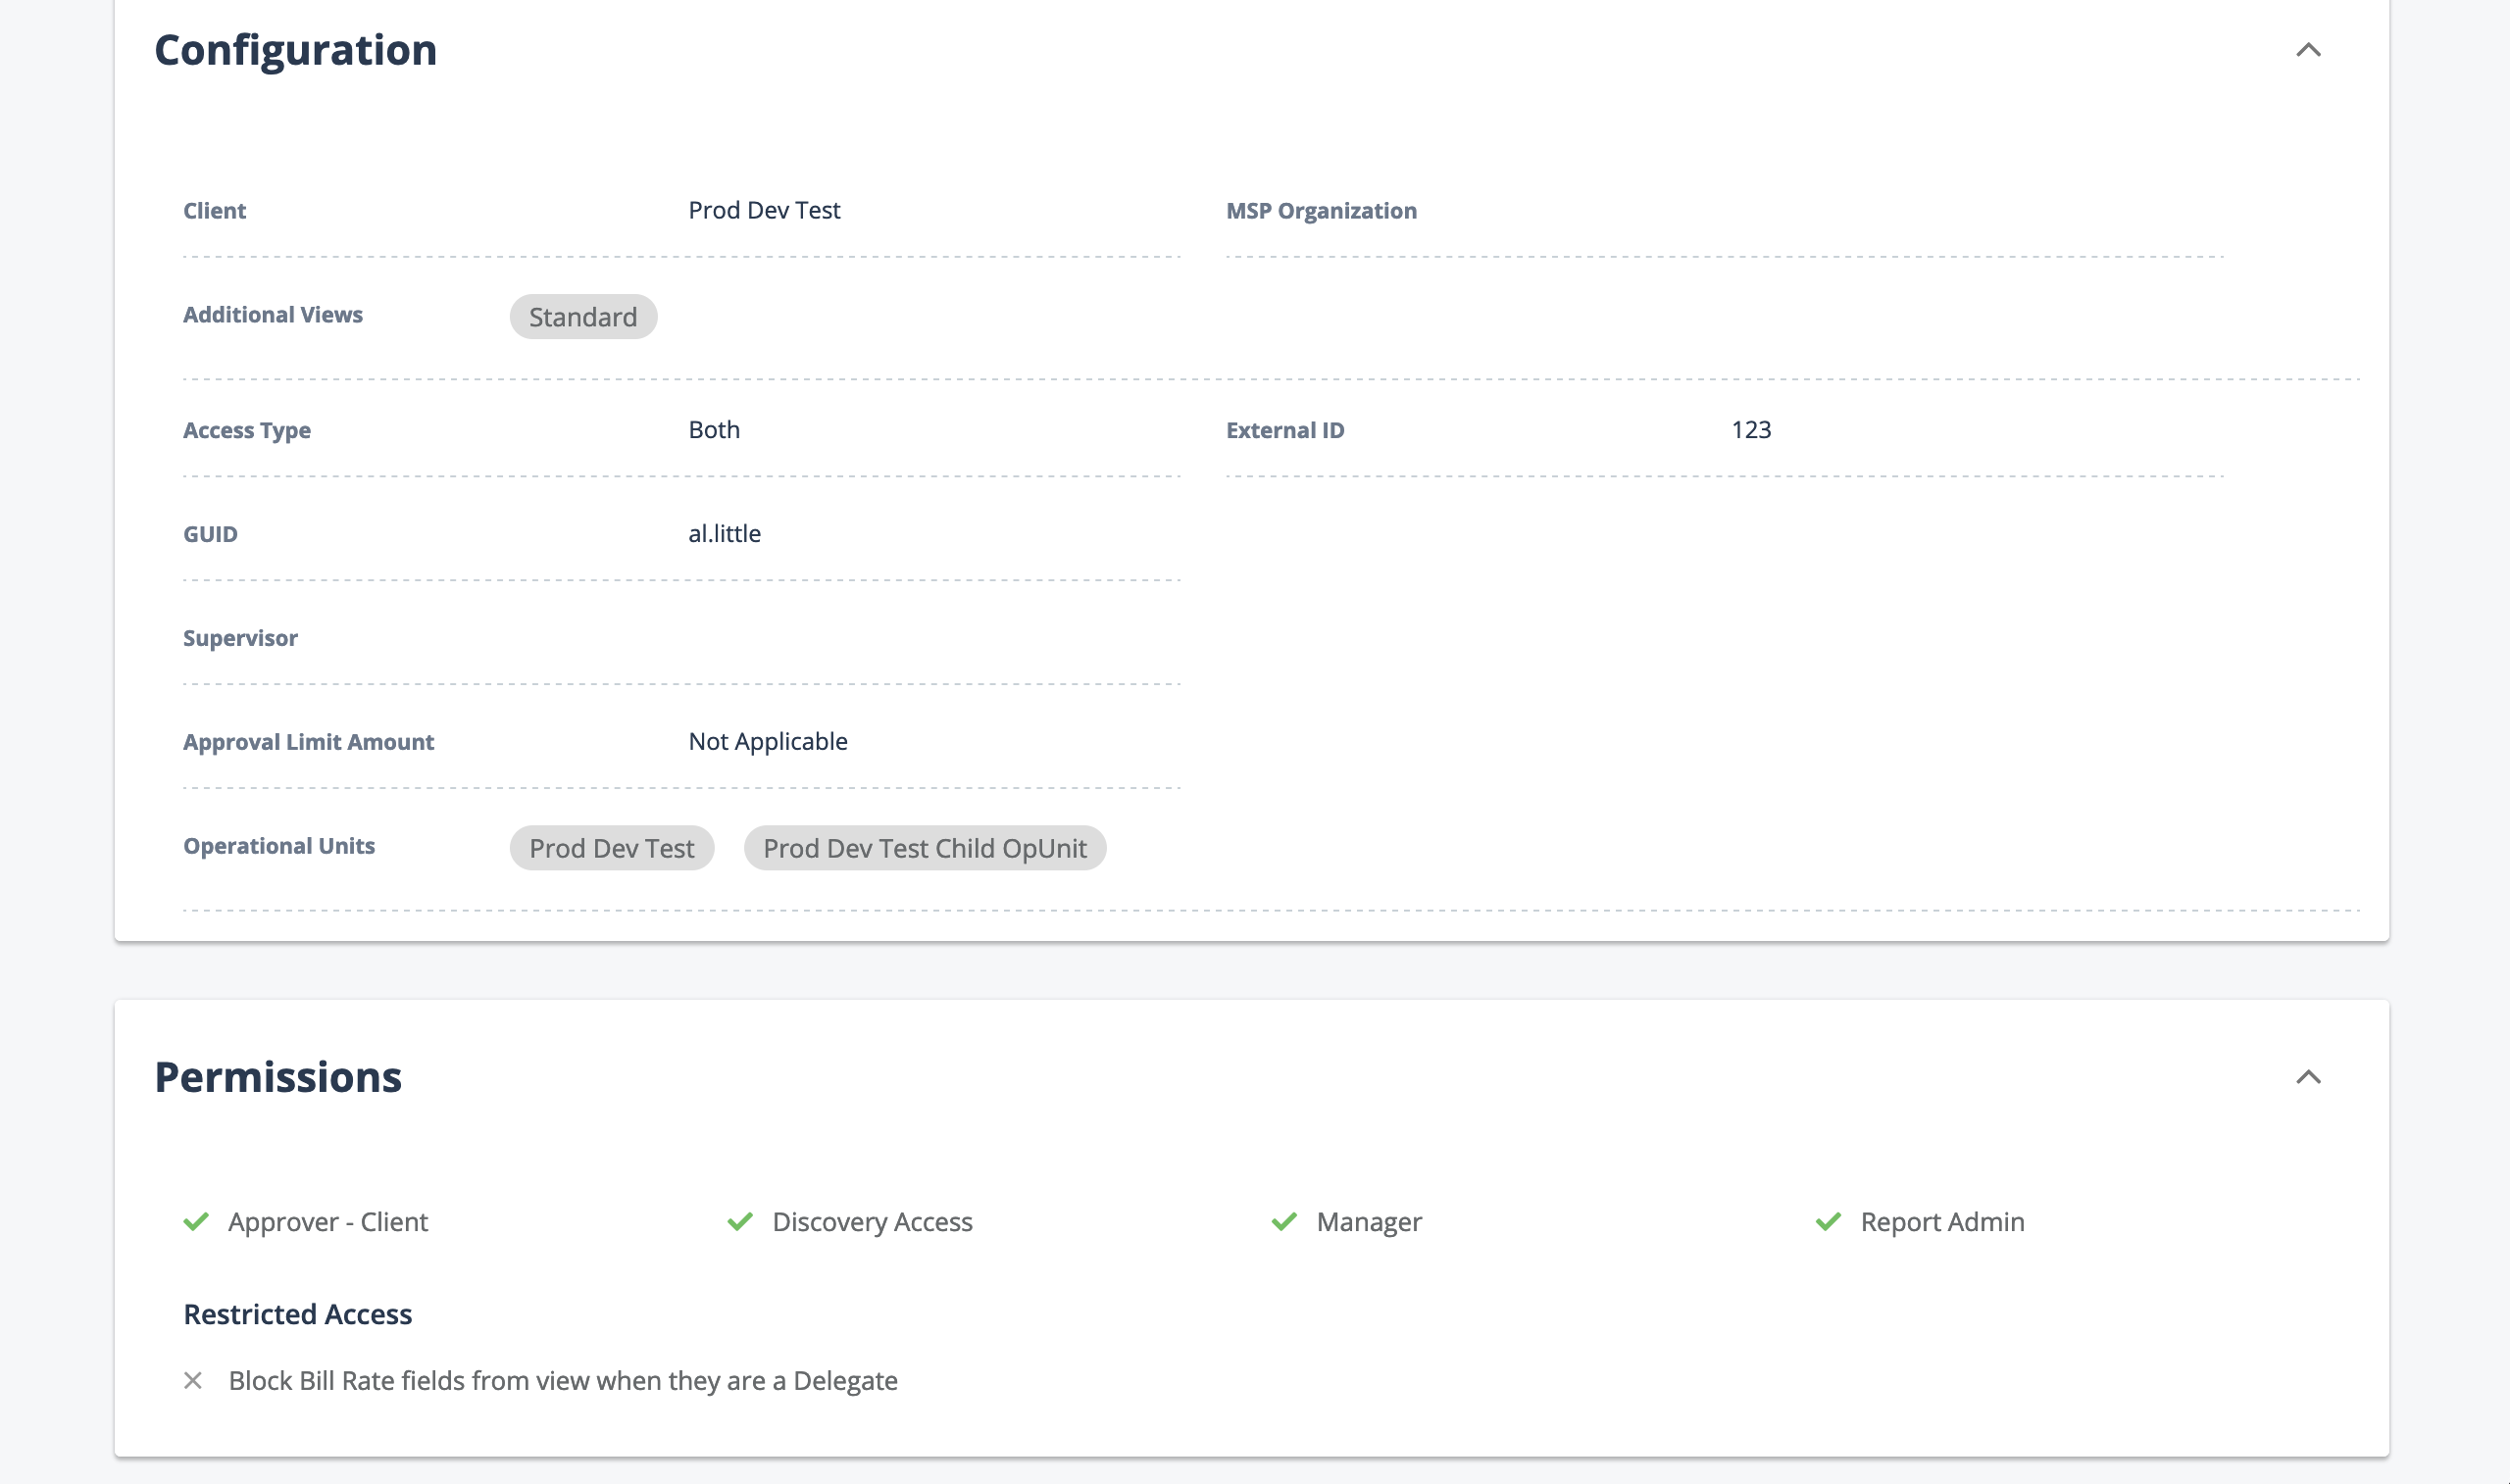
The User tab is a user specific search in the system that allows you to find any manager or supplier user associated with client. You can view the user's account details and permissions using this search.
The User tab is also where you can create a client or supplier user if necessary.