Define a Supplier Agreement
- Client Country
- Client Location (State/Province/City)
- Job Categories
- Navigate to the Clients page on the Configuration view.
-
Click the link in the NAME column for the client whose
information you want to modify.
The Client Info page appears.
- Click the Suppliers tab.
- Click the supplier name to add the contract for.
- Navigate to Service Types.
-
Click
 .
.
-
On the Supplier Details page, for the
Supplier Agreement General Information, enter the
information described in the following table:
Field Description Contact Owner From the drop down, select the owner: - Client
- <msp_org>
This setting determines how up and down fees are applied for a requisition.
Service Type Select the requisition type for the contract, Staffing or Project. Start Date Select the start date of the contract by clicking the date in the pop up calendar. End Date Select the end date of the contract by clicking the date in the pop up calendar. Allow for Offsite Sourcing Only applicable when configuring a Staffing contract for a supplier. If selected, the supplier/vendor populates in the Sourcing section of a staffing request if the following are true:- The requester selects the Offsite Work Location check box on the request.
- The client organization/OpUnit has the Allow Offsite Sourcing option enabled in the Sourcing section for staffing requests.
- The location information configured by the requester matches the configured job location in the supplier contract.
This setting can also be applied to existing contracts on the Locations tab.
Evergreen? Select this check box if the contract does not have an end date. Default MS Supplier Only appears for Managed Services type contracts.
Select this option to make the supplier default for Managed Services engagements. Selecting this option automatically populates the supplier/vendor in the Supplier field in the request creation workflow.Note:You can only select this option for one Managed Services supplier contract for a client organization. If you select this check box and attempt to save on another supplier contract, you receive an error.Allow Workers Assignment Only appears for Managed Services type contracts.
Allows a supplier/vendor with the 'Headcount Tracking Workers Assignment' permission to add workers and manage request/engagement details for a Managed Services request.Note:The 'Headcount Tracking Workers Assignment' permission is not visible for configuration on a supplier's user account until this setting is enabled in the Managed Services contract. See Supplier User Permissions.Note:The 'Allow Workers Termination' setting is disabled until this setting is enabled.Allow Workers Termination Only appears for Managed Services type contracts.
Allows a supplier/vendor to change the status of a worker (remove worker) from an engagement. See Manually Close an Engagement.Service Description Information only. Enter free text that describes the contract. Payroll Email For Payroll type contracts. Enter the contact email address when notifications are triggered by activity on payroll onboarding and expense billing items. Note:Does not display for payroll contracts configured under Magnit-affiliated MSP organizations.Payroll Supplier can edit OT Rule on Workers For Payroll type contracts. Select the check box to allow a payroll supplier user to edit the OT rule on a worker record. For more information about OT rule application, see Overtime Rules Application. Note:Does not display for payroll contracts configured under Magnit-affiliated MSP organizations.Contract Number Enter the contract number for the supplier. This value can be any alphanumeric value. The supplier contract number is an internal number used to associate the supplier with the supplier in the application, and is not required.
Sourcing Email Alias Enter the default sourcing email alias. Note:Although this field is optional, it is recommended that you provide this information. If you have requisition with job category where the notification is not assigned at the supplier user level, and this field is empty, the supplier is not notified of the pending requisition. For more information about assigning email notifications to a supplier user, see Supplier Email Notifications.Office Number For Magnit-affiliated MSP organizations only. From the drop down, select the office number for the contract. This value is used to sync the contract information with Magnit's ERP.
Timecard Email Alias Enter the email address of the supplier to be notified if missing timecards for a billing period are detected. This email notification is enabled for the client organization in the Email settings. For more information about this setting, see Email Settings.
Expense Email Alias Enter the email address of the supplier for expense notifications. Mailing Address Enter the mailing address of the supplier. Address Line 2 Enter any additional address information for the supplier. Country Required field. From the drop down, select the country where the supplier that is servicing the contract is located. State/Province From the drop down, select the state or province where the supplier is located. City Enter the city where the supplier is located. Postal Code Enter the postal code for the supplier's location. Billing Address If the supplier's billing address is the same as the supplier's mailing address, select the Same as Above check box. Warranty Enter a text description of the warranty. Conversion to Employees Enter a note about conversion to employees. Billing Submissions Using the check boxes, select the types of billing items that can be submitted by a worker or supplier under the contract to the client organization. - Adjustments
- Project - Only applicable to a project contract.
- Benefits
- Expenses
- Time
- Modify Billing Filters - Allows the supplier change the billing filters, enabling or disabling the billing item from view to the specified user groups.
- Billing To Filter Expenses - Forces the expense billing item, after being approved by the supplier, to be routed to the MSP to be approved before being routed to the client manager to approver.
- MSP To Filter Expenses - Forces the expense billing item, after being approved by the supplier, to be routed to the MSP to be approved before being routed to the client manager to approver.
MSP Fees Fees are a percentage of each request or for staffing requisitions, a percentage or flat fee for each request, based on which party owns the contract (up or down). Using the radio buttons, select either Percentage or Flat Rate (monetary units per hour), then enter the following:
- MSP Up Fee - Enter the additional fee to the client.
- MSP Down Fee - Enter the additional fee to the supplier.
Note:Flat rate fees are only applied on hourly timecards and only to time billed only (no expenses). -
Click
 .
.
-
On the Select Locations page, select the check boxes for
the locations that the supplier supports.
All of the configure locations for the client organization appear. You can click the
 icon to expand each configured country's states
(locations). You can also toggle the All Client Locations
switch to select all of the client locations.
icon to expand each configured country's states
(locations). You can also toggle the All Client Locations
switch to select all of the client locations.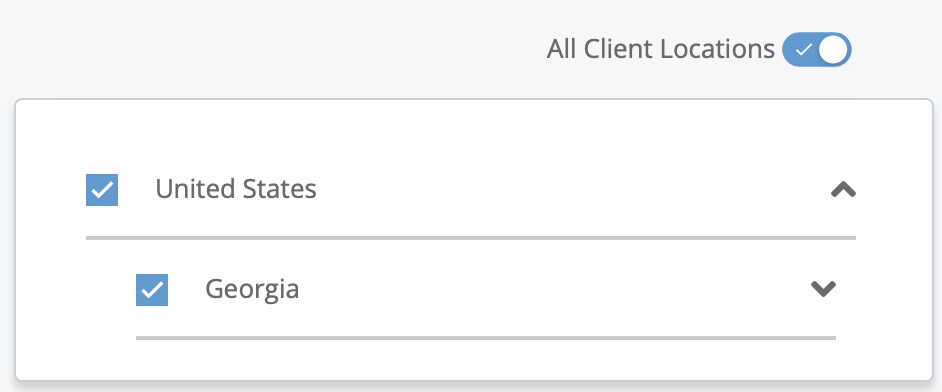
-
Click .
-
On the Overtime & Holiday Multipliers page, enter
the contract multipliers for overtime, double time, and holidays.
These are the multiplier values that are added to the Financials section of the requisition/engagement. You can modify these values as necessary.
You can enter the modifiers at the country level, or at the city level (where the supplier is servicing the client organization location).
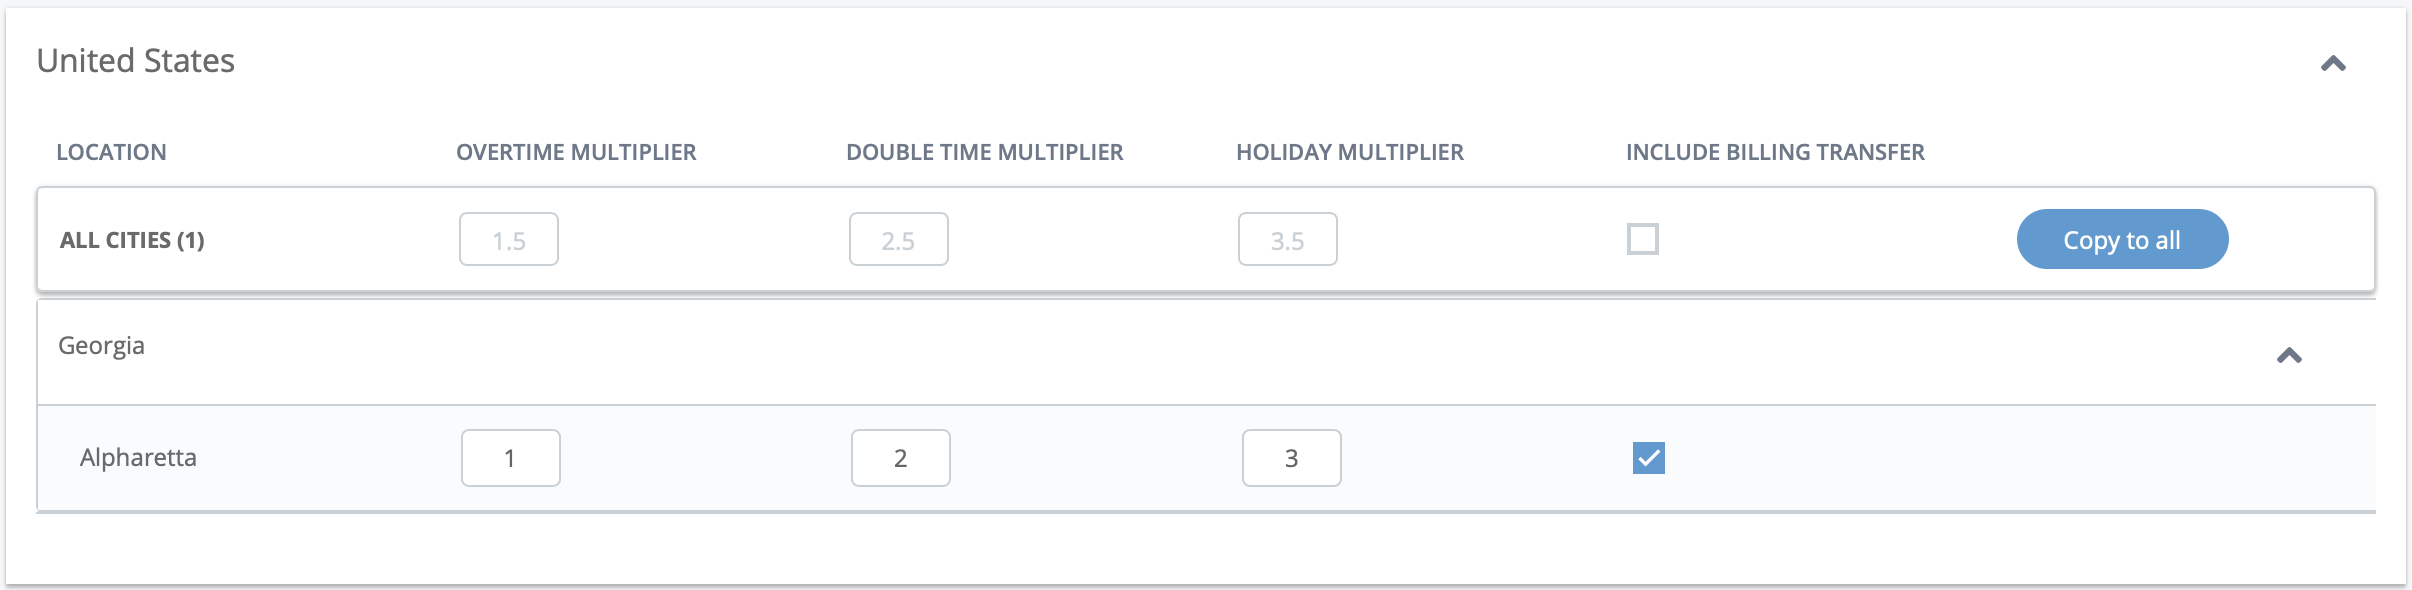
The values are populated for all cities in the client location country, based on the overtime rule definition. Click the
to expand all of the cities defined
for each state/province, and if required, enter the Overtime
Multiplier, Double Time Multiplier,
and Holiday Multiplier fields. For more information
about defined overtime multipliers, see Client Location Overtime Rule.If you want to use the multipliers for all cities, click
 in the All Cities
row.
in the All Cities
row.To include the multipliers in billing transfer, select the Include Billing Transfer check box. If you select this option in the All Cities row, and click
, the option is copied to all client location
cities. -
Click .
-
On the Job Categories page, select the check box for the
job categories that the supplier services.
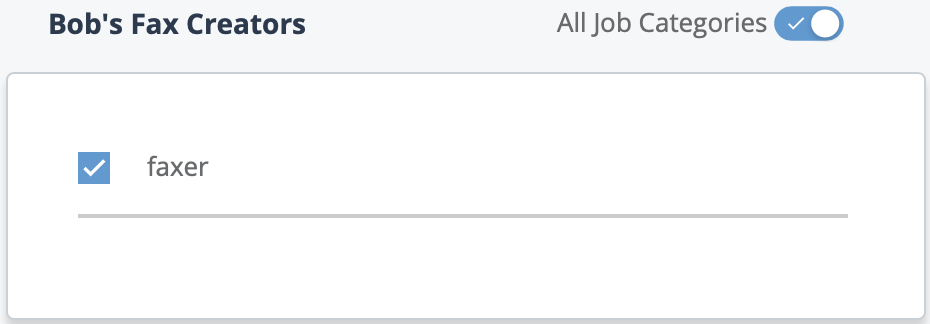
You can add all defined job categories for the client location by toggling the All Job Categories switch. If you do not add a job category for the contract, you are not able to select the supplier for a job category requisition.
-
Click .
-
On the Activate Job Categories page, define the
supplier's tier behavior for requisitions.
 You can select the tier for the supplier at the job category level, or at the location level. From the drop down, select the tier for the supplier contract.Note:This setting defines in what order the supplier for that requisition type is displayed to the client manager when creating requests.
In the Mark-up % field, enter the percentage difference limit allowed for the contract. This limit applies to the difference between the pay rate and the bill rate and is calculated by the application when making a requisition. If the calculated percentage exceeds the Mark-up %, and you have not selected the Let the manager see candidates when Bill Rate exceeds defined Max Bill Rate option in , the submitted resume is routed to the MSP for review. For more information about the Max Bill Rate option, see Resumes and Interviews Settings.
Select the following options for the contract:- Create Request - Allows a supplier to create job category requests through the Supplier view.
- Include in Sourcing - Makes the supplier visible for a requisition based on the job category, location, and tier.
- Activate - Activates the settings in the supplier contract.
To add the settings for all of the job categories, click
. -
Click
 .
You can additionally configure a minimum and maximum bill rate for a location defined in the supplier contract, based on the job code. You can also allow a supplier to enter the tax rate for a worker when the taxes are , based on the location defined in the supplier contract. For more information on these configurations, see the following topics:
.
You can additionally configure a minimum and maximum bill rate for a location defined in the supplier contract, based on the job code. You can also allow a supplier to enter the tax rate for a worker when the taxes are , based on the location defined in the supplier contract. For more information on these configurations, see the following topics: