Excel Invoicing
Overview of Excel Invoicing features and functions available to MSPs.
Excel Invoicing is available in the MSP view of the VMS application. Use this section to manage Excel invoice template configurations and workflows for your client organization.
Invoice templates define the billing format used when generating invoices for MSP organizations and their clients. You can generate separate invoice templates for the MSP and for the client directly from the VMS.
Generate an MSP Invoice Template
Use the following steps to generate an invoice template for the MSP organization.
- Log in to the VMS and navigate to MSP Billing page from the left navigation menu.
- Select the Country And Based On The Country Select the Invoice Template tab to edit the same template.
-
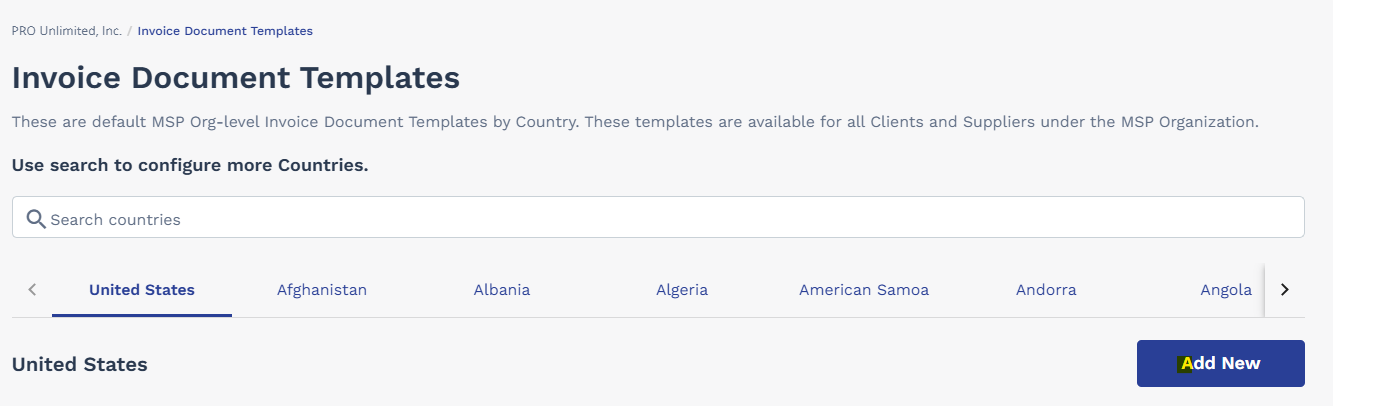
For New Template, Select The Country And Click Add New on the Invoice Document Templates page.
-
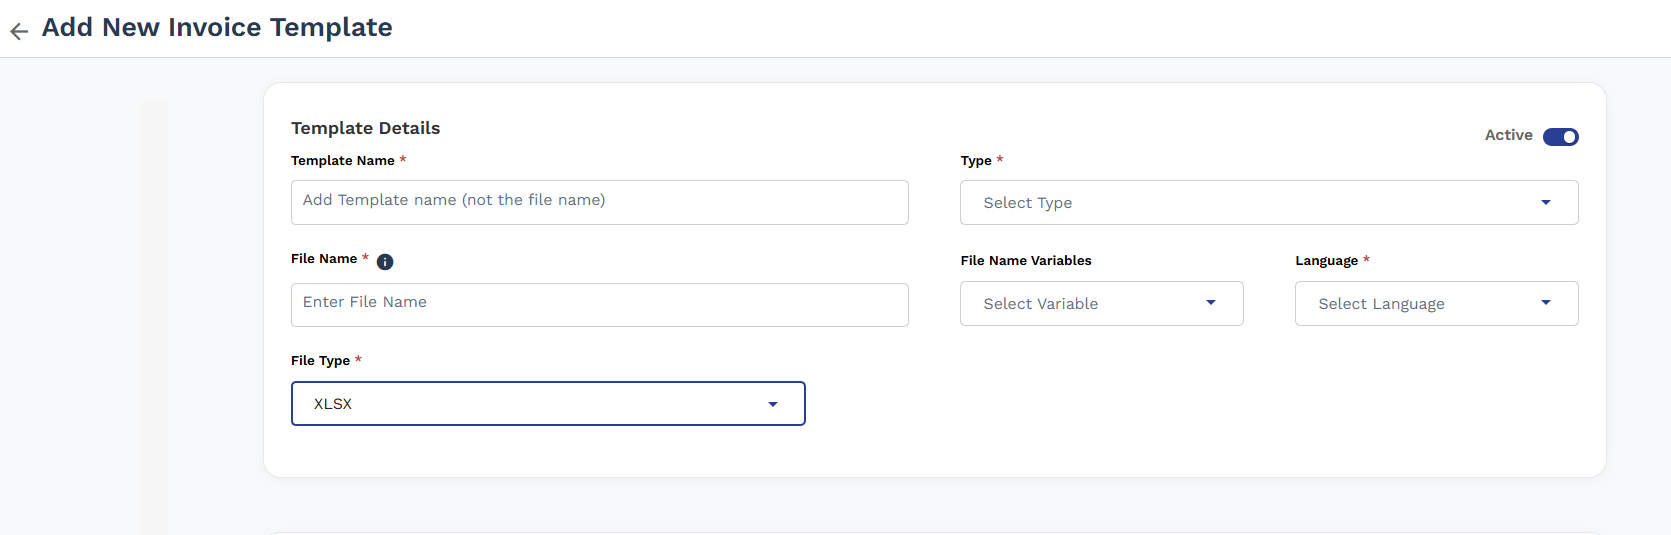
The Add New Invoice Template page opens. In the Template Details section, complete the following fields:
- Template Name  Enter a name for the template (this is not the file name).
- Type  Select the template type from the dropdown (for example, MSP or Client).
- File Name  Enter the file name for the generated invoice document.
- File Name Variables  Optionally select a variable to append to the file name dynamically.
- Language  Select the language for the invoice document.
- File Type  Select the output format. The default is XLSX.
-
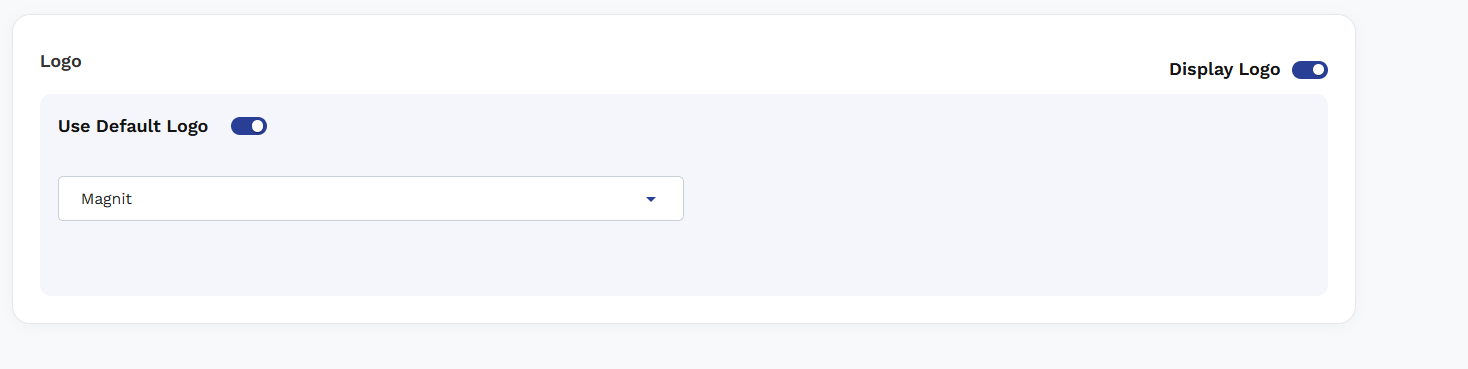
In the Logo section, configure the logo settings:
- Toggle Use Default Logo on to use the MSP organization's default logo. When enabled, a dropdown appears  select the organization logo (for example, Magnit).
- If Use Default Logo is off, click Upload Logo to upload a custom image file.
- Toggle Display Logo on (top right of the section) to show the logo on the generated invoice.
-
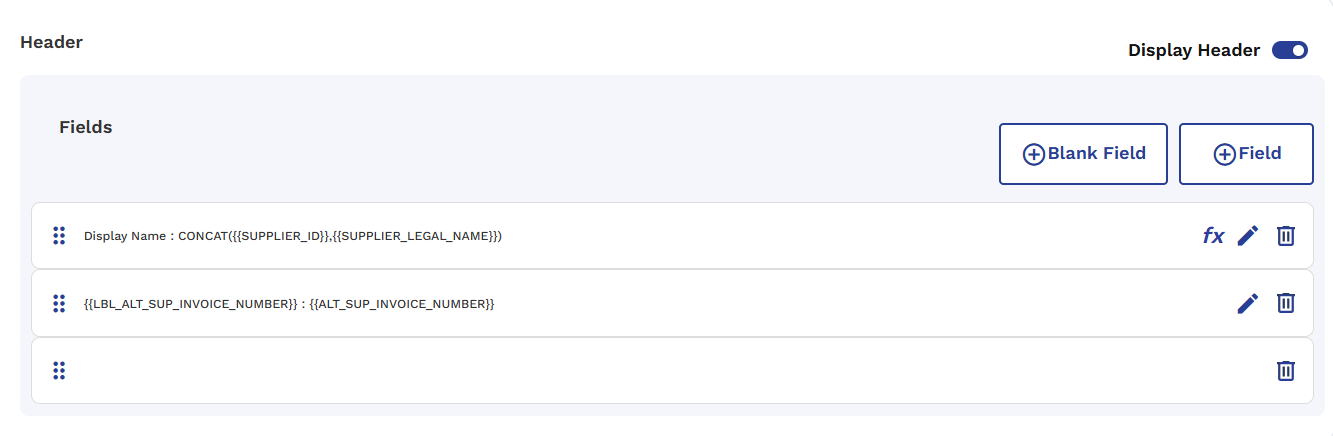
In the Header section, add the fields to display in the invoice header:
- Click + Field to add a data field, or click + Blank Field to add an empty spacer field.
- Toggle Display Header on to include the header in the generated invoice.
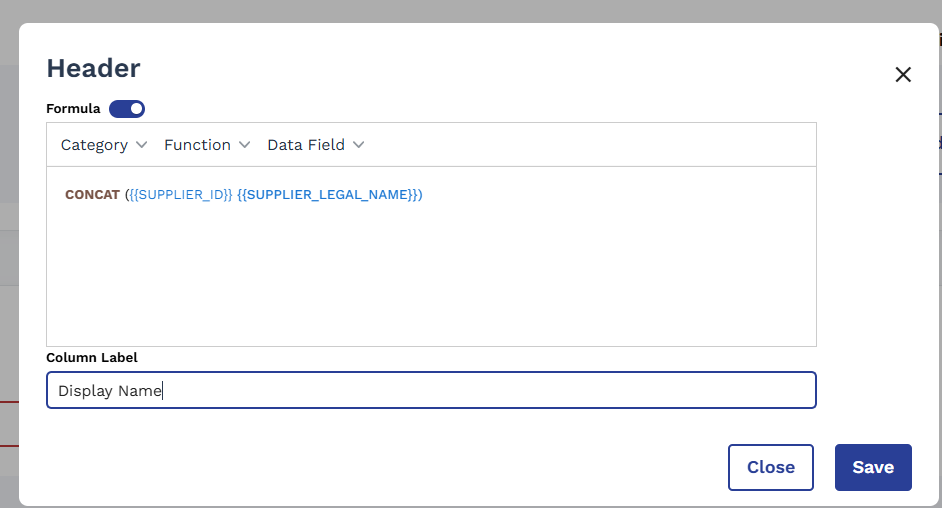
- To add a formula to a header field, click The Formula Toggle Button , then select Formula from the Data Value dropdown. Enter your formula expression in the formula input box that appears. Formulas allow you to combine or calculate values dynamically on the generated invoice.
-
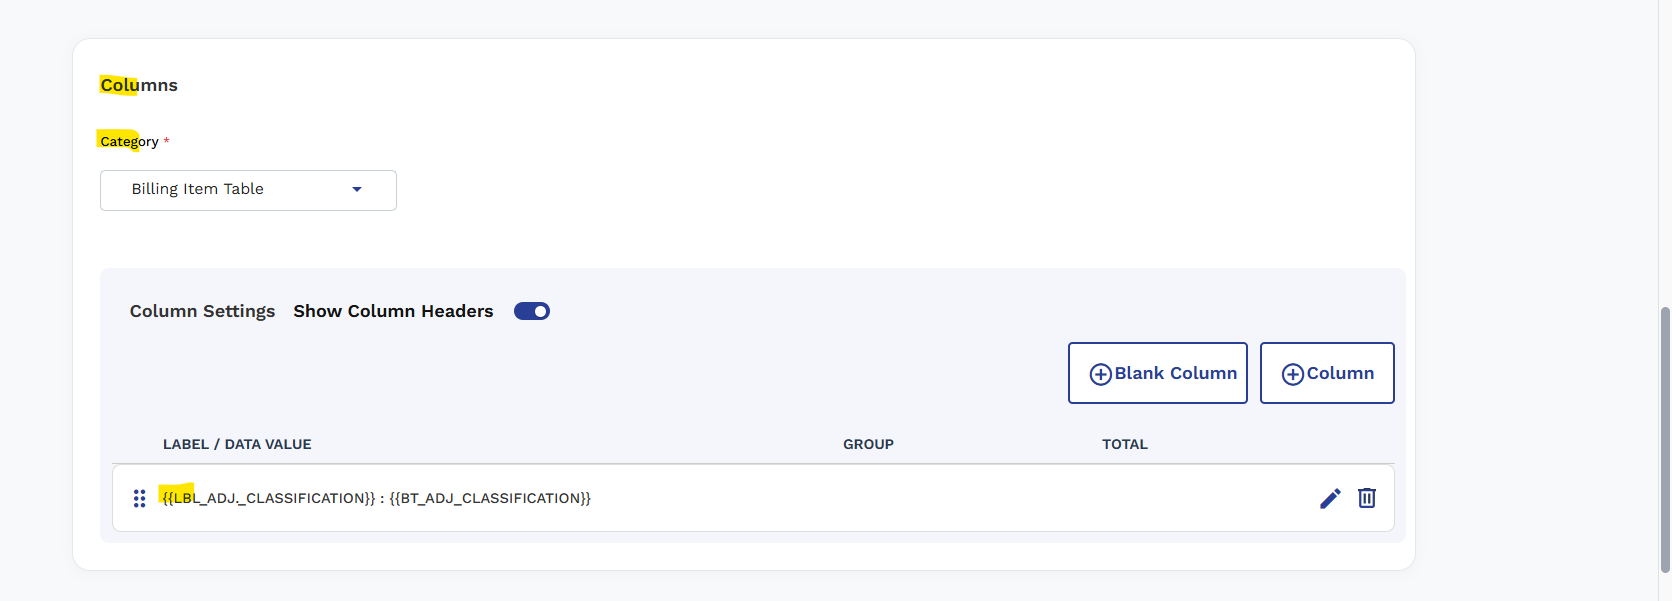
In the Columns section, define the line item columns for the invoice body:
- Select a Category from the dropdown to determine the data source for the columns.
- Toggle Show Column Headers on to display column labels on the invoice.
- Click + Column to add a data column (Label / Data Value, Group, Total), or click + Blank Column to add a spacer column.
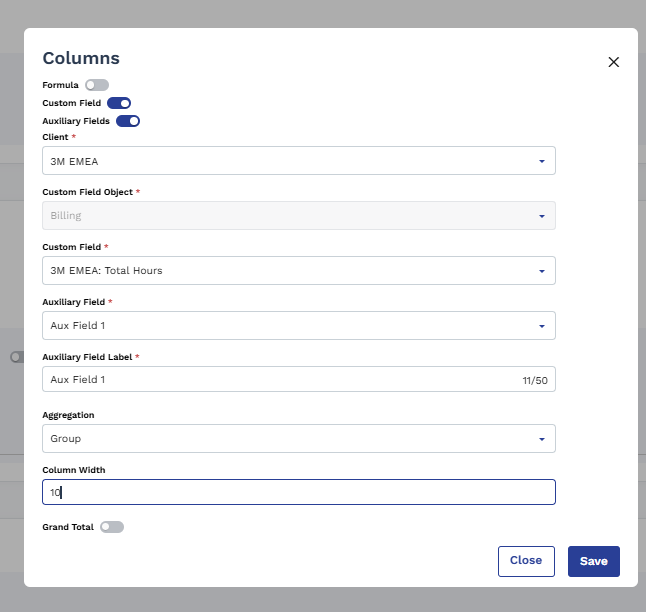
- Click Custom Field Toggle Button to add a Custom Field Select Client , Select Custom Field Object , Column (Label / Data Value, Aggregration, Column Width , Grand Total).
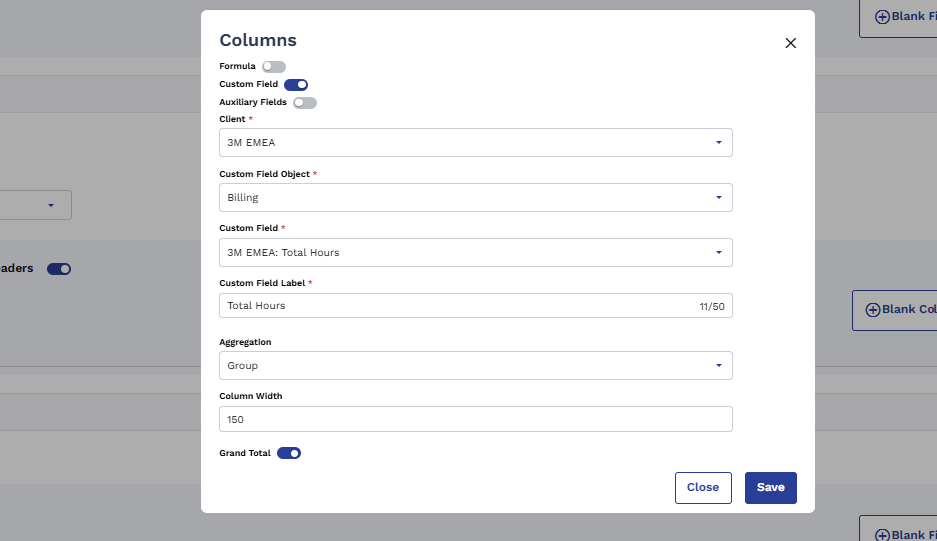
- Click Toogle Button For Auxiliary Fields to add a data column (Aux Field 1, Aux Field 2, Group, Total,Width) .
-
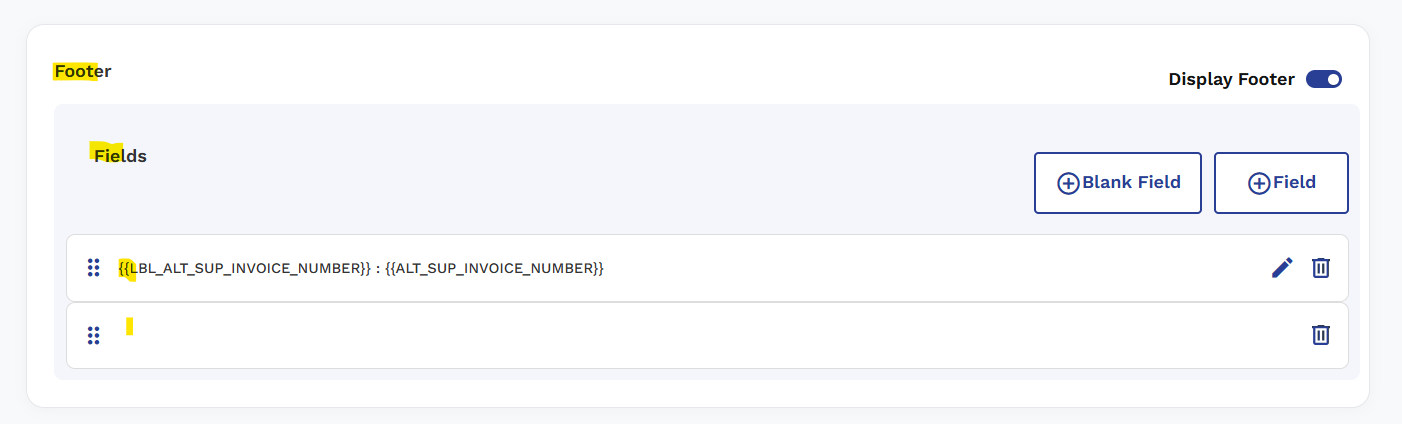
In the Footer section, add the fields to display in the invoice footer:
- Click + Field to add a data field, or click + Blank Field to add a spacer field.
- Toggle Display Footer on to include the footer in the generated invoice.
- Ensure to Click Save Button, to create the invoice document template.
- Please Find The Reference For Formula Guide in the documentation.
Note:
The MSP invoice template is applied to all billing transactions processed through the MSP organization. Changes to an existing template apply to future invoices only.
Generate a Client Invoice Template
Use the following steps to generate an invoice template for a specific client organization.
- Log in to the VMS and navigate to the Countries And Select The Country.
- Select the Invoice Options tab. And Select The Invoice Option And Select Invoice Document Template For Type and Select Tax Calculation Method.
- Click Invoice Document Template.
-
The Add New Invoice Template page opens. In the Template Details section, complete the following fields:
- Template Name  Enter a name for the template (this is not the file name).
- Type  Select Client from the dropdown.
- File Name  Enter the file name for the generated invoice document.
- File Name Variables  Optionally select a variable to append to the file name dynamically.
- Language  Select the language for the invoice document.
- File Type  Select the output format. The default is XLSX.
-
In the Logo section, configure the logo settings:
- Toggle Use Default Logo on to use the MSP organization's default logo. When enabled, a dropdown appears  select the organization logo (for example, Magnit).
- If Use Default Logo is off, click Upload Logo to upload a custom image file.
- Toggle Display Logo on (top right of the section) to show the logo on the generated invoice.
-
In the Header section, add the fields to display in the invoice header:
- Toggle Display Header on to include the header in the generated invoice.
- Click + Field to add a data field, or click + Blank Field to add an empty spacer field.
- To add a formula to a header field, click The Formula Toggle Button , then select Formula from the Data Value dropdown. Enter your formula expression in the formula input box that appears. Formulas allow you to combine or calculate values dynamically on the generated invoice.
-
In the Columns section, define the line item columns for the invoice body:
- Select a Category from the dropdown to determine the data source for the columns.
- Toggle Show Column Headers on to display column labels on the invoice.
- Click + Column to add a data column (Label / Data Value, Group, Total), or click + Blank Column to add a spacer column.
- Click Custom Field Toggle Button to add a Custom Field  Select Client, Select Custom Field Object, Column (Label / Data Value, Aggregation, Column Width, Grand Total).
- Click Toogle Button For Auxiliary Fields to add a data column (Aux Field 1, Aux Field 2, Group, Total,Width) .
-
In the Footer section, add the fields to display in the invoice footer:
- Click + Field to add a data field, or click + Blank Field to add a spacer field.
- Toggle Display Footer on to include the footer in the generated invoice.
- Ensure to Click Save button, to create the client invoice document template.
- Please Find The Reference For Formula Guide in the documentation.